


《OpenCV 轻松入门 面向Python》 学习笔记
获取凸包
hull = cv2.convexHull( points[, clockwise[, returnPoints]] )
返回值:
- hull:凸包角点
参数:
- points:轮廓
- clockwise 布尔值
- 值为True时(默认),凸包角点将按顺时针方向排序,
- 值为False时,逆时针排列凸包角点
- returnPoints 布尔值
- 值为True时(默认),函数返回凸包角点的 x/y 轴坐标,
- 值为False时,返回轮廓中凸包角点的索引
举例:
import cv2
import numpy as np

# 读取图像
o = cv2.imread('/Users/manmi/Desktop/contours.bmp')
# 灰度图
gray = cv2.cvtColor(o, cv2.COLOR_BGR2GRAY)
# 二值图
threshold, binary = cv2.threshold(gray, 127, 255, cv2.THRESH_BINARY)
# 查找轮廓
image, contours, hierarchy = cv2.findContours(binary, cv2.RETR_TREE, cv2.CHAIN_APPROX_SIMPLE)

hull = cv2.convexHull(contours[1])
print(hull)
hull = cv2.convexHull(contours[1], returnPoints=False)
print('\n', hull)

# 输出为:
# [[[1259  715]]
#  [[ 926  715]]
#  [[ 926  484]]
#  [[1259  484]]]
#
#  [[2]
#  [1]
#  [0]
#  [3]]
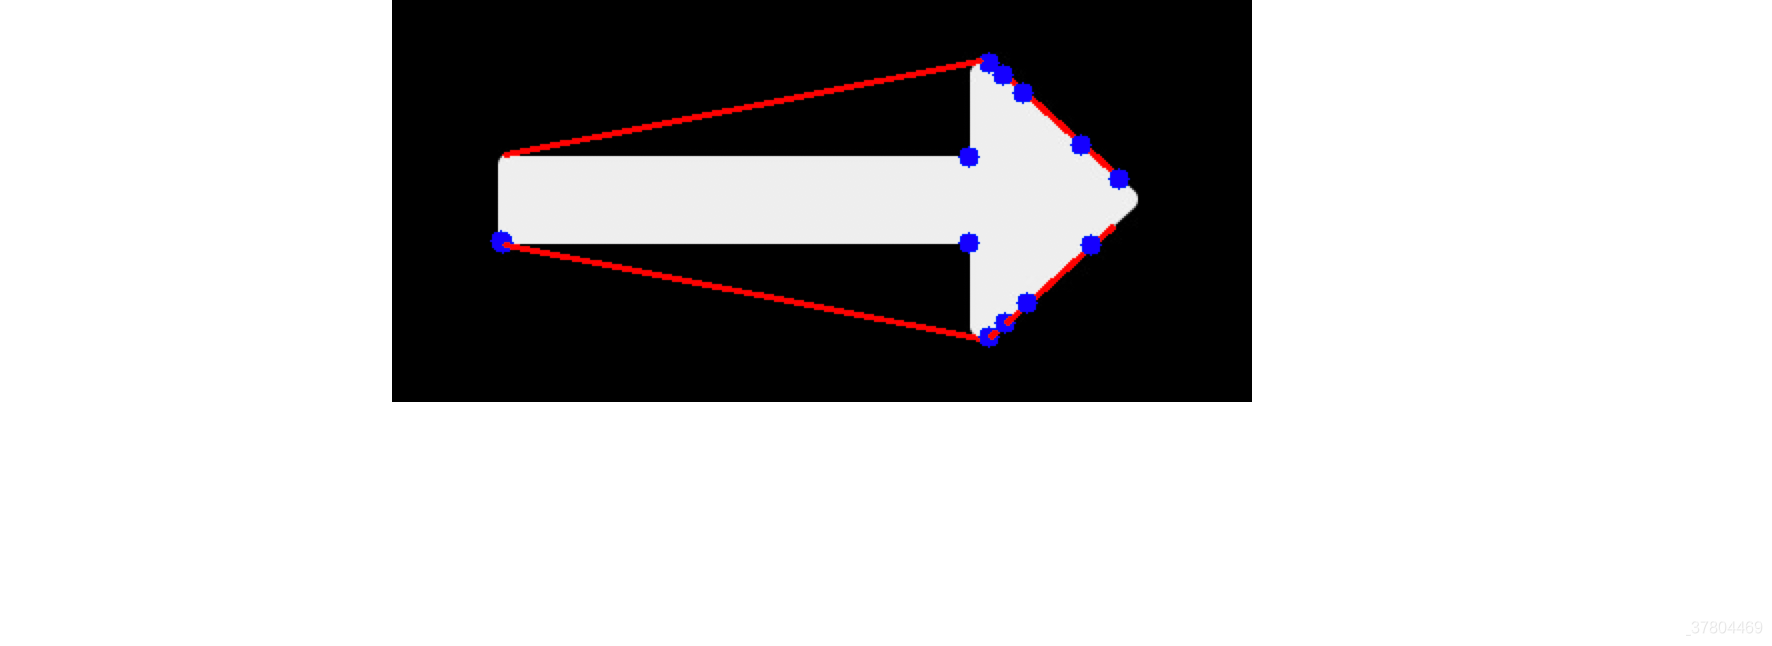
凸缺陷
凸包与轮廓之间的部分就是凸缺陷
convexityDefects = cv2.convexityDefects( contour, convexhull )
返回值是凸缺陷点集,是一个数组,每一行包括的值是 [起点,终点,轮廓上距离凸包最远的点,最远点到凸包的近似距离] .另外前三个值都是轮廓点的索引,要到轮廓点中再寻找。参数就是轮廓和凸包。
举例:
import cv2
import numpy as np

# 读取图像
o = cv2.imread('/Users/manmi/Desktop/contours.bmp')
# 灰度图
gray = cv2.cvtColor(o, cv2.COLOR_BGR2GRAY)
# 二值图
threshold, binary = cv2.threshold(gray, 127, 255, cv2.THRESH_BINARY)
# 查找轮廓
image, contours, hierarchy = cv2.findContours(binary, cv2.RETR_TREE, cv2.CHAIN_APPROX_SIMPLE)
# 提取第一个轮廓, cv2.CHAIN_APPROX_SIMPLE 只保留该方向的终点坐标
cnt = contours[0]   # (61, 1, 2)
# 凸包  (20, 1)
hull = cv2.convexHull(cnt, returnPoints=False)
# 凸缺陷 (13, 1, 4)  有13个凸缺陷
defects = cv2.convexityDefects(cnt, hull)

for i in range(defects.shape[0]):
    s, e, f, d = defects[i, 0]
    start = tuple(cnt[s][0])           # 得到的是索引,要再轮廓中选出来
    end = tuple(cnt[e][0])
    far = tuple(cnt[f][0])
    cv2.line(o, start, end, [0, 0, 255],2)
    cv2.circle(o, far, 5, [255, 0, 0], -1)

cv2.imshow('result', o)
cv2.waitKey(0)
cv2.destroyAllWindows()
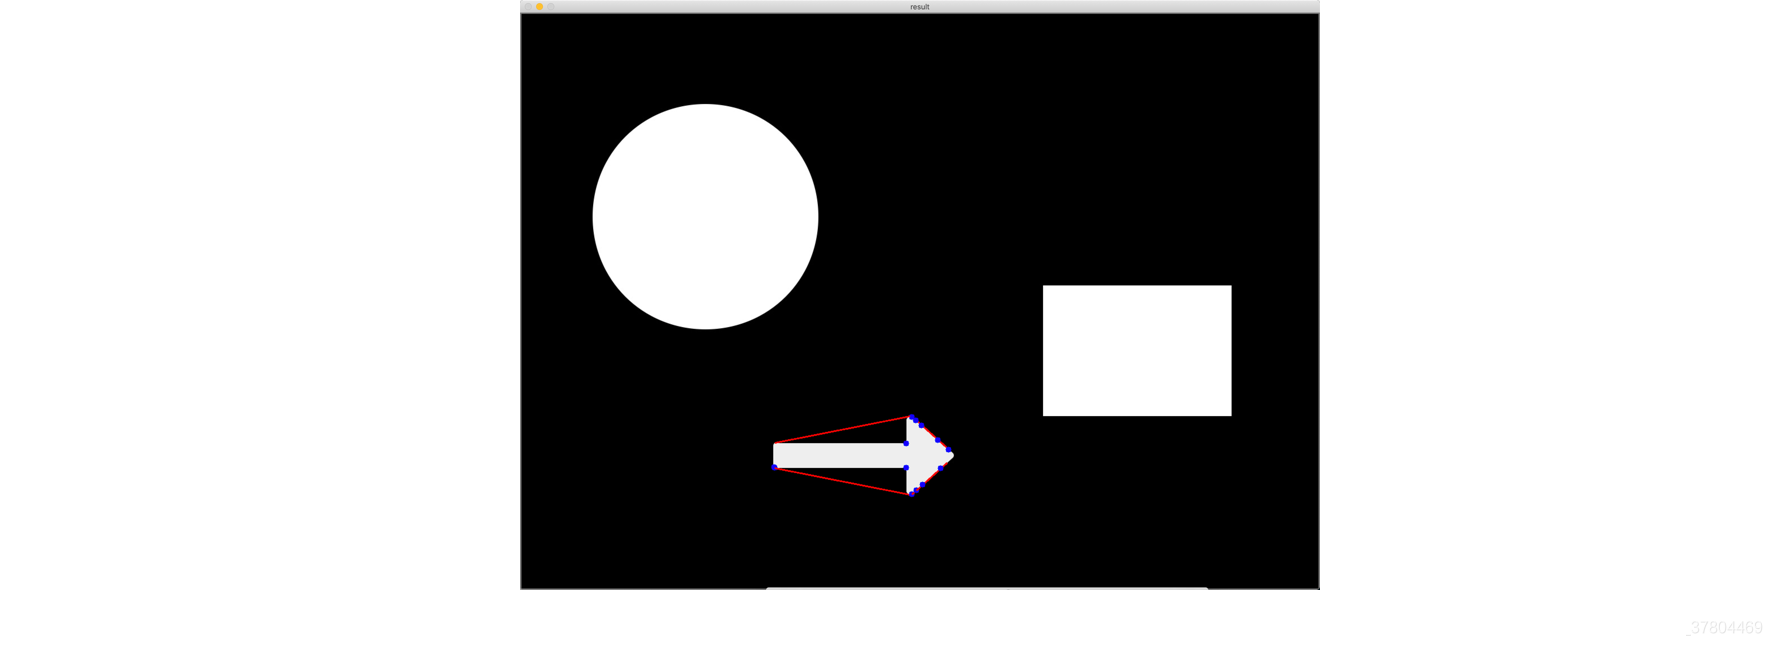
把第0个轮廓(箭头)放大观察,如下:
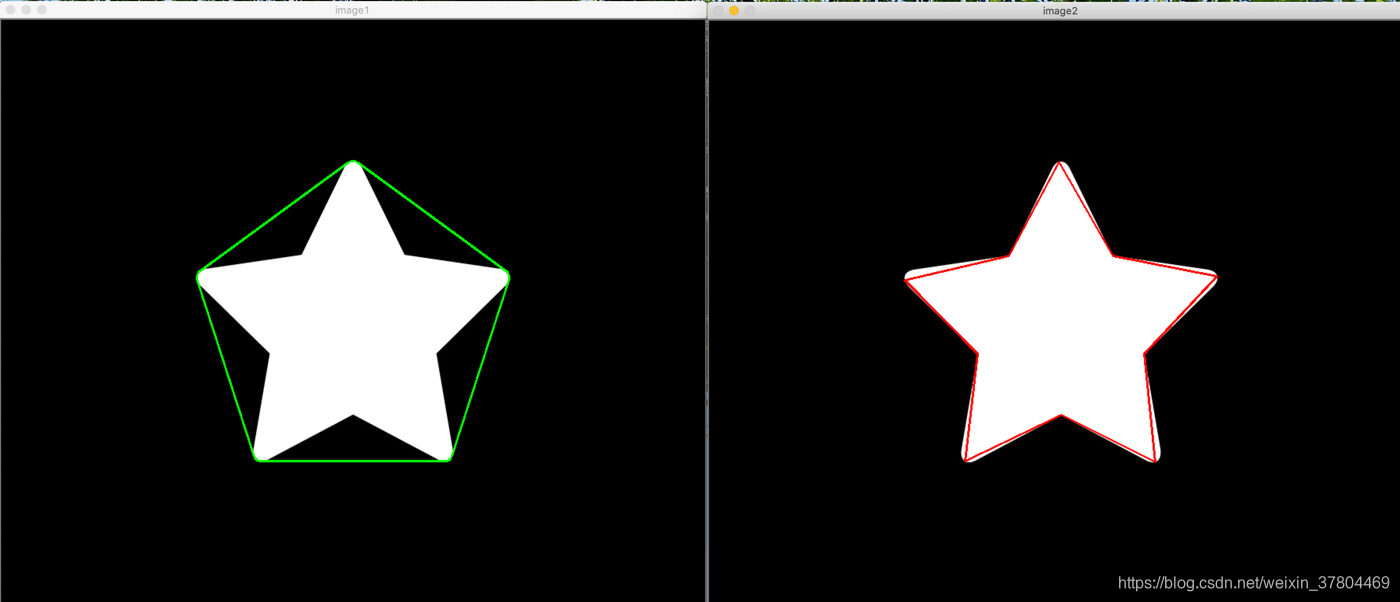
几何学测试
检测轮廓是否是凸型的
retval = cv2.isContourConvex( contour )
返回值是布尔值,True表示轮廓是凸的,contour 是判断的轮廓
举例:
import cv2
import numpy as np

# 读取图像
o = cv2.imread('/Users/manmi/Desktop/contour_star.bmp')
# 灰度图
gray = cv2.cvtColor(o, cv2.COLOR_BGR2GRAY)
# 二值图
threshold, binary = cv2.threshold(gray, 127, 255, cv2.THRESH_BINARY)
# 查找轮廓
image, contours, hierarchy = cv2.findContours(binary, cv2.RETR_TREE, cv2.CHAIN_APPROX_SIMPLE)

# --------- 凸包 ----------
image1 = o.copy()
# 提取第一个轮廓, cv2.CHAIN_APPROX_SIMPLE 只保留该方向的终点坐标
cnt = contours[0]   # (61, 1, 2)
# 凸包  (20, 1)
hull = cv2.convexHull(cnt)
# 画出凸包
cv2.polylines(image1, [hull], True, (0, 255, 0), 2)
# 判断是否是凸形的
resval = cv2.isContourConvex(hull)
print('构造的凸包是否是凸形的:', resval)

# --------- 逼近多边形 ----------
image2 = o.copy()
epsilon = 0.01 * cv2.arcLength(contours[0], True)
approx = cv2.approxPolyDP(contours[0], epsilon, True)
# 画出逼近多边形
cv2.drawContours(image2, [approx], 0, (0, 0, 255), 2)
# 判断是否是凸形的
resval = cv2.isContourConvex(approx)
print('构造的逼近多边形是否是凸形的:', resval)

cv2.imshow('image1', image1)
cv2.imshow('image2', image2)
cv2.waitKey(0)
cv2.destroyAllWindows()

# 输出为:
# 构造的凸包是否是凸形的: True
# 构造的逼近多边形是否是凸形的: False
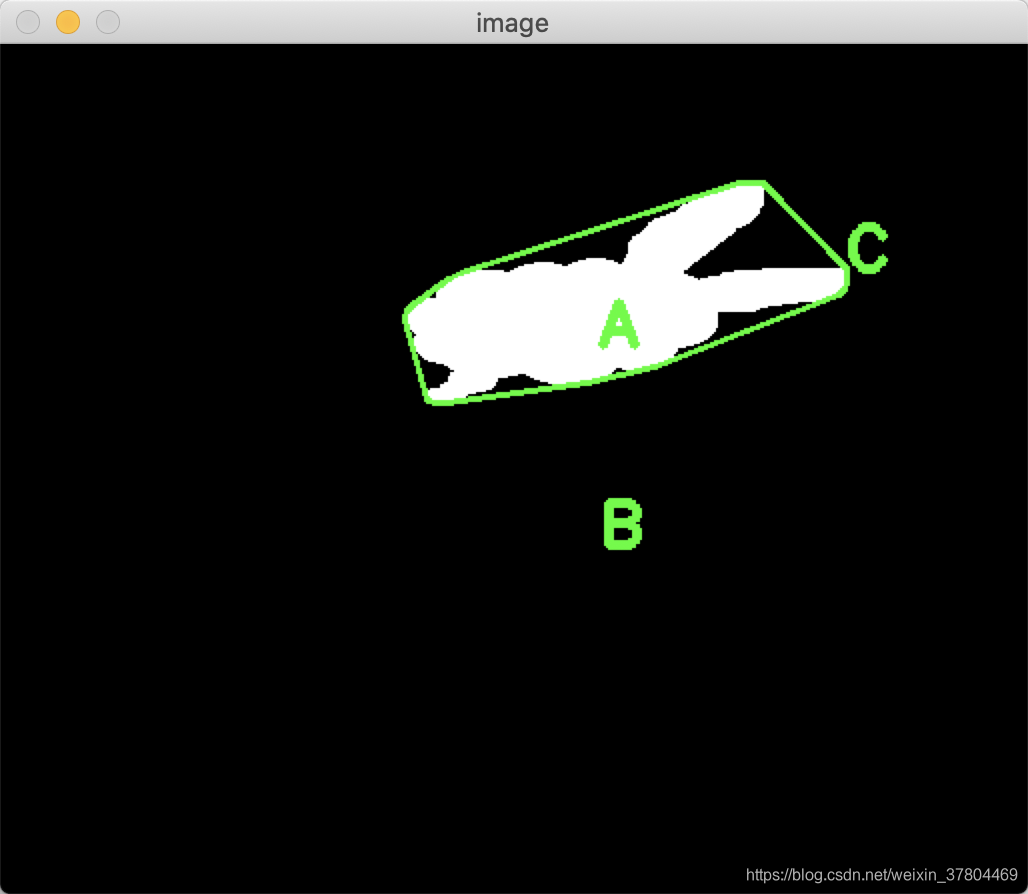
点到轮廓的距离
用来计算点到多边形(轮廓)的最短距离(也就是垂线距离),又叫点和多边形的关系测试。
retval = cv2.pointPolygonTest( contour, pt, measureDist )
返回值:
- retval:点到轮廓的距离 / 点与轮廓的关系(内, 外,上),由参数measureDist决定
参数: - contour 轮廓
- pt 待判定的点
- measureDist 布尔值,表示距离的判定方式:
- True时,表示计算点到轮廓的距离,如果点在轮廓外,返回负值;如果点在轮廓上,返回0;如果点在轮廓内部,就是正数
- False 时,不计算距离,只返回 -1, 0, 1 表示点相对于轮廓的位置,外,上,内。
举例:
import cv2

# ----------------原始图像-------------------------
o = cv2.imread('/Users/manmi/Documents/GitHub/open_cv/源代码及图像/chapter12/cs.bmp')
cv2.imshow('original', o)

# ----------------获取凸包------------------------
gray = cv2.cvtColor(o, cv2.COLOR_BGR2GRAY)
threshold, binary = cv2.threshold(gray, 127, 255, cv2.THRESH_BINARY)
image, contours, hierarchy = cv2.findContours(binary,
                                             cv2.RETR_LIST,
                                             cv2.CHAIN_APPROX_SIMPLE)
hull = cv2.convexHull(contours[0])
image = cv2.cvtColor(image, cv2.COLOR_GRAY2BGR)   # 转成三通道后,在能在图像上画有色的轮廓
cv2.polylines(image, [hull], True, (0, 255, 0), 2)

# ---------------- 内部点A到轮廓的距离 ------------------------

distA = cv2.pointPolygonTest(hull, (300, 150), True)   # 参数measureDist=True, 返回点到轮廓的距离
cv2.putText(image, 'A', (300, 150), cv2.FONT_HERSHEY_SIMPLEX, 1, (0, 255, 0), 3)
print(distA)

# ---------------- 外部点B到轮廓的距离 ------------------------
distB = cv2.pointPolygonTest(hull, (300, 250), True)   # 参数measureDist=True, 返回点到轮廓的距离
cv2.putText(image, 'B', (300, 250), cv2.FONT_HERSHEY_SIMPLEX, 1, (0, 255, 0), 3)
print(distB)

# ---------------- 轮廓上的点C到轮廓的距离 ------------------------
distC = cv2.pointPolygonTest(hull, (423, 112), True)   # 参数measureDist=True, 返回点到轮廓的距离
cv2.putText(image, 'C', (423, 112), cv2.FONT_HERSHEY_SIMPLEX, 1, (0, 255, 0), 3)
print(distC)

cv2.imshow('image', image)
cv2.waitKey(0)
cv2.destroyAllWindows()

# 输出为:
# 16.891650862259112
# -81.17585848021565
# -0.0
利用形状场景算法比较轮廓
计算形状场景距离
使用 ‘距离’ 作为形状比较的度量标准,这是因为形状之间的差异值(矩)和距离有相似之处,二者的表达都只能是零或者正数;当两个形状一模一样时,距离值和差值(矩)都等于零。
retval = cv2.createShapeContextDistanceExtractor(
[, nAngularBins[,
nRadialBins[,
innerRadius[,
outerRadius[,
iterations[,
comparer[,
transformer]]]]]]] )
使用这个函数计算形状场景距离,使用 ‘形状上下文算法’,在每个点上附加一个“形状上下文”描述符,让每个点都能够捕获剩余点相对于它的分布特征,从而提供全局鉴别特征
返回结果可以通过如下函数计算两个不同形状之间的距离,参数是两个不同的轮廓。
retval=cv2.ShapeDistanceExtractor.computeDistance(contour1, contour2)
举例:
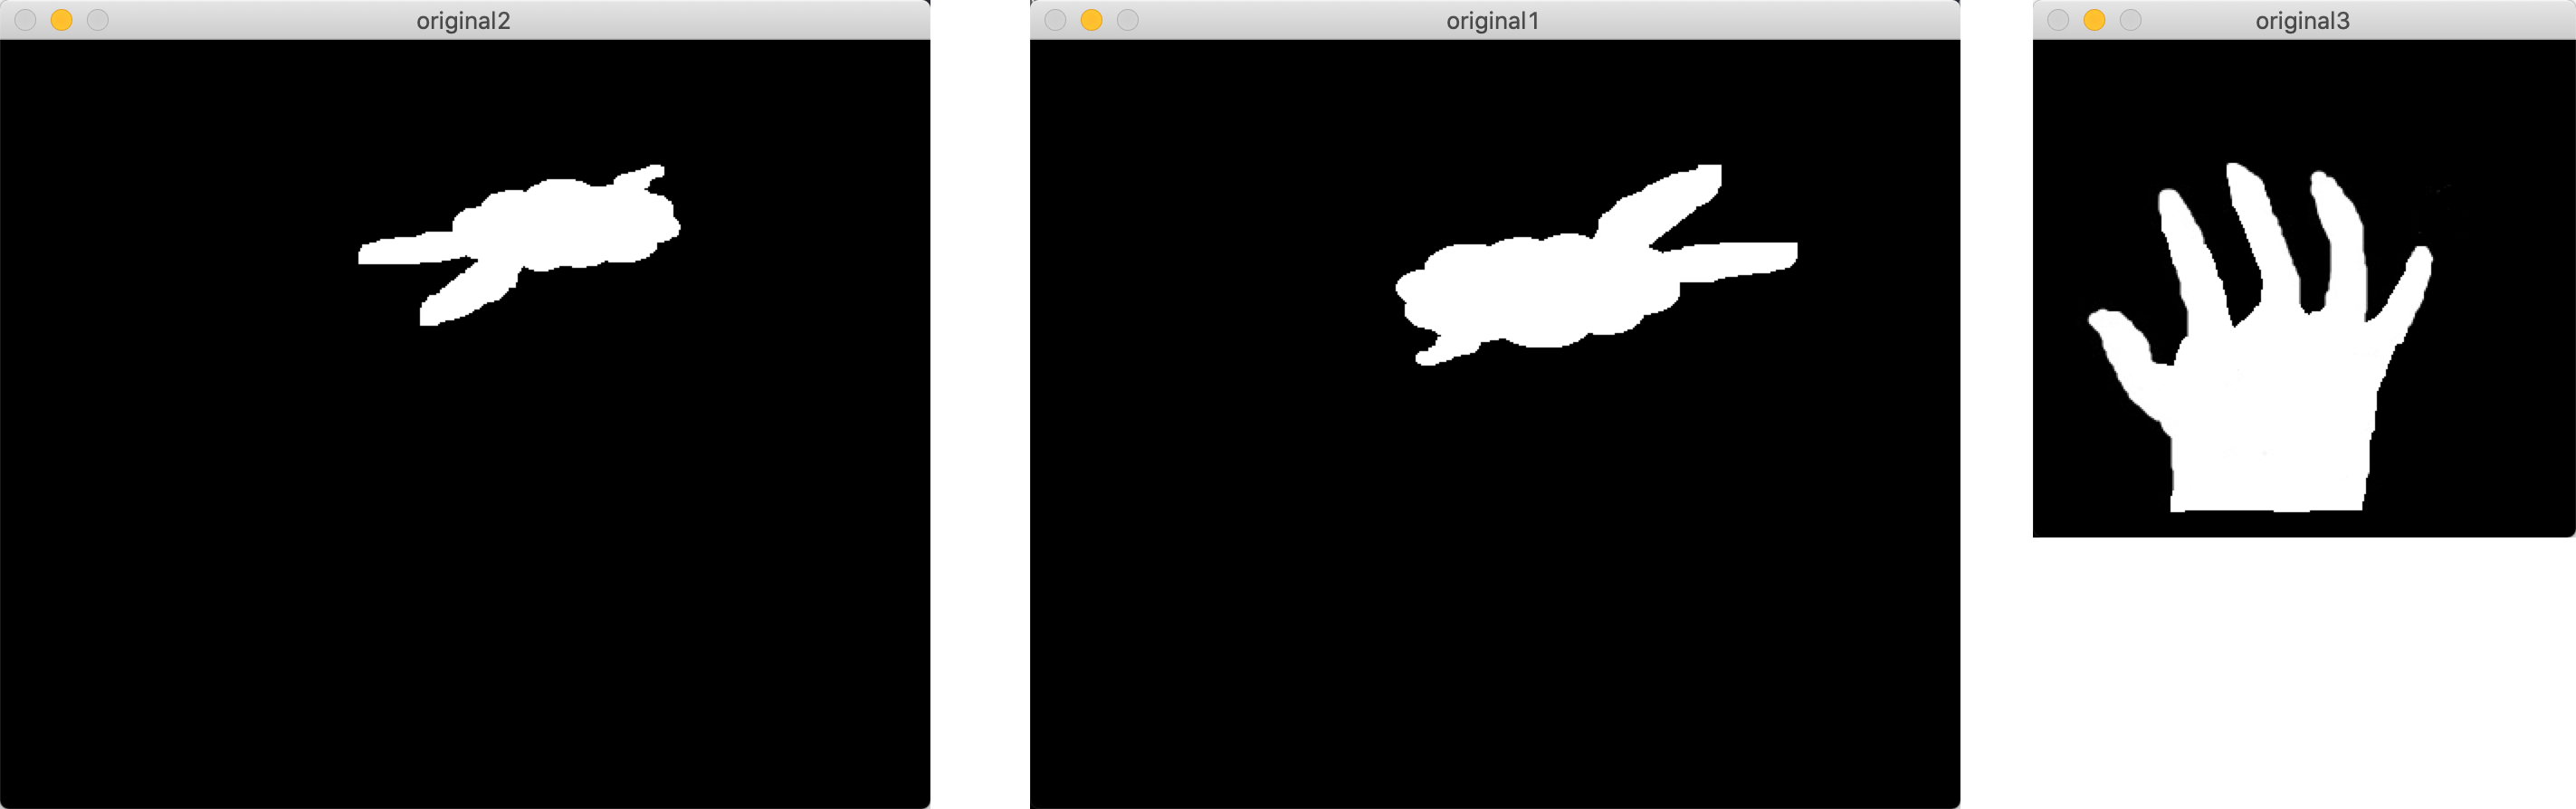
import cv2
# -----------原始图像o1边缘--------------------
o1 = cv2.imread('/Users/manmi/Documents/GitHub/open_cv/源代码及图像/chapter12/cs.bmp')
cv2.imshow("original1",o1)
gray1 = cv2.cvtColor(o1,cv2.COLOR_BGR2GRAY)
ret, binary1 = cv2.threshold(gray1,127,255,cv2.THRESH_BINARY)
image,contours1, hierarchy = cv2.findContours(binary1,
                                              cv2.RETR_LIST,
                                              cv2.CHAIN_APPROX_SIMPLE)
cnt1 = contours1[0]

# -----------原始图像o2边缘--------------------
o2 = cv2.imread('/Users/manmi/Documents/GitHub/open_cv/源代码及图像/chapter12/cs3.bmp')
cv2.imshow("original2",o2)
gray2 = cv2.cvtColor(o2,cv2.COLOR_BGR2GRAY)
ret, binary2 = cv2.threshold(gray2,127,255,cv2.THRESH_BINARY)
image, contours2, hierarchy = cv2.findContours(binary2,
                                              cv2.RETR_LIST,
                                              cv2.CHAIN_APPROX_SIMPLE)
cnt2 = contours2[0]

# -----------原始图像o3边缘--------------------
o3 = cv2.imread('/Users/manmi/Documents/GitHub/open_cv/源代码及图像/chapter12/hand.bmp')
cv2.imshow("original3",o3)
gray3 = cv2.cvtColor(o3,cv2.COLOR_BGR2GRAY)
ret, binary3 = cv2.threshold(gray3,127,255,cv2.THRESH_BINARY)
image, contours3, hierarchy = cv2.findContours(binary3,
                                              cv2.RETR_LIST,
                                              cv2.CHAIN_APPROX_SIMPLE)
cnt3 = contours3[0]

# -----------构造距离提取算子--------------------
sd = cv2.createShapeContextDistanceExtractor()

# -----------计算距离--------------------
d1 = sd.computeDistance(cnt1,cnt1)
print("自身距离d1=", d1)
d2 = sd.computeDistance(cnt1,cnt2)
print("旋转缩放后距离d2=", d2)
d3 = sd.computeDistance(cnt1,cnt3)
print("不相似对象距离d3=", d3)
# -----------显示距离--------------------
cv2.waitKey()
cv2.destroyAllWindows()

# 输出为:
# 旋转缩放后距离d2= 0.7844208478927612
# 不相似对象距离d3= 2.7514803409576416
计算 Hausdorff 距离
cv2.createHausdorffDistanceExtractor()


 3万+
3万+


 被折叠的 条评论
为什么被折叠?
被折叠的 条评论
为什么被折叠?
 到【灌水乐园】发言


