


点击下方卡片,关注“小白玩转Python”公众号
在当今的数字时代,人脸识别技术已经成为一个关键技术,它正在从安全到个性化体验等多个领域进行革新。从门禁控制到考勤系统,再到走失儿童的检测,人脸识别的应用非常广泛,涵盖了安全、教育和公共安全领域。然而,在不同的条件下准确识别人脸面临着一系列独特的挑战。在本指南中,我们将深入探讨人脸识别的复杂性,探索使用Python和先进的机器学习工具来确保强大的识别和验证的技术。
理解人脸识别
人脸识别技术利用先进的算法分析和比较从图像或视频片段中提取的面部特征,从而实现个人的识别和验证。提供的Python代码展示了人脸识别的实现。让我们探索代码的主要组成部分,以深入了解该过程。
1. 导入库:
在本节中,导入了执行各种任务所需的库,如面部检测、图像处理、数据增强和人脸识别。
import face_recognition
import cv2
import numpy as np
from deepface import DeepFace
from utils import apply_blur, generate_unique_random_numbers, find_cosine_distance_helper
from utils import apply_resize
from utils import augment_data, face_distance
import os
from PIL import Image
from mtcnn.mtcnn import MTCNN
import random
2. 数据集准备:
数据集准备阶段涉及遍历包含已知个人图像的目录(known_people_dir)。对于每个人,代码在train_dataset目录中创建一个输出目录。然后加载每张图像,使用MTCNN(多任务级联卷积网络)模型检测面部,裁剪检测到的面部区域,并将其保存在相应的输出目录(known_people_train_dir)中。此外,还应用了模糊、调整大小和应用随机变换等数据增强技术,以增加数据集的多样性并增强人脸识别系统的鲁棒性。
for person_name in os.listdir(known_people_dir):
    person_dir = os.path.join(known_people_dir, person_name)
    if os.path.isdir(person_dir):
        output_person_dir = os.path.join("train_dataset", person_name)
        os.makedirs(output_person_dir, exist_ok=True)
        for filename in os.listdir(person_dir):
            image_path = os.path.join(person_dir, filename)
            image = cv2.imread(image_path)
            faces = mtcnn.detect_faces(cv2.cvtColor(image, cv2.COLOR_BGR2RGB))
            if faces:
                for face in faces:
                    x, y, w, h = face['box']
                    left = max(x, 0)
                    top = max(y, 0)
                    right = min(x + w, image.shape[1])
                    bottom = min(y + h, image.shape[0])
                    if right > left and bottom > top:
                        output_face_path = os.path.join(output_person_dir, f"{filename}.jpg")
                        cv2.imwrite(output_face_path, image)
                        # Apply data augmentation
                        apply_blur(output_face_path, output_folder=output_person_dir)
                        apply_resize(output_face_path, output_folder=output_person_dir)
                        augment_data(output_face_path, output_folder=output_person_dir, face_coordinates=(left, top, right, bottom), prefix=filename)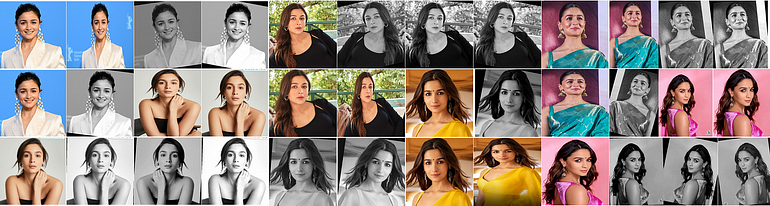
训练数据集
3. 检测面部:
使用MTCNN(多任务级联卷积网络)模型进行面部检测,该模型能够检测图像中的面部。然后使用检测到的面部进行进一步处理。
# Detect faces in the image using MTCNN
faces = mtcnn.detect_faces(rgb_image)
4. 提取边界框坐标:
# Get the bounding box coordinates of the face
x, y, w, h = face['box']
# Ensure that the bounding box coordinates are valid
left = max(x, 0)
top = max(y, 0)
right = min(x + w, image.shape[1])
bottom = min(y + h, image.shape[0])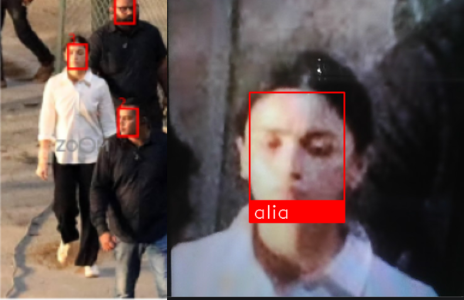
5. 图像增强:
对提取的面部图像应用模糊、调整大小和随机变换等数据增强技术,以增强数据集的多样性。
i. 随机变换
def augment_data(original_image_path, output_folder, face_coordinates, num_augmented_images=3, should_add_jitter=True, prefix=""):
    # Load the original image
    original_image = Image.open(original_image_path)
    # Convert face image to grayscale
    face_image_gray = original_image.convert('L')
    # Define torchvision transforms for data augmentation
    data_transforms = transforms.Compose([
        transforms.RandomHorizontalFlip(),
        transforms.RandomRotation(degrees=15),
        transforms.ColorJitter(brightness=0.2, contrast=0.2, saturation=0.2, hue=0.1),
        transforms.ToTensor(),
    ])
    # Apply data augmentation and save augmented images
    for i in range(num_augmented_images):
        # Apply different transformations to each augmented image
        transformed_image = data_transforms(face_image_gray)
        augmented_image_path = os.path.join(output_folder, f"{prefix}augmented_{i + 1}.jpg")
        transforms.ToPILImage()(transformed_image).save(augmented_image_path)
        print(f"Augmented image {i + 1} saved to {augmented_image_path}")
ii. 调整大小和模糊
def apply_blur(image_path, output_folder, kernel_size=(7, 7)):
    # Load the image
    image = cv2.imread(image_path)
    # Apply Gaussian blur
    blurred_image = cv2.GaussianBlur(image, kernel_size, 0)
    # Save the blurred image
    filename = os.path.basename(image_path)
    output_path = os.path.join(output_folder, f"blurred_{filename}")
    cv2.imwrite(output_path, blurred_image)
    print(f"Blurred image saved to {output_path}")


def apply_resize(image_path, output_folder, target_size=(256, 256)):
    # Load the image
    image = cv2.imread(image_path)
    # Resize the image
    resized_image = cv2.resize(image, target_size)
    # Save the resized image
    filename = os.path.basename(image_path)
    output_path = os.path.join(output_folder, f"resized_{filename}")
    cv2.imwrite(output_path, resized_image)
    print(f"Resized image saved to {output_path}")
6. 在训练目录中存储增强图像:
处理后的图像,包括裁剪的面部、模糊的面部和增强的图像,存储在训练目录(train_dataset)中。这种目录结构便于访问训练数据,以构建人脸识别模型。
# Save the face image
cv2.imwrite(output_face_path, image)
# Apply data augmentation on the face image
apply_blur(output_face_path, output_folder=output_person_dir)
apply_resize(output_face_path, output_folder=output_person_dir)
augment_data(output_face_path, output_folder=output_person_dir,
face_coordinates=(left, top, right, bottom),prefix=filename)7. 从训练数据集中编码已知面部:
代码遍历我们指定的训练数据集目录中的目录,称为known_people_train_dir。在每个代表特定个人的目录中,它处理每个图像文件。代码验证每个图像文件的有效性,加载它,并使用高级技术提取面部特征。这些特征被编码成数值向量,称为面部编码,使用DeepFace.represent函数。这些编码以及相应的人名然后被添加到列表中以进行进一步处理。
通过将增强数据与原始图像结合,我们的模型训练数据集变得更加丰富和多样化,从而在不同条件和环境中提高了人脸识别的准确性和鲁棒性。
for person_name in os.listdir(known_people_train_dir):
    person_dir = os.path.join(known_people_train_dir, person_name)
    # Check if it's a directory
    if os.path.isdir(person_dir):
        # Iterate over each file in the person's directory
        for filename in os.listdir(person_dir):
            image_path = os.path.join(person_dir, filename)
            print(image_path)
            # Check if the file is a valid image file
            try:
                with Image.open(image_path) as img:
                    img.verify()  # Attempt to open and verify the image file
                    # Load the image file
                    person_image = face_recognition.load_image_file(image_path)
                    # Encode the face in the image-
                    face_encoding = DeepFace.represent(person_image,model_name="Dlib",detector_backend="mtcnn", enforce_detection=False)
                    # Append the face encoding and name to the respective lists
                    known_face_encodings.append(np.array(face_encoding[0]['embedding']))
                    known_face_names.append(person_name)
            except (IOError, SyntaxError,IndexError):
                # Ignore any files that are not valid image files
                continue
8. 人脸识别循环:
在人脸识别循环中,程序不断从网络摄像头捕获帧,确保实时人脸识别。为了优化处理速度,每个帧都被调整大小,减少了计算负载而不影响准确性。使用MTCNN面部检测模型,程序在帧内识别面部,对其特征进行编码以进行比较。
# Continuous capture of frames from the webcam
while True:
    ret, frame = video_capture.read()
# Resize each frame for optimized processing speed
    small_frame = cv2.resize(frame, (0, 0), fx=0.25, fy=0.25)
    # Using MTCNN for face detection
    rgb_small_frame = small_frame[:, :, ::-1]
    result1 = DeepFace.represent(rgb_small_frame, model_name="Dlib", detector_backend="mtcnn", enforce_detection=False)
    # Encoding features of detected faces for comparison
    face_locations = [(res['facial_area']['y'], res['facial_area']['x'] + res['facial_area']['w'], res['facial_area']['y'] + res['facial_area']['h'], res['facial_area']['x']) for res in result1]
    face_encodings = [res['embedding'] for res in result1]
通过计算检测到的面部和训练数据集中已知面部之间的余弦距离,程序确定潜在的匹配项。
# Calculating cosine distances between detected faces and known faces
for f_encoding in face_encodings:
    face_distances = find_cosine_distance_helper(known_face_encodings, f_encoding)
    best_match_index = np.argmin(face_distances)
    if face_distances[best_match_index] <= 0.07:
        name = known_face_names[best_match_index]
    else:
        name = "Unknown"
    face_names.append(name)
9. 显示结果:
检测到的面部显示在视频流中,包括相应的名称(如果识别出来,否则为“未知”)。在面部周围绘制矩形框,并在每个面部下方添加标签,以便于识别。
# Draw a bounding box around the face
cv2.rectangle(frame, (left, top), (right, bottom), (0, 0, 255), 2)
# Draw a label with a name below the face
cv2.putText(frame, text, (left + 6, bottom - 6), font, 1.0, (255, 255, 255), 1)
# Display the resulting image
cv2.imshow('Video', frame)
输出
人脸识别系统使用网络摄像头在实时面部检测和识别任务中取得了显著的性能。它能够准确识别已知个人,并以良好的精度进行标记,并将未知面部适当地标记为“未知”。系统以高置信度运行,提高了其可靠性和可用性。在Salman的图像上训练的模型准确地识别了他在监控录像中的面部。

当遇到不在数据集中的Amitabh的图像时,它被适当地标记为“未知”。

· END ·
🌟 想要变身计算机视觉小能手?快来「小白玩转Python」公众号!
回复“Python视觉实战项目”,解锁31个超有趣的视觉项目大礼包!🎁

本文仅供学习交流使用,如有侵权请联系作者删除


 384
384

 被折叠的 条评论
为什么被折叠?
被折叠的 条评论
为什么被折叠?
 到【灌水乐园】发言


