


知识点回顾:
工厂的意义:uvm工厂的存在就是为了更方便的替换验证环境中的实例或者已经注册的类型,同时工厂的注册机制带来了配置的灵活性。
创建:创建的方法可以通过new()函数进行,也可以通过create的方法
覆盖机制:可以通过类型名trans进行覆盖,factory提供了覆盖的特性,可以通过类型覆盖和实例名覆盖这两种方式。
1、工厂的注册、创建和覆盖机制
uvm的世界中只有两种注册方式,uvm_object_utils(T)和uvm_component_utils(T),所有的类都是来自于这两种。
运行UVM测试object_creat和component_creat代码,观察打印信息,检查t2/t3/t4和u2/u3/u4是否被创建。根据提示给了四中创建方法,第一种是直接创建,第二种是普遍使用的方法,第三种是利用工厂机制方法创建,第四个是使用预先定义的方法进行创建。
  class object_create extends top;
    trans t1, t2, t3, t4;
    `uvm_component_utils(object_create)
    function new(string name = "object_create", uvm_component parent = null);
      super.new(name, parent);
    endfunction
    function void build_phase(uvm_phase phase);
      uvm_factory f = uvm_factory::get(); // get singleton factory
      super.build_phase(phase);
      t1 = new("t1"); // direct construction
      t2 = trans::type_id::create("t2", this); // common method
      void'($cast(t3,f.create_object_by_type(trans::get_type(), get_full_name(), "t3"))); // factory method
      void'($cast(t4,create_object("trans", "t4"))); // pre-defined method inside component
    endfunction
  endclass
下面是参考别人的代码,区别是有没有`void和动态转换$cast,`void加不加的区别是会不会打印函数的返回值,$cast会进行类经检查,如果转换失败的话,会进行错误。$cast通常是向下类型转换,所以用的更多的是不同层次之间的转换,但是在父类和子类的转换之间,父类向子类转换称之为向下类型转换,子类向父类转换称之为向上类型转换,向上类型转换是安全的。这里没有涉及到父类到子类的转换,所以$cast可有可无。
  f.create_object_by_type(trans::get_type, get_full_name,"t3");//factory method
  create_object("trans","t4");// pre-defined method inside component
添加仿真命令、运行:
vsim -novopt -classdebug +UVM_TESTNAME=object_create work.factory_mechanism

t1被创建,剩下的三个是type [trans] ,这是因为uvm版本为1.2导致的,最新的版本会避免这个问题。
  class component_create extends top;
    unit u1, u2, u3, u4;
    `uvm_component_utils(component_create)
    function new(string name = "component_create", uvm_component parent = null);
      super.new(name, parent);
    endfunction
    function void build_phase(uvm_phase phase);
      uvm_factory f = uvm_factory::get(); // get singleton factory
      super.build_phase(phase);
      u1 = new("u1"); // direct construction
      u2 = unit::type_id::create("u2", this); // common method
      void'($cast(u3,f.create_component_by_type(unit::get_type(), get_full_name(), "u3", this))); // factory method
      void'($cast(u4,create_component("unit", "u4"))); // pre-defined method inside component
    endfunction
  endclass
vsim -novopt -classdebug +UVM_TESTNAME=component_create work.factory_mechanism
运行UVM测试对象object_override 和component_override 观察打印信息,检查t2/t3/t4和u2/u3/u4的类型是否被替换,再考虑为什么t1和u1没有被类型覆盖呢?
重复以上步骤,object_override 和component_override代码和运行结果如下:
  class object_override extends object_create;
    `uvm_component_utils(object_override)
    function new(string name = "object_override", uvm_component parent = null);
      super.new(name, parent);
    endfunction
    function void build_phase(uvm_phase phase);
      set_type_override_by_type(trans::get_type(), bad_trans::get_type());
      super.build_phase(phase);
    endfunction
  endclass
vsim -novopt +UVM_TESTNAME=object_override work.factory_mechanism

  class component_override extends component_create;
    `uvm_component_utils(component_override)
    function new(string name = "component_override", uvm_component parent = null);
      super.new(name, parent);
    endfunction
    function void build_phase(uvm_phase phase);
      set_type_override("unit", "big_unit");
      super.build_phase(phase);
    endfunction
  endclass
vsim -novopt +UVM_TESTNAME=component_override work.factory_mechanism
尝试移除trans类型的`uvm_object_utils注册宏,移除unit类型的`uvm_component_utils注册宏:

编译的时候会出错,因为`uvm_object_utils注册宏是用于把一个直接或间接派生自uvm_object的类注册到factory中
2、域的自动化以及uvm_object的常用方法
域自动化的宏方法:
  class trans extends uvm_object;
    bit[31:0] addr;
    bit[31:0] data;
    op_t op;
    string name;
    `uvm_object_utils_begin(trans)
      `uvm_field_int(addr, UVM_ALL_ON)
      `uvm_field_int(data, UVM_ALL_ON)
      `uvm_field_enum(op_t, op, UVM_ALL_ON)
      `uvm_field_string(name, UVM_ALL_ON)
    `uvm_object_utils_end
conpare()方法:比较所有属性,并给出详细的比较信息
is_equal = t1.compare(t2);全局控制对象 :uvm_default_comparer 是全局比较器,可以设置他的属性show_max来查询更多的比较结果。
 uvm_default_comparer.show_max = 10;
 is_equal = t1.compare(t2);

 if(!is_equal)
    `uvm_warning("CMPERR", "t1 is not equal to t2")
 else
     `uvm_info("CMPERR", "t1 is equal to t2", UVM_LOW)
回调函数:do_compare,理解预定义函数compare和do_compare的调用顺序和关系。
   function bit do_compare(uvm_object rhs, uvm_comparer comparer);
      trans t;
      do_compare = 1;
      void'($cast(t, rhs));
      if(addr != t.addr) begin
        do_compare = 0;
        `uvm_warning("CMPERR", $sformatf("addr %8x != %8x", addr, t.addr))
      end
      if(data != t.data) begin
        do_compare = 0;
        `uvm_warning("CMPERR", $sformatf("data %8x != %8x", data, t.data))
      end
      if(op != t.op) begin
        do_compare = 0;
        `uvm_warning("CMPERR", $sformatf("op %s != %8x", op, t.op))
      end
      if(addr != t.addr) begin
        do_compare = 0;
        `uvm_warning("CMPERR", $sformatf("name %8x != %8x", name, t.name))
      end
    endfunction
uvm_object:print()和uvm_object:copy()函数
  `uvm_info("COPY", "Before uvm_object copy() taken", UVM_LOW)
      t1.print();
      t2.print();
   `uvm_info("COPY", "After uvm_object t2 is copied to t1", UVM_LOW)
      t1.copy(t2);
      t1.print();
      t2.print();
   `uvm_info("CMP", "Compare t1 and t2", UVM_LOW)
      is_equal = t1.compare(t2);
      if(!is_equal)
        `uvm_warning("CMPERR", "t1 is not equal to t2")
      else
        `uvm_info("CMPERR", "t1 is equal to t2", UVM_LOW)
输入仿真命令,然后运行:
vsim -novopt +UVM_TESTNAME=object_methods_test work.object_methods
 分别打印了t1和t2的名称、大小、地址。 do_compare函数是compare函数的回调函数,执行完conpare以后会自动的执行do_compare,compare没有执行的话do_compare也不会执行。如果去掉 uvm_default_comparer.show_max = 10,这句代码,就会只给出发生错误的地址,并没有数据的比较,这是因为conpare在发生一个错误比较之后,就会立马停止比较,直接输出结果。
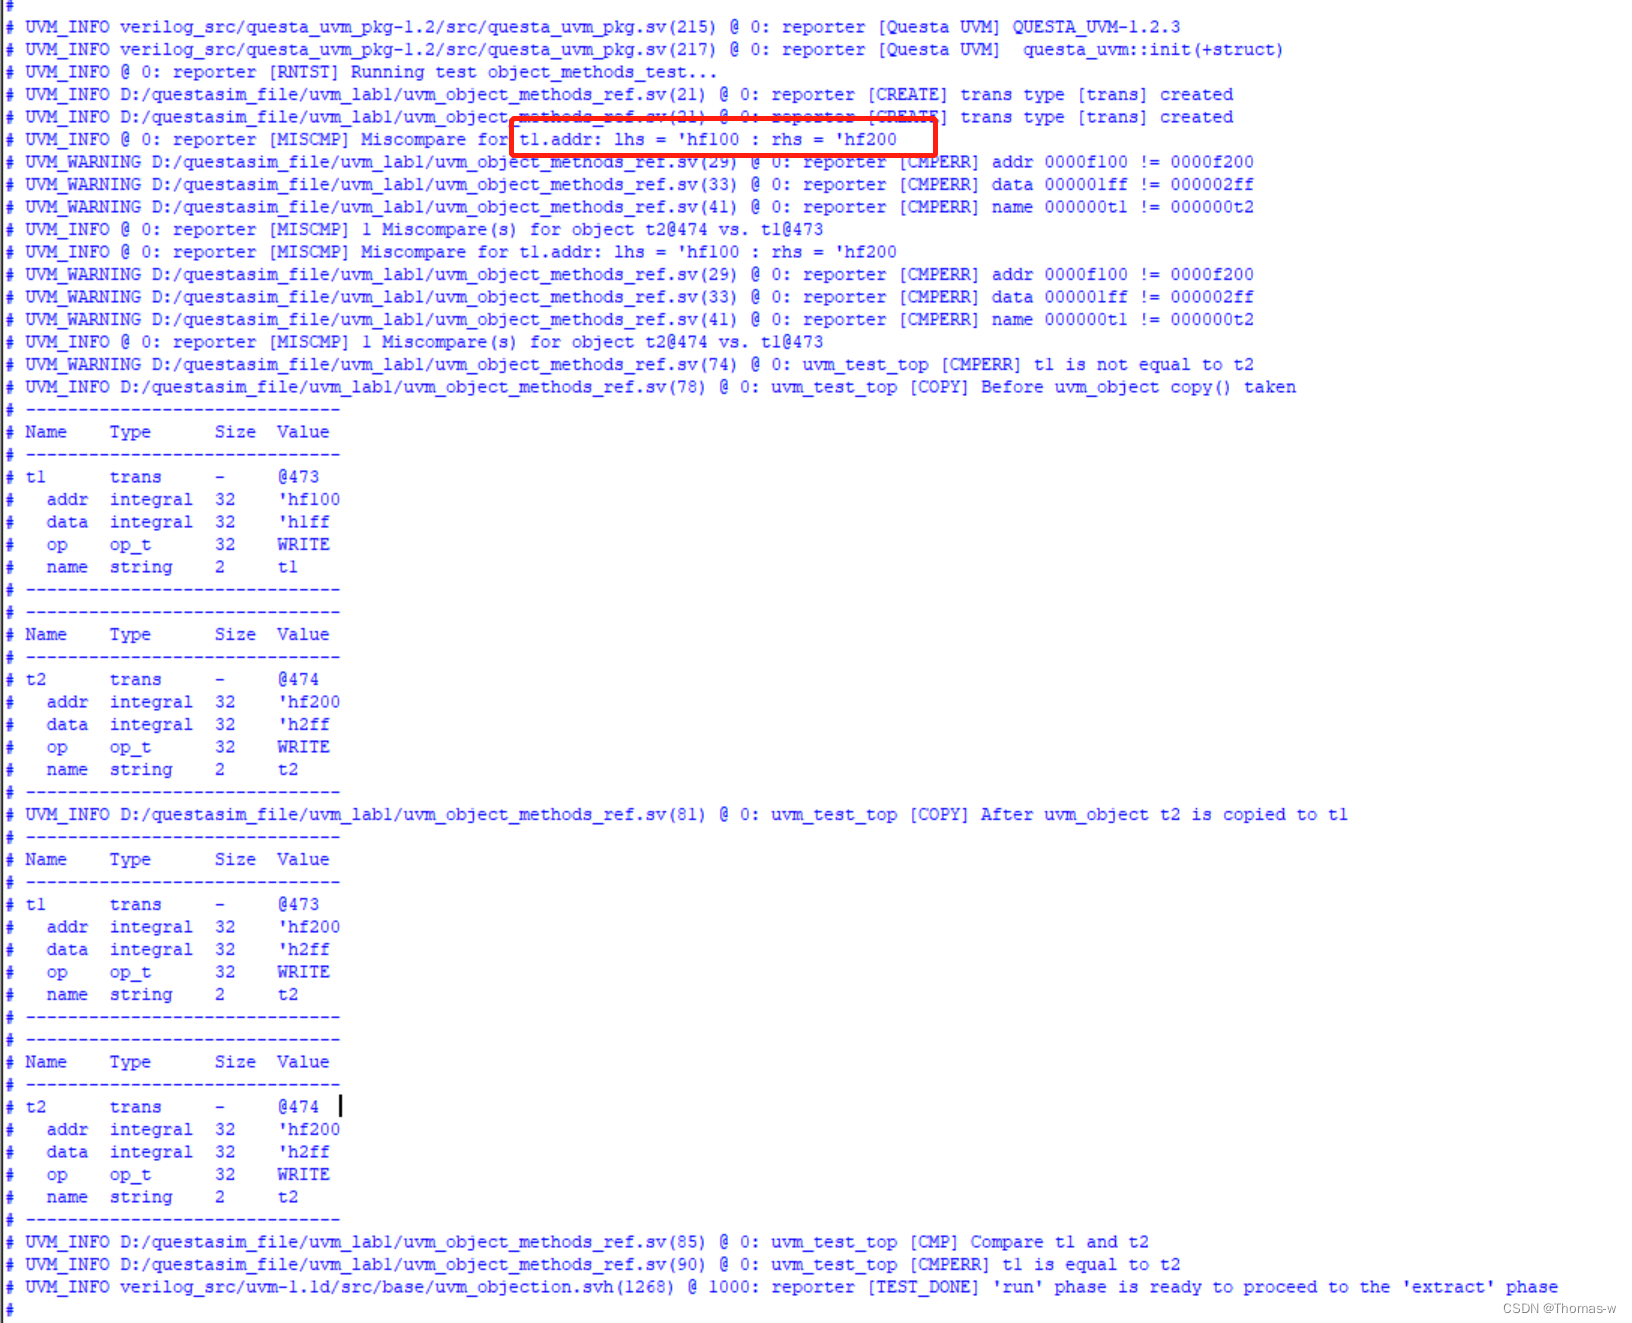
3、phase机制
参考comp1定义comp2和comp3中的phase方法,运行phase_order_test,观察phase的执行顺序。comp1中声明和连接了comp2和comp3,除去此部分,都一样,分别是build_phase、connect_phase、run_phase和report_phase。
  class comp2 extends uvm_component;
    `uvm_component_utils(comp2)
    function new(string name = "comp2", uvm_component parent = null);
      super.new(name, parent);
      `uvm_info("CREATE", $sformatf("unit type [%s] created", name), UVM_LOW)
    endfunction
    function void build_phase(uvm_phase phase);
      super.build_phase(phase);
      `uvm_info("BUILD", "comp2 build phase entered", UVM_LOW)
      `uvm_info("BUILD", "comp2 build phase exited", UVM_LOW)
    endfunction
    function void connect_phase(uvm_phase phase);
      super.connect_phase(phase);
      `uvm_info("CONNECT", "comp2 connect phase entered", UVM_LOW)
      `uvm_info("CONNECT", "comp2 connect phase exited", UVM_LOW)
    endfunction
    task run_phase(uvm_phase phase);
      super.run_phase(phase);
      `uvm_info("RUN", "comp2 run phase entered", UVM_LOW)
      `uvm_info("RUN", "comp2 run phase entered", UVM_LOW)
    endtask
    function void report_phase(uvm_phase phase);
      super.report_phase(phase);
      `uvm_info("REPORT", "comp2 report phase entered", UVM_LOW)
      `uvm_info("REPORT", "comp2 report phase exited", UVM_LOW)
    endfunction
  endclass

  class comp3 extends uvm_component;
    `uvm_component_utils(comp3)
    function new(string name = "comp3", uvm_component parent = null);
      super.new(name, parent);
      `uvm_info("CREATE", $sformatf("unit type [%s] created", name), UVM_LOW)
    endfunction
    function void build_phase(uvm_phase phase);
      super.build_phase(phase);
      `uvm_info("BUILD", "comp3 build phase entered", UVM_LOW)
      `uvm_info("BUILD", "comp3 build phase exited", UVM_LOW)
    endfunction
    function void connect_phase(uvm_phase phase);
      super.connect_phase(phase);
      `uvm_info("CONNECT", "comp3 connect phase entered", UVM_LOW)
      `uvm_info("CONNECT", "comp3 connect phase exited", UVM_LOW)
    endfunction
    task run_phase(uvm_phase phase);
      super.run_phase(phase);
      `uvm_info("RUN", "comp3 run phase entered", UVM_LOW)
      `uvm_info("RUN", "comp3 run phase entered", UVM_LOW)
    endtask
    function void report_phase(uvm_phase phase);
      super.report_phase(phase);
      `uvm_info("REPORT", "comp3 report phase entered", UVM_LOW)
      `uvm_info("REPORT", "comp3 report phase exited", UVM_LOW)
    endfunction
  endclass
vsim -novopt -classdebug +UVM_TESTNAME=phase_order_test work.phase_order
 build_phase的执行顺序为自顶向下,先执行uvm_test_top,然后是C1,其次是C2,C3。connect_phase的执行顺序是自下而上,跟build_phase刚好相反。run_phase的执行顺序是自下而上,同时在运行。report_phase的执行顺序是自下而上。
除了build_phase之外,所有不耗费仿真时间的phase(function_phase)都是自下而上的运行的。类似run_phase、main_phase等task_phase也都是按照自下而上的顺序执行的,但是与function_phase不同的是,这种task_phase是消耗时间的,所以他并不是等待下面的phase执行完毕才执行,二十通过“fork jion_none”的形式全部启动,所以是自下而上的启动,全部在运行。
参考run_phase完成reset_phase和main_phase,耗时1微秒,观察运行phase_order_test时各个组件的执行顺序。
    task reset_phase(uvm_phase phase);
      `uvm_info("RESET", "phase_order_test reset phase entered", UVM_LOW)
      phase.raise_objection(this);
      #1us;
      phase.drop_objection(this);
      `uvm_info("RESET", "phase_order_test reset phase exited", UVM_LOW)
    endtask

    task main_phase(uvm_phase phase);
      `uvm_info("MAIN", "phase_order_test main phase entered", UVM_LOW)
      phase.raise_objection(this);
      #1us;
      phase.drop_objection(this);
      `uvm_info("MAIN", "phase_order_test main phase exited", UVM_LOW)
    endtask
可以看出0时刻的时候build_phase、connect_phase、run_phase、reset_phase同时开始执行,1000时刻main_phase执行,执行结束以后report在2000时刻开始执行。run_phase和12个task_phase的执行顺序是并行执行的,run_phase和reset_phase同时开始执行,运行时长为刚才设置的1微秒,12个task_phase的执行顺序是由上而下,所以main_phase是在reset_phase执行结束之后才开始执行的。
4、config机制
有get,就需要有set,在顶层module里面set
module uvm_config;

  import uvm_pkg::*;
  `include "uvm_macros.svh"
  import uvm_config_pkg::*;

  uvm_config_if if0();

  initial begin
    uvm_config_db#(virtual uvm_config_if)::set(uvm_root::get(), "uvm_test_top.*", "vif", if0);
    run_test(""); // empty test name
  end

endmodule
声明好接口以后就可以在设置build_phase里面设置get
完成接口从uvm_config模块到验证环境中的传递,使得C1和C2可以得到接口,并进行检查,不成功就打印信息。
  `uvm_info("BUILD", "comp2 build phase entered", UVM_LOW)
    if(!uvm_config_db#(virtual uvm_config_if)::get(this, "", "vif", vif))
     `uvm_error("GETVIF", "no virtual interface is assigned")
完成配置对象config.obj从uvm_config.test到C1和C2的传递:在顶层uvm_config_test对c1.var1和c2.var2的变量设置:
  class uvm_config_test extends uvm_test;
    comp1 c1;
    config_obj cfg;
    `uvm_component_utils(uvm_config_test)
    function new(string name = "uvm_config_test", uvm_component parent = null);
      super.new(name, parent);
    endfunction
    function void build_phase(uvm_phase phase);
      super.build_phase(phase);
      `uvm_info("BUILD", "uvm_config_test build phase entered", UVM_LOW)

      cfg = config_obj::type_id::create("cfg");
      cfg.comp1_var = 100;
      cfg.comp2_var = 200;
      uvm_config_db#(config_obj)::set(this, "*", "cfg", cfg);

      uvm_config_db#(int)::set(this, "c1", "var1", 10);
      uvm_config_db#(int)::set(this, "c1.c2", "var2", 20);

      c1 = comp1::type_id::create("c1", this);
      `uvm_info("BUILD", "uvm_config_test build phase exited", UVM_LOW)
    endfunction
    task run_phase(uvm_phase phase);
      super.run_phase(phase);
      `uvm_info("RUN", "uvm_config_test run phase entered", UVM_LOW)
      phase.raise_objection(this);
      #1us;
      phase.drop_objection(this);
      `uvm_info("RUN", "uvm_config_test run phase exited", UVM_LOW)
    endtask
  endclass
class comp2 extends uvm_component;
int var2;
virtual uvm_config_if vif;
config_obj cfg;
`uvm_component_utils(comp2)
function new(string name = "comp2", uvm_component parent = null);
super.new(name, parent);
var2 = 200;
`uvm_info("CREATE", $sformatf("unit type [%s] created", name), UVM_LOW)
endfunction
function void build_phase(uvm_phase phase);
super.build_phase(phase);
`uvm_info("BUILD", "comp2 build phase entered", UVM_LOW)
if(!uvm_config_db#(virtual uvm_config_if)::get(this, "", "vif", vif))
`uvm_error("GETVIF", "no virtual interface is assigned")
`uvm_info("GETINT", $sformatf("before config get, var2 = %0d", var2), UVM_LOW)
uvm_config_db#(int)::get(this, "", "var2", var2);
`uvm_info("GETINT", $sformatf("after config get, var2 = %0d", var2), UVM_LOW)
uvm_config_db#(config_obj)::get(this, "", "cfg", cfg);
`uvm_info("GETOBJ", $sformatf("after config get, cfg.comp2_var = %0d", cfg.comp2_var), UVM_LOW)
`uvm_info("BUILD", "comp2 build phase exited", UVM_LOW)
endfunction
endclass
class comp1 extends uvm_component;
int var1;
comp2 c2;
config_obj cfg;
virtual uvm_config_if vif;
`uvm_component_utils(comp1)
function new(string name = "comp1", uvm_component parent = null);
super.new(name, parent);
var1 = 100;
`uvm_info("CREATE", $sformatf("unit type [%s] created", name), UVM_LOW)
endfunction
function void build_phase(uvm_phase phase);
super.build_phase(phase);
`uvm_info("BUILD", "comp1 build phase entered", UVM_LOW)
if(!uvm_config_db#(virtual uvm_config_if)::get(this, "", "vif", vif))
`uvm_error("GETVIF", "no virtual interface is assigned")
`uvm_info("GETINT", $sformatf("before config get, var1 = %0d", var1), UVM_LOW)
uvm_config_db#(int)::get(this, "", "var1", var1);
`uvm_info("GETINT", $sformatf("after config get, var1 = %0d", var1), UVM_LOW)
uvm_config_db#(config_obj)::get(this, "", "cfg", cfg);
`uvm_info("GETOBJ", $sformatf("after config get, cfg.comp1_var = %0d", cfg.comp1_var), UVM_LOW)
c2 = comp2::type_id::create("c2", this);
`uvm_info("BUILD", "comp1 build phase exited", UVM_LOW)
endfunction
endclass输入仿真命令:
vsim -novopt -classdebug +UVM_TESTNAME=uvm_config_test work.uvm_config

5、消息管理
首先运行uvm_message_test,查看打印信息。
vsim -novopt -classdebug +UVM_TESTNAME=uvm_message_test work.uvm_message_ref

使用消息过滤方法set_report_verbosity_level_hier() 屏蔽所有层次的消息。
 function void build_phase(uvm_phase phase);
   super.build_phase(phase);

   set_report_verbosity_level_hier(UVM_NONE);

  `uvm_info("BUILD", "uvm_message_test build phase entered", UVM_LOW)
  cfg = config_obj::type_id::create("cfg");
  c1 = comp1::type_id::create("c1", this);
  c2 = comp2::type_id::create("c2", this);
中间所有的build_phase和run_phase都被过滤掉了
使用set_report_id_verbosity_level_hier()过滤BUILD、CREAT、RUN这三个ID信息:
    function void build_phase(uvm_phase phase);
      super.build_phase(phase);

	//  set_report_verbosity_level_hier(UVM_NONE);

	  set_report_id_verbosity_hier("BUILD",UVM_NONE);
	  set_report_id_verbosity_hier("CREATE",UVM_NONE);
      set_report_id_verbosity_hier("RUN",UVM_NONE);

      `uvm_info("BUILD", "uvm_message_test build phase entered", UVM_LOW)
      cfg = config_obj::type_id::create("cfg");
      c1 = comp1::type_id::create("c1", this);
      c2 = comp2::type_id::create("c2", this);
使用使用uvm_root::get()来获取最顶层(即uvm_message_test的顶层)控制:
  initial begin

    uvm_root::get().set_report_id_verbosity_hier("TOPTB", UVM_NONE);
    `uvm_info("TOPTB", "RUN TEST entered", UVM_LOW)
    run_test(""); // empty test name
    `uvm_info("TOPTB", "RUN TEST exited", UVM_LOW)
  end
set_report_verbosity_level_hier无论是对于cfg还是c1、c2都是起作用的, 但是无论是在build_phase还是顶层的set_report_id_verbosity_hier,对于c1和c2来说这些指令是不起作用的,因为作用在uvm_message_test里面,在uvm_message_test中例化c1和c2,然后运行发现, cfg的build_phase和run_phase都被屏蔽了,但是c1、c2的并没有屏蔽掉。如果没有例化c1、c2,这两个结果是一样的。

set_report_verbosity_level_hier:

set_report_id_verbosity_hier()来过滤ID的消息:

uvm_root::get()来获取最顶层控制,过滤“CREATE”和“TOPTB”的消息:

博客参考:路科验证MCDF_uvmlab1_Hardworking_IC_boy的博客-CSDN博客_uvm的do_compare


 572
572

 被折叠的 条评论
为什么被折叠?
被折叠的 条评论
为什么被折叠?
 到【灌水乐园】发言


