


every blog every motto: You can do more than you think.
https://blog.csdn.net/weixin_39190382?type=blog
0. 前言
detr整个流程https://blog.csdn.net/weixin_39190382/article/details/137905915?spm=1001.2014.3001.5502
本节介绍:detr 之backbone逐行梳理
1. 整体
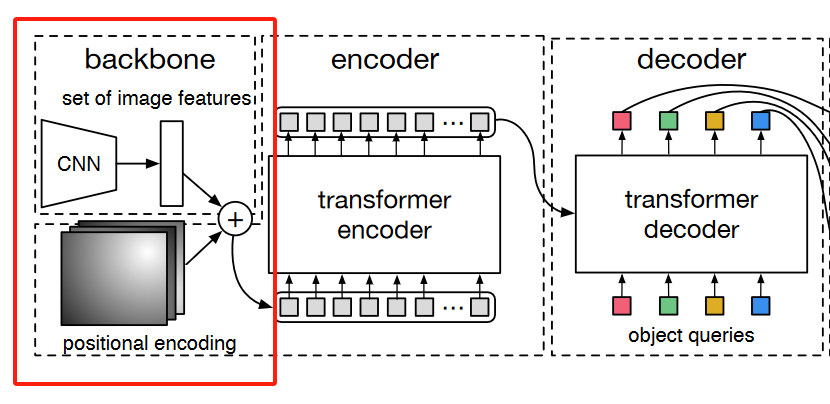
整体来说,backbone是获取resnet其中的一层的输出以及对应的位置编码。
说明:
检测时只需要resnet中的layer4层,分割时会用到resnet中的layer1、layer2、layer3、layer4层。
2. 部分
2.1 Backbonebase
2.1.1 NestedTensor
在聊Backbonebase之前,我们先看一下NestedTensor,NestedTensor是自己定义的一个数据结构,用于存tensor和对应的mask。其中to方法是合并tensor和mask;decompose方法是拆分tensor和mask。
class NestedTensor(object):
    def __init__(self, tensors, mask: Optional[Tensor]):
        self.tensors = tensors
        self.mask = mask

    def to(self, device, non_blocking=False):
        # 合并
        # type: (Device) -> NestedTensor # noqa
        cast_tensor = self.tensors.to(device, non_blocking=non_blocking)
        mask = self.mask
        if mask is not None:
            assert mask is not None
            cast_mask = mask.to(device, non_blocking=non_blocking)
        else:
            cast_mask = None
        return NestedTensor(cast_tensor, cast_mask)

    def record_stream(self, *args, **kwargs):
        self.tensors.record_stream(*args, **kwargs)
        if self.mask is not None:
            self.mask.record_stream(*args, **kwargs)

    def decompose(self):
        # 拆分
        return self.tensors, self.mask

    def __repr__(self):
        return str(self.tensors)
2.1.2 IntermediateLayerGetter
再来看一个IntermediateLayerGetter,其用于获取网络指定层的输出。
eg:
import torchvision
import torch
m = torchvision.models.resnet18(pretrained=True)
new_m = torchvision.models._utils.IntermediateLayerGetter(m, {'layer1': 'feat1', 'layer3': 'feat2'})
out = new_m(torch.rand(1, 3, 224, 224))
print([(k, v.shape) for k, v in out.items()])


输出:
[('feat1', torch.Size([1, 64, 56, 56])), ('feat2', torch.Size([1, 256, 14, 14]))]
2.1.3 names_parameters
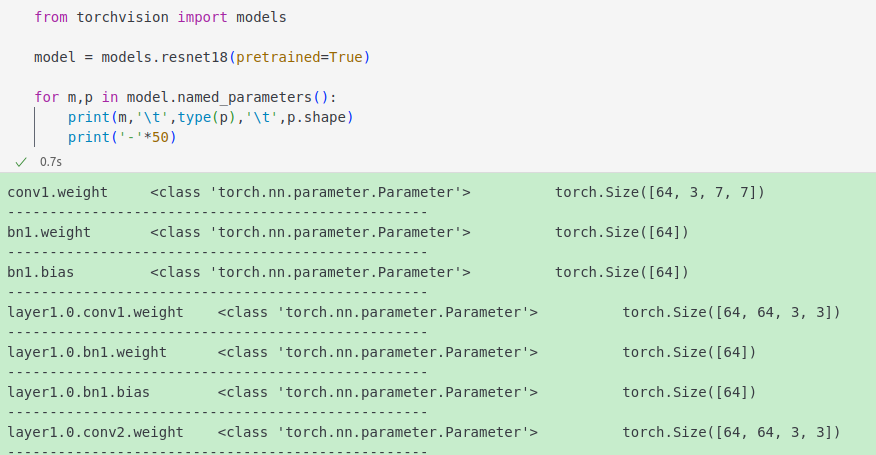
所以下方代码,当非训练时,参数不需要计算梯度;当训练时,只保留指定层(layer2、layer3、layer4)的需要计算梯度。
for name, parameter in backbone.named_parameters():
    if not train_backbone or 'layer2' not in name and 'layer3' not in name and 'layer4' not in name:
        parameter.requires_grad_(False)
2.1.4 正文
输入backbone的img(tensor)是原图大小,其中的mask也是原始大小,如下。所以会在backbone中进行下采样:
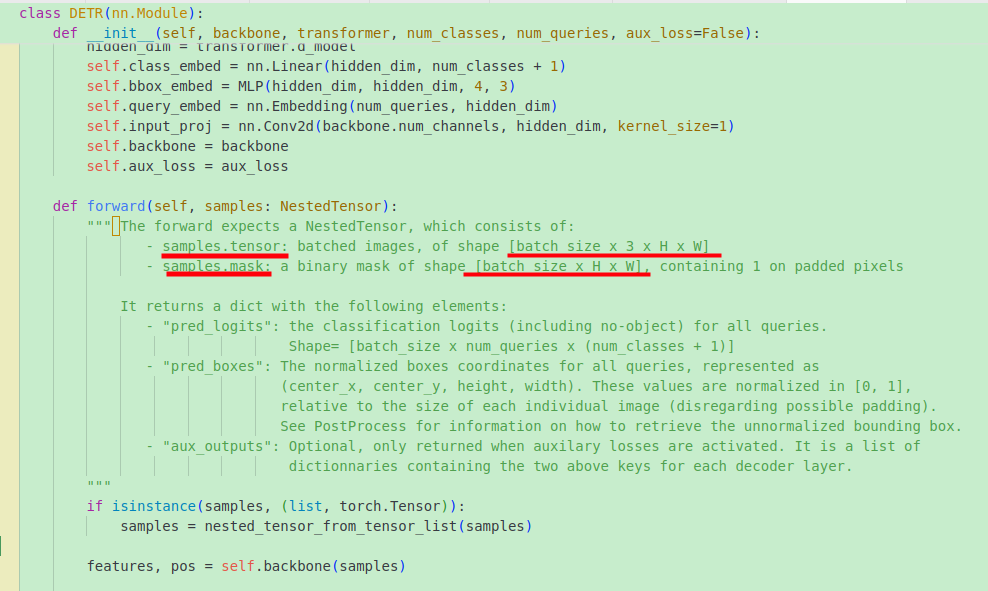
梗概: 用IntermediateLayerGetter获取网络指定层的输出,输出层的大小相较于原图进行了缩放,所以mask也缩放到相应的尺寸。
输入: 原始图像的(x,x_mask)形式
输出:
- 检测时返回:{‘layer4’: “0”}和对应的mask;
- 分割时返回三层的输出特征图和对应的mask,{‘layer1’:(x,mask),‘layer2’:(x,mask),…}形式
class BackboneBase(nn.Module):

    def __init__(self, backbone: nn.Module, train_backbone: bool, return_interm_layers: bool):
        super().__init__()
        # 当非训练时,参数不需要计算梯度;当训练时,只保留指定层(layer2、layer3、layer4)的需要计算梯度。
        for name, parameter in backbone.named_parameters():
            if not train_backbone or 'layer2' not in name and 'layer3' not in name and 'layer4' not in name:
                parameter.requires_grad_(False)

        # 分割时,返回需要的层
        if return_interm_layers:
            # return_layers = {"layer1": "0", "layer2": "1", "layer3": "2", "layer4": "3"}
            return_layers = {"layer2": "0", "layer3": "1", "layer4": "2"}
            self.strides = [8, 16, 32] # 上面三个特征图下采样的倍率
            self.num_channels = [512, 1024, 2048] # 上面三个特征图的通道数
        # 检测时
        else:
            return_layers = {'layer4': "0"}
            self.strides = [32]
            self.num_channels = [2048]

        self.body = IntermediateLayerGetter(backbone, return_layers=return_layers)

    def forward(self, tensor_list: NestedTensor):
        # 获取指定层的输出
        xs = self.body(tensor_list.tensors)

        out: Dict[str, NestedTensor] = {}
        for name, x in xs.items():
            m = tensor_list.mask
            assert m is not None
            # 由于不同层特征图的大小是不同的,故将mask缩放到对应特征图的大小
            mask = F.interpolate(m[None].float(), size=x.shape[-2:]).to(torch.bool)[0]
            out[name] = NestedTensor(x, mask)
        return out
2.2 Backbone
梗概: Backbone从Backbonebase中继承,替换了其中的backbone的获取方式。
class Backbone(BackboneBase):
    """ResNet backbone with frozen BatchNorm."""
    def __init__(self, name: str,
                 train_backbone: bool,
                 return_interm_layers: bool,
                 dilation: bool):
        norm_layer = FrozenBatchNorm2d

        # 从torchvision.models中获取backbone
        backbone = getattr(torchvision.models, name)(
            replace_stride_with_dilation=[False, False, dilation],
            pretrained=is_main_process(), norm_layer=norm_layer)

        assert name not in ('resnet18', 'resnet34'), "number of channels are hard coded"
        super().__init__(backbone, train_backbone, return_interm_layers)
2.3 Joiner
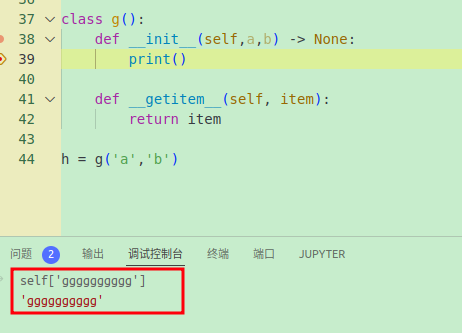
2.3.1 self
先看一个self的列子
由于有__getitem__,self可以被索引
2.3.2 正文
梗概:
- 原始图片和对应的mask,(x,mask)输入进backbone获取第四层特征图和对应的mask
- 再将上面的结果,即第四层特征图(x,mask)输入进position_embedding生成对应的位置编码。
输出: 返回特征图(x,mask)和相应的位置编码
class Joiner(nn.Sequential):
    def __init__(self, backbone, position_embedding):
        super().__init__(backbone, position_embedding)
        self.strides = backbone.strides
        self.num_channels = backbone.num_channels

    def forward(self, tensor_list: NestedTensor):
        # self[0] 表示backbone
        # 调用backbone的forward方法,获取3层的网络输出和对应的mask
        # forward的返回字典形式:out[name] = NestedTensor(x, mask)
        xs = self[0](tensor_list)
        out: List[NestedTensor] = []
        pos = []
        # 获取指定层输出特征图和对应的mask
        for name, x in sorted(xs.items()):
            out.append(x)

        # position encoding
        # self[1] 表示position_embedding函数
        # (x, mask)输入进 position_embedding函数,获取位置编码
        for x in out:
            pos.append(self[1](x).to(x.tensors.dtype))

        return out, pos
2.4 build_backbone
梗概: 用上面的Joiner构建一个backbone,其中forwward的输入是一个原始图片和对应的mask,输出是特征图(x,mask)和相应的位置编码
输出:
- out: [(x4,mask4)]
- pos: [pos4]
def build_backbone(args):
    position_embedding = build_position_encoding(args)
    train_backbone = args.lr_backbone > 0
    return_interm_layers = args.masks or (args.num_feature_levels > 1)

    backbone = Backbone(args.backbone, train_backbone, return_interm_layers, args.dilation)
    model = Joiner(backbone, position_embedding)
    return model
2.5 位置编码
2.5.1 mask
我们输入进网络的是(x,mask)形式,我们知道x是原图,mask是对应的掩码,那具体掩哪里呢?

梗概: 对于一个batch的数据,所有图片像最大的图片看齐,不够的在右下方补0。
假如一个batch中的图片尺寸不同,
- 获取各个方向最大的尺寸,即得到一个(h_max,w_max)
- 生成一个全0的tensor,shpae为(batch,c,h_max,w_max)
- 把一个batch中的图片放到全0图片的对应位置,如果图片小了,那么该位置会0,相当于所有图片都像最大的图片看齐,不够就在右下补0
- 生成一个 mask,shape (b,h_max,w_max),没有通道,因为在像素方向进行掩码,不针对通道;mask上图片位置为False,padding位置为True
输入: 原始图像的(x,x_mask)形式
def nested_tensor_from_tensor_list(tensor_list: List[Tensor]):
    # TODO make this more general
    if tensor_list[0].ndim == 3:
        # TODO make it support different-sized images
        # 获取各个方向最大的尺寸
        max_size = _max_by_axis([list(img.shape) for img in tensor_list])
        # min_size = tuple(min(s) for s in zip(*[img.shape for img in tensor_list]))
        # 最大的shape,[batch,c,h_max,w_max]
        batch_shape = [len(tensor_list)] + max_size
        b, c, h, w = batch_shape
        dtype = tensor_list[0].dtype
        device = tensor_list[0].device
        # 根据最大尺寸生成一个全0的tensor
        tensor = torch.zeros(batch_shape, dtype=dtype, device=device)
        # 根据最大尺寸生成一个 mask,shape (b,h,w),没有通道,因为在像素方向进行掩码,不针对通道
        mask = torch.ones((b, h, w), dtype=torch.bool, device=device)

        for img, pad_img, m in zip(tensor_list, tensor, mask):
            # 把一个batch中的图片放到全0图片的对应位置,如果图片小了,那么该位置会0
            pad_img[: img.shape[0], : img.shape[1], : img.shape[2]].copy_(img)
            # 理解:小图放到大的框里面,有值为False,没有值为True
            m[: img.shape[1], :img.shape[2]] = False
    else:
        raise ValueError('not supported')
    return NestedTensor(tensor, mask)
2.5.2 build_position_encoding
梗概: 构建位置编码,有两种方式,一种是正弦一种是可学习的。
def build_position_encoding(args):
    N_steps = args.hidden_dim // 2
    # 正弦方式
    if args.position_embedding in ('v2', 'sine'):
        # TODO find a better way of exposing other arguments
        position_embedding = PositionEmbeddingSine(N_steps, normalize=True)

    # 可学习方式
    elif args.position_embedding in ('v3', 'learned'):
        position_embedding = PositionEmbeddingLearned(N_steps)
    else:
        raise ValueError(f"not supported {args.position_embedding}")

    return position_embedding
2.5.3 正余弦方式
公式如下:

公式中主要涉及两个一个是pos,一个是2i
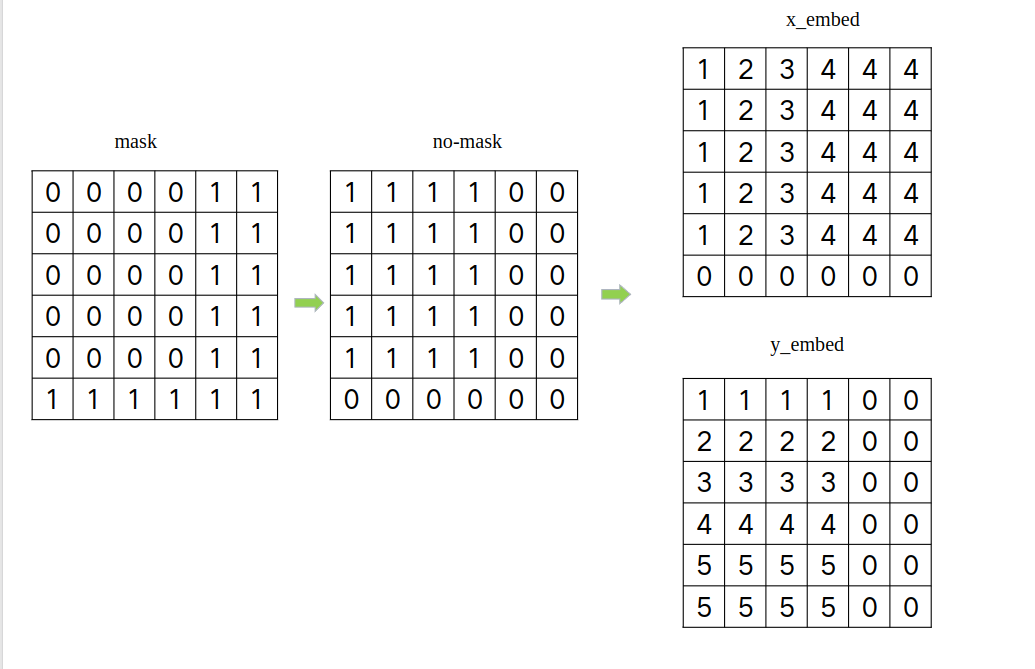
其中,pos就是每个像素的位置,通过mask进行确定,直接看如下图:
正余弦的分母都是: 1000 0 2 i d m o d e l \Large 10000^{\frac{2i}{d_{model}}} 10000dmodel2i , 公式都是2i,故,
通过如下代码,将原始dim_t是: 0,1,2,3,4…,dim_t 变成:0,0,1,1,2,2,…。
dim_t = self.temperature ** (2 * (dim_t // 2) / self.num_pos_feats)
class PositionEmbeddingSine(nn.Module):
    """
    This is a more standard version of the position embedding, very similar to the one
    used by the Attention is all you need paper, generalized to work on images.
    """
    def __init__(self, num_pos_feats=64, temperature=10000, normalize=False, scale=None):
        super().__init__()
        self.num_pos_feats = num_pos_feats
        self.temperature = temperature
        self.normalize = normalize
        if scale is not None and normalize is False:
            raise ValueError("normalize should be True if scale is passed")
        if scale is None:
            scale = 2 * math.pi
        self.scale = scale

    def forward(self, tensor_list: NestedTensor):
        x = tensor_list.tensors
        mask = tensor_list.mask # padding的位置为1
        assert mask is not None
        not_mask = ~mask # 取反,padding的位置为0

        # not_mask shape (b,h,w),沿着指定方向求累计和,这就是公式中的pos,位置。
        # eg: 对于第一列,y_embed: [1,2,3,4,5...,h,h,h,h],后续都是h是因为有填充,h+0=h;
        y_embed = not_mask.cumsum(1, dtype=torch.float32)
        x_embed = not_mask.cumsum(2, dtype=torch.float32)
        if self.normalize:
            eps = 1e-6
            # 归一化,缩放到0-2pi之间
            y_embed = y_embed / (y_embed[:, -1:, :] + eps) * self.scale
            x_embed = x_embed / (x_embed[:, :, -1:] + eps) * self.scale

        # [0,1,2,...,63]
        dim_t = torch.arange(self.num_pos_feats, dtype=torch.float32, device=x.device)
        # 公式中不管对于奇数还是偶数位置,都是用的2i,所以下方会有dim_t//2 -> 0,0,1,1,2,2,...,31,31
        dim_t = self.temperature ** (2 * (dim_t // 2) / self.num_pos_feats)

        # pos/ 10000^(2i/d_model) (b,h,w,1)/(64,) -> (b,h,w,64)
        pos_x = x_embed[:, :, :, None] / dim_t
        pos_y = y_embed[:, :, :, None] / dim_t
        # 偶数位用sin,x,y中都是 ,shape: (b,h,w,64) -> (b,h,w,64,2) -> (b,h,w,128)
        pos_x = torch.stack((pos_x[:, :, :, 0::2].sin(), pos_x[:, :, :, 1::2].cos()), dim=4).flatten(3)
        # 奇数位用cos,x,y中都是
        pos_y = torch.stack((pos_y[:, :, :, 0::2].sin(), pos_y[:, :, :, 1::2].cos()), dim=4).flatten(3)
        # 合并x,y (b,h,w,128) -> (b,h,w,256) -> (b,256,h,w)
        pos = torch.cat((pos_y, pos_x), dim=3).permute(0, 3, 1, 2)

        # pos (b,256,h,w), 前128是y位置编码,后128是x位置编码
        return pos
2.5.4 可学习方式
主要是提前顶一个Embedding,再进行相关变换。可参考代码中的注释
class PositionEmbeddingLearned(nn.Module):
    """
    Absolute pos embedding, learned.
    """
    def __init__(self, num_pos_feats=256):
        super().__init__()
        # y
        self.row_embed = nn.Embedding(50, num_pos_feats)
        # x
        self.col_embed = nn.Embedding(50, num_pos_feats)
        self.reset_parameters()

    def reset_parameters(self):
        nn.init.uniform_(self.row_embed.weight)
        nn.init.uniform_(self.col_embed.weight)

    def forward(self, x):
        # x = tensor_list.tensors
        h, w = x.shape[-2:]
        # [0,1,2,...,w-1]
        i = torch.arange(w, device=x.device)
        # [0,1,2,...,h-1]
        j = torch.arange(h, device=x.device)
        print('i j shape,',i.shape,j.shape)

        x_emb = self.col_embed(i)
        y_emb = self.row_embed(j)

        print('x y emb: ',x_emb.shape,y_emb.shape)
        # (h,w,256) -> (h,w,512) -> (512,h,w) -> (1,512,h,w)-> (b,512,h,w)
        pos = torch.cat([
            x_emb.unsqueeze(0).repeat(h, 1, 1), #  (w,256) -> (h,w,256)
            y_emb.unsqueeze(1).repeat(1, w, 1), #  (h,256) -> (h,w,256)
        ], dim=-1).permute(2, 0, 1).unsqueeze(0).repeat(x.shape[0], 1, 1, 1)

        # pos (b,512,h,w)
        return pos
2.6 小结
在检测时,获取renset第四层的输出,生成对应的mask,以及位置编码。
参考
- https://blog.csdn.net/weixin_39190382/article/details/137905915?spm=1001.2014.3001.5502
- https://blog.csdn.net/qq_38253797/article/details/127614228


 4884
4884

 被折叠的 条评论
为什么被折叠?
被折叠的 条评论
为什么被折叠?
 到【灌水乐园】发言


