


文章目录
前言

CANopen通信协议是基于CAN现场总现的应用层协议,在运动控制、车辆工业、电机驱动等领域广泛应用。
本文的目标是移植canfestival开源协议栈到树莓派pico开发板上,实现CANopen协议功能。
一、硬件介绍
为了实现CANopen协议栈功能,需要硬件模块如下所示:
| 树莓派pico开发板 | x1 |
|---|---|
| 微雪Pico-CAN-B扩展版 | x1 |
| CAN报文分析仪 | x1 |
1 树莓派pico开发板
2 微雪Pico-CAN-B扩展板
专为Raspberry Pi Pico 设计的一款can拓展板,可使 Pico 获得可靠的长距离通信。使用SPI接口CAN控制器MCP2515,搭配收发器SIT65HVD230DR。
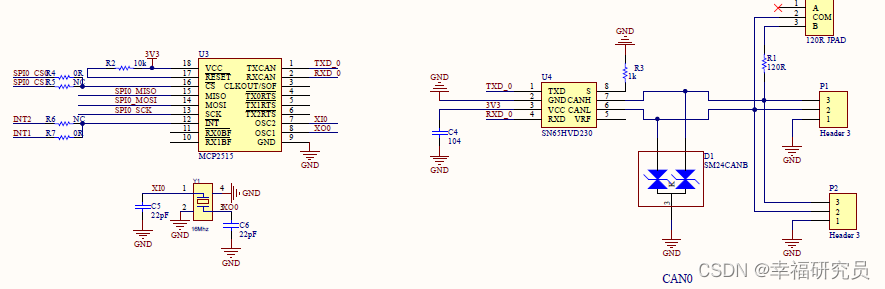
MCP2515是Microchip 的一款独立控制器局域网络CAN协议控制器,完全
支持CAN V2.0B 技术规范。该器件能发送和接收标准和扩展数据帧以及远程帧。MCP2515 自带的两个验收屏蔽寄存器和六个验收滤波寄存器可以过滤掉不想要的报文,因此减少了主单片机(MCU)的开销。MCP2515与MCU 的连接是通过业界标准串行外设接口(SearialPeripheral Interface, SPI)来实现的。
3 CAN报文分析仪
用于CAN报文分析,程序测试和模拟CANopen主站功能。
二、代码移植
1.canfestival源码
canfestival源码可以在canfetival 官网下载: https://canfestival.org。
此次工程中需要使用源代码中include和src中源码,将这两个文件夹复制到工程canfectival目录下。
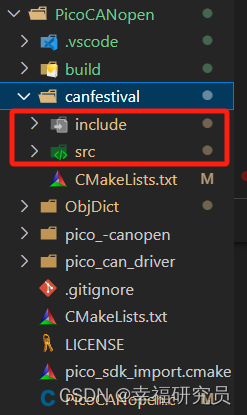
源代码中硬件驱动相关的文件替换成pico相关驱动,这也是canfestival移植的核心内容。
2.MCP2515 驱动程序
MCP2515的驱动程序使用的是微雪提供的示例程序,主要包括SPI通信和CAN读写两部分。
- SPI通信
SPI通信这部分源码未作任何修改,主要包括SPI读写时序和MCP2515读写指令和控制命令,其中MCP2515控制指令如下:
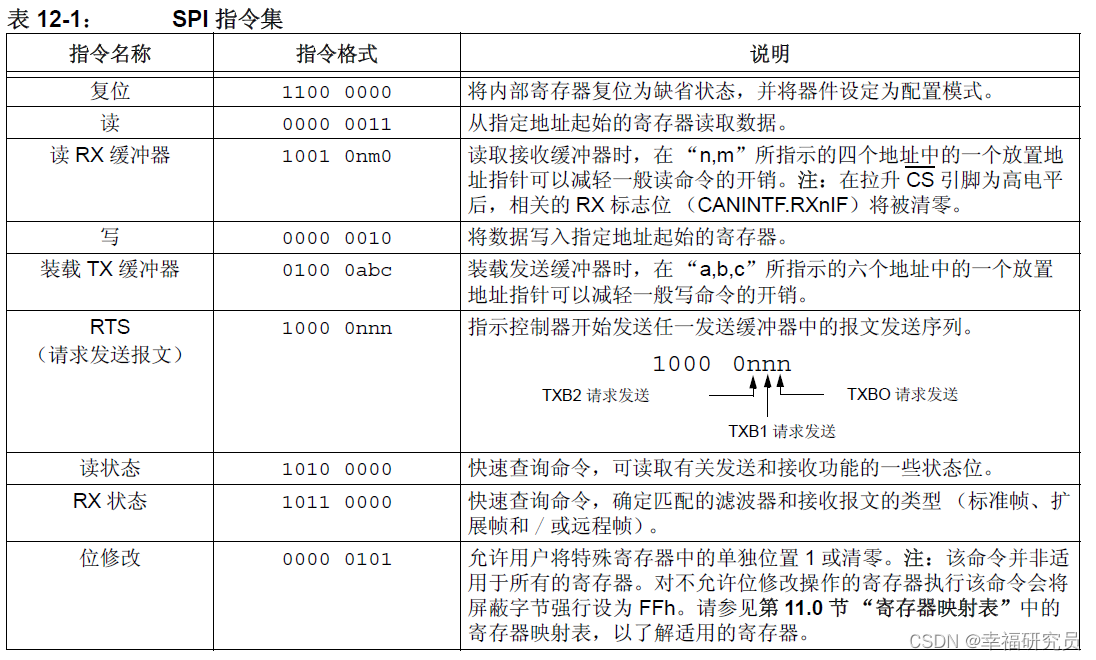
MCP2515控制器SPI通信相关函数如下:
void MCP2515_Init(void);
void MCP2515_Send(uint32_t Canid, uint8_t *Buf, uint8_t len);
void MCP2515_Receive(uint32_t Canid, uint8_t *CAN_RX_Buf);

uint8_t MCP2515_ReadByte(uint8_t Addr);
void MCP2515_WriteBytes(uint8_t Addr, uint8_t Data);
void MCP2515_WriteByte(uint8_t Addr);
void MCP2515_bit_Modfify(unsigned char addr, unsigned char mask, unsigned char data);
- CANopen通信驱动程序
微雪提供的例程里面这部分是针对CAN通信程序,为了适配CANopen帧结构和canfestival,这部分代码需要重写。
这部分代码放在canfestival/src/driver.c中,主要实现以下功能:
/*can 初始化函数*/
unsigned char canInit(unsigned int bitrate);
/*can报文发送函数*/
unsigned char canSend(CAN_PORT notused, Message *m);
/*can报文接收函数*/
unsigned char canReceive(Message *m);
/*MCP2515 CAN报文接收中断回调函数,调用canReceive()*/
void mcp2515_interrupt_callback(unsigned int gpio, uint32_t events);
unsigned char canInit(unsigned int bitrate);
unsigned char canSend(CAN_PORT notused, Message * m);
unsigned char canReceive(Message * m);
这三个函数是canfestival CAN驱动调用函数,函数声明不能修改,需要使用微雪提供的源码适配canfestival。
void mcp2515_interrupt_callback(unsigned int gpio, uint32_t events); CAN报文接收中断函数,MCP2515 接收缓冲器0满后触发次中断函数,函数调用canReceive函数,接收CAN报文。代码如下:
void mcp2515_interrupt_callback(unsigned int gpio, uint32_t events)
{
  static Message m = Message_Initializer;		// contain a CAN message

  printf("mcp2515_interrupt_callback\n");
  canReceive(&m);
  canDispatch(&picoObj_Data, &m);
}
树莓派pico中断函数使用参考《raspberry-pi-pico-c-sdk.pdf》
3 timer定时器
定时器是canfestival的时基,canfestival中的所有软件定时器都是基于系统定时。此工程中的树莓派pico定时器代码如下:
static TIMEVAL last_time_set = TIMEVAL_MAX;


void TIMER_interrupt(void)
{

  hw_clear_bits(&timer_hw->intr, 1u << ALARM_NUM);

  last_time_set = timer_hw->timelr;
  // Assume alarm 0 has fired
  printf("TIMER_interrupt fired\n");
  TimeDispatch();                               // Call the time handler of the stack to adapt the elapsed time
}

void initTimer(void)
{

}

static uint64_t get_time(void) {
    // Reading low latches the high value
    uint32_t lo = timer_hw->timelr;
    uint32_t hi = timer_hw->timehr;
    return ((uint64_t) hi << 32u) | lo;
}

void setTimer(TIMEVAL value)
{
    // Enable the interrupt for our alarm (the timer outputs 4 alarm irqs)
    hw_set_bits(&timer_hw->inte, 1u << ALARM_NUM);
    // Set irq handler for alarm irq
    irq_set_exclusive_handler(ALARM_IRQ, TIMER_interrupt);
    // Enable the alarm irq
    irq_set_enabled(ALARM_IRQ, true);
    // Enable interrupt in block and at processor

    uint64_t target = timer_hw->timerawl + value;

    // Write the lower 32 bits of the target time to the alarm which
    // will arm it
    timer_hw->alarm[ALARM_NUM] = (uint32_t) target;
}

TIMEVAL getElapsedTime(void)
{
   unsigned int timer = timer_hw->timelr;            // Copy the value of the running timer
  if (timer > last_time_set)          // In case the timer value is higher than the last time.
    return (timer - last_time_set);   // Calculate the time difference
  else if (timer < last_time_set)
    return (last_time_set - timer);   // Calculate the time difference
  else
    return TIMEVAL_MAX;
}
4 对象字典
是通过canfestival自带的objdictgen工具生成CANopen对象字典。objdictgen使用需要安装python环境,参考方法如下:
objdictgen工具界面如下:
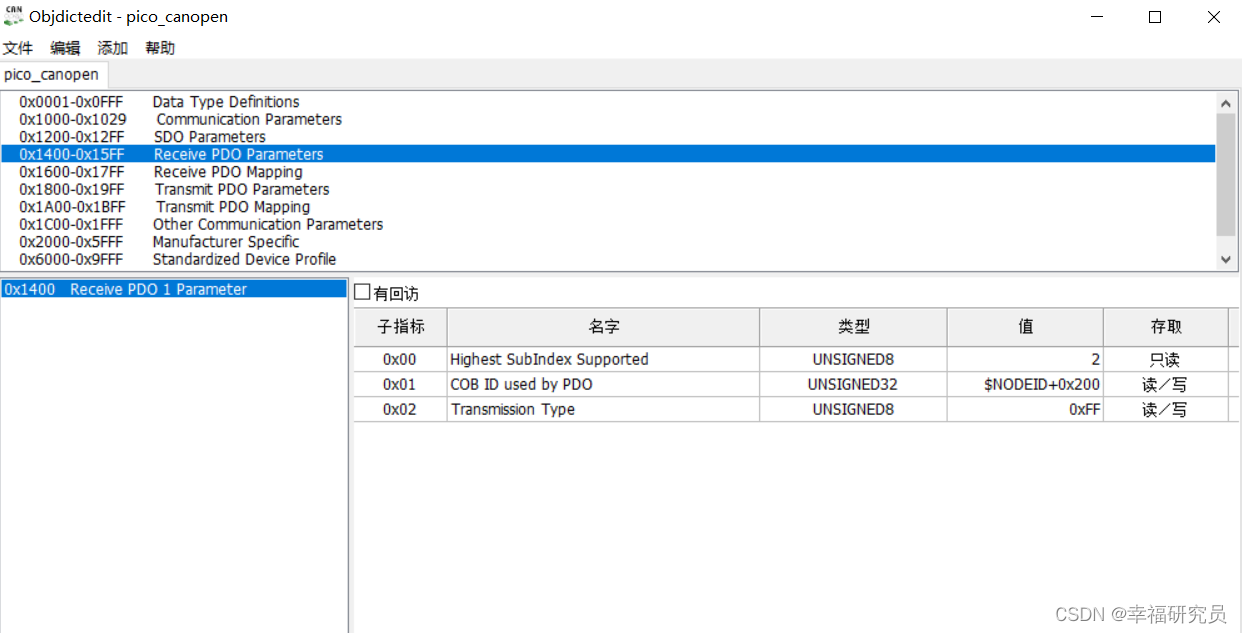
pico_canopen对象字典配置一个RPDO,传输类型是异步,配置一个TPDO ,传输类型是循环同步。
5 CMakeLists文件
pico 开发板的SDK是基于Cmake工具生成构建系统,工程主CMakeLists如下:
if (PICO_SDK_VERSION_STRING VERSION_LESS "1.4.0")
  message(FATAL_ERROR "Raspberry Pi Pico SDK version 1.4.0 (or later) required. Your version is ${PICO_SDK_VERSION_STRING}")
endif()

project(PicoCANopen C CXX ASM)

# Initialise the Raspberry Pi Pico SDK
pico_sdk_init()

# Add executable. Default name is the project name, version 0.1

add_executable(PicoCANopen PicoCANopen.c)

pico_set_program_name(PicoCANopen "PicoCANopen")
pico_set_program_version(PicoCANopen "0.1")

pico_enable_stdio_uart(PicoCANopen 0)
pico_enable_stdio_usb(PicoCANopen 1)

# added subdirectory
add_subdirectory(canfestival)
add_subdirectory(pico_can_driver)
add_subdirectory(ObjDict)


# Add the standard library to the build
target_link_libraries(PicoCANopen
        pico_stdlib)

# Add the standard include files to the build
target_include_directories(PicoCANopen PRIVATE
  ${CMAKE_CURRENT_LIST_DIR}
  ${CMAKE_CURRENT_LIST_DIR}/.. # for our common lwipopts or any other standard includes, if required
)

# Add any user requested libraries
target_link_libraries(PicoCANopen
                      libcanfestival
                      lib_objDict
                      lib_pico_can)

pico_add_extra_outputs(PicoCANopen)
三、 main 函数
main函数代码如下:
#include <stdio.h>
#include "pico/stdlib.h"
#include "can_pico.h"
#include "hardware/gpio.h"
#include "picoObj.h"
#include "canfestival.h"
#include "MCP2515.h"

static Message txMessge;
// static Message rxMessge;
unsigned char nodeID;
char *getCanopenState(e_nodeState state);
int main()
{
    stdio_init_all();

    const uint LED_PIN = PICO_DEFAULT_LED_PIN;
    gpio_init(LED_PIN);
    gpio_set_dir(LED_PIN, GPIO_OUT);

    sleep_ms(5000);
    canInit(0);
    // init irq;
    gpio_set_irq_enabled_with_callback(21, GPIO_IRQ_LEVEL_LOW | GPIO_IRQ_EDGE_FALL, true, &mcp2515_interrupt_callback);
    nodeID = 0x01;
    // Read node ID first
     setNodeId(&picoObj_Data, nodeID);
     setState(&picoObj_Data, Initialisation);	// Init the state
    while(1) {

        printf("CANopen state: %s\n",getCanopenState(picoObj_Data.nodeState));
        gpio_put(LED_PIN, 1);
        sleep_ms(500);
        gpio_put(LED_PIN, 0);
        sleep_ms(500);
    }
    return 0;
}
char *getCanopenState(e_nodeState state)
{
    switch (state)
   {
        case 0x00:    return ("Initialisation");
        case 0x01:    return ("Disconnected");
        case 0x02:    return ("Connecting");
        case 0x04:    return ("Stopped");
        case 0x05:    return ("Operational");
        case 0x7F:    return ("Pre_operational");
        case 0x0F:    return ("Unknown_state");
      default:
         return ("Unknown_state");
   }
}
实现的功能是设置启动CANopen通信,并且周期打印CANopen从站状态。
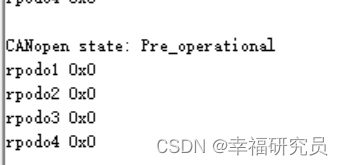
2 测试结果
CANopen 协议栈启动成功,bootup报文发送成功,CANopen状态是在 Pre_operational状态。
bootup报文如下:

串口助手打印CANopen从站状态:
总结
从测试结果看移植工作是成功的,后续继续测试PDO、NMT、SDO功能。


 1万+
1万+

 被折叠的 条评论
为什么被折叠?
被折叠的 条评论
为什么被折叠?
 到【灌水乐园】发言


