


前言
这篇教程,将教学如何完成游戏中大厅、音效、规则和分数等模块,如果你在我们的教程中遇到麻烦,可参考[文档]进行学习。
为了方便大家阅读,蓝色文字为跳转链接,统一放在文末,敬请留意!
准备开发环境
Cocos Creator 2.1.2
Visual Studio Code
文档
Node and Component
Script Development Guid
AudioEngine
Scheduler
API
Node
AudioEngine
Scheduler
我们开始吧
1. 了解并使用 AudioEngine
在 Cocos Creator 中,有两套音频播放系统,它们分别是 AudioEngine 和 AudioSource 。目前大多数开发者都在使用 AudioEngine ,因为它相比 AudioSource 拥有更加丰富的功能。
在 Cocos Creator2.1.2 版本中,目前支持 4 种音频播放格式,分别是:MP3、OGG、WAV、M4A,这个信息记录在 引擎源码 downloader.js 中。

Cocos Creator 支持两种音频加载模式:Web Audio 和 Dom Audio,引擎默认选择 Web Auido 模式。可以在编辑器中选中某个音频文件然后在右上角更改它的音频加载模式。

我们暂时不用了解这些音频格式的优缺点,也不用知道这两种加载模式的区别。目前一般情况下我们使用 MP3 格式并选择 Web Audio 模式,这足以应付大多数游戏项目。
1.1 使用 AudioEngine:
我们可以使用 cc.audioEngine 来访问 AudioEngine 模块,并使用它的各个接口来实现对游戏音频的控制。
首先,在项目上创建一个脚本:SoundManager.js,并将它添加到 Canvas节点下面。它将会负责游戏的控制。在 CocosCreator 中,音频资源被封装成 AudioClip 资源,所以如果想给 SoundManager.js 添加一个背景音频资源属性,应该这样添加代码:
cc.Class({ extends: cc.Component, properties: { backGroupSound: { default: null, type: cc.AudioClip } }});保存代码之后,回到编辑器上,我们会看到一个类型为 AudioClip 的属性框,并且框中没有任何东西。我们将游戏背景音乐 “game_music.mp3” 文件拖入名为 “backGroupSound” 的属性框中,这样就完成了一个音频资源的添加。

通过查阅 AudioEngine 的 API 之后,我们了解到可以使用 play 方法来播放指定的 AudioClip 资源,使用示范如下:
var audioId = cc.audioEngine.play(audioClip, loop, volume);这句示范代码中,audioId 是由 cc.audioEngine.play 函数返回的音频播放实例的 ID,每播放一次,这个 ID 都会改变一次,相当于是每个音频实例的标签。audioClip 是指定的音频资源,只有满足上述4种音频格式的资源能被播放。loop 指的是是否循环播放。volume 就是播放的音量大小。
了解这些之后,我们可以正式使用 audioEngine 了。
loop 与 volume 应该能够被随时调整,所以我们不再将它硬编码到程序中。我们将它添加到 properties 中,这样不仅可以在编辑器上调整,就算游戏过程中也可以用代码控制。
properties: { backGroupSound: { default: null, type: cc.AudioClip }, loop: true, soundVolume: { default: 1, range: [0,1,0.1], slide: true, }, audioClipPool: { default: [], type: cc.AudioClip }, _isPlaying: false, _audioId: null, _EffectId: null, },添加完成之后的属性检查器界面是这样的(看起来还不错):

大家如果对属性检查器参数还不太了解,可以参考下这个文档[属性检查器参数]。在代码中 audioClipPool 这个参数用于记录游戏中需要用到的所有 AudioClip 资源,它能够方便我们随时播放任意一个音频。
_isPlaying用于记录当前背景音乐是否正在播放。在audioEngine中每个音频播放实例也会记录自身的播放状态,但是它并不是全局音乐的播放状态,所以我们仍然需要一个用于代表全局音乐状态的标签。_audioId 和 _EffffectId 分别是背景音乐和游戏音效的音频播放实例的 ID。
接下来,我们应该让音乐播放了。
// SoundManager.js codeplayBackGroupSound () { cc.audioEngine.stopAll(); this._audioId = cc.audioEngine.play(this.backGroupSound, this.loop, this.soundVolume);}因为 AudioEngine 播放音频资源时不会暂停当前的音频,所以 playBackGroupSound 这个方法在播放背景音乐之前会把所有音乐都先暂停一次,确保不会出现奇怪的声音。随后调用了 play 方法按照我们指定的资源、循环方式和音量大小播放了背景音乐。我们在 Game.js 执行这句方法试试:
this.node.getComponent("SoundManager").playBackGroupSound();执行之后,却无法播放声音的朋友不用担心,这是因为谷歌浏览器内核规定只有进行有效的界面交互之后,才能播放声音,也就是说我们可以创建一个开始游戏的按钮,当点击按钮之后执行播放代码,就能正常播放音频了。我们可以在 initEventListener 方法中找到点击事件的监听回调,将这句代码添加进去测试以下是否正确:
this.node.on(cc.Node.EventType.TOUCH_START, (event)=>{ //audioEngine play function test this.node.getComponent("SoundManager").playBackGroupSound();},this);```另外我们还设计了一个通过传递不同的指令播放不同的音频的方法:
playEffectSound (command, loop) { if (loop === null && loop === undefined) { var loop = loop; } if (command !== null || command !== undefined) { switch (command) { case "begin": case "score": this._EffectId = cc.audioEngine.playEffect(this.audioClipPool[0], loop); break; case "pass": this._EffectId = cc.audioEngine.playEffect(this.audioClipPool[1], loop); break; case "hit": this._EffectId = cc.audioEngine.playEffect(this.audioClipPool[2], loop); break; case "lose": this._EffectId = cc.audioEngine.playEffect(this.audioClipPool[3], loop); break; case "second": this._EffectId = cc.audioEngine.playEffect(this.audioClipPool[4], loop); break; case "click": this._EffectId = cc.audioEngine.playEffect(this.audioClipPool[5], loop); break; default: console.error("Command is invalid"); } } },比如我们可以给锤子的点击事件添加声效。我们可以在 onHammerClicked 方法中加入以下代码,默认播放 “no_hit.mp3” :
this.node.getComponent("SoundManager").playEffectSound("hit");并且当它满足 if 语句中的条件时,就会播放另一种音效 “second_music.mp3” :
this.node.getComponent("SoundManager").playEffectSound("score");1.2 补充音频控制方法:
在游戏过程中我们往往需要暂停或恢复背景音乐,调整音量大小。所以我们需要补充这两个方法。首先是暂停音乐,我们可以直接使用 stopAll 这个方法来暂停游戏中的所有音频,但是他也会把游戏中的音效暂停掉。另外我们也可以使用 stop 这个方法来暂停指定音频播放实例 ID 的音频。在当前的项目中,我们选择直接使用 stopAll,因为我们的音效都是一些简单的音效,暂停它不会影响游戏。
// SoundManager.js codestopAll () { cc.audioEngine.stopAll(); this._audioId = null; }// test in Game.js codethis.node.getComponent("SoundManager").stopAll();另外我们可以使用 setVolume 这个方法来控制背景音乐音量:
// SoundManager.js codesetVolume(value) { if (!isNaN(value)) { this.soundVolume = value; cc.audioEngine.setVolume(value); } },我们在屏幕点击事件回调中测试一下:
///test in Game.js codethis.node.on(cc.Node.EventType.TOUCH_START, (event)=>{ //audioEngine setVolume function test this.node.getComponent("SoundManager").setVolume(0); this.node.getComponent("SoundManager").playBackGroupSound();},this);这样执行代码之后,背景音乐就不能发出声音了。另外,我们也添加了暂停与恢复的方法,如下:
// SoundManager.js code pauseMusic () { cc.audioEngine.pauseAll(); }, resumeMusic () { cc.audioEngine.resumeAll(); },综上,就是一个简单的游戏音频控制模块的脚本了。
2、制作游戏大厅界面
每个游戏都需要一个游戏大厅界面,游戏大厅界面作为游戏的第一个界面,不仅可以引导用户、介绍规则、设置游戏,还可以添加多种游戏活动为游戏增加活力并给游戏开发者带来收益。所以一个优秀的游戏大厅至关重要。
2.1 添加图片和 UI 组件
找到位于 assets/res/texture 下的 “hall.png” 图片,它是大厅界面的背景图片资源。我们将它拖到 Game 场景中并设置 position 为:(0,0),之后添加 widget 组件,调整属性为如下所示:

widget 组件可以帮助我们适配不同的屏幕分辨率,建议所有背景图片都添加一个 widget 组件。随后,我们为大厅节点添加4个带有 Button 组件的子节点,分别是:
"Button Game Start":游戏开始按钮;
"Button Game Rule":游戏规则按钮;
"Button GitHub":游戏 GitHub 跳转按钮;
"Button Sound":音频开关按钮。

同时也要为这些按钮添加 widget 组件,让它们也可以适配不同的屏幕分辨率。这些按钮的位置布局请参考完整工程上的布局。当然,你也可以随意发挥。
在这个游戏的场景设计上,我们没有使用第二个场景来展示游戏登录,因为我们的游戏内容相对简单很多。如果大家的制作更加复杂的项目时,可以使用双场景架构,即一个场景负责游戏加载和登录,一个场景负责大厅和核心玩法。或者更好的办法。
因为大厅界面和核心玩法界面存在重叠,会出现点击穿透的问题,所以我们要先将核心玩法界面屏蔽掉,既将 ”Sp Game Bg“ 节点的属性检查器左上角的选项去掉。这样做的效果等同于 node.active =false; 这样做之后就可以随意点击大厅界面了。
2.2 为每个按钮添加点击回调
为子节点具有 Label 组件的按钮修改label字符串,并相应的修改它们的样式。之后我们开始为各个按钮添加点击回调函数。
2.2.1 为 "Button Game Start” 按钮添加点击回调函数
在 Game.js 代码中添加回调函数 onGamePlayButtonClicked,它的代码如下:
onGamePlayButtonClicked() { //播放背景音乐 this.node.getComponent("SoundManager").playBackGroupSound(); //控制游戏运行环节 cc.find("Canvas/Sp Hall Bg").active = false; cc.find("Canvas/Sp Game Bg").active = true; }之后回到编辑器上,为按钮添加回调函数,这样按钮在完成点击之后就会执行这个函数,下面的三个回调函数的添加也是采取相似的操作,我就不再示范了:

2.2.2 为 "Button Game Rule” 按钮添加点击回调函数
在 Game.js 代码中添加回调函数 onGameRuleButtonClicked,它的代码如下:
onGameRuleButtonClicked () { //播放通用点击音效 this.node.getComponent("SoundManager").playEffectSound("click", false); if (!this.gameRuleNode) { //创建显示游戏规则图片的节点 this.gameRuleNode = new cc.Node(); this.gameRuleNode.addComponent(cc.Sprite).spriteFrame = this.gameRule; this.node.addChild(this.gameRuleNode); } //调整游戏规则节点的不透明度 this.gameRuleNode.opacity = 255; },2.2.3 为 "Button GitHub” 按钮添加点击回调函数
在 Game.js 代码中添加回调函数 onGameGitHubButtonClicked,它的代码如下:
onGameGitHubButtonClicked () { //播放通用的点击音效 this.node.getComponent("SoundManager").playEffectSound("click", false); //判断当前环境是否浏览器环境,只在浏览器环境下执行 if (cc.sys.isBrowser) { //在新窗口打开游戏GitHub链接 cc.sys.openURL(this.gameGitHubUrl); } },2.2.4 为 "Button Sound” 按钮添加点击回调函数
在 Game.js 代码中添加回调函数 onSwitchMusicVolume,它的代码如下:
onSwitchMusicVolume (event) { //播放通用的点击音效 this.node.getComponent("SoundManager").playEffectSound("click"); //改变音频管理系统中的音频播放状态 this.node.getComponent("SoundManager")._isPlaying = !this.node.getComponent("SoundManager")._isPlaying; //根据当前音频播放状态变换按钮的显示图片并控制背景音频的播放 if (this.node.getComponent("SoundManager")._isPlaying) { event.target.getComponent(cc.Sprite).spriteFrame = this.icon.getSpriteFrame("sound_close"); this.node.getComponent("SoundManager").stopAll(); } else { event.target.getComponent(cc.Sprite).spriteFrame = this.icon.getSpriteFrame("sound_open"); this.node.getComponent("SoundManager").playBackGroupSound(); } },综上,我们已经完成了大厅的 UI 设计和相关按钮的点击回调。
3、增加游戏算分机制
游戏分数是对游戏成果的最佳体现,他最能激发玩家对游戏的渴望。而不同的游戏拥有不同的算分方式,打地鼠游戏的算分特点主要是每一只老鼠的算分方式都不一样,接下来我们来实现这个算分机制。
3.1 为每只老鼠设定算分函数
首先我们新建一个名为 “MouseManager” 的 JavaScript 脚本,将它添加到每一个 Sp Mouse 节点上。
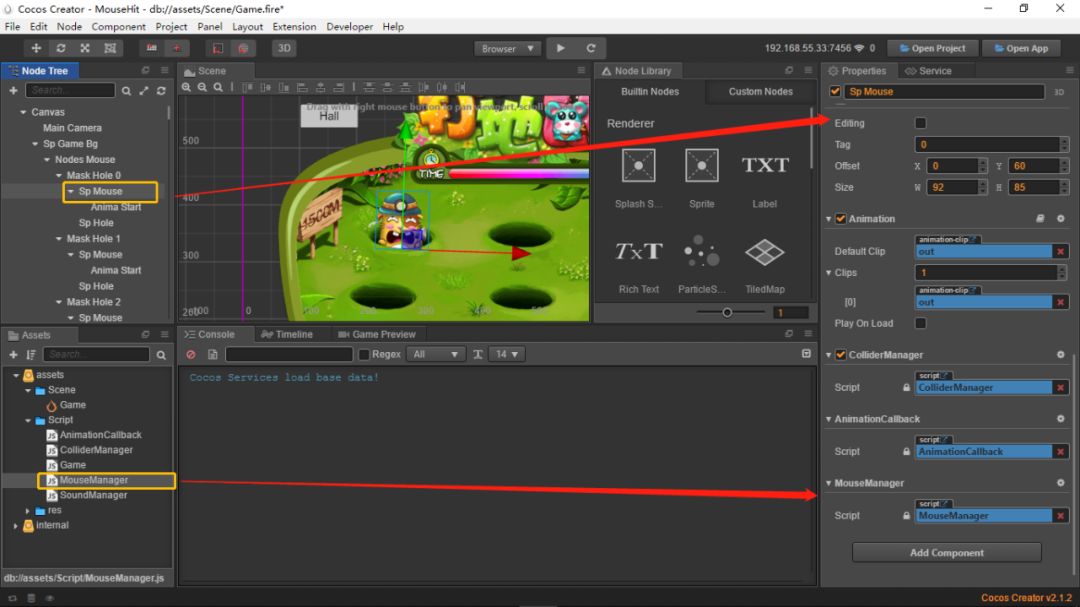
代码细节如下:
cc.Class({ extends: cc.Component, properties: { _isLive: false, //代表老鼠是否被击晕 _tag: null, //节点标签 },});每一只老鼠都有不同的名字,同样的也有不同的算分方式。我们可以在游戏初始化时,为每只老鼠设定它们独有的数据。可以参考下面的做法,我们需要在 Game.js 中创建一个 initGameData 函数,它会在start 回调中执行。不了解 start 生命周期回调的朋友,可以查看这篇文章[生命周期]。
initGameData () { //创建一个老鼠数据集合,并对每一个元素设定不同的老鼠名以及算分函数 this._mouseDataTable = [ { mouseName: "harmful_mouse_0", scoreUpdateFunc: function () { this._score += 100; } }, { mouseName: "harmful_mouse_1", scoreUpdateFunc: function () { this._score += 500; } }, { mouseName: "kind_mouse_0", scoreUpdateFunc: function () { if (this._score === 0) { this._score += 200; } else { this._score = Math.floor(this._score * 1.2); } } }, { mouseName: "kind_mouse_1", scoreUpdateFunc: function () { this._score -= 100; } }, { mouseName: "rabbit_0", scoreUpdateFunc: function () { this._score = Math.floor(this._score / 2); } } ]; },我们需要准确的知道每一只随机出现的老鼠的算分方式是什么,所以我们添加一个
updateMouseNodeInfo 函数来做这件事。它会在 initMouseOutEvent 函数中执行,当确定老鼠的类型之后,就会将当前类型的序号记录在老鼠节点上。
updateMouseNodeInfo(mouseNode, tag) { //设置当前老鼠节点为存活 mouseNode.getComponent("MouseManager")._isLive = true; //根据接收的老鼠类型序号绑定相应的算分函数 mouseNode._scoreUpdateFunc = this._mouseDataTable[tag].scoreUpdateFunc.bind(this); //将老鼠类型序号作为标签添加到老鼠节点上 mouseNode.getComponent("MouseManager")._tag = tag; },initMouseOutEvent () { if (this._mouseIndexArr.length === 0) { let mouseAmount = Math.ceil(Math.random() * (this.mouseNodes.childrenCount - 1)); if (mouseAmount === 0) { mouseAmount = 1; } for (let i = 0; i < 5; i++) { let randomNodeIndex = Math.ceil(Math.random() * (this.mouseNodes.childrenCount - 1)); let randomSpriteFrameIndex = Math.ceil(Math.random() * (this.animalAtlas.getSpriteFrames().length - 1)) if (this._mouseIndexArr.indexOf(randomNodeIndex) === -1) { var mouseNode = this.mouseNodes.children[randomNodeIndex].getChildByName("Sp Mouse"); //执行老鼠节点数据刷新函数 this.updateMouseNodeInfo(mouseNode, randomSpriteFrameIndex); mouseNode.getComponent(cc.BoxCollider).enabled = true; this._mouseIndexArr.push(randomNodeIndex); mouseNode.getComponent(cc.Sprite).spriteFrame = this.animalAtlas.getSpriteFrames()[randomSpriteFrameIndex]; mouseNode.getComponent(cc.Animation).play(); } } } },
我们还需要一个显示分数的 label,所以我们在 ”Sp Game Bg“ 节点下添加两个带有 Label 组件的节点,它们的position 可以参考完整项目的设计,但是你们也可以自由发挥。

接着将 “Lab Score Tittle” 节点拖到 Game.js 的 gameScore 属性框中。

我们每一次有效的击晕老鼠,都可以获得不同的分数。比如你击晕有害的老鼠就会加分,击晕了无害的老鼠就会减分,这样的设计十分有趣。当然我们也不能允许出现0以下的分数。所以我们在 onHammerClicked 函数中的加入这几句代码:
onHammerClicked () { this.hammerNode.angle = this.hammerNode.angle === 0 ? 30 : 0; this.node.getComponent("SoundManager").playEffectSound("hit"); if (this._mouseNode && this._mouseNode.getComponent("ColliderManager")._isCollider && this._mouseNode.getComponent("MouseManager")._isLive && cc.find("Canvas/Sp Game Bg")) { //播放得分音效 this.node.getComponent("SoundManager").playEffectSound("score"); //执行老鼠的算分函数刷新当前游戏分数 this._mouseNode._scoreUpdateFunc(); //判断当前分数是否低于0,如果低于零则重置为0 this._score = this._score < 0 ? 0 : this._score; //让游戏分数文本显示当前分数 this.gameScore.string = this._score; this._mouseNode.getComponent("MouseManager")._isLive = false; let oldSpriteFrameName = this._mouseNode.getComponent(cc.Sprite).spriteFrame.name; let newSpriteFrameName = oldSpriteFrameName + "_death"; this._mouseNode.getComponent(cc.Sprite).spriteFrame = this.animalDeathAtlas.getSpriteFrame(newSpriteFrameName); this._mouseNode.getChildByName("Anima Start").getComponent(cc.Animation).play(); } },保存代码,运行游戏,就可以看到当我们击晕老鼠时,右上角的分数就会开始变化了。
3.2 添加分数显示特效
为了丰富游戏表现,我们可以让每次击晕老鼠得分的动作都有一个得分的特效。首先我们添加一个节点 Nodes Score Effffect ,接着为它添加 5 个子节点,分别表示 5 种得分特效。它们所使用的资源是来自图集 “icon” 中的图片。我们默认让这 5 个子节点的 opacity 都设置为 0。之后将这个节点拖入 assets/res/prefab 中制作成 Prefab,然后将这个 prefab 拖入 Canvas/Sp Game Bg/Nodes Mouse 的每一个子节点中。

现在每一只随机出现的老鼠身上都会带着代表它类型的标签_tag,我们则可以通过这个标签来指定当前老鼠所处的老鼠洞所应该呈现的得分特效。我们可以添加一个 showScoreEffffectByTag 函数来做这件事。我们在 onHammerClicked 函数中执行这个函数就能看到效果。
showScoreEffectByTag (node, scoreEffectNode) { //node 接收 每个不同的老鼠节点,scroEffectNode 接收得分特效父节点 for (let i = 0; i < scoreEffectNode.childrenCount; i++) { //遍历得分特效父节点,只有节点次序与老鼠类型次序相吻合的节点会被显示,其余的隐藏。 scoreEffectNode.children[i].opacity = node.getComponent("MouseManager")._tag === i ? 255 : 0; //执行渐隐动作 scoreEffectNode.children[i].runAction(cc.fadeOut(1)); } },onHammerClicked () { this.hammerNode.angle = this.hammerNode.angle === 0 ? 30 : 0; this.node.getComponent("SoundManager").playEffectSound("hit"); if (this._mouseNode && this._mouseNode.getComponent("ColliderManager")._isCollider && this._mouseNode.getComponent("MouseManager")._isLive && cc.find("Canvas/Sp Game Bg")) { this.node.getComponent("SoundManager").playEffectSound("score"); this._mouseNode._scoreUpdateFunc(); // New add : 显示得分特效 this.showScoreEffectByTag(this._mouseNode, this._mouseNode.parent.getChildByName("Nodes Score Effect")); this._score = this._score < 0 ? 0 : this._score; this.gameScore.string = this._score; this._mouseNode.getComponent("MouseManager")._isLive = false; let oldSpriteFrameName = this._mouseNode.getComponent(cc.Sprite).spriteFrame.name; let newSpriteFrameName = oldSpriteFrameName + "_death"; this._mouseNode.getComponent(cc.Sprite).spriteFrame = this.animalDeathAtlas.getSpriteFrame(newSpriteFrameName); this._mouseNode.getChildByName("Anima Start").getComponent(cc.Animation).play(); } },4、加入游戏倒计时和结算机制
当前的游戏可以一直没有时间限制的玩下去,这显然是不合理的,这也会使得游戏无法停止、无法结算分数。
4.1 加入游戏开始倒计时
我们添加一个函数 startTimeRoller 来做这件事,这个函数的执行是由大厅界面上的 “Button GamePlay” 按钮触发的。现在我们可以将这个按钮所添加的回调函数中的注释代码反注释掉了。我们先来添加一个用于显示倒计时的节点。我们在 Canvas 下创建一个节点名为 Sp CountDown,为它添加 “icon”图集中与倒计时显示有关的图片。

将 Sp CountDown 节点拖到 assets/res/prefab 下制成 prefab 之后,将它拖入 Game.js 的 countDown 属性框中。我们还需要使用 CocosCreator 封装的定时器 Scheduler 来帮助我们实现倒计时功能,所以可以添加一个名为startTimeRoller 的函数来做这件事。
startTimeRoller () { //默认计数值 var times = 3; //启动定时器 this.schedule(()=> { //当计数值不为0时,会变换倒计时节点的图片 if (times !== 0) { if (!this.countDownNode) { //实例化倒计时节点的预制体 this.countDownNode = cc.instantiate(this.countDown); //添加倒计时节点到当前组件的节点下 this.node.addChild(this.countDownNode); } //显示倒计时节点 this.countDownNode.getChildByName("Sp Num").opacity = 255; //隐藏倒计时节点中的游戏开始父节点 this.countDownNode.getChildByName("Nodes Start").opacity = 0; //根据当前计数值切换计时图片 let spriteFrameName = "num_" + times; this.countDownNode.getChildByName("Sp Num").getComponent(cc.Sprite).spriteFrame = this.icon.getSpriteFrame(spriteFrameName); //播放倒计时音效 this.node.getComponent("SoundManager").playEffectSound("second", false); } //当计数值为0时,也就是倒计时结束,则执行游戏开始逻辑 else { //隐藏倒计时节点中的计时子节点 this.countDownNode.getChildByName("Sp Num").opacity = 0; //显示倒计时节点中的游戏开始子节点 this.countDownNode.getChildByName("Nodes Start").opacity = 255; //播放游戏开始音效 this.node.getComponent("SoundManager").playEffectSound("begin", false); //倒计时节点执行渐隐动作 this.countDownNode.runAction(cc.fadeOut(1)); //开始游戏 this.startGame(); } //计数值自减 times--; }, 1, 3); },4.2 加入游戏结束倒计时:
在当前的 startTimeRoller 函数中,我们已经完整了游戏开始倒计时,我们可以在里面加入游戏结束倒计时。我们先添加一个游戏结束倒计时的精灵 Sp TimeRoller 。它使用的资源来自图集 time_roller 。
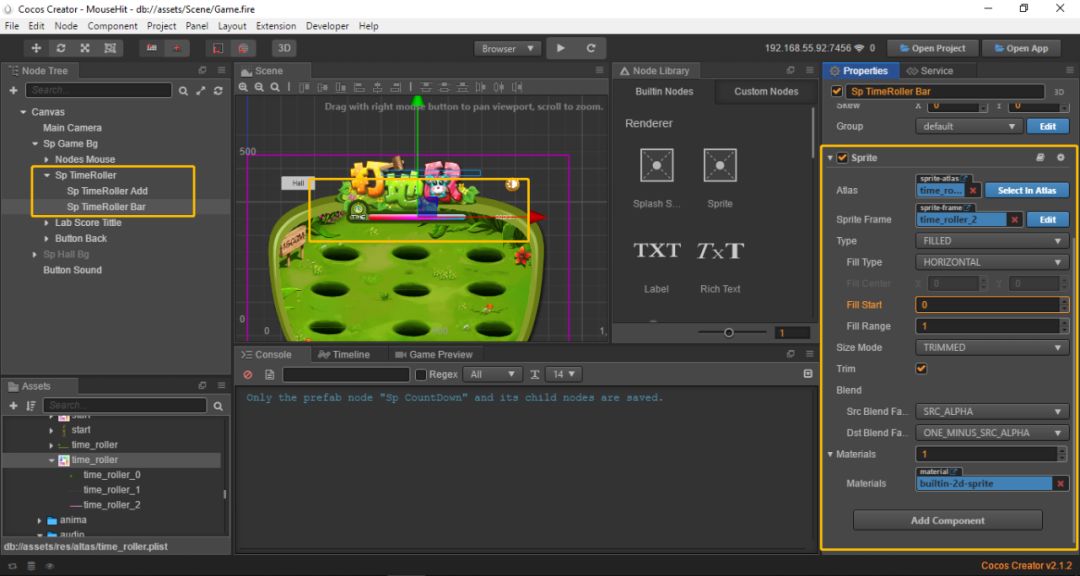
Sp TimeRoller 的子节点 Sp TimeRoller Bar 采用 FILLED 的渲染模式,它会使精灵按照当前的 fifillStart 与 fifill Range 的比例来决定显示图片的区域。我们选择 fifillType 为 horizontal,设置 fifillStart 为 0,fifillRange 为 1,这样就能很好的显示游戏结束倒计时。我们将 Sp TimeRoller Bar 添加到 Game.js 的 timeRollerBar 属性框中,之后开始补充 startTimeRoller 的代码。
startTimeRoller () { var times = 3; //重置游戏结束倒计时精灵的初始填充值 this.timeRollerBar.fillStart = 0; this.schedule(()=> { if (times !== 0) { if (!this.countDownNode) { this.countDownNode = cc.instantiate(this.countDown); this.node.addChild(this.countDownNode); } this.countDownNode.getChildByName("Sp Num").opacity = 255; this.countDownNode.getChildByName("Nodes Start").opacity = 0; let spriteFrameName = "num_" + times; this.countDownNode.getChildByName("Sp Num").getComponent(cc.Sprite).spriteFrame = this.icon.getSpriteFrame(spriteFrameName); this.node.getComponent("SoundManager").playEffectSound("second", false); } else { this.countDownNode.getChildByName("Sp Num").opacity = 0; this.countDownNode.getChildByName("Nodes Start").opacity = 255; this.node.getComponent("SoundManager").playEffectSound("begin", false); this.countDownNode.runAction(cc.fadeOut(1)); //开始游戏结束倒计时,this.timeRollerStep可控制倒计时频率 this.schedule(this.countDownScheduleCallBack, this.timeRollerStep); this.startGame(); } times--; }, 1, 3); },为游戏结束倒计时添加执行回调函数 countDownScheduleCallBack:
countDownScheduleCallBack () { //每次执行回调时倒计时精灵填充1% this.timeRollerBar.fillStart += 0.01; //当完全填充时游戏结束 if (this.timeRollerBar.fillStart === this.timeRollerBar.fillRange) { //关闭游戏结束倒计时计时器 this.unschedule(this.countDownScheduleCallBack); //关闭游戏监听事件 this.unEventListener(); }},当游戏结束时,可以判断当前分数是否满足当前游戏难度要求的分数。如果达不到要求,则算是输。如果达到要求,则算是赢。这个逻辑代码可以补充在 countDownScheduleCallBack 函数中。
countDownScheduleCallBack () { this.timeRollerBar.fillStart += 0.01; if (this.timeRollerBar.fillStart === this.timeRollerBar.fillRange) { this.unschedule(this.countDownScheduleCallBack); this.unEventListener(); //判断分数是否超过当前设定的游戏难度分,超过分数,执行 passGame 函数 if (this._score > this.gameDifficultScore) { this.passGame(); } //没超过,生成游戏失败界面 else { if (!this.gameOverNode) { this.gameOverNode = cc.instantiate(this.gameOver); this.node.addChild(this.gameOverNode); } //显示游戏失败界面 this.gameOverNode.opacity = 255; //游戏失败界面执行渐隐动作 this.gameOverNode.runAction(cc.fadeOut(1.5)); //执行 loseGame 函数 this.loseGame(); } //执行游戏完成函数 this.onFinishGameEvent(); } },passGame() { //播放游戏通过音效this.node.getComponent("SoundManager").playEffectSound("pass", false);},loseGame () { //播放游戏失败音效this.node.getComponent("SoundManager").playEffectSound("lose", false);},onFinishGameEvent () { //停止所有老鼠的动画 for (let i = 0; i < this.mouseNodes.childrenCount; i++) { this.mouseNodes.children[i].getChildByName("Sp Mouse").getComponent(cc.Animation).stop(); } //在2秒钟之后重新开始游戏 setTimeout(()=>{ cc.director.loadScene("Game"); },2000);}至此,我们已经制作完成了打地鼠游戏。如果你有任何问题可以在 issues 中提出你的问题,或者到论坛上提出问题, @337031709 来通知我。
参考链接
新项目的 GitHub 链接
https://github.com/Jno1995/MouseHit_New
完整项目的 GitHub 链接
https://github.com/Jno1995/MouseHit
生命周期
https://docs.cocos.com/creator/manual/en/scripting/life-cycle-callbacks.html?h=%E7%94%9F%E5%91%BD%E5%91%A8%E6%9C%9F
文档
https://docs.cocos.com/creator/manual/zh/
属性检查器参数
https://docs.cocos.com/creator/manual/zh/scripting/reference/attributes.html?h=%E5%B1%9E%E6%80%A7%E5%8F%82%E6%95%B0
issues
https://github.com/Jno1995/MouseHit/issues
论坛
https://forum.cocos.com/

Cocos 技术派 | 实时竞技小游戏技术分享
Cocos 技术派 |《野蛮人大作战》从开发到上线
Cocos 技术派 | Cocos Creator 2.0 摄像机的灵活运用
Cocos 技术派 | 重度小游戏《三国封魔传》技术实现方案
Cocos 技术派 | 3D 人物渲染详细教程
《我飞刀玩得贼6》性能优化案例分享
Cocos Creator v2.1.1 新增 3D 场景编辑
互动类游戏潜力大,这款插件让你1小时创造作品
畅销 SLG《乱世王者》深度优化方案
Cocos Service 全面解析
Cocos Creator 接入微信小游戏引擎插件指引


 1112
1112


 被折叠的 条评论
为什么被折叠?
被折叠的 条评论
为什么被折叠?
 到【灌水乐园】发言


