


在游戏中有二种方法构建地牢环境,第一种方法是手动创建并连接地牢空间,这种方法的优点是我们可以手动选择每个地牢空间中的内容。
第二种方法是程序化生成地牢空间,使用这种方法,我们不会对每个地牢空间的内容进行太多控制,但我们可以提高游戏的随机性。
本教程将展示如何使用Unity来程序化生成地牢环境。我们会使用Unity的Tilemap功能来生成多个地牢空间,并通过伪随机方法连接它们。然后构建演示游戏,我们会在游戏中尝试使用不同数量的地牢空间,敌人和障碍物。
学习准备
为了充分理解本教程,我们需要熟悉以下概念:
C#语言和面向对象的概念
Unity基础概念,例如:精灵,场景和预制件
我们提供本教程的源代码文件,你可以点击文末的[阅读原文]进行下载。
创建平铺地图
首先我们要为地牢空间创建Tilemap,然后在生成地牢后加载Tilemap,我们需要使用Unity提供的Tilemap生成功能。
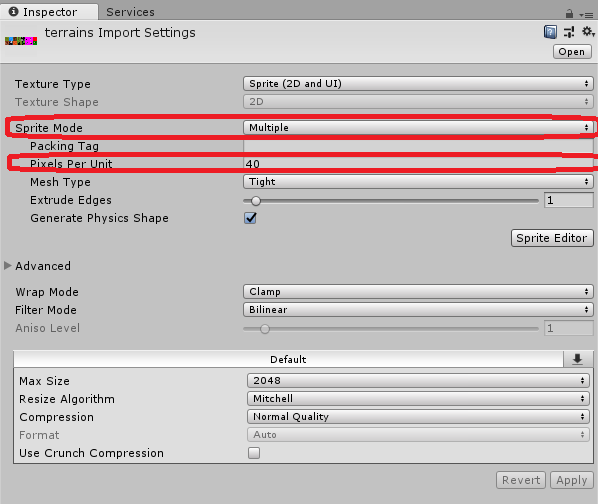
首先下载本教程的精灵,我们配置用于Tilemap的terrains精灵。我们把Pixels Per Unit设为40,确保瓦片以正确大小出现。然后我们把Sprite Mode设为Multiple,将其切分为多个独立瓦片。
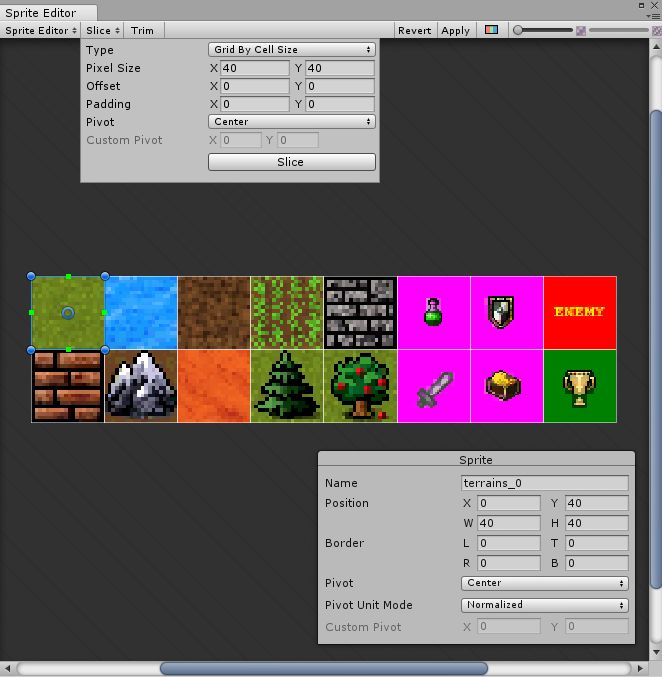
现在右键单击层级窗口,选择2D Object -> Tilemap。我们需要用terrains瓦片集来创建一个新的瓦片调色板,并将它保存在一个名为Tile Palettes的单独文件夹中。创建瓦片调色板后,我们将瓦片集拖到Tile Palette窗口。

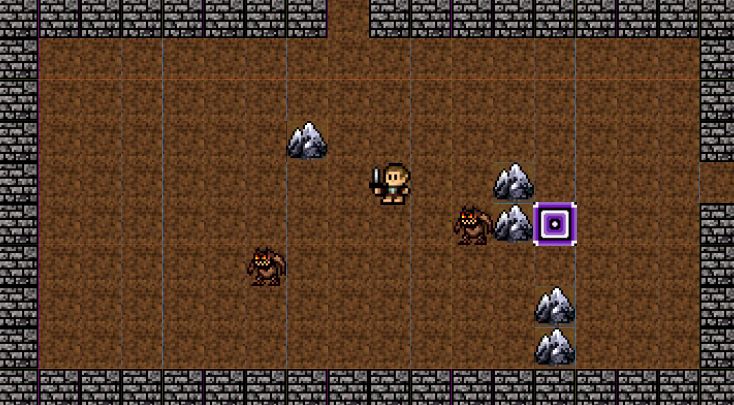
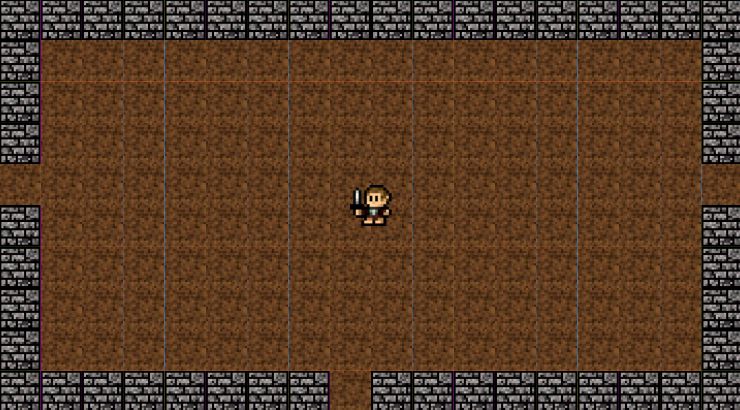
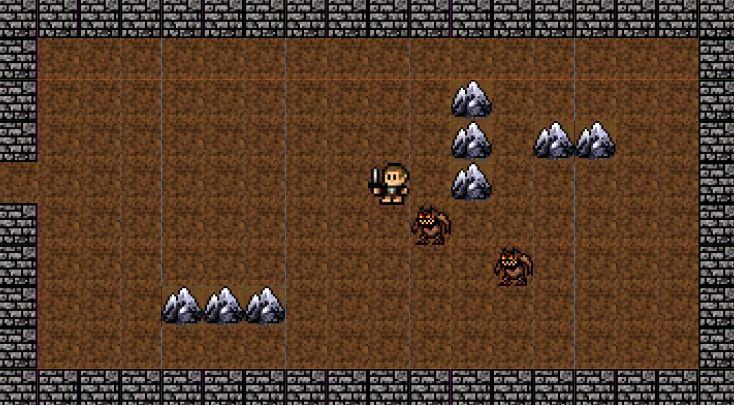
现在我们使用瓦片调色板,开始创建地牢空间的Tilemap,选中笔刷工具并使用合适的瓦片绘制Tilemap。绘制好完成后,我们得到了下图效果。

下一步是让地牢空间的墙体可以发生碰撞,同时地板瓦片不会发生碰撞。
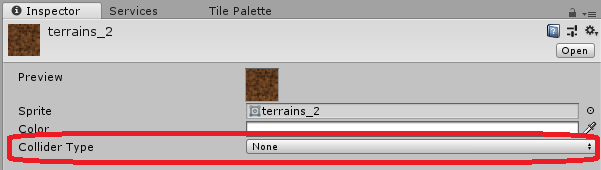
我们选中Tilemap对象并添加Tilemap Collider 2D组件,但这样会使所有瓦片都会发生碰撞。为了让地板瓦片无法碰撞,我们在Tile Palettes文件夹选中地板瓦片,把它的Collider Type改为None。

创建玩家对象和门预制件
我们已经创建了地牢空间,还需要制作地牢中移动的玩家和通向不同地牢空间的门。
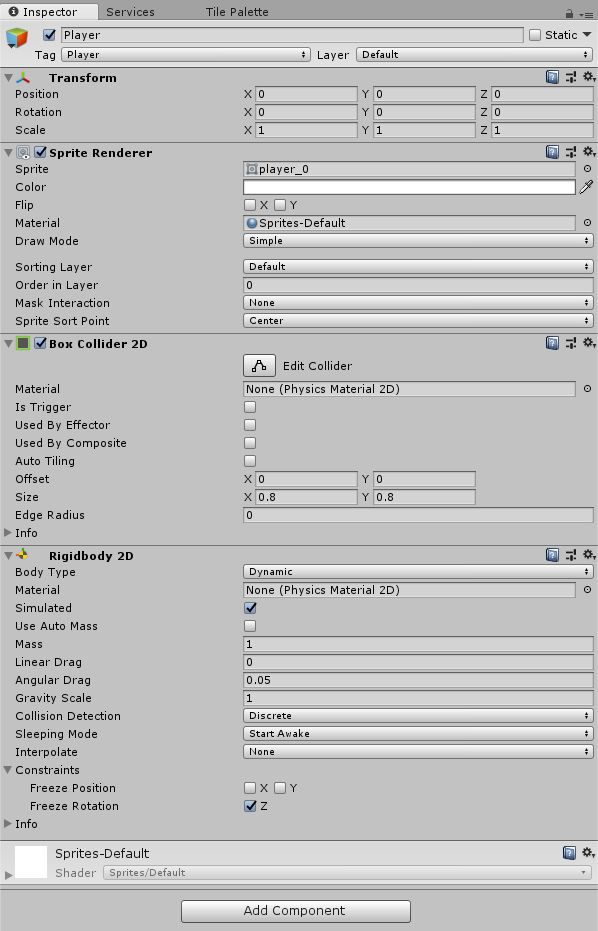
我们从创建玩家开始,首先在Sprites文件夹选中“player”精灵,把Pixels Per Unit设为30,Sprite Mode设为Multiple,然后切分预制件。我们使用该精灵创建新游戏对象,命名为player,给对象添加Box Collider 2D组件和Rigidbody 2D组件。下面我们需要对组件做调整。
我们不希望玩家在在与物体碰撞时旋转,因此要勾选Rigidbody 2D组件的Freeze Rotation。此外,我们需要减小碰撞体的大小,以便玩家可以穿过门,我们可以按照下图修改Box Collider 2D的Size属性。我们还需要创建“Player”标签,并把它指定给Player对象。
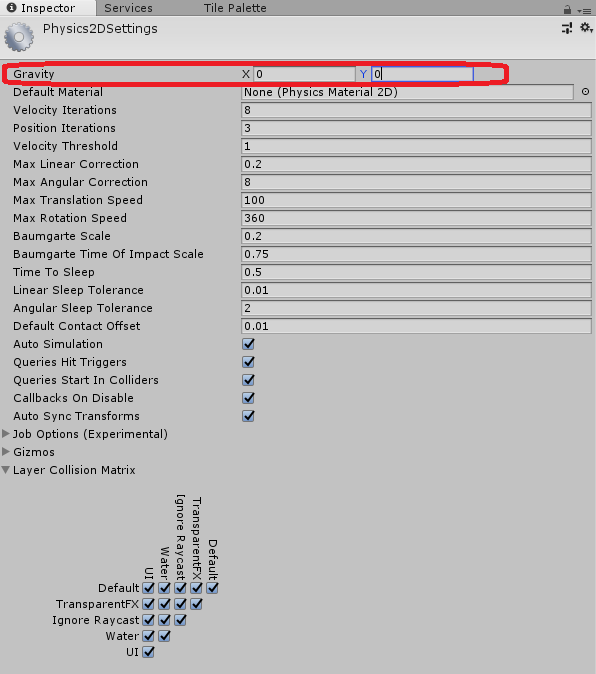
由于这是一个俯视角游戏,不需要任何重力效果,所以我们点击Edit -> Project Settings -> Physics2D中禁用重力,将Gravity的Y值改为0。
现在创建一个名为PlayerMovement脚本,并将其添加到Player对象上。该脚本只要能移动Player对象即可,所以该脚本需要speed属性作为SerializeField,我们在此实现了FixedUpdate方法来移动玩家。
为了实现移动效果,该脚本会获取水平方向和垂直方向的移动数值,并相应地更新速度。
using System.Collections;
using System.Collections.Generic;
using UnityEngine;
public class PlayerMovement : MonoBehaviour {
[SerializeField]
private float speed;
// 初始化
void Start () {
}
// Update每帧只调用一次
void FixedUpdate () {
float horizontal = Input.GetAxis ("Horizontal");
float vertical = Input.GetAxis ("Vertical");
GetComponent ().velocity = new Vector2 (horizontal * speed, vertical * speed);
}
}
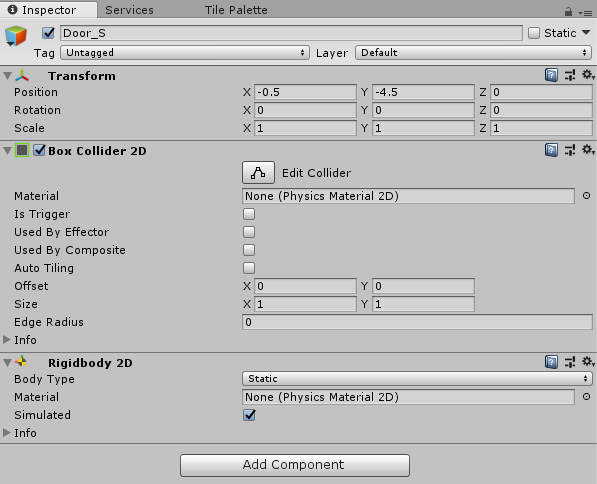
现在我们创建一个Door预制件,创建新游戏对象并命名为Door。该对象没有实际显示的精灵,只有用于碰撞的隐形精灵,为此我们需要给Door对象添加Box Collider 2D组件和Rigidbody 2D组件。
在Rigidbody 2D组件上,把Body Type设为Static。这会确保Door对象无法移动,并且能和Player对象碰撞。
创建好Door对象后,我们创建一个名为EnterDoor脚本,并将其添加到Door对象上。当Player对象碰到门口时,我们现在只会重新开始游戏,此后我们将使用它来连接地牢空间。
无论是什么功能,Door对象和Player对象之间的碰撞都会通过实现OnCollisionEnter2D方法来检测。使用这种方法,我们会检查碰撞对象是否为Player对象。如果是的,我们会重新开始Demo场景。
请注意,我们需要添加SceneManagement命名空间来重启场景。
using System.Collections;
using System.Collections.Generic;
using UnityEngine;
using UnityEngine.SceneManagement;
public class EnterDoor : MonoBehaviour {
void OnCollisionEnter2D(Collision2D col) {
if (col.gameObject.tag == "Player") {
SceneManager.LoadScene ("Demo");
}
}
}
现在我们测试游戏,保存场景为Demo场景并运行游戏。我们可以移动玩家,并在碰到门口时重启游戏。
地牢生成算法
现在我们已经有了游戏的基础对象Player和Door,接下来实现地牢生成算法。我们首先会创建名为Dungeon的空白对象,然后给该对象附加DungeonGeneration脚本。
地牢生成算法会按以下步骤生成地牢空间:
创建一个空白网格,用于保存地牢空间。
创建一个初始地牢空间,并将其保存到rooms_to_create列表。
当空间数量小于设定值“n”时,重复以下步骤:
a、在rooms_to_create列表选取第一个空间
b、添加该空间到对应位置的网格
c、创建随机数量的相邻空间,然后将这些空间添加到rooms_to_create列表
连接相邻空间。
地牢生成算法会在下面的GenerateDungeon方法中实现。
第一个空间的坐标在网格中央生成,地牢网格会在每条轴上以地牢空间的三倍数量初始化,这样可以确保所有地牢空间符合网格大小。然后第一次循环会通过上述步骤创建地牢空间,所有创建的空间都保存在“createdRooms”列表中。。
当所有空间都创建好后,脚本会迭代createdRooms列表来连接相邻空间。连接空间的具体过程是先迭代每个空间的相邻坐标,然后检查网格上该坐标是否存在空间。如果是的,算法会连接二个空间。
最后我们会确保地牢中有预期数量的空间,并让所有空间相互连通,每个空间都与前一个相邻空间连接。
using System.Collections;
using System.Collections.Generic;
using UnityEngine;
using UnityEngine.Tilemaps;
public class DungeonGeneration : MonoBehaviour {
[SerializeField]
private int numberOfRooms;
private Room[,] rooms;
void Start () {
this.currentRoom = GenerateDungeon ();
}
private Room GenerateDungeon() {
int gridSize = 3 * numberOfRooms;
rooms = new Room[gridSize, gridSize];
Vector2Int initialRoomCoordinate = new Vector2Int ((gridSize / 2) - 1, (gridSize / 2) - 1);
Queue roomsToCreate = new Queue ();
roomsToCreate.Enqueue (new Room(initialRoomCoordinate.x, initialRoomCoordinate.y));
List createdRooms = new List ();
while (roomsToCreate.Count > 0 && createdRooms.Count < numberOfRooms) {
Room currentRoom = roomsToCreate.Dequeue ();
this.rooms [currentRoom.roomCoordinate.x, currentRoom.roomCoordinate.y] = currentRoom;
createdRooms.Add (currentRoom);
AddNeighbors (currentRoom, roomsToCreate);
}
foreach (Room room in createdRooms) {
List neighborCoordinates = room.NeighborCoordinates ();
foreach (Vector2Int coordinate in neighborCoordinates) {
Room neighbor = this.rooms [coordinate.x, coordinate.y];
if (neighbor != null) {
room.Connect (neighbor);
}
}
}
return this.rooms [initialRoomCoordinate.x, initialRoomCoordinate.y];
}
}
我们使用Room类来创建地牢网格,我们还使用了AddNeighbors方法把相邻空间添加到“rooms_to_create”列表,因此我们要实现AddNeighbors方法。
AddNeighbors方法首先会检查哪些相邻坐标可以拥有地牢空间。只有在位置没有被其它地牢空间占用时,该位置的坐标才可以使用。在找到可用坐标后,随机数量的可用坐标会添加到“rooms_to_create”列表。
为了创建空间,我们会随机选取其中的一个相邻空间。
private void AddNeighbors(Room currentRoom, Queue roomsToCreate) {
List neighborCoordinates = currentRoom.NeighborCoordinates ();
List availableNeighbors = new List ();
foreach (Vector2Int coordinate in neighborCoordinates) {
if (this.rooms[coordinate.x, coordinate.y] == null) {
availableNeighbors.Add (coordinate);
}
}
int numberOfNeighbors = (int)Random.Range (1, availableNeighbors.Count);
for (int neighborIndex = 0; neighborIndex < numberOfNeighbors; neighborIndex++) {
float randomNumber = Random.value;
float roomFrac = 1f / (float)availableNeighbors.Count;
Vector2Int chosenNeighbor = new Vector2Int(0, 0);
foreach (Vector2Int coordinate in availableNeighbors) {
if (randomNumber < roomFrac) {
chosenNeighbor = coordinate;
break;
} else {
roomFrac += 1f / (float)availableNeighbors.Count;
}
}
roomsToCreate.Enqueue (new Room(chosenNeighbor));
availableNeighbors.Remove (chosenNeighbor);
}
}
现在让我们创建Room类。Room类不属于MonoBehaviour,它只是一个常规类,所以我们需要在DungeonGeneration脚本中创建它的构造函数和方法,即NeighborCoordinates和Connect方法。
构造函数很简单,它只需要初始化空间坐标和带有相邻信息的字典即可。我们将使用字典而不是列表,因为我们希望将每个相邻空间与其方向相关联起来。
using System.Collections.Generic;
using UnityEngine;
using UnityEngine.Tilemaps;
public class Room
{
public Vector2Int roomCoordinate;
public Dictionary neighbors;
public Room (int xCoordinate, int yCoordinate)
{
this.roomCoordinate = new Vector2Int (xCoordinate, yCoordinate);
this.neighbors = new Dictionary ();
}
public Room (Vector2Int roomCoordinate)
{
this.roomCoordinate = roomCoordinate;
this.neighbors = new Dictionary ();
}
NeighborCoordinates方法将返回当前空间的所有相邻空间坐标。每个空间在四个方向都有一个相邻空间:北边、东边、南边,西边。此顺序很重要,因为顺序是游戏中初始化空间的必要信息。
public List NeighborCoordinates () {
List neighborCoordinates = new List ();
neighborCoordinates.Add (new Vector2Int(this.roomCoordinate.x, this.roomCoordinate.y - 1));
neighborCoordinates.Add (new Vector2Int(this.roomCoordinate.x + 1, this.roomCoordinate.y));
neighborCoordinates.Add (new Vector2Int(this.roomCoordinate.x, this.roomCoordinate.y + 1));
neighborCoordinates.Add (new Vector2Int(this.roomCoordinate.x - 1, this.roomCoordinate.y));
return neighborCoordinates;
}
最后,Connect方法会检查空间的方向,并添加空间和方向到neighbors字典中。
public void Connect (Room neighbor) {
string direction = "";
if (neighbor.roomCoordinate.y < this.roomCoordinate.y) {
direction = "N";
}
if (neighbor.roomCoordinate.x > this.roomCoordinate.x) {
direction = "E";
}
if (neighbor.roomCoordinate.y > this.roomCoordinate.y) {
direction = "S";
}
if (neighbor.roomCoordinate.x < this.roomCoordinate.x) {
direction = "W";
}
this.neighbors.Add (direction, neighbor);
}
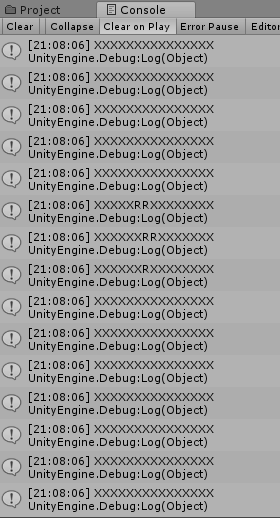
为了测试地牢是否正确生成,我们将实现PrintGrid方法,它会将空间网格显示为字符串。
private void PrintGrid() {
for (int rowIndex = 0; rowIndex < this.rooms.GetLength (1); rowIndex++) {
string row = "";
for (int columnIndex = 0; columnIndex < this.rooms.GetLength (0); columnIndex++) {
if (this.rooms [columnIndex, rowIndex] == null) {
row += "X";
} else {
row += "R";
}
}
Debug.Log (row);
}
}
现在,返回到DungeonGeneration脚本,我们在其Start方法中调用了GenerateDungeon方法。创建地牢后,我们会输出地牢的字符串以供测试。
void Start () {
GenerateDungeon ();
PrintGrid ();
}
现在,我们可以尝试使用给定参数来运行游戏,并检查游戏是否正常工作。
连通地牢空间
现在生成了地牢网格,我们需要在游戏中实例化地牢空间的Tilemap,首先我们需要为所有可用空间创建Tilemap。
我们把已有的空间保存到Resources文件夹中,保存到Resources文件夹很重要,因为我们需要在运行时实例化空间。现在我们需要为所有空间做同样的处理,建议下载教程源代码素材,并从素材的Resources文件夹复制地牢空间的内容,因为制作所有空间需要一些时间。
每个可用相邻空间的配置都需要一个地牢空间,所以一共有15个可用空间。空间名称应该按照“Room_NESW”的格式命名,“NESW”表示空间的相邻位置,即北边,东边,南边,西边。
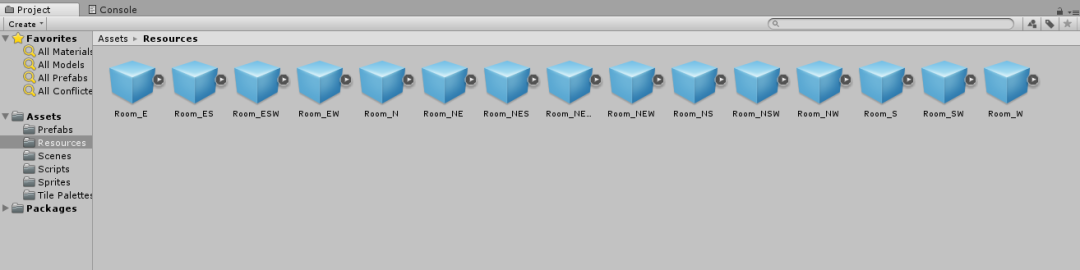
这样我们可以在Room类添加PrefabName方法,该方法会返回当前空间的Room预制件名称。由于NeighborCoordinates方法会以正确顺序返回相邻位置,因此由PrefabName返回的名称,会匹配我们打算实例化的预制件名称。
public string PrefabName () {
string name = "Room_";
foreach (KeyValuePair neighborPair in neighbors) {
name += neighborPair.Key;
}
return name;
}
最后我们更新DungeonGeneration脚本的Start方法,从而实例化该地牢空间的预制件。生成地牢后,它会返回初始地牢空间。然后脚本会从Resources文件夹加载并实例化预制件。
void Start () {
this.currentRoom = GenerateDungeon ();
string roomPrefabName = this.currentRoom.PrefabName ();
GameObject roomObject = (GameObject) Instantiate (Resources.Load (roomPrefabName));
}
现在运行游戏并检查脚本是否实例化正常的空间。尝试多次运行游戏,注意观察初始空间是否有变化。
现在我们实例化Room预制件并命名为预制件名称,下面开始制作连通各个空间的门。我们要重启Demo场景,把其它空间用作当前空间,然而我们不想重新生成地牢,所以我们需要使Dungeon对象保持不变,这样我们确保始终得到相同的地牢。
我们通过在Awake方法中调用DontDestroyOnLoad,这样在我们重启场景时,Dungeon对象不会被销毁。但是Unity仍会在场景启动时创建新的Dungeon对象,因此我们要保存第一个DungeonGeneration实例为一个静态属性,它会在Awake方法首次被调用时设置。
我们还要在该方法中生成地牢,如果实例已经设置好,我们会仅实例化当前空间的预制件,然后删除新建的Dungeon对象。
void Awake () {
if (instance == null) {
DontDestroyOnLoad (this.gameObject);
instance = this;
this.currentRoom = GenerateDungeon ();
} else {
string roomPrefabName = instance.currentRoom.PrefabName ();
GameObject roomObject = (GameObject) Instantiate (Resources.Load (roomPrefabName));
Destroy (this.gameObject);
}
}
void Start () {
string roomPrefabName = this.currentRoom.PrefabName ();
GameObject roomObject = (GameObject) Instantiate (Resources.Load (roomPrefabName));
}
现在我们更新EnterDoor脚本,使它以新的当前空间来重启Demo场景。
我们需要在脚本中保存门口的方向,然后在OnCollisionEnter2D方法中,我们会访问neighbors字典来获取当前空间的合适方向,从而获取下一个空间。在找到下一个空间后,我们修改地牢中的当前空间,然后重启Demo场景。
using System.Collections;
using System.Collections.Generic;
using UnityEngine;
using UnityEngine.SceneManagement;
public class EnterDoor : MonoBehaviour {
[SerializeField]
string direction;
void OnCollisionEnter2D(Collision2D col) {
if (col.gameObject.tag == "Player") {
GameObject dungeon = GameObject.FindGameObjectWithTag ("Dungeon");
DungeonGeneration dungeonGeneration = dungeon.GetComponent ();
Room room = dungeonGeneration.CurrentRoom ();
dungeonGeneration.MoveToRoom (room.Neighbor (this.direction));
SceneManager.LoadScene ("Demo");
}
}
}
我们仍然需要在DungeonGeneration脚本实现CurrentRoom方法和MoveToRoom方法,以及Room对象中获取相邻空间的方法。
public void MoveToRoom(Room room) {
this.currentRoom = room;
}
public Room CurrentRoom() {
return this.currentRoom;
}
public Room Neighbor (string direction) {
return this.neighbors [direction];
}
最后为所有空间设置门的方向值,然后再次运行游戏,此时我们可以在空间之间移动。
添加障碍物
现在我们给地牢添加更多元素,首先从障碍物开始。障碍物是我们在空间特定部分的设置的瓦片,每个空间中将随机选中障碍物数量及其位置。
我们首先在Room类编写PopulateObstacles方法,该方法会把障碍物数量和可用障碍物大小做为参数。障碍物大小的数值类型为Vector2int,它会指定X轴和Y轴上的大小。
对于每个要创建的障碍物,该方法都会在可用范围内选取随机大小,然后在空间中寻找符合大小的可用区域。
为了记录空间中的可用坐标,我们会使用称为population的字符串矩阵。选取障碍物的区域后,我们会更新population矩阵。
private string[,] population;
public Room (int xCoordinate, int yCoordinate)
{
this.roomCoordinate = new Vector2Int (xCoordinate, yCoordinate);
this.neighbors = new Dictionary ();
this.population = new string[18, 10];
for (int xIndex = 0; xIndex < 18; xIndex += 1) {
for (int yIndex = 0; yIndex < 10; yIndex += 1) {
this.population [xIndex, yIndex] = "";
}
}
this.population [8, 5] = "Player";
}
public Room (Vector2Int roomCoordinate)
{
this.roomCoordinate = roomCoordinate;
this.neighbors = new Dictionary ();
this.population = new string[18, 10];
for (int xIndex = 0; xIndex < 18; xIndex += 1) {
for (int yIndex = 0; yIndex < 10; yIndex += 1) {
this.population [xIndex, yIndex] = "";
}
}
this.population [8, 5] = "Player";
}
public void PopulateObstacles (int numberOfObstacles, Vector2Int[] possibleSizes) {
for (int obstacleIndex = 0; obstacleIndex < numberOfObstacles; obstacleIndex += 1) {
int sizeIndex = Random.Range (0, possibleSizes.Length);
Vector2Int regionSize = possibleSizes [sizeIndex];
List region = FindFreeRegion (regionSize);
foreach (Vector2Int coordinate in region) {
this.population [coordinate.x, coordinate.y] = "Obstacle";
}
}
}
现在我们需要实现FindFreeRegion方法。该方法包含的循环会一直寻找随机区域,直到找到可用区域。
在循环的每次迭代中,它都会在瓦片的X轴坐标范围在2~15之间,Y轴坐标范围在2~7之间生成随机的中心瓦片,。通过使用这些坐标,我们使障碍物不会出现在空间的墙体上。
此后,脚本会根据障碍物大小计算剩余障碍物的坐标。最后,脚本会在while循环检查区域是否可用。如果不可用,它会再次迭代寻找另一个区域,直到找到可用区域。
private List FindFreeRegion (Vector2Int sizeInTiles) {
List region = new List();
do {
region.Clear();
Vector2Int centerTile = new Vector2Int(UnityEngine.Random.Range(2, 18 - 3), UnityEngine.Random.Range(2, 10 - 3));
region.Add(centerTile);
int initialXCoordinate = (centerTile.x - (int)Mathf.Floor(sizeInTiles.x / 2));
int initialYCoordinate = (centerTile.y - (int)Mathf.Floor(sizeInTiles.y / 2));
for (int xCoordinate = initialXCoordinate; xCoordinate < initialXCoordinate + sizeInTiles.x; xCoordinate += 1) {
for (int yCoordinate = initialYCoordinate; yCoordinate < initialYCoordinate + sizeInTiles.y; yCoordinate += 1) {
region.Add(new Vector2Int(xCoordinate, yCoordinate));
}
}
} while(!IsFree (region));
return region;
}
IsFree方法会迭代区域的所有坐标,检查population矩阵是否对所有坐标可用。
private bool IsFree (List region) {
foreach (Vector2Int tile in region) {
if (this.population [tile.x, tile.y] != "") {
return false;
}
}
return true;
}
现在,我们需要为每个空间调用PopulateObstacles方法,该方法将在连接空间后调用。在实例化空间预制件后,我们需要在Tilemap添加障碍物瓦片。因此,我们会相应地修改Awake和Start方法。
[SerializeField]
private TileBase obstacleTile;
void Awake () {
if (instance == null) {
DontDestroyOnLoad (this.gameObject);
instance = this;
this.currentRoom = GenerateDungeon ();
} else {
string roomPrefabName = instance.currentRoom.PrefabName ();
GameObject roomObject = (GameObject) Instantiate (Resources.Load (roomPrefabName));
Tilemap tilemap = roomObject.GetComponentInChildren ();
instance.currentRoom.AddPopulationToTilemap (tilemap, instance.obstacleTile);
Destroy (this.gameObject);
}
}
void Start () {
string roomPrefabName = this.currentRoom.PrefabName ();
GameObject roomObject = (GameObject) Instantiate (Resources.Load (roomPrefabName));
Tilemap tilemap = roomObject.GetComponentInChildren ();
this.currentRoom.AddPopulationToTilemap (tilemap, this.obstacleTile);
}
我们需要实现AddPopulationToTilemap方法,该方法会迭代population矩阵中的所有坐标,检查坐标是否是障碍物。如果是的,我们会在该坐标设置瓦片,使它显示为障碍物。
我们需要在(xIndex – 9, yIndex – 5)坐标设置瓦片,因为在population矩阵中,(0, 0)索引表示左下角,而在Tilemap中,(0, 0)表示地图中心。
public void AddPopulationToTilemap (Tilemap tilemap, TileBase obstacleTile) {
for (int xIndex = 0; xIndex < 18; xIndex += 1) {
for (int yIndex = 0; yIndex < 10; yIndex += 1) {
if (this.population [xIndex, yIndex] == "Obstacle") {
tilemap.SetTile (new Vector3Int (xIndex - 9, yIndex - 5, 0), obstacleTile);
}
}
}
}
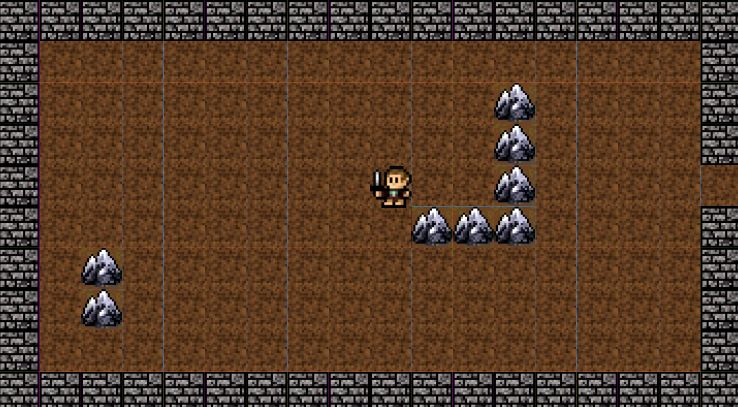
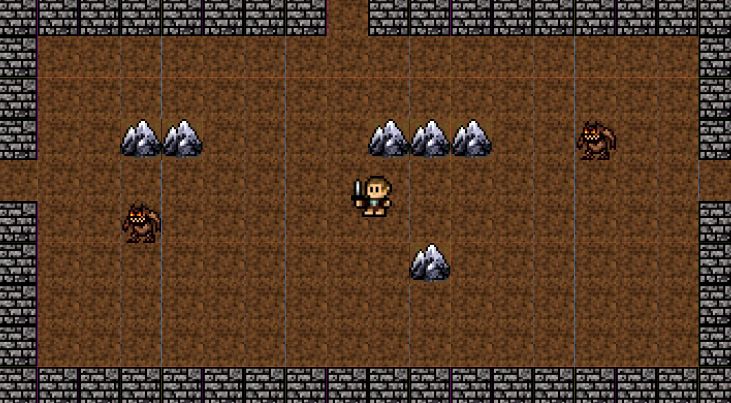
现在更新Dungeon对象,以设置新属性的值,例如:可能障碍物大小和障碍物瓦片。然后运行游戏,观察游戏是否正确地创建了障碍物。
添加敌人
添加敌人的方法类似添加障碍物,只不过敌人是预制件而不是瓦片,而且敌人总会是一个瓦片的大小。
我们首先添加PopulatePrefabs方法,它将使用敌人预制件来添加敌人到游戏中。该方法会迭代设定的预制件数量,并在每次迭代时从可用预制件中进行随机选取,然后找到大小为一个瓦片的可用区域,添加该区域到population矩阵。
在population矩阵中,我们会用预制件名称来识别预制件。然后通过名称来实例化预制件。我们使用了name2Prefab字典。该字典会用预制件名称作为索引,并返回其预制件。
private Dictionary name2Prefab;
public Room (int xCoordinate, int yCoordinate)
{
this.roomCoordinate = new Vector2Int (xCoordinate, yCoordinate);
this.neighbors = new Dictionary ();
this.population = new string[18, 10];
for (int xIndex = 0; xIndex < 18; xIndex += 1) {
for (int yIndex = 0; yIndex < 10; yIndex += 1) {
this.population [xIndex, yIndex] = "";
}
}
this.population [8, 5] = "Player";
this.name2Prefab = new Dictionary ();
}
public Room (Vector2Int roomCoordinate)
{
this.roomCoordinate = roomCoordinate;
this.neighbors = new Dictionary ();
this.population = new string[18, 10];
for (int xIndex = 0; xIndex < 18; xIndex += 1) {
for (int yIndex = 0; yIndex < 10; yIndex += 1) {
this.population [xIndex, yIndex] = "";
}
}
this.population [8, 5] = "Player";
this.name2Prefab = new Dictionary ();
}
public void PopulatePrefabs (int numberOfPrefabs, GameObject[] possiblePrefabs) {
for (int prefabIndex = 0; prefabIndex < numberOfPrefabs; prefabIndex += 1) {
int choiceIndex = Random.Range (0, possiblePrefabs.Length);
GameObject prefab = possiblePrefabs [choiceIndex];
List region = FindFreeRegion (new Vector2Int(1, 1));
this.population [region[0].x, region[0].y] = prefab.name;
this.name2Prefab [prefab.name] = prefab;
}
}
通过这种方法,我们可以更新AddPopulationToTilemap,把预制件添加到地图中。
当坐标不是障碍物,而且既不是空白坐标也不是玩家时,这表示我们需要为该坐标实例化一个预制件,我们会通过访问name2Prefab字典来实例化预制件。
public void AddPopulationToTilemap (Tilemap tilemap, TileBase obstacleTile) {
for (int xIndex = 0; xIndex < 18; xIndex += 1) {
for (int yIndex = 0; yIndex < 10; yIndex += 1) {
if (this.population [xIndex, yIndex] == "Obstacle") {
tilemap.SetTile (new Vector3Int (xIndex - 9, yIndex - 5, 0), obstacleTile);
} else if (this.population [xIndex, yIndex] != "" && this.population [xIndex, yIndex] != "Player") {
GameObject prefab = GameObject.Instantiate (this.name2Prefab[this.population [xIndex, yIndex]]);
prefab.transform.position = new Vector2 (xIndex - 9 + 0.5f, yIndex - 5 + 0.5f);
}
}
}
}
添加障碍物后,我们可以从GenerateDungeon调用PopulatePrefabs方法。
[SerializeField]
private int numberOfEnemies;
[SerializeField]
private GameObject[] possibleEnemies;
private Room GenerateDungeon() {
int gridSize = 3 * numberOfRooms;
rooms = new Room[gridSize, gridSize];
Vector2Int initialRoomCoordinate = new Vector2Int ((gridSize / 2) - 1, (gridSize / 2) - 1);
Queue roomsToCreate = new Queue ();
roomsToCreate.Enqueue (new Room(initialRoomCoordinate.x, initialRoomCoordinate.y));
List createdRooms = new List ();
while (roomsToCreate.Count > 0 && createdRooms.Count < numberOfRooms) {
Room currentRoom = roomsToCreate.Dequeue ();
this.rooms [currentRoom.roomCoordinate.x, currentRoom.roomCoordinate.y] = currentRoom;
createdRooms.Add (currentRoom);
AddNeighbors (currentRoom, roomsToCreate);
}
foreach (Room room in createdRooms) {
List neighborCoordinates = room.NeighborCoordinates ();
foreach (Vector2Int coordinate in neighborCoordinates) {
Room neighbor = this.rooms [coordinate.x, coordinate.y];
if (neighbor != null) {
room.Connect (neighbor);
}
}
room.PopulateObstacles (this.numberOfObstacles, this.possibleObstacleSizes);
room.PopulatePrefabs (this.numberOfEnemies, this.possibleEnemies);
}
return this.rooms [initialRoomCoordinate.x, initialRoomCoordinate.y];
}
我们还需要创建敌人预制件,在DungeonGeneration脚本中设置可用敌人。
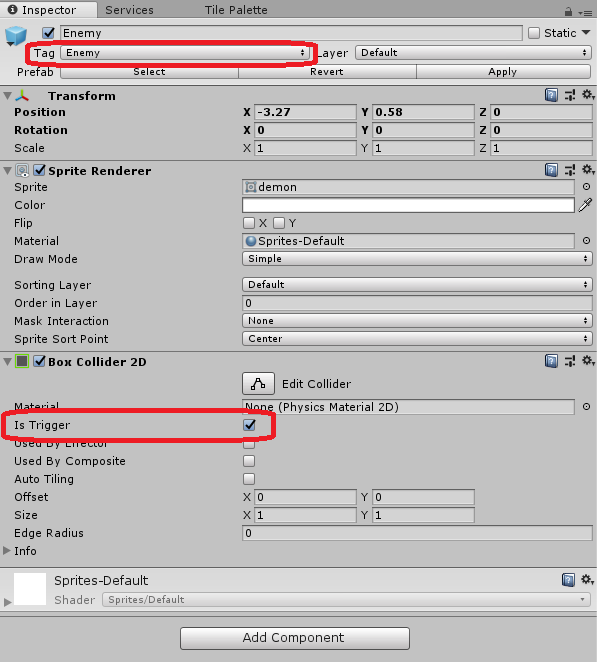
首先把Enemy精灵的Pixels Per Unit设为40,这样它在地图中不会显得太大。然后使用Enemy精灵创建新游戏对象,给对象添加BoxCollider2D组件。最后将Enemy对象设置“Enemy”标签,并将它保存为预制件。
现在,我们可以更新Dungeon对象,添加敌人数量和敌人预制件到DungeonGeneration脚本。运行游戏,检查敌人是否成功创建。
添加目标点
完成制作敌人后,我们需要一种实现通关的方式。接下来我们要在游戏中添加Goal对象,它始终会处于离起始位置最远的地牢空间,并且必须由玩家找到。当玩家碰到Goal对象时,便能完成游戏。
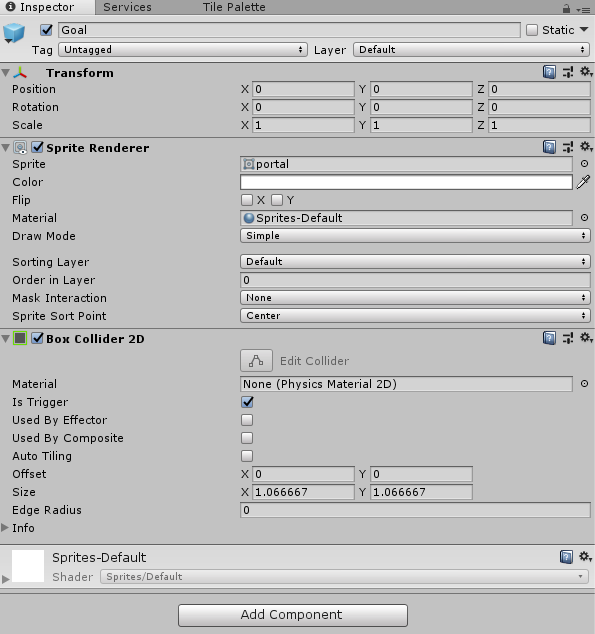
首先创建Goal预制件,我们要为Goal预制件使用Portal精灵。把Portal精灵的Pixels Per Unit改为30,并使用该精灵创建一个新对象。
正如制作敌人一样,我们需要给对象添加BoxCollider2D组件,然后将它设为触发器,最后保存对象为预制件。
现在修改DungeonGeneration脚本,使它在最远地牢空间创建Goal对象。
我们需要找到最远的空间。我们会在迭代createdRooms列表时找到最远的空间。在每个空间中,我们会计算它和初始空间的距离,保存最后的空间。
我们这个在循环外为最后的空间再次调用PopulatePrefabs,但此时要使用Goal预制件而不是Enemy预制件,我们只需要在空间内创建一个Goal对象。
[SerializeField]
private GameObject goalPrefab;
private Room GenerateDungeon() {
int gridSize = 3 * numberOfRooms;
rooms = new Room[gridSize, gridSize];
Vector2Int initialRoomCoordinate = new Vector2Int ((gridSize / 2) - 1, (gridSize / 2) - 1);
Queue roomsToCreate = new Queue ();
roomsToCreate.Enqueue (new Room(initialRoomCoordinate.x, initialRoomCoordinate.y));
List createdRooms = new List ();
while (roomsToCreate.Count > 0 && createdRooms.Count < numberOfRooms) {
Room currentRoom = roomsToCreate.Dequeue ();
this.rooms [currentRoom.roomCoordinate.x, currentRoom.roomCoordinate.y] = currentRoom;
createdRooms.Add (currentRoom);
AddNeighbors (currentRoom, roomsToCreate);
}
int maximumDistanceToInitialRoom = 0;
Room finalRoom = null;
foreach (Room room in createdRooms) {
List neighborCoordinates = room.NeighborCoordinates ();
foreach (Vector2Int coordinate in neighborCoordinates) {
Room neighbor = this.rooms [coordinate.x, coordinate.y];
if (neighbor != null) {
room.Connect (neighbor);
}
}
room.PopulateObstacles (this.numberOfObstacles, this.possibleObstacleSizes);
room.PopulatePrefabs (this.numberOfEnemies, this.possibleEnemies);
int distanceToInitialRoom = Mathf.Abs (room.roomCoordinate.x - initialRoomCoordinate.x) + Mathf.Abs(room.roomCoordinate.y - initialRoomCoordinate.y);
if (distanceToInitialRoom > maximumDistanceToInitialRoom) {
maximumDistanceToInitialRoom = distanceToInitialRoom;
finalRoom = room;
}
}
GameObject[] goalPrefabs = { this.goalPrefab };
finalRoom.PopulatePrefabs(1, goalPrefabs);
return this.rooms [initialRoomCoordinate.x, initialRoomCoordinate.y];
}
现在,在Goal预制件中添加一个名为ReachGoal的新脚本。
在该脚本中,我们只用实现OnTriggerEnter2D方法,并在玩家与Goal对象相碰时,调用DungeonGeneration脚本中的ResetDungeon方法,并重启Demo场景。
using System.Collections;
using System.Collections.Generic;
using UnityEngine;
using UnityEngine.SceneManagement;
public class ReachGoal : MonoBehaviour {
void OnTriggerEnter2D(Collider2D col) {
if (col.gameObject.tag == "Player") {
GameObject dungeon = GameObject.FindGameObjectWithTag ("Dungeon");
DungeonGeneration dungeonGeneration = dungeon.GetComponent ();
dungeonGeneration.ResetDungeon ();
SceneManager.LoadScene ("Demo");
}
}
}
最后,ResetDungeon方法会再次生成地牢。
public void ResetDungeon() {
this.currentRoom = GenerateDungeon ();
}
现在,设置DungeonGeneration脚本中的Goal预制件参数,再次运行游戏。我们现在可以在地牢中找到Goal对象,并重启Demo场景。
完成游戏
我们最后要实现的是,只有当空间内所有敌人被打败后,玩家才能离开空间或地牢。我们需要一种打败敌人的方法。
我们给Enemy预制件添加一个名为KillEnemy新脚本,该脚本会实现OnTriggerEnter2D方法。由于这只是一个演示游戏,所以敌人会在碰到玩家时自动销毁,你也可以在后续完善游戏中添加战斗过程。
using System.Collections;
using System.Collections.Generic;
using UnityEngine;
public class KillEnemy : MonoBehaviour {
void OnTriggerEnter2D(Collider2D col) {
if (col.gameObject.tag == "Player") {
Destroy (this.gameObject);
}
}
}
现在,我们修改EnterDoor和ReachGoal脚本,使它们在玩家离开空间或地牢前,检查剩余敌人数量。
首先从EnterDoor脚本开始,在OnCollisionEnter2D方法中,找到带有“Enemy”标签的对象。它会返回所找到对象的数组,如果数组长度为0,这表示所有敌人已被击败。这种情况下,我们会执行已有代码。否则,我们什么也不做。
using System.Collections;
using System.Collections.Generic;
using UnityEngine;
using UnityEngine.SceneManagement;
public class EnterDoor : MonoBehaviour {
[SerializeField]
string direction;
void OnCollisionEnter2D(Collision2D col) {
if (col.gameObject.tag == "Player") {
GameObject[] enemies = GameObject.FindGameObjectsWithTag ("Enemy");
if (enemies.Length == 0) {
GameObject dungeon = GameObject.FindGameObjectWithTag ("Dungeon");
DungeonGeneration dungeonGeneration = dungeon.GetComponent ();
Room room = dungeonGeneration.CurrentRoom ();
dungeonGeneration.MoveToRoom (room.Neighbor (this.direction));
SceneManager.LoadScene ("Demo");
}
}
}
}
然后,我们在ReachGoal脚本执行同样的检查,这意味着我们只有在空间没有任何敌人时才可以重启地牢。
using System.Collections;
using System.Collections.Generic;
using UnityEngine;
using UnityEngine.SceneManagement;
public class ReachGoal : MonoBehaviour {
void OnTriggerEnter2D(Collider2D col) {
if (col.gameObject.tag == "Player") {
GameObject[] enemies = GameObject.FindGameObjectsWithTag ("Enemy");
if (enemies.Length == 0) {
GameObject dungeon = GameObject.FindGameObjectWithTag ("Dungeon");
DungeonGeneration dungeonGeneration = dungeon.GetComponent ();
dungeonGeneration.ResetDungeon ();
SceneManager.LoadScene ("Demo");
}
}
}
}
现在运行游戏,我们只能在杀掉空间内所有敌人后,才可以离开空间或重启地牢。
小结
在Unity中程序化生成地牢环境游戏就大功告成了,我们希望你能喜欢本教程,
更多Unity教程,尽在Unity官方中文论坛(UnityChina.cn)。
原文来源:gamedevacademy.org
推荐阅读
在Unity中使用WFC算法无限生成城市
《莫塔之子》:如何使用程序化生成功能
使用Unity程序化方法制作游戏动画
创建程序化的游戏世界
伴随Simplex噪声的GPU粒子动画
使用AR Foundation制作圣诞AR小游戏
AR Foundation已支持LWRP 4.8.0-preview
Unity 2D开发挑战赛获奖名单
官方活动
Unite Shanghai 2019
5月10日-12日上海,Unite大会强势回归。技术门票正在热销中,购票即获指定Asset Store资源商店精品21款资源的5折优惠券。
了解Training Day开发者训练营课程内容,请点击此处。
Unite大会Made with Unity作品招募,请点击此处。
Unite大会案例分享专场演讲席位招募,请点击此处。
购票请访问:Unite2019.csdn.net


 620
620


 被折叠的 条评论
为什么被折叠?
被折叠的 条评论
为什么被折叠?
 到【灌水乐园】发言


