


今天我们将学习在python中使用opencv制作迷宫解谜器。
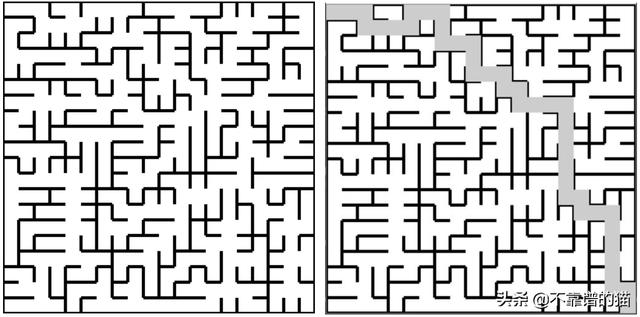
解决迷宫的例子
首先,我们导入所需的Python库
import cv2import numpy as npimport os让我们从读取图像开始
def readImage(img_file_path): binary_img = None img = cv2.imread(img_file_path,0) ret,img = cv2.threshold(img,127,255,cv2.THRESH_BINARY) binary_img = img return binary_img现在我们有一个读取迷宫方块的问题。

def blockwork(img,coordinate): size = CELL_SIZE h = CELL_SIZE*(coordinate[0]+1) w = CELL_SIZE*(coordinate[1]+1) h0= CELL_SIZE*coordinate[0] w0= CELL_SIZE*coordinate[1] block = img[h0:h,w0:w] up = bool(block[0,int(size/2)]) *1000 down = bool(block[int(size-1),int(size/2)])*100 left = bool(block[int(size/2),0]) *10 right = bool(block[int(size/2),int(size-1)])*1 edge = up+down+left+right return edge, block变量“ edge”包含每个单个块的边界信息。如果该块的特定面是开放的,我们设置为1。这样会将大量信息压缩为一个数字,0
- 对于上边缘-1000
- 对于下边缘-100
- 对于左边缘-10
- 对于右边缘-1

这也,我们可以知道给定块的哪一侧是打开的,哪一侧是闭合的。
def solveMaze(original_binary_img, initial_point, final_point, no_cells_height, no_cells_width): edgearray = [] for i in range (no_cells_height): edgearray.append([]) for j in range(no_cells_width): sz = [i,j] edge, block = blockwork(img, sz) edgearray[i].append(edge) edge= edgearray在获得所有块的边缘数组之后,我们将它附加到一个边缘数组中。
解迷宫实际上就是解这个数组

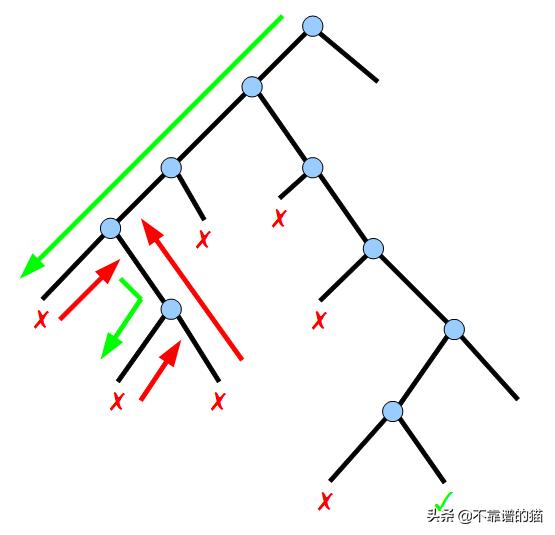
回溯算法
回溯是一种递归地解决问题的算法技术,它尝试逐步地构建一个解,每次只构建一个部分,并删除那些在任何时间点都不能满足问题约束的解。
#The solvemaze method is continued here... shortestPath = [] img = original_binary_img sp = [] rec = [0] p = 0 sp.append(list(initial_point)) while True: h,w = sp[p][0],sp[p][1]#h stands for height and w stands for width if sp[-1]==list(final_point): break if edge[h][w] > 0: rec.append(len(sp)) if edge[h][w]>999:#If this edge is open upwards edge[h][w] = edge[h][w]-1000 h = h-1 sp.append([h,w]) edge[h][w] =edge[h][w]-100 p = p+1 continue if edge[h][w]>99:#If the edge is open downward edge[h][w] =edge[h][w]-100 h = h+1 sp.append([h,w]) edge[h][w] =edge[h][w]-1000 p=p+1 continue if edge[h][w]>9:#If the edge is open left edge[h][w] = edge[h][w]-10 w = w-1 sp.append([h,w]) edge[h][w] = edge[h][w]-1 p = p+1 continue if edge[h][w]==1:#If the edge is open right edge[h][w] = edge[h][w]-1 w = w+1 sp.append([h,w]) edge[h][w] = edge[h][w]-10 p=p+1 continue else:#Removing the coordinates that are closed or don't show any path sp.pop() rec.pop() p = rec[-1] for i in sp: shortestPath.append(tuple(i))return shortestPath在上述代码中,我们使用变量h,w迭代edgearray。对于每个边缘,我们使用这些值检查是否可通过。
我们检查连接到路径或初始块的每个块。路径采用一次后,通过减去相应的值来删除该路径。
对于回溯,我们用变量' rec '。对于任何具有多个开放路径的块,它将成为一个节点,因为它可能会导致多个路径。如果前面的路径是封闭的,比如在其他块之后,则会再次访问初始节点。由于所有初始路径都已被删除,因此将访问新路径并检查路径的完成情况。
最短路径被计算为所有点的数组。

要在图像上创建路径,我们使用方法pathHighlight。
def pathHighlight(img, ip, fp, path): size = CELL_SIZE for coordinate in path: h = CELL_SIZE*(coordinate[0]+1) w = CELL_SIZE*(coordinate[1]+1) h0= CELL_SIZE*coordinate[0] w0= CELL_SIZE*coordinate[1] img[h0:h,w0:w] = img[h0:h,w0:w]-50 return img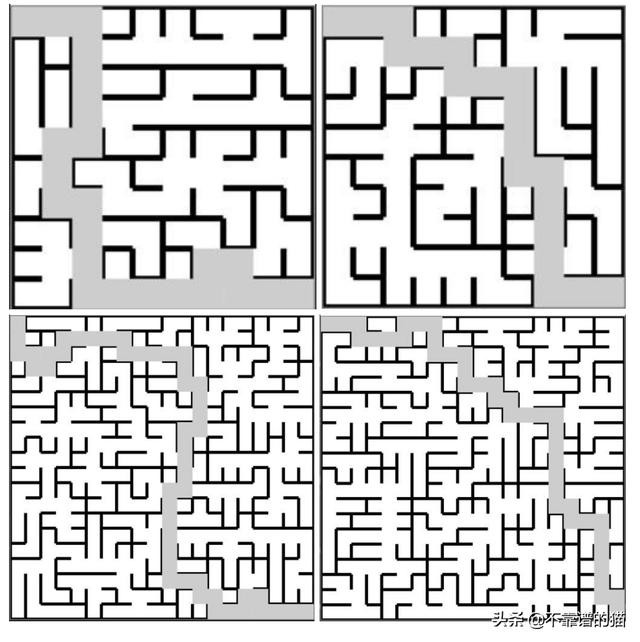


 129
129


 被折叠的 条评论
为什么被折叠?
被折叠的 条评论
为什么被折叠?
 到【灌水乐园】发言


