


基于TensorRT 3的自动驾驶快速INT8推理
Fast INT8 Inference for Autonomous Vehicles with TensorRT 3
自主驾驶需要安全性,需要一种高性能的计算解决方案来处理极其精确的传感器数据。研究人员和开发人员创建用于自动驾驶的深度神经网络(DNNs)必须优化其网络,以确保低延迟推理和能源效率。由于NVIDIA TensorRT中有了一个新的Python API,这个过程变得更加简单。
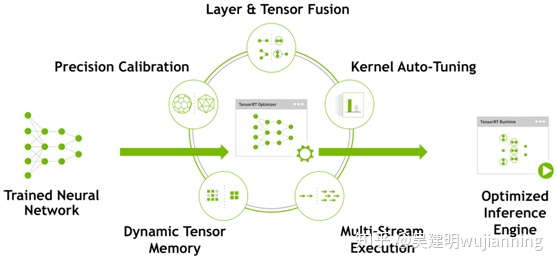
Figure 1. TensorRT optimizes trained neural network models to produce deployment-ready runtime inference engines.
TensorRT是一个高性能的深度学习推理优化器和运行时引擎,用于深度学习应用程序的生产部署。开发人员可以优化在TensorFlow或Caffe中训练的模型,以生成内存高效的运行时引擎,从而最大限度地提高推理吞吐量,使深度学习对于延迟关键的产品和服务(如自主驾驶)切实可行。。
最新的TensorRT 3版本引入了一个功能齐全的Python API,使研究人员和开发人员能够使用熟悉的Python代码优化和序列化DNN。使用TySoRRT 3,可以在Python中部署云计算服务,或者在C++中实时应用,例如在英伟达驱动PX AI汽车计算机上运行的自主驱动软件。 在本文中,将向展示如何在主机上使用TensorRT 3 Python API来缓存语义分段网络的校准结果,以便使用INT8 precision进行部署。然后,可以使用校准缓存来优化和部署在驱动PX平台上使用C++ API的网络。
城市景观数据集与全卷积网络The Cityscapes Dataset and Fully Convolutional Network

Figure 2. Sample images from the Cityscapes dataset.
城市景观数据集[Cordts等人。2016]用于城市自主驾驶场景的语义分割。图2显示了数据集中的示例图像。该数据集共有30个不同的类,分为8个不同的类别。为了评估性能,使用了19个类和7个类别,如图3所示。
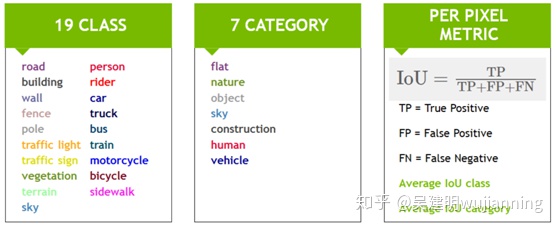
Figure 3. Classes and categories used in the Cityscapes benchmark, and the IoU (Intersection-over-Union) metric.
对于评估,使用IoU(Intersection over Union)度量,提供两个平均分数,一个用于类,另一个用于类别。

Figure 4. A sample VGG16-based fully convolutional network trained for semantic segmentation.
为了证明TensorRT的能力,设计了一种全卷积网络FCN[Long等人]。基于VGG16,如图4所示。该网络由一个基于VGG16的编码器和两个使用反卷积层实现的上采样层组成。用NVIDIA数字和Caffe在城市景观数据集上训练了[2014年]网络后端。
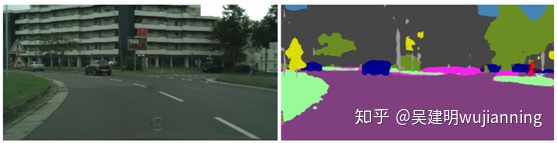
Figure 5. Sample FCN network output.
该网络设计为获取512×1024的输入图像并生成每像素分类结果,如图5所示。训练后的网络IoU类平均得分为48.4分,IoU类平均得分为76.9分。如果直接使用Caffe和cuDNN在其中一个驱动器PX autochauffer gpu(Pascal)上运行推断,该网络将达到大约242ms的延迟和大约4个图像/秒的吞吐量。在35英里/小时的速度下,242毫秒相当于大约12英尺的行驶距离。这种水平的表现不足以为自动驾驶做出及时的决定。让来看看如何才能做得更好。
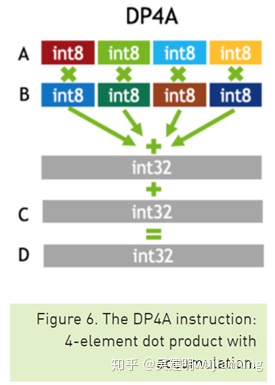
图6. DP4A指令:四元点积累加。
作为第一步,使用TensorRT优化网络,使用FP32精度提供了良好的加速。通过使用TensorRT,实现了170毫秒的延迟和大约6个图像/秒的吞吐量。这比Caffe提高了50%,但是TensorRT可以进一步优化网络。
以下各节将演示如何使用TensorRT,在保持原FP32网络良好精度的同时,使用INT8降低的精度来提高该网络的推理性能。
INT8推理和校准
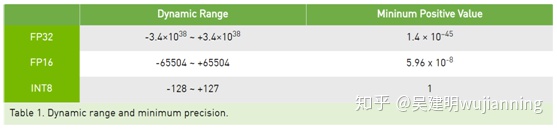
驱动器PX autochauffer中的Pascal dGPU能够执行8位整数4元向量点积(DP4A,见图6)指令,以加速深层神经网络推理。虽然这条新指令提供了更快的计算速度,但在用这种简化的INT8格式表示深度神经网络的权值和激活方面存在着重大挑战。如表1所示,与FP32或FP16相比,INT8可表示值的动态范围和粒度明显受限。
TensorRT提供了一种快速简便的方法来获取在FP32中训练过的模型,并自动转换网络以供部署,INT8的精度降低,精度损失最小。为了实现这一目标,TensorRT使用了一个校准过程,当用有限的8位整数表示逼近FP32网络时,该校准过程将信息损失最小化。有关此算法如何工作的更多信息,请参阅TensorRT GPU技术会议演示的8位推理。
在准备校准数据集时,应在典型的推断场景中捕获预期的数据分布。需要确保校准数据集涵盖所有预期场景,例如晴天、雨天、夜景等。如果正在创建自己的数据集,建议创建单独的校准数据集。校准数据集不应与训练、验证或测试数据集重叠,以避免校准模型仅在这些数据集上正常工作的情况。
让看看如何使用新的TensorRT Python API创建校准缓存。
使用Python API创建校准缓存
随着TensorRT Python API的引入,现在完全可以在Python中实现INT8校准器类。这个例子演示了如何处理图像数据并为校准器提供数据。修改这个示例以支持Python中不同类型的数据和网络应该很简单。
import pycuda.driver as cuda
import pycuda.autoinit
import numpy as np
from PIL import Image
import ctypes
import tensorrt as trt
CHANNEL = 3
HEIGHT = 512
WIDTH = 1024
class PythonEntropyCalibrator(trt.infer.EntropyCalibrator):
def __init__(self, input_layers, stream):
trt.infer.EntropyCalibrator.__init__(self)
self.input_layers = input_layers
self.stream = stream
self.d_input = cuda.mem_alloc(self.stream.calibration_data.nbytes)
stream.reset()
def get_batch_size(self):
return self.stream.batch_size
def get_batch(self, bindings, names):
batch = self.stream.next_batch()
if not batch.size:
return None
cuda.memcpy_htod(self.d_input, batch)
for i in self.input_layers[0]:
assert names[0] != i
bindings[0] = int(self.d_input)
return bindings
def read_calibration_cache(self, length):
return None
def write_calibration_cache(self, ptr, size):
cache = ctypes.c_char_p(int(ptr))
with open('calibration_cache.bin', 'wb') as f:
f.write(cache.value)
return None
PythonEntropyCalibrator类是INT8校准器的Python实现。这个类负责分配CUDA内存并为所有输入层创建绑定。每当调用get_batch()时,会将校准输入数据上载到预先分配的CUDA内存。校准批大小定义了同时处理多少校准图像以收集计算正确比例因子所需的输入分布。校准批大小可以不同于用于推断的最大批大小参数。使用较大的校准批大小通常会加快校准过程,建议使用GPU内存中可以容纳的最大批大小。
class ImageBatchStream():
def __init__(self, batch_size, calibration_files, preprocessor):
self.batch_size = batch_size
self.max_batches = (len(calibration_files) // batch_size) +
(1 if (len(calibration_files) % batch_size)
else 0)
self.files = calibration_files
self.calibration_data = np.zeros((batch_size, CHANNEL, HEIGHT, WIDTH),
dtype=np.float32)
self.batch = 0
self.preprocessor = preprocessor
@staticmethod
def read_image_chw(path):
img = Image.open(path).resize((WIDTH,HEIGHT), Image.NEAREST)
im = np.array(img, dtype=np.float32, order='C')
im = im[:,:,::-1]
im = im.transpose((2,0,1))
return im
def reset(self):
self.batch = 0
def next_batch(self):
if self.batch < self.max_batches:
imgs = []
files_for_batch = self.files[self.batch_size * self.batch :
self.batch_size * (self.batch + 1)]
for f in files_for_batch:
print("[ImageBatchStream] Processing ", f)
img = ImageBatchStream.read_image_chw(f)
img = self.preprocessor(img)
imgs.append(img)
for i in range(len(imgs)):
self.calibration_data[i] = imgs[i]
self.batch += 1
return np.ascontiguousarray(self.calibration_data, dtype=np.float32)
else:
return np.array([])
ImageBatchStream是一个helper类,负责处理文件I/O、图像大小的缩放、创建要处理的批处理数据、将数据布局重新排序为CHW格式,以及应用预处理器函数(例如减去图像平均值)。
校准结果可以保存到缓存文件中,因此可以创建优化的TensorRT运行时引擎,而无需在目标上重复校准过程。在本例中,生成的文件名是calibration_cache.bin,在write_calibration_cache函数中处理。
一旦准备好校准器类,剩下的过程就可以用TensorRT的新的拉氏体Python模块,旨在抽象出许多低级细节,使数据科学家更容易使用TensorRT。这个包允许添加预处理和后处理函数,并使能够利用现有的Python数据预处理例程。在下面的代码中,函数sub_mean_chw作为预处理步骤处理均值减影,函数color_map处理将输出类ID映射到颜色以可视化输出。
import glob
from random import shuffle
import numpy as np
from PIL import Image
import tensorrt as trt
import labels #from cityscapes evaluation script
import calibrator #calibrator.py
MEAN = (71.60167789, 82.09696889, 72.30508881)
MODEL_DIR = '/data/fcn8s/'
CITYSCAPES_DIR = '/data/Cityscapes/'
TEST_IMAGE = CITYSCAPES_DIR + 'leftImg8bit/val/lindau/lindau_000042_000019_leftImg8bit.png'
CALIBRATION_DATASET_LOC = CITYSCAPES_DIR + 'leftImg8bit/train/*/*.png'
CLASSES = 19
CHANNEL = 3
HEIGHT = 512
WIDTH = 1024
def sub_mean_chw(data):
data = data.transpose((1,2,0)) # CHW -> HWC
data -= np.array(MEAN) # Broadcast subtract
data = data.transpose((2,0,1)) # HWC -> CHW
return data
def color_map(output):
output = output.reshape(CLASSES, HEIGHT, WIDTH)
out_col = np.zeros(shape=(HEIGHT, WIDTH), dtype=(np.uint8, 3))
for x in range (WIDTH):
for y in range (HEIGHT):
out_col[y,x] = labels.id2label[labels.trainId2label[np.argmax(output[:,y,x])].id].color
return out_col
这是将所有代码组合在一起的主要功能。这个tensorrt.lite模块提供高级函数,使用一个名为tensorrt.lite.Engine.
def create_calibration_dataset():
# Create list of calibration images (filename)
# This sample code picks 100 images at random from training set
calibration_files = glob.glob(CALIBRATION_DATASET_LOC)
shuffle(calibration_files)
return calibration_files[:100]
def main():
calibration_files = create_calibration_dataset()
# Process 5 images at a time for calibration
# This batch size can be different from MaxBatchSize (1 in this example)
batchstream = calibrator.ImageBatchStream(5, calibration_files, sub_mean_chw)
int8_calibrator = calibrator.PythonEntropyCalibrator(["data"], batchstream)
# Easy to use TensorRT lite package
engine = trt.lite.Engine(framework="c1",
deployfile=MODEL_DIR + "fcn8s.prototxt",
modelfile=MODEL_DIR + "fcn8s.caffemodel",
max_batch_size=1,
max_workspace_size=(256 << 20),
input_nodes={"data":(CHANNEL,HEIGHT,WIDTH)},
output_nodes=["score"],
preprocessors={"data":sub_mean_chw},
postprocessors={"score":color_map},
data_type=trt.infer.DataType.INT8,
calibrator=int8_calibrator,
logger_severity=http://trt.infer.LogSeverity.INFO)
test_data = calibrator.ImageBatchStream.read_image_chw(TEST_IMAGE)
out = engine.infer(test_data)[0]
test_img = Image.fromarray(out, 'RGB')
test_img.show()
在城市景观数据集中,有独立的训练、验证和测试集,遵循深度学习的常见做法。然而,这意味着没有单独的校准数据集。因此,可以从训练数据集中随机选择100幅图像用作校准数据集,以说明校准过程的工作情况。正如将看到的,校准算法可以达到良好的精度,只有100个随机图像!
使用包含计算能力为6.1的NVIDIA GPU的系统(例如Quadro P4000、Tesla P4或P40),可以运行INT8优化引擎来验证其准确性。建议运行整个验证数据集,以确保使用降低精度所带来的小精度损失是可接受的。通过使用所有500个验证图像运行Cityscapes评估脚本,发现校准后的INT8模型实现了48.1个平均类IoU和76.8个平均类IoU,而原始FP32精度模型分别为48.4和76.9。
Optimizing the INT8 Model on DRIVE PX
TensorRT builder实现了一种基于分析的优化,称为内核自动调整。此过程要求在目标设备上优化网络。在这个目标优化阶段,可以使用从主机生成的校准缓存文件生成INT8模型,而不需要校准数据集。需要编写一个实现readCalibrationCache函数的校准器类,以告诉TensorRT使用缓存的结果,如下代码所示。
class Int8CacheCalibrator : public IInt8EntropyCalibrator {
public:
Int8CacheCalibrator(std::string cacheFile)
: mCacheFile(cacheFile) {}
virtual ~Int8CacheCalibrator() {}
int getBatchSize() const override {return 1;}
bool getBatch(void* bindings[], const char* names[], int nbBindings) override {
return false;
}
const void* readCalibrationCache(size_t& length) override
{
mCalibrationCache.clear();
std::ifstream input(mCacheFile, std::ios::binary);
input >> std::noskipws;
if (input.good()) {
std::copy(std::istream_iterator(input),
std::istream_iterator<char>(),
std::back_inserter<char>(mCalibrationCache));
}
length = mCalibrationCache.size();
return length ? &mCalibrationCache[0] : nullptr;
}
private:
std::string mCacheFile;
std::vector<char> mCalibrationCache;
利用TensorRT的INT8推断,该模型现在可以在一个驱动器PX autochauffer的Pascal GPU上以50毫秒的延迟或20个图像/秒的速度运行。图7总结了TensorRT使用FP32和INT8推断获得的性能。
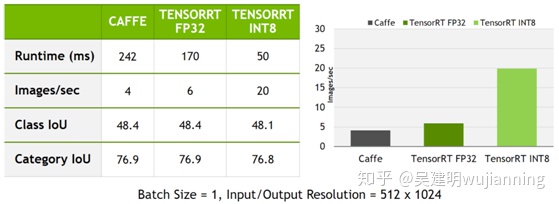
Figure 7. INT8 inference with TensorRT improves inference throughput and latency by about 5x compared to the original network running in Caffe.
可以将优化的引擎序列化到一个文件中进行部署,然后就可以在驱动器PX上部署INT8优化的网络了!


 288
288

 被折叠的 条评论
为什么被折叠?
被折叠的 条评论
为什么被折叠?
 到【灌水乐园】发言


