


Conda 指引
https://docs.conda.io/en/latest/miniconda.html
wget -c https://docs.conda.io/en/latest/miniconda.html
一键安装, 一路yes
sh Miniconda3-latest-Linux-x86_64.sh
切换conda 源,要把torch源也切换进去
vim ~/.condarc
放入以下命令,用的是清华源
channels:
  - https://mirrors.tuna.tsinghua.edu.cn/anaconda/pkgs/main/
  - https://mirrors.tuna.tsinghua.edu.cn/anaconda/pkgs/free/
  - https://mirrors.tuna.tsinghua.edu.cn/anaconda/cloud/conda-forge/
  - https://mirrors.tuna.tsinghua.edu.cn/anaconda/cloud/pytorch/
ssl_verify: true
show_channel_urls: true
切换pip源
Linux下,修改 ~/.pip/pip.conf (没有就创建一个文件夹及文件。文件夹要加“.”,表示是隐藏文件夹)。输入或修改内容如下:
[global]
index-url = https://pypi.tuna.tsinghua.edu.cn/simple
[install]
trusted-host = https://pypi.tuna.tsinghua.edu.cn
直接一行代码搞定
pip config set global.index-url https://pypi.tuna.tsinghua.edu.cn/simple
下面提供常用的一些国内镜像源
阿里云 http://mirrors.aliyun.com/pypi/simple/
豆瓣http://pypi.douban.com/simple/
清华大学 https://pypi.tuna.tsinghua.edu.cn/simple/
中国科学技术大学 http://pypi.mirrors.ustc.edu.cn/simple/
华中科技大学http://pypi.hustunique.com/
conda会安装好一个 base 环境, python=3.9
但我们开发在py3.8上,所以需要
conda create -n py38 python=3.8
构建一个3.8的环境
安装pytorch
conda install pytorch1.8.0 torchvision0.9.0 torchaudio==0.8.0 cudatoolkit=11.1 -c pytorch -c conda-forge
到这里,只在永伟给的NVIDIA-Linux-x86_64-465.31.run驱动,是可以跑起来的。
只是没有nvcc -V
从 CUDA 11.0 开始,由于 CUDA 库(例如 cuFFT 和 CUB)中的 C++11 要求,推荐的最低 GCC 编译器至少为 GCC 6。
如何升级gcc:
# 教程 https://www.cnblogs.com/jixiaohua/p/11732225.html
sudo yum install centos-release-scl -y # 安装centos-release-scl 红帽自带工具让原始gcc和你新安装的共存
sudo yum install devtoolset-8-gcc* -y #安装devtoolset,注意,如果想安装7.*版本的,就改成devtoolset-7-gcc*,以此类推
scl enable devtoolset-8 bash # 激活对应的devtoolset,所以你可以一次安装多个版本的devtoolset,需要的时候用下面这条命令切换到对应的版本
gcc -v # 查看版本
# 避免下次重启终端后还是会恢复到gcc4.8.5,所以:
cd /usr/bin/ # 去这个目录
mv /usr/bin/gcc /usr/bin/gcc-4.8.5 # 备份原有gcc
ln -s /opt/rh/devtoolset-8/root/bin/gcc /usr/bin/gcc # 软链接
mv /usr/bin/g++ /usr/bin/g++-4.8.5 # 备份 没有的话可以不管
ln -s /opt/rh/devtoolset-8/root/bin/g++ /usr/bin/g++ # 软链接 没有的话可以不管
gcc --version # 查看版本
g++ --version # 查看版本
### 安装cuda环境
到这里找到合适匹配的cuda版本,我看到的465.31的驱动是可以支持cuda的
https://developer.nvidia.com/cuda-11-0-3-download-archive?target_os=Linux&target_arch=x86_64&Distribution=CentOS&target_version=7&target_type=runfile_local
### 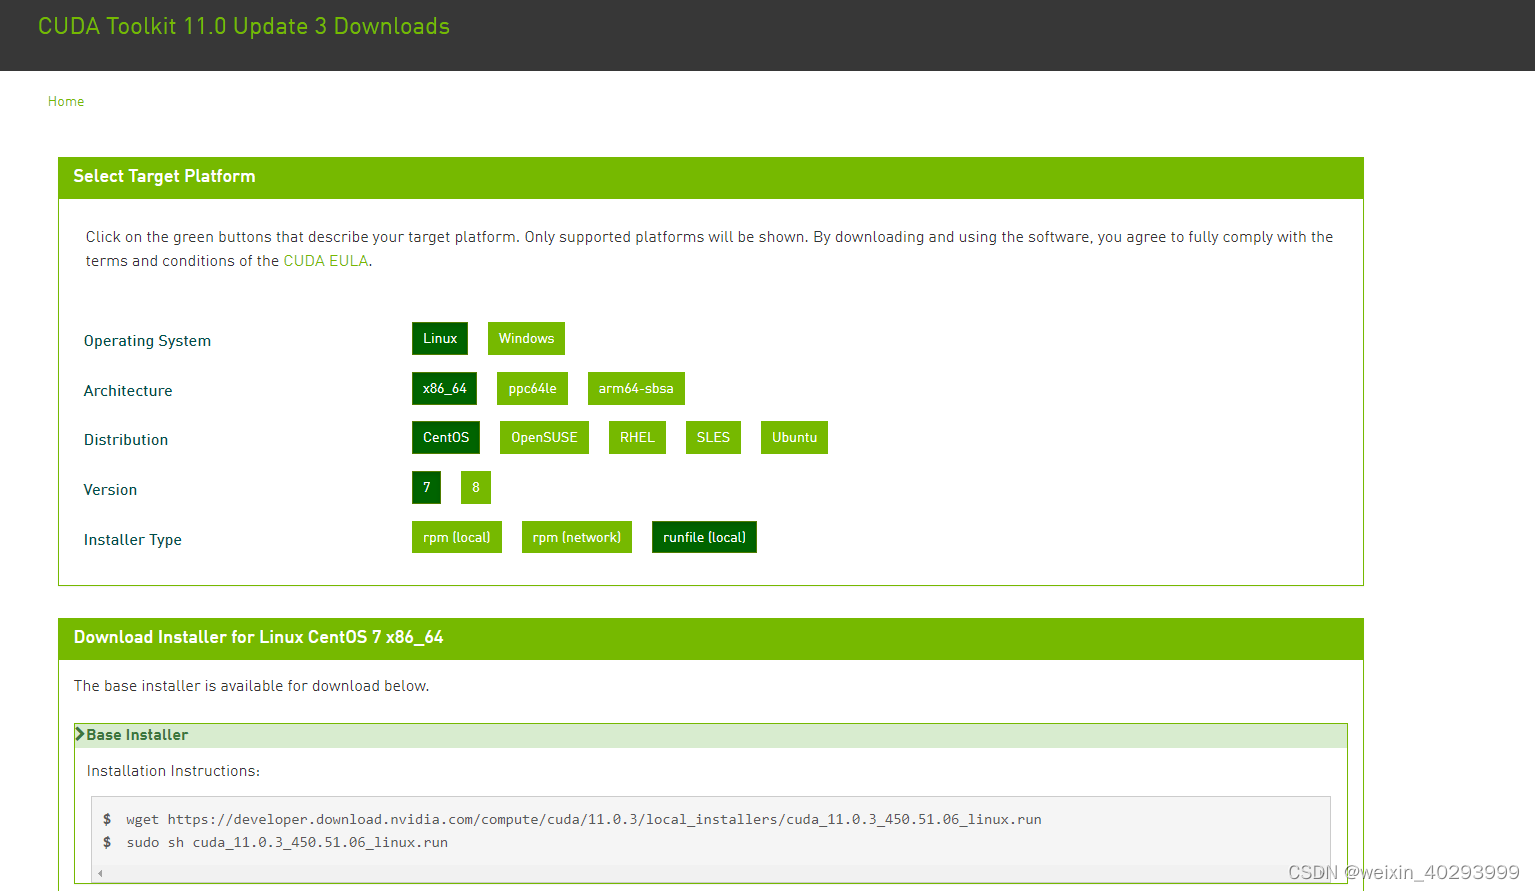
wget https://developer.download.nvidia.com/compute/cuda/11.0.3/local_installers/cuda_11.0.3_450.51.06_linux.run
遇到问题,不能解析host, developer.download.nvidia.com 联系运维修改dns, 永伟是把其它dns服务器(114.114.114.114),改成阿里的了
下面安装cuda
sh ./cuda_11.0.3_450.51.06_linux.run
### 安装后显示
===========
= Summary =
===========

Driver:   Not Selected
Toolkit:  Installed in /usr/local/cuda-11.0/
Samples:  Installed in /root/, but missing recommended libraries

Please make sure that
 -   PATH includes /usr/local/cuda-11.0/bin
 -   LD_LIBRARY_PATH includes /usr/local/cuda-11.0/lib64, or, add /usr/local/cuda-11.0/lib64 to /etc/ld.so.conf and run ldconfig as root

To uninstall the CUDA Toolkit, run cuda-uninstaller in /usr/local/cuda-11.0/bin
***WARNING: Incomplete installation! This installation did not install the CUDA Driver. A driver of version at least .00 is required for CUDA 11.0 functionality to work.
To install the driver using this installer, run the following command, replacing <CudaInstaller> with the name of this run file:
    sudo <CudaInstaller>.run --silent --driver

Logfile is /var/log/cuda-installer.log
然而 nvcc -V 依然报错
其实安装城管后已经提示了,要设置环境变量
vim /etc/profile # 进入文件写env变量
# 在最后添加三句话env
export LD_LIBRARY_PATH=$LD_LIBRARY_PATH:/usr/local/cuda-11.0/lib64
export PATH=$PATH:/usr/local/cuda-11.0/bin
export CUDA_HOME=$CUDA_HOME:/usr/local/cuda-11.0

# 也可以这样添加
export LD_LIBRARY_PATH=/usr/local/cuda-11.0/lib64
export PATH=$PATH:/usr/local/cuda-11.0/bin
export CUDA_HOME=/usr/local/cuda-11.0
source /etc/profile # 生效env变量
3 cuDNN
参考看这里:https://docs.nvidia.com/deeplearning/cudnn/install-guide/index.html
下载链接:https://developer.nvidia.com/zh-cn/cudnn
需要注册登陆才能下载,下载与CUDA版本对应的版本:

安装很简单:
tar -zxvf cudnn-11.1-linux-x64-v8.0.5.39.tgz # 解压后就是cuda文件夹
sudo cp cuda/include/cudnn*.h /usr/local/cuda/include
sudo cp -P cuda/lib64/libcudnn* /usr/local/cuda/lib64
sudo chmod a+r /usr/local/cuda/include/cudnn*.h /usr/local/cuda/lib64/libcudnn*
验证cudnn安装成功:
其实上面一步我们不需要安装cuda和cudnn都不需要安装,原因是torch已经自带了。
conda install pytorch1.8.0 torchvision0.9.0 torchaudio==0.8.0 cudatoolkit=11.1 -c pytorch -c conda-forge
vim test.py
import torch
# 若正常则静默

a = torch.tensor(1.)
# 若正常则静默

print(a.cuda())
# 若正常则返回 tensor(1., device='cuda:0')

from torch.backends import cudnn
# 若正常则静默

print(cudnn.is_available())
# 若正常则返回 True

print(cudnn.is_acceptable(a.cuda()))
# 若正常则返回 True
python test.py
最后,补上yolov5推理的各个参数的解释
https://blog.csdn.net/IT_charge/article/details/119180151
其中augment和agnostic_nms我还没有理解,后面再研究吧,占个坑


 1328
1328

 被折叠的 条评论
为什么被折叠?
被折叠的 条评论
为什么被折叠?
 到【灌水乐园】发言


