


依赖注入
典型的企业应用程序不包含单个对象(或 Spring 用语中的 bean)。即使是最简单的应用程序也有一些对象,它们协同工作以呈现最终用户所看到的连贯应用程序。下一节将解释如何从定义多个独立的 bean 定义到完全实现的应用程序,其中对象协作以实现目标。
依赖注入
依赖注入(DI) 是一个过程,其中对象定义它们的依赖项,即它们使用的其他对象,仅通过构造函数参数、工厂方法的参数或在对象实例构造或返回后在对象实例上设置的属性从工厂方法。然后容器 在创建 bean 时注入这些依赖项。这个过程从根本上来说是相反的,因此称为 控制反转(IoC),bean 本身通过使用类的直接构造或服务定位器模式自行控制其依赖项的实例化或位置。
使用 DI 原则,代码更清晰,当对象具有依赖关系时,解耦更有效。该对象不查找其依赖项,并且不知道依赖项的位置或类。因此,您的类变得更容易测试,特别是当依赖项位于接口或抽象基类上时,这允许在单元测试中使用存根或模拟实现。
DI 存在于两个主要变体中,基于 Constructor 的依赖注入和基于 Setter 的依赖注入。
一、构造器注入
前篇文章写过,#构造注入
二、Set注入【重点】
- 依赖注入:set注入!
- 依赖:bean对象的创建依赖于容器。
- 注入:bean对象中的所有属性,由容器来注入。
【环境搭建】
- 复杂类型
package com.zsm.pojo;

public class Address {
    private String address;

    public String getAddress() {
        return address;
    }

    public void setAddress(String address) {
        this.address = address;
    }
}
- 真实测试对象
package com.zsm.pojo;

import java.util.*;

public class Student {
    private String name;
    private Address address;
    private String[] books;
    private List<String> hobbys;
    private Map<String,String> card;
    private Set<String> games;
    private String wife;
    private Properties info;

    public String getName() {
        return name;
    }

    public void setName(String name) {
        this.name = name;
    }

    public Address getAddress() {
        return address;
    }

    public void setAddress(Address address) {
        this.address = address;
    }

    public String[] getBooks() {
        return books;
    }

    public void setBooks(String[] books) {
        this.books = books;
    }

    public List<String> getHobbys() {
        return hobbys;
    }

    public void setHobbys(List<String> hobbys) {
        this.hobbys = hobbys;
    }

    public Map<String, String> getCard() {
        return card;
    }

    public void setCard(Map<String, String> card) {
        this.card = card;
    }

    public Set<String> getGames() {
        return games;
    }

    public void setGames(Set<String> games) {
        this.games = games;
    }

    public String getWife() {
        return wife;
    }

    public void setWife(String wife) {
        this.wife = wife;
    }

    public Properties getInfo() {
        return info;
    }

    public void setInfo(Properties info) {
        this.info = info;
    }

    @Override
    public String toString() {
        return "Student{" +
                "name='" + name + '\'' +
                ", address=" + address +
                ", books=" + Arrays.toString(books) +
                ", hobbys=" + hobbys +
                ", card=" + card +
                ", games=" + games +
                ", wife='" + wife + '\'' +
                ", info=" + info +
                '}';
    }
}
- ApplicationContext.xml
<?xml version="1.0" encoding="UTF-8"?>
<beans  xmlns = "http://www.springframework.org/schema/beans"
        xmlns:xsi = "http://www.w3.org/2001/XMLSchema-instance"
        xsi:schemaLocation = "http://www.springframework.org/schema/beans
           http://www.springframework.org/schema/beans/spring-beans.xsd" >
    <bean name="student" class="com.zsm.pojo.Student">
        <!-- 第一种 普通值注入 value -->
        <property name="name" value="zsm"/>
    </bean>

</beans>
- 测试类
import com.zsm.pojo.Student;
import org.springframework.context.ApplicationContext;
import org.springframework.context.support.ClassPathXmlApplicationContext;

public class MyTest {
    public static void main(String[] args) {
        //获取spring的上下文对象!
        ApplicationContext context =new ClassPathXmlApplicationContext("ApplicationContext.xml");
        //我们的对象现在都在spring中的管理了,我们要使用,直接去里面取出来就可以!
       Student student = (Student) context.getBean("student");
        System.out.println(student.getName());
    }
}
-
运行结果

-
完善注入信息
<?xml version="1.0" encoding="UTF-8"?>
<beans  xmlns = "http://www.springframework.org/schema/beans"
        xmlns:xsi = "http://www.w3.org/2001/XMLSchema-instance"
        xsi:schemaLocation = "http://www.springframework.org/schema/beans
           http://www.springframework.org/schema/beans/spring-beans.xsd" >
    <bean name="address" class="com.zsm.pojo.Address">
        <property name="address" value="厦门"/>
    </bean>
    <bean name="student" class="com.zsm.pojo.Student">
        <!-- 第一种 普通值注入 value -->
        <property name="name" value="zsm"/>
        <!-- 第二种 bean注入 ref -->
        <property name="address" ref="address"/>
        <!-- 数组-->
        <property name="books">
            <array>
                <value>红楼梦</value>
                <value>西游记</value>
                <value>水浒传</value>
            </array>
        </property>
        <!-- List-->
        <property name="hobbys">
            <list>
                <value>听歌</value>
                <value>写代码</value>
            </list>
        </property>
        <!-- Map-->
        <property name="card">
            <map>
                <entry key="身份证" value="350321193605050505"/>
                <entry key="学生证" value="2012115563"/>
            </map>
        </property>
        <!-- Set-->
        <property name="games">
            <set>
                <value>LOL</value>
                <value>CS</value>
                <value>qqSpeed</value>
            </set>
        </property>
        <!-- null-->
        <property name="wife">
            <null/>
        </property>

        <!-- Properties-->
        <property name="info">
            <props>
                <prop key="学号">2015226526</prop>
                <prop key="性别">女</prop>
                <prop key="名字">小周</prop>
            </props>
        </property>
    </bean>

</beans>
- 完善信息后的执行代码和运行结果
public class MyTest {
    public static void main(String[] args) {
        //获取spring的上下文对象!
        ApplicationContext context =new ClassPathXmlApplicationContext("ApplicationContext.xml");
        //我们的对象现在都在spring中的管理了,我们要使用,直接去里面取出来就可以!
       Student student = (Student) context.getBean("student");
        System.out.println(student.toString());
    }
}
Student{name=‘zsm’,
address=Address{address=‘厦门’},
books=[红楼梦, 西游记, 水浒传],
hobbys=[听歌, 写代码],
card={身份证=350321193605050505, 学生证=2012115563},
games=[LOL, CS, qqSpeed],
wife=‘null’,
info={学号=2015226526, 性别=女, 名字=小周}}
三、拓展方式注入
1、带有 p 命名空间的 XML 快捷方式
p-namespace 使您能够使用bean 元素的属性而不是嵌套 元素来描述您的属性值和/或协作 bean。
Spring 2.0 及更高版本支持具有命名空间的可扩展配置格式,这些格式基于 XML 模式定义。beans本章讨论的配置格式是在 XML Schema 文档中定义的。但是,p 命名空间并未在 XSD 文件中定义,仅存在于 Spring 的核心中。
需要在beans下添加以下代码
xmlns:p = "http://www .springframework.org/schema/p"
- user.java
package com.zsm.pojo;

public class User {
    private int age;
    private String name;

    public int getAge() {
        return age;
    }

    public void setAge(int age) {
        this.age = age;
    }

    public String getName() {
        return name;
    }

    public void setName(String name) {
        this.name = name;
    }

    @Override
    public String toString() {
        return "User{" +
                "age=" + age +
                ", name='" + name + '\'' +
                '}';
    }
}
- xml
<?xml version="1.0" encoding="UTF-8"?>
<beans  xmlns = "http://www.springframework.org/schema/beans"
        xmlns:xsi = "http://www.w3.org/2001/XMLSchema-instance"
        xmlns:p = "http://www.springframework.org/schema/p"
        xsi:schemaLocation = "http://www.springframework.org/schema/beans
           http://www.springframework.org/schema/beans/spring-beans.xsd" >

        <bean name="user" class="com.zsm.pojo.User" p:age="12" p:name="zsm"/>
</beans>
- test
@Test
    public void UserTest(){
        ApplicationContext context = new ClassPathXmlApplicationContext("userbeans.xml");
        User user = (User) context.getBean("user");
        System.out.println(user.toString());
    }
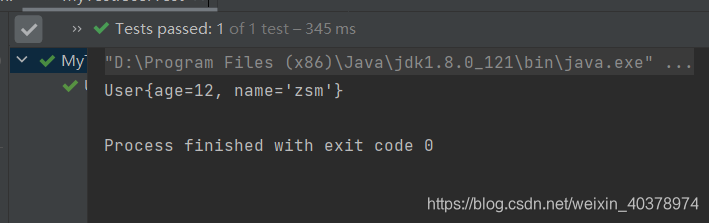
- 运行结果
2、带有 c 命名空间的 XML 快捷方式
与名为“带有 p-namespace 的 XML 快捷方式”的部分类似,Spring 3.1 中新引入的c-namespace允许使用内联属性来配置构造函数参数而不是嵌套constructor-arg 元素。
xmlns:c="http://www.springframework.org/schema/c"
- user.java
新增了无参构造和有参构造
package com.zsm.pojo;

public class User {
    private int age;
    private String name;


    public User() {
    }

    public User(int age, String name) {
        this.age = age;
        this.name = name;
    }

    public int getAge() {
        return age;
    }

    public void setAge(int age) {
        this.age = age;
    }

    public String getName() {
        return name;
    }

    public void setName(String name) {
        this.name = name;
    }

    @Override
    public String toString() {
        return "User{" +
                "age=" + age +
                ", name='" + name + '\'' +
                '}';
    }
}
- xml
<?xml version="1.0" encoding="UTF-8"?>
<beans  xmlns = "http://www.springframework.org/schema/beans"
        xmlns:xsi = "http://www.w3.org/2001/XMLSchema-instance"
        xmlns:c="http://www.springframework.org/schema/c"
        xsi:schemaLocation = "http://www.springframework.org/schema/beans
           http://www.springframework.org/schema/beans/spring-beans.xsd" >

        <bean name="user" class="com.zsm.pojo.User" c:age="13" c:name="zsm1"/>
</beans>
- test
@Test
    public void UserTest(){
        ApplicationContext context = new ClassPathXmlApplicationContext("userbeans2.xml");
        User user = (User) context.getBean("user");
        System.out.println(user.toString());
    }
- 运行结果


 137
137


 被折叠的 条评论
为什么被折叠?
被折叠的 条评论
为什么被折叠?
 到【灌水乐园】发言


