目录
3.mmdetection训练自己的数据,用网络deformable_detr做示例
(0)先生成整体配置文件,在一个配置文件中修改比较方便,方法参考:open-mmlab. mmclassification安装并使用自己数据集windows下_黛玛日孜的博客-CSDN博客
(1)#mmdet/datasets/coco.py中将类CocoDataset中的内容改成自己的,只改类别和颜色表示
(2)#mmdet/core/evaluation/classnames.py中将函数coco_classes中的内容改成自己的
(3)展示整体配置文件。配置文件configs中的类别数量改成自己的,并修改数据路径,
4.模型训练train.py(选择可视化标注文件browse_dataset.py)
7.可视化分析模块confusion_matrix.py、analyze_results.py、analyze_logs.py等
1.标注labelme
安装labelme,
1.使用Annoconda创建虚拟环境
conda create -n labelme python=3.6
activate labelme
2.安装相关的包
pip install pyqt
pip install labelme
3.启动labelme 并标注:
在labelme的虚拟环境中键入labelme就会启动labelme可视化标注软件
安装好labelme后直接在cmd命名窗口输入labelme打开。![]()
open打开单张图片,opendir打开文件夹。
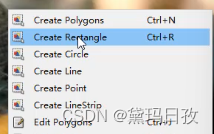
右键,选择矩形框标注。
左上角到右下角标注,确定框的名字,可以标注多个框。保存![]() ,最好不改名字。
,最好不改名字。
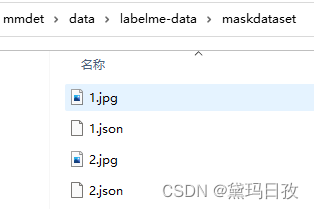
得到如下文件格式:

2.将labelme标注的数据转为coco格式
直接上代码:
D:\Code\mmdetection-master\mmdet\data\json2coco.py
重点修改类别和输入输出文件路径,以及测试集比例:
classname_to_id = {
"mask": 0, #改成自己的类别
"person": 1
}
labelme_path = "./labelme-data/maskdataset"
saved_coco_path = "./labelme-data/coco-format"
train_path, val_path = train_test_split(json_list_path, test_size=0.1, train_size=0.9)
代码如下:
#D:\Code\mmdetection-master\mmdet\data\json2coco.py

import os
import json
import numpy as np
import glob
import shutil
import cv2
from sklearn.model_selection import train_test_split

np.random.seed(41)

classname_to_id = {
    "mask": 0, #改成自己的类别
    "person": 1
}


class Lableme2CoCo:

    def __init__(self):
        self.images = []
        self.annotations = []
        self.categories = []
        self.img_id = 0
        self.ann_id = 0

    def save_coco_json(self, instance, save_path):
        json.dump(instance, open(save_path, 'w', encoding='utf-8'), ensure_ascii=False, indent=1)  # indent=2 更加美观显示

    # 由json文件构建COCO
    def to_coco(self, json_path_list):
        self._init_categories()
        for json_path in json_path_list:
            obj = self.read_jsonfile(json_path)
            self.images.append(self._image(obj, json_path))
            shapes = obj['shapes']
            for shape in shapes:
                annotation = self._annotation(shape)
                self.annotations.append(annotation)
                self.ann_id += 1
            self.img_id += 1
        instance = {}
        instance['info'] = 'spytensor created'
        instance['license'] = ['license']
        instance['images'] = self.images
        instance['annotations'] = self.annotations
        instance['categories'] = self.categories
        return instance

    # 构建类别
    def _init_categories(self):
        for k, v in classname_to_id.items():
            category = {}
            category['id'] = v
            category['name'] = k
            self.categories.append(category)

    # 构建COCO的image字段
    def _image(self, obj, path):
        image = {}
        from labelme import utils
        img_x = utils.img_b64_to_arr(obj['imageData'])
        h, w = img_x.shape[:-1]
        image['height'] = h
        image['width'] = w
        image['id'] = self.img_id
        image['file_name'] = os.path.basename(path).replace(".json", ".jpg")
        return image

    # 构建COCO的annotation字段
    def _annotation(self, shape):
        # print('shape', shape)
        label = shape['label']
        points = shape['points']
        annotation = {}
        annotation['id'] = self.ann_id
        annotation['image_id'] = self.img_id
        annotation['category_id'] = int(classname_to_id[label])
        annotation['segmentation'] = [np.asarray(points).flatten().tolist()]
        annotation['bbox'] = self._get_box(points)
        annotation['iscrowd'] = 0
        annotation['area'] = 1.0
        return annotation

    # 读取json文件,返回一个json对象
    def read_jsonfile(self, path):
        with open(path, "r", encoding='utf-8') as f:
            return json.load(f)

    # COCO的格式: [x1,y1,w,h] 对应COCO的bbox格式
    def _get_box(self, points):
        min_x = min_y = np.inf
        max_x = max_y = 0
        for x, y in points:
            min_x = min(min_x, x)
            min_y = min(min_y, y)
            max_x = max(max_x, x)
            max_y = max(max_y, y)
        return [min_x, min_y, max_x - min_x, max_y - min_y]

#训练过程中,如果遇到Index put requires the source and destination dtypes match, got Long for the destination and Int for the source
#参考:https://github.com/open-mmlab/mmdetection/issues/6706
if __name__ == '__main__':
    labelme_path = "./labelme-data/maskdataset"
    saved_coco_path = "./labelme-data/coco-format"
    print('reading...')
    # 创建文件
    if not os.path.exists("%scoco/annotations/" % saved_coco_path):
        os.makedirs("%scoco/annotations/" % saved_coco_path)
    if not os.path.exists("%scoco/images/train2017/" % saved_coco_path):
        os.makedirs("%scoco/images/train2017" % saved_coco_path)
    if not os.path.exists("%scoco/images/val2017/" % saved_coco_path):
        os.makedirs("%scoco/images/val2017" % saved_coco_path)
    # 获取images目录下所有的joson文件列表
    print(labelme_path + "/*.json")
    json_list_path = glob.glob(labelme_path + "/*.json")
    print('json_list_path: ', len(json_list_path))
    # 数据划分,这里没有区分val2017和tran2017目录,所有图片都放在images目录下
    train_path, val_path = train_test_split(json_list_path, test_size=0.1, train_size=0.9)
    print("train_n:", len(train_path), 'val_n:', len(val_path))

    # 把训练集转化为COCO的json格式
    l2c_train = Lableme2CoCo()
    train_instance = l2c_train.to_coco(train_path)
    l2c_train.save_coco_json(train_instance, '%scoco/annotations/instances_train2017.json' % saved_coco_path)
    for file in train_path:
        # shutil.copy(file.replace("json", "jpg"), "%scoco/images/train2017/" % saved_coco_path)
        img_name =


 最低0.47元/天 解锁文章


 1万+
1万+


 被折叠的 条评论
为什么被折叠?


