


通过openVPN实现远程plc设备:
方案一:ubuntu22.04系统网关作为openVPN服务端参考:
https://blog.csdn.net/weixin_40734514/article/details/143961287?spm=1001.2014.3001.5502
方案二如下:
场景需求描述:
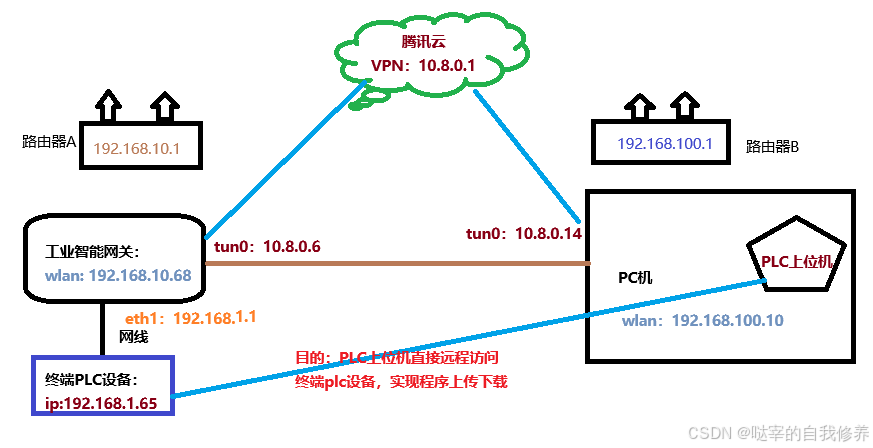
搭建环境:
腾讯云服务器:windows系统(淘宝直接租用一个月的即可)
ubuntu22.04系统网关
安装plc上位机的windows系统pc机
终端plc设备
解决步骤:
第一阶段:使用EasyRSA-制作openVPN所需证书;
第二阶段:windows云服务上部署openVPN服务器;
第三阶段:ubuntu22.04系统网关部署openVPN客户端;
第四阶段:远程windowsPC机部署openVPN客户端;
第五阶段:设置路由转发,使远程PC机成功访问终端PLC设备;
第一阶段:使用EasyRSA-制作openVPN所需证书:
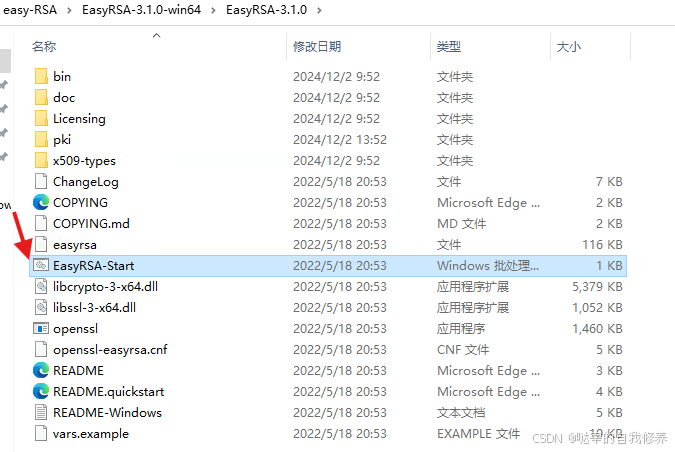
第一步:下载openVPN的证书制作工具:EasyRSA-3.1.0-win64.zip
在 release 上下载一个 windows 版本的(我使用的EasyRSA-3.1.0-win64.zip ), 解压压缩包。
windows系统解压后:双击EasyRSA-Start.bat,进入CMD窗口能够运行easy-rsa程序
第二步:生成CA证书:
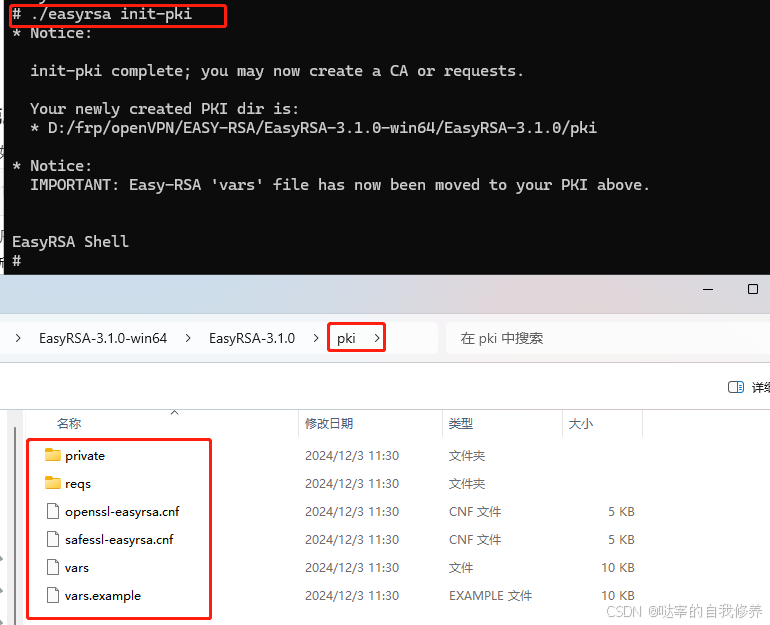
初始化证书目录:
./easyrsa init-pki
程序根目录会生成pki文件夹并生成如下的文件,这样就成功了:
我们可以修改pki下vars文件更改一些配置信息,比如添加一些证书说明信息(这里没有修改,使用默认配置,不添加信息)
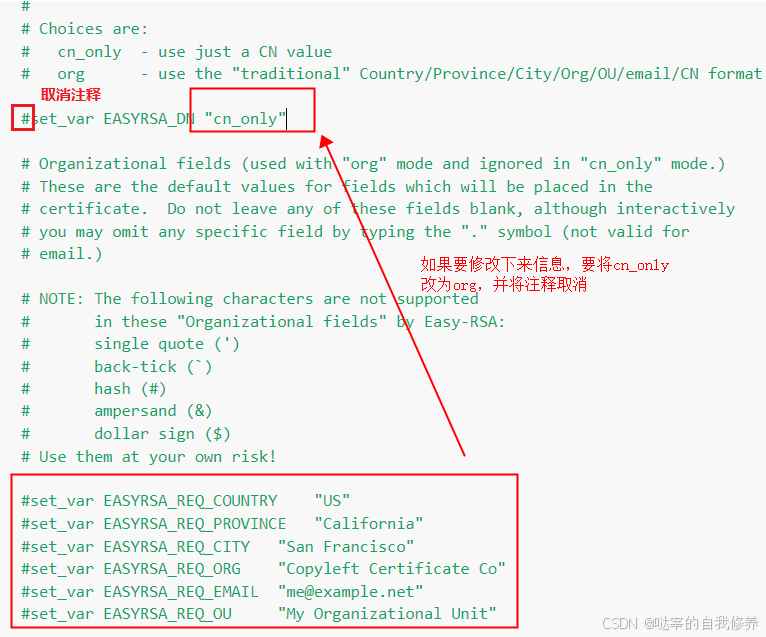
注:其他配置可以查询按照自己需求修改
之后就是创建 CA 证书了,如果不想每次都输入一个密码,可以用 nopass 参数来取消密码。在输出中还会提示你输入 CA 的公共名称,直接默认回车即可,当然你想改也随意。
./easyrsa build-ca nopass
会生成如下的信息,这样一来就完成了:
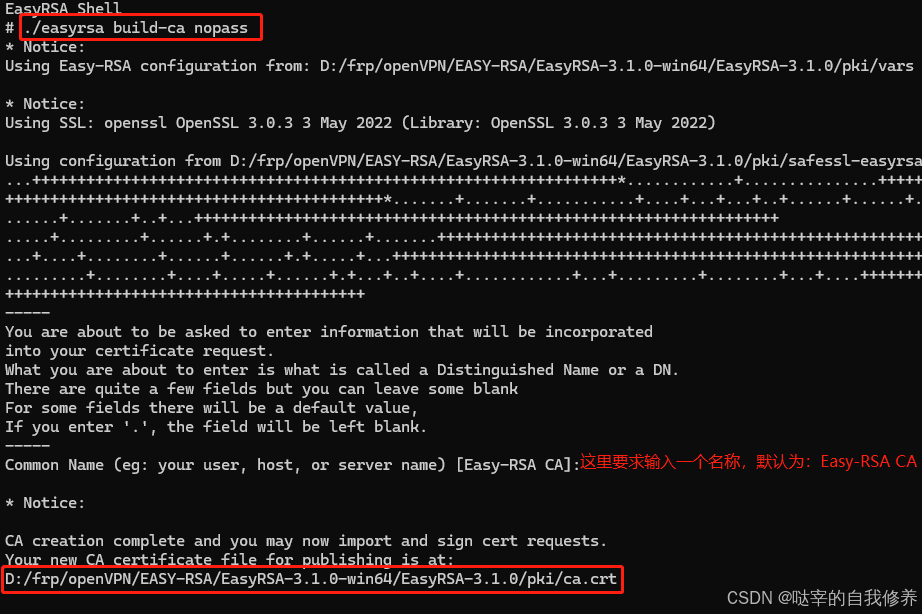
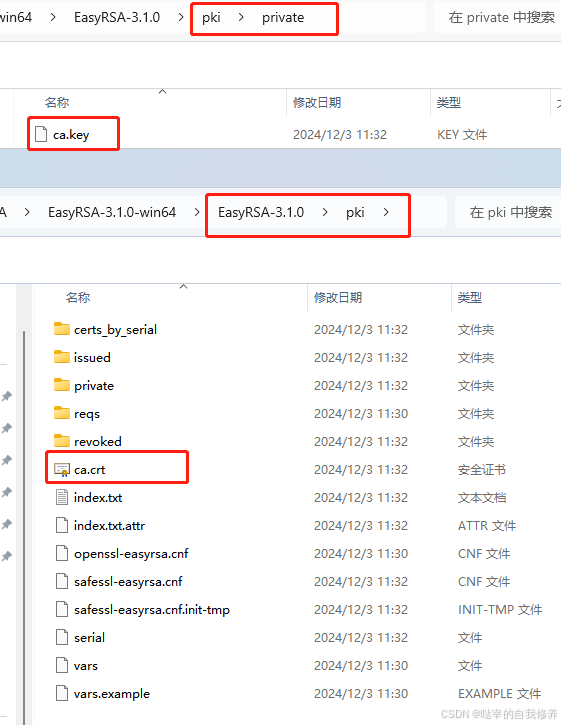
这样一来,在 pki 和 pki/private 文件夹中会生成 ca.crt 和 ca.key 文件,正是 SSL 证书所用的公私钥对。
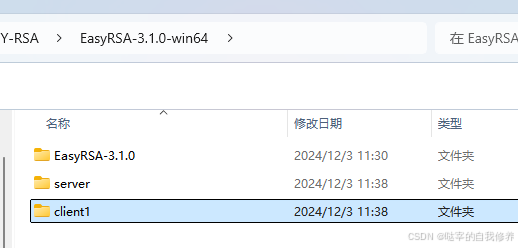
分别创建server 和 client 文件夹存储服务器与客户端配置文件:
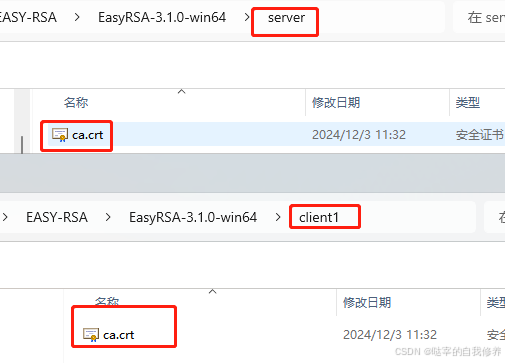
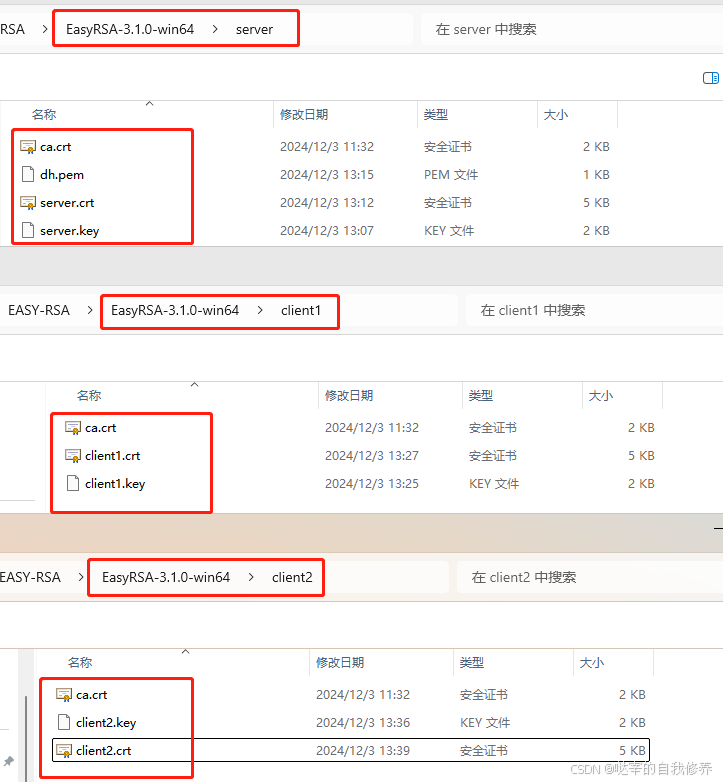
将生成的ca.crt分别复制一份存入server和client1文件夹中
第三步:生成服务端证书和加密文件:
生成私钥:
首先输入下面的命令,这里的 server 是服务器的名称,可以修改,但是由于接下来好几处命令以及生成的文件都受这个名称影响,所以还是用默认的 server 省事一点:
./easyrsa gen-req server nopass
输出如下:
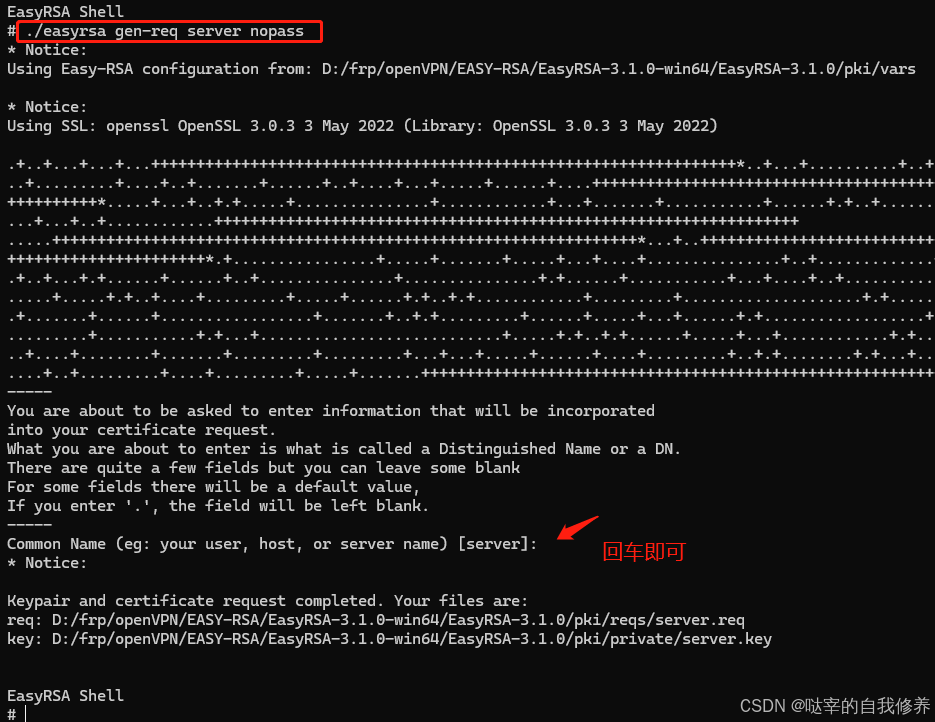
这样就生成了服务器私钥 server.key 和证书请求文件 server.req。
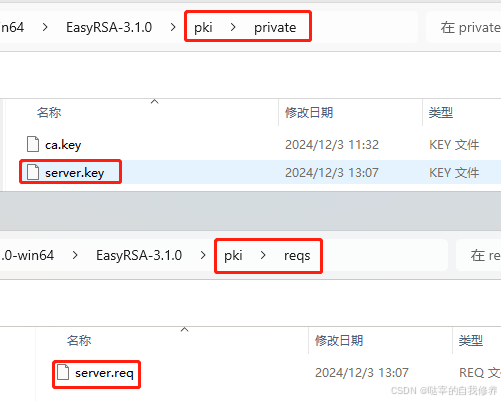
将生成的server.key复制一份存入server 文件夹中:
成功之后,用下面的命令签发请求,注意这里的第一个 server 是请求类型,可以是 client 或者 server,第二个 server 是前面指定的服务器名称:
./easyrsa sign-req server server
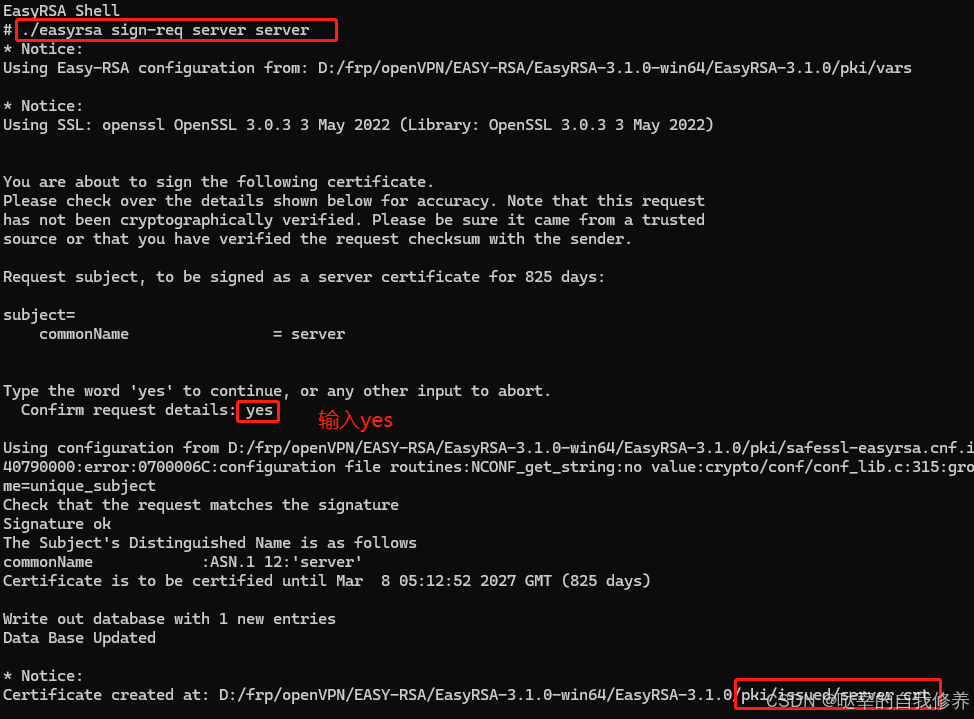
生成server.crt文件
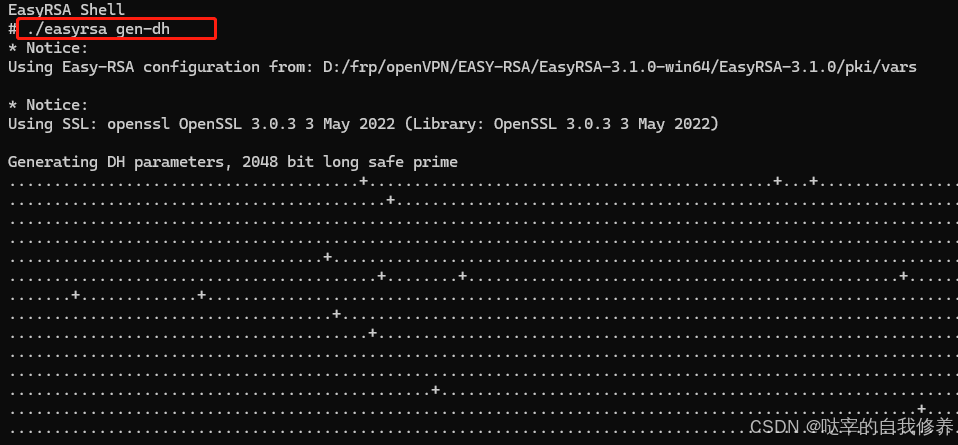
然后生成Diffie-Hellman密钥文件,这会让VPN更加安全,不过生成过程可能需要几分钟时间:
./easyrsa gen-dh
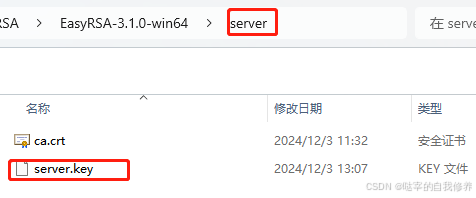
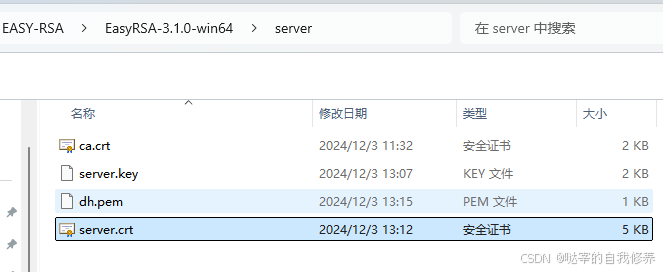
将server.crt和dh.pem 复制一份存入server文件夹
第四步:为ubuntu22.04系统网关生成客户端所需的证书和密钥对:
生成客户端请求文件,考虑到可能会有几个客户端,所以这里叫 client1,当然名称也可以修改:
./easyrsa gen-req client1 nopass
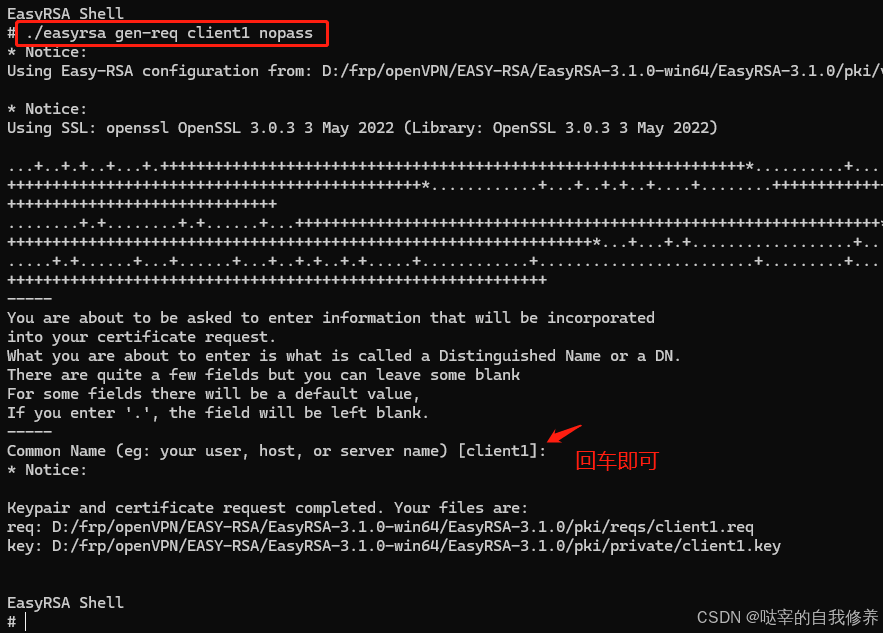
命令生成了客户端私钥 client1.key 和证书请求文件 client1.req。
再执行下面命令签发客户端证书:
./easyrsa sign-req client client1
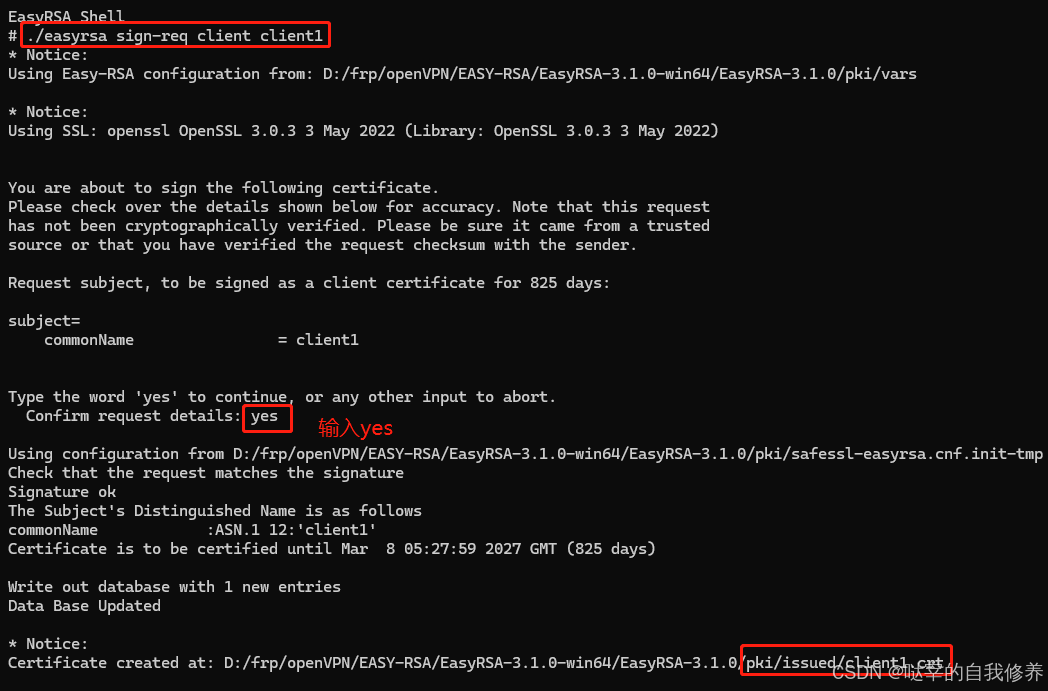
这样会生成 client1.crt 文件,签发成功
将签发后的client1.crt文件复制一份存入client1文件夹中
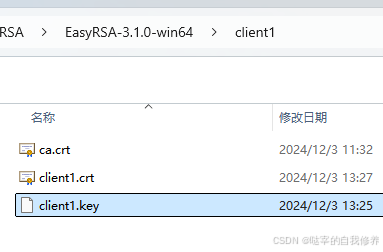
这样,所有证书文件就准备就绪了。
文件确认
第五步:为windows PC机生成所需的客户端证书和密钥对:
方法类似第五步,先创建一个client2目录:

然后生成客户端请求文件,考虑到可能会有几个客户端,所以这里叫 client2,当然名称也可以修改:
./easyrsa gen-req client2 nopass
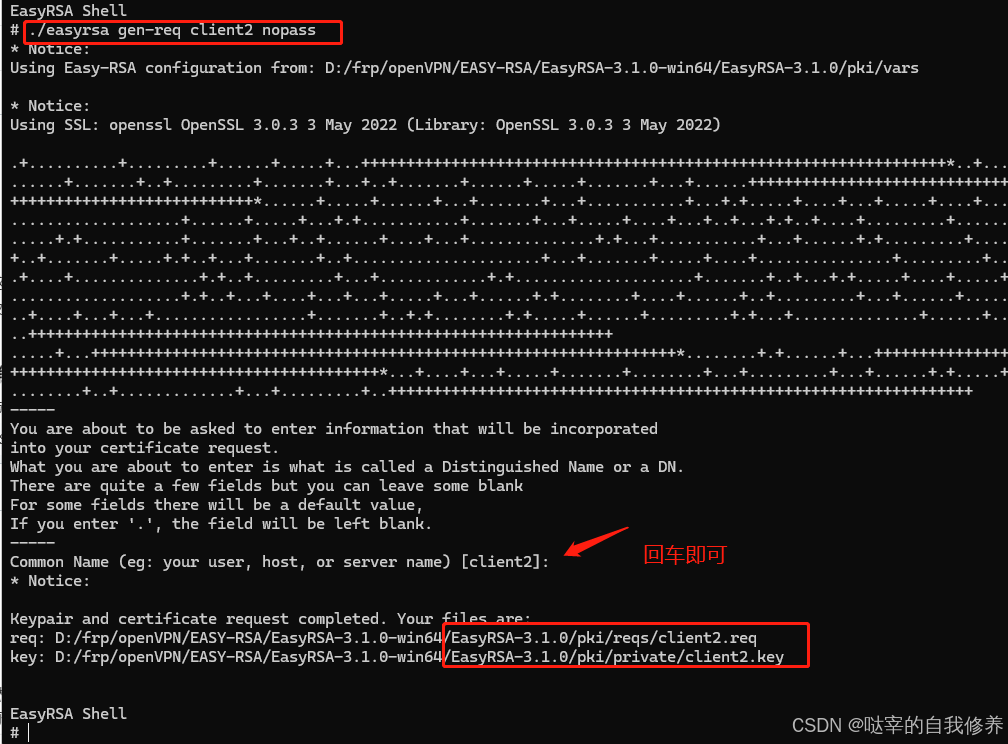
命令生成了客户端私钥 client2.key 和证书请求文件 client1.req。
再签发客户端证书:
./easyrsa sign-req client client2
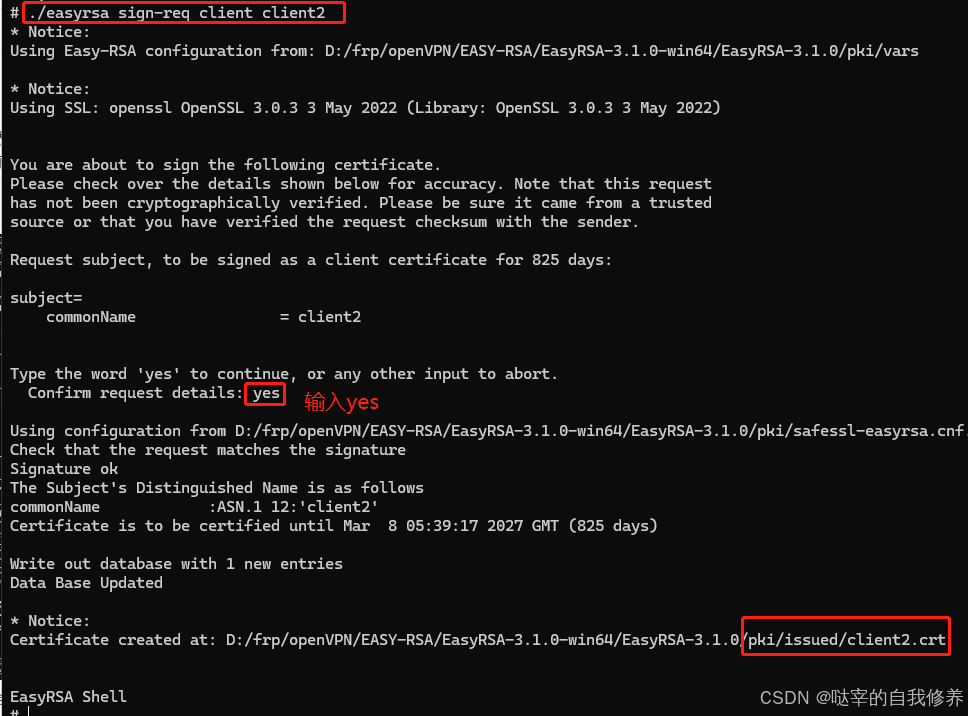
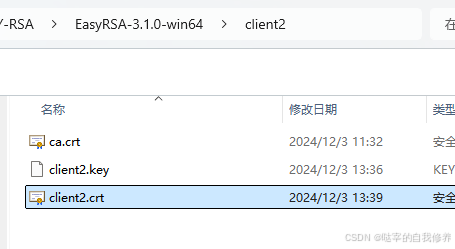
这样会生成 client2.crt 文件,签发成功
将签发后的client2.crt文件复制一份存入client1文件夹中
第六步:文件确认:
第二阶段:windows云服务上部署openVPN服务器:
第一步:下载openVPN服务端软件:
windows的openvpn服务端和客户端所需安装的软件是一样的。
下载openvpn
32为访问openvpn 下载
64位访问openvpn下载
本文档使用的64位2.5.7版本的openvpn
安装openvpn
打开安装包,点击install now
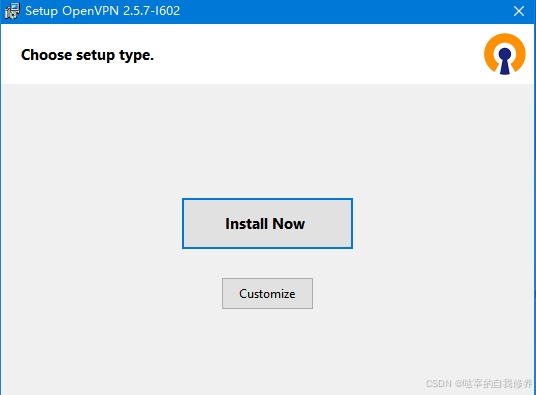
等待安装完成即可。
第二步:配置腾讯云云服务器:
在腾讯云服务器的防火墙上放开对1194端口的管理:

server.ovpn修改如下:
#################################################

# Sample OpenVPN 2.0 config file for            #

# multi-client server.                          #

#                                               #

# This file is for the server side              #

# of a many-clients <-> one-server              #

# OpenVPN configuration.                        #

#                                               #

# OpenVPN also supports                         #

# single-machine <-> single-machine             #

# configurations (See the Examples page         #

# on the web site for more info).               #

#                                               #

# This config should work on Windows            #

# or Linux/BSD systems.  Remember on            #

# Windows to quote pathnames and use            #

# double backslashes, e.g.:                     #

# "C:\\Program Files\\OpenVPN\\config\\foo.key" #

#                                               #

# Comments are preceded with '#' or ';'         #

#################################################


# Which local IP address should OpenVPN

# listen on? (optional)

;local 10.1.12.16


# Which TCP/UDP port should OpenVPN listen on?

# If you want to run multiple OpenVPN instances

# on the same machine, use a different port

# number for each one.  You will need to

# open up this port on your firewall.

port 1194


# TCP or UDP server?

;proto tcp

proto udp


# "dev tun" will create a routed IP tunnel,

# "dev tap" will create an ethernet tunnel.

# Use "dev tap0" if you are ethernet bridging

# and have precreated a tap0 virtual interface

# and bridged it with your ethernet interface.

# If you want to control access policies

# over the VPN, you must create firewall

# rules for the the TUN/TAP interface.

# On non-Windows systems, you can give

# an explicit unit number, such as tun0.

# On Windows, use "dev-node" for this.

# On most systems, the VPN will not function

# unless you partially or fully disable

# the firewall for the TUN/TAP interface.

;dev tap

dev tun


# Windows needs the TAP-Win32 adapter name

# from the Network Connections panel if you

# have more than one.  On XP SP2 or higher,

# you may need to selectively disable the

# Windows firewall for the TAP adapter.

# Non-Windows systems usually don't need this.

;dev-node MyTap


# SSL/TLS root certificate (ca), certificate

# (cert), and private key (key).  Each client

# and the server must have their own cert and

# key file.  The server and all clients will

# use the same ca file.

#

# See the "easy-rsa" directory for a series

# of scripts for generating RSA certificates

# and private keys.  Remember to use

# a unique Common Name for the server

# and each of the client certificates.

#

# Any X509 key management system can be used.

# OpenVPN can also use a PKCS #12 formatted key file

# (see "pkcs12" directive in man page).

ca ca.crt

cert server.crt

key server.key  # This file should be kept secret


# Diffie hellman parameters.

# Generate your own with:

#   openssl dhparam -out dh2048.pem 2048

dh dh.pem


# Network topology

# Should be subnet (addressing via IP)

# unless Windows clients v2.0.9 and lower have to

# be supported (then net30, i.e. a /30 per client)

# Defaults to net30 (not recommended)

;topology subnet


# Configure server mode and supply a VPN subnet

# for OpenVPN to draw client addresses from.

# The server will take 10.8.0.1 for itself,

# the rest will be made available to clients.

# Each client will be able to reach the server

# on 10.8.0.1. Comment this line out if you are

# ethernet bridging. See the man page for more info.

server 10.8.0.0 255.255.255.0


# Maintain a record of client <-> virtual IP address

# associations in this file.  If OpenVPN goes down or

# is restarted, reconnecting clients can be assigned

# the same virtual IP address from the pool that was

# previously assigned.

# ifconfig-pool-persist ipp.txt


# Configure server mode for ethernet bridging.

# You must first use your OS's bridging capability

# to bridge the TAP interface with the ethernet

# NIC interface.  Then you must manually set the

# IP/netmask on the bridge interface, here we

# assume 10.8.0.4/255.255.255.0.  Finally we

# must set aside an IP range in this subnet

# (start=10.8.0.50 end=10.8.0.100) to allocate

# to connecting clients.  Leave this line commented

# out unless you are ethernet bridging.

;server-bridge 10.8.0.4 255.255.255.0 10.8.0.50 10.8.0.100


# Configure server mode for ethernet bridging

# using a DHCP-proxy, where clients talk

# to the OpenVPN server-side DHCP server

# to receive their IP address allocation

# and DNS server addresses.  You must first use

# your OS's bridging capability to bridge the TAP

# interface with the ethernet NIC interface.

# Note: this mode only works on clients (such as

# Windows), where the client-side TAP adapter is

# bound to a DHCP client.

;server-bridge


# Push routes to the client to allow it

# to reach other private subnets behind

# the server.  Remember that these

# private subnets will also need

# to know to route the OpenVPN client

# address pool (10.8.0.0/255.255.255.0)

# back to the OpenVPN server.

;push "route 192.168.10.0 255.255.255.0"

;push "route 192.168.20.0 255.255.255.0"


# To assign specific IP addresses to specific

# clients or if a connecting client has a private

# subnet behind it that should also have VPN access,

# use the subdirectory "ccd" for client-specific

# configuration files (see man page for more info).


# EXAMPLE: Suppose the client

# having the certificate common name "Thelonious"

# also has a small subnet behind his connecting

# machine, such as 192.168.40.128/255.255.255.248.

# First, uncomment out these lines:

;client-config-dir ccd

;route 192.168.40.128 255.255.255.248

# Then create a file ccd/Thelonious with this line:

#   iroute 192.168.40.128 255.255.255.248

# This will allow Thelonious' private subnet to

# access the VPN.  This example will only work

# if you are routing, not bridging, i.e. you are

# using "dev tun" and "server" directives.


# EXAMPLE: Suppose you want to give

# Thelonious a fixed VPN IP address of 10.9.0.1.

# First uncomment out these lines:

;client-config-dir ccd

;route 10.9.0.0 255.255.255.252

# Then add this line to ccd/Thelonious:

#   ifconfig-push 10.9.0.1 10.9.0.2


# Suppose that you want to enable different

# firewall access policies for different groups

# of clients.  There are two methods:

# (1) Run multiple OpenVPN daemons, one for each

#     group, and firewall the TUN/TAP interface

#     for each group/daemon appropriately.

# (2) (Advanced) Create a script to dynamically

#     modify the firewall in response to access

#     from different clients.  See man

#     page for more info on learn-address script.

;learn-address ./script


# If enabled, this directive will configure

# all clients to redirect their default

# network gateway through the VPN, causing

# all IP traffic such as web browsing and

# and DNS lookups to go through the VPN

# (The OpenVPN server machine may need to NAT

# or bridge the TUN/TAP interface to the internet

# in order for this to work properly).

;push "redirect-gateway def1 bypass-dhcp"


# Certain Windows-specific network settings

# can be pushed to clients, such as DNS

# or WINS server addresses.  CAVEAT:

# http://openvpn.net/faq.html#dhcpcaveats

# The addresses below refer to the public

# DNS servers provided by opendns.com.

;push "dhcp-option DNS 208.67.222.222"

;push "dhcp-option DNS 208.67.220.220"


# Uncomment this directive to allow different

# clients to be able to "see" each other.

# By default, clients will only see the server.

# To force clients to only see the server, you

# will also need to appropriately firewall the

# server's TUN/TAP interface.

client-to-client


# Uncomment this directive if multiple clients

# might connect with the same certificate/key

# files or common names.  This is recommended

# only for testing purposes.  For production use,

# each client should have its own certificate/key

# pair.

#

# IF YOU HAVE NOT GENERATED INDIVIDUAL

# CERTIFICATE/KEY PAIRS FOR EACH CLIENT,

# EACH HAVING ITS OWN UNIQUE "COMMON NAME",

# UNCOMMENT THIS LINE OUT.

duplicate-cn


# The keepalive directive causes ping-like

# messages to be sent back and forth over

# the link so that each side knows when

# the other side has gone down.

# Ping every 10 seconds, assume that remote

# peer is down if no ping received during

# a 120 second time period.

keepalive 10 120


# For extra security beyond that provided

# by SSL/TLS, create an "HMAC firewall"

# to help block DoS attacks and UDP port flooding.

#

# Generate with:

#   openvpn --genkey tls-auth ta.key

#

# The server and each client must have

# a copy of this key.

# The second parameter should be '0'

# on the server and '1' on the clients.

;tls-auth ta.key 0 # This file is secret


# Select a cryptographic cipher.

# This config item must be copied to

# the client config file as well.

# Note that v2.4 client/server will automatically

# negotiate AES-256-GCM in TLS mode.

# See also the ncp-cipher option in the manpage

cipher AES-256-GCM


# Enable compression on the VPN link and push the

# option to the client (v2.4+ only, for earlier

# versions see below)

;compress lz4-v2

;push "compress lz4-v2"


# For compression compatible with older clients use comp-lzo

# If you enable it here, you must also

# enable it in the client config file.

;comp-lzo


# The maximum number of concurrently connected

# clients we want to allow.

;max-clients 100


# It's a good idea to reduce the OpenVPN

# daemon's privileges after initialization.

#

# You can uncomment this out on

# non-Windows systems.

;user nobody

;group nobody


# The persist options will try to avoid

# accessing certain resources on restart

# that may no longer be accessible because

# of the privilege downgrade.

persist-key

persist-tun


# Output a short status file showing

# current connections, truncated

# and rewritten every minute.

status openvpn-status.log


# By default, log messages will go to the syslog (or

# on Windows, if running as a service, they will go to

# the "\Program Files\OpenVPN\log" directory).

# Use log or log-append to override this default.

# "log" will truncate the log file on OpenVPN startup,

# while "log-append" will append to it.  Use one

# or the other (but not both).

;log         openvpn.log

;log-append  openvpn.log


# Set the appropriate level of log

# file verbosity.

#

# 0 is silent, except for fatal errors

# 4 is reasonable for general usage

# 5 and 6 can help to debug connection problems

# 9 is extremely verbose

verb 3


# Silence repeating messages.  At most 20

# sequential messages of the same message

# category will be output to the log.

;mute 20


# Notify the client that when the server restarts so it

# can automatically reconnect.

explicit-exit-notify 1
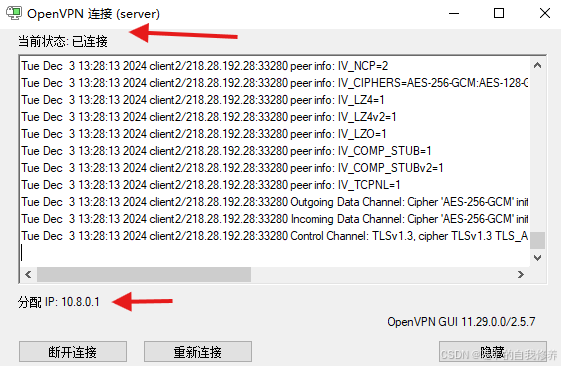
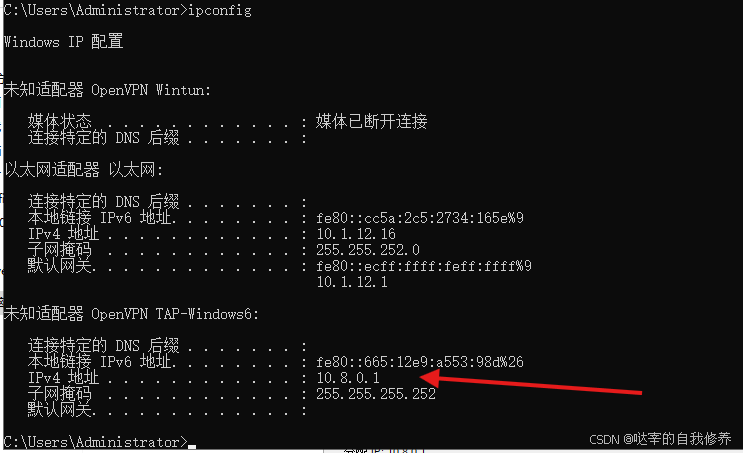
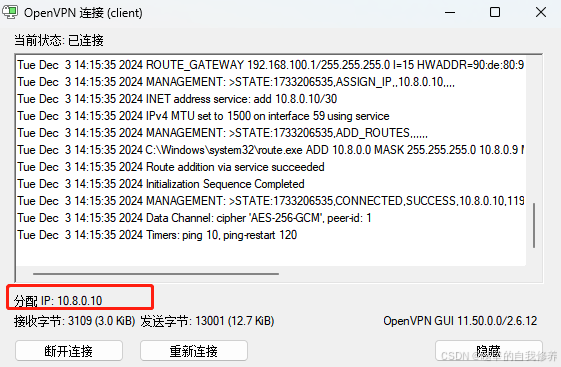
双击运行 OpenVPN GUI 程序(会看到是 server 模式启动,图标从黄变绿说明连接成功),服务器连接成功后可以在 cmd 输入 ipconfig ,看到能获取到 vpn 网关给自己分发的 ip 地址。
第三阶段:远程windowsPC机部署openVPN客户端:
需提前关闭客户端防火墙
第一步:在客户端安装openVPN软件:
无脑安装即可,建议和服务端版本相匹配:
第二步: 修改客户端配置:
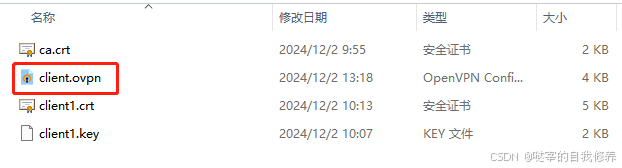
进入config 目录(没有请新建一个),新建 client.ovpn,粘贴下面的配置,同时把上面client1文件夹中生成的客户端证书也放进来(client1.crt,client1.key,ca.crt)
##############################################
# Sample client-side OpenVPN 2.0 config file #
# for connecting to multi-client server.     #
#                                            #
# This configuration can be used by multiple #
# clients, however each client should have   #
# its own cert and key files.                #
#                                            #
# On Windows, you might want to rename this  #
# file so it has a .ovpn extension           #
##############################################

# Specify that we are a client and that we
# will be pulling certain config file directives
# from the server.
client

# Use the same setting as you are using on
# the server.
# On most systems, the VPN will not function
# unless you partially or fully disable
# the firewall for the TUN/TAP interface.
;dev tap
dev tun

# Windows needs the TAP-Win32 adapter name
# from the Network Connections panel
# if you have more than one.  On XP SP2,
# you may need to disable the firewall
# for the TAP adapter.
;dev-node MyTap

# Are we connecting to a TCP or
# UDP server?  Use the same setting as
# on the server.
;proto tcp
proto udp

# The hostname/IP and port of the server.
# You can have multiple remote entries
# to load balance between the servers.
remote 119.29.52.151 1194
;remote my-server-2 1194

# Choose a random host from the remote
# list for load-balancing.  Otherwise
# try hosts in the order specified.
;remote-random

# Keep trying indefinitely to resolve the
# host name of the OpenVPN server.  Very useful
# on machines which are not permanently connected
# to the internet such as laptops.
resolv-retry infinite

# Most clients don't need to bind to
# a specific local port number.
nobind

# Downgrade privileges after initialization (non-Windows only)
;user nobody
;group nobody

# Try to preserve some state across restarts.
persist-key
persist-tun

# If you are connecting through an
# HTTP proxy to reach the actual OpenVPN
# server, put the proxy server/IP and
# port number here.  See the man page
# if your proxy server requires
# authentication.
;http-proxy-retry # retry on connection failures
;http-proxy [proxy server] [proxy port #]

# Wireless networks often produce a lot
# of duplicate packets.  Set this flag
# to silence duplicate packet warnings.
;mute-replay-warnings

# SSL/TLS parms.
# See the server config file for more
# description.  It's best to use
# a separate .crt/.key file pair
# for each client.  A single ca
# file can be used for all clients.
ca ca.crt
cert client1.crt
key client1.key

# Verify server certificate by checking that the
# certificate has the correct key usage set.
# This is an important precaution to protect against
# a potential attack discussed here:
#  http://openvpn.net/howto.html#mitm
#
# To use this feature, you will need to generate
# your server certificates with the keyUsage set to
#   digitalSignature, keyEncipherment
# and the extendedKeyUsage to
#   serverAuth
# EasyRSA can do this for you.
remote-cert-tls server

# If a tls-auth key is used on the server
# then every client must also have the key.
;tls-auth ta.key 1

# Select a cryptographic cipher.
# If the cipher option is used on the server
# then you must also specify it here.
# Note that v2.4 client/server will automatically
# negotiate AES-256-GCM in TLS mode.
# See also the data-ciphers option in the manpage
cipher AES-256-GCM

# Enable compression on the VPN link.
# Don't enable this unless it is also
# enabled in the server config file.
#comp-lzo

# Set log file verbosity.
verb 3

# Silence repeating messages
;mute 20
双击运行OpenVPN GUI程序(会看到是client模式启动,图标从黄变绿说明连接成功),能看到服务器分配的ip
第四阶段:ubuntu22.04系统网关部署openVPN客户端:
需提前关闭客户端防火墙
第一步:ubuntu22.04安装openVPN:
sudo apt install openvpn
第二步:修改ubuntu22.04系统网关客户端配置:

其中client.conf内容如下:
client.conf
##############################################
# Sample client-side OpenVPN 2.0 config file #
# for connecting to multi-client server.     #
#                                            #
# This configuration can be used by multiple #
# clients, however each client should have   #
# its own cert and key files.                #
#                                            #
# On Windows, you might want to rename this  #
# file so it has a .ovpn extension           #
##############################################

# Specify that we are a client and that we
# will be pulling certain config file directives
# from the server.
client

# Use the same setting as you are using on
# the server.
# On most systems, the VPN will not function
# unless you partially or fully disable
# the firewall for the TUN/TAP interface.
;dev tap
dev tun

# Windows needs the TAP-Win32 adapter name
# from the Network Connections panel
# if you have more than one.  On XP SP2,
# you may need to disable the firewall
# for the TAP adapter.
;dev-node MyTap

# Are we connecting to a TCP or
# UDP server?  Use the same setting as
# on the server.
;proto tcp
proto udp

# The hostname/IP and port of the server.
# You can have multiple remote entries
# to load balance between the servers.
remote 119.29.52.151 1194
;remote my-server-2 1194

# Choose a random host from the remote
# list for load-balancing.  Otherwise
# try hosts in the order specified.
;remote-random

# Keep trying indefinitely to resolve the
# host name of the OpenVPN server.  Very useful
# on machines which are not permanently connected
# to the internet such as laptops.
resolv-retry infinite

# Most clients don't need to bind to
# a specific local port number.
nobind

# Downgrade privileges after initialization (non-Windows only)
;user nobody
;group nobody

# Try to preserve some state across restarts.
persist-key
persist-tun

# If you are connecting through an
# HTTP proxy to reach the actual OpenVPN
# server, put the proxy server/IP and
# port number here.  See the man page
# if your proxy server requires
# authentication.
;http-proxy-retry # retry on connection failures
;http-proxy [proxy server] [proxy port #]

# Wireless networks often produce a lot
# of duplicate packets.  Set this flag
# to silence duplicate packet warnings.
;mute-replay-warnings

# SSL/TLS parms.
# See the server config file for more
# description.  It's best to use
# a separate .crt/.key file pair
# for each client.  A single ca
# file can be used for all clients.
ca ca.crt
cert client2.crt
key client2.key

# Verify server certificate by checking that the
# certificate has the correct key usage set.
# This is an important precaution to protect against
# a potential attack discussed here:
#  http://openvpn.net/howto.html#mitm
#
# To use this feature, you will need to generate
# your server certificates with the keyUsage set to
#   digitalSignature, keyEncipherment
# and the extendedKeyUsage to
#   serverAuth
# EasyRSA can do this for you.
remote-cert-tls server

# If a tls-auth key is used on the server
# then every client must also have the key.
;tls-auth ta.key 1

# Select a cryptographic cipher.
# If the cipher option is used on the server
# then you must also specify it here.
# Note that v2.4 client/server will automatically
# negotiate AES-256-GCM in TLS mode.
# See also the data-ciphers option in the manpage
cipher AES-256-GCM

# Enable compression on the VPN link.
# Don't enable this unless it is also
# enabled in the server config file.
#comp-lzo

# Set log file verbosity.
verb 3

# Silence repeating messages
;mute 20
然后在ubuntu22.04上启动openVPN客户端:
cd /etc/openvpn
openvpn  --config ./client.conf &
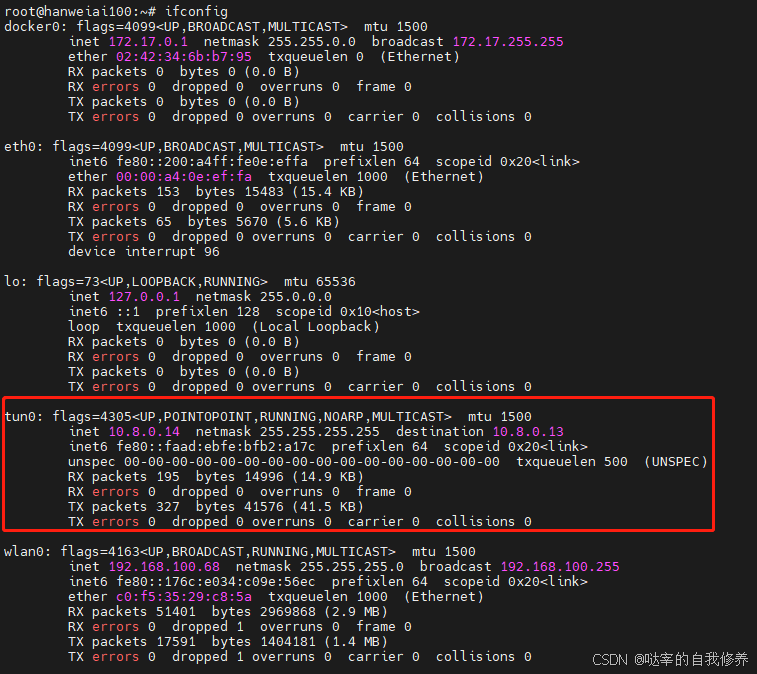
可以看到会新增一个虚拟网卡tun0:
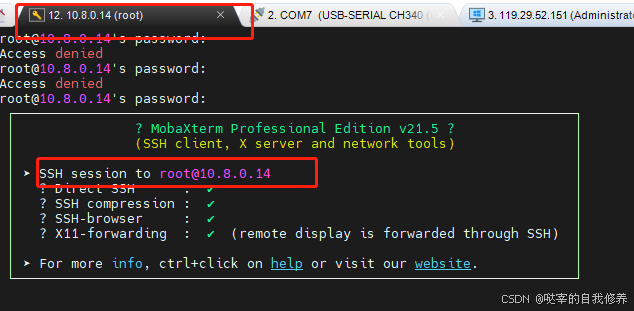
此时,我们在另一个openVPN的客户端(10.8.0.10)即可通过ssh的形式连接ubuntu22.04系统网关,如下:
第五阶段:设置路由转发,使远程PC机成功访问终端PLC设备:
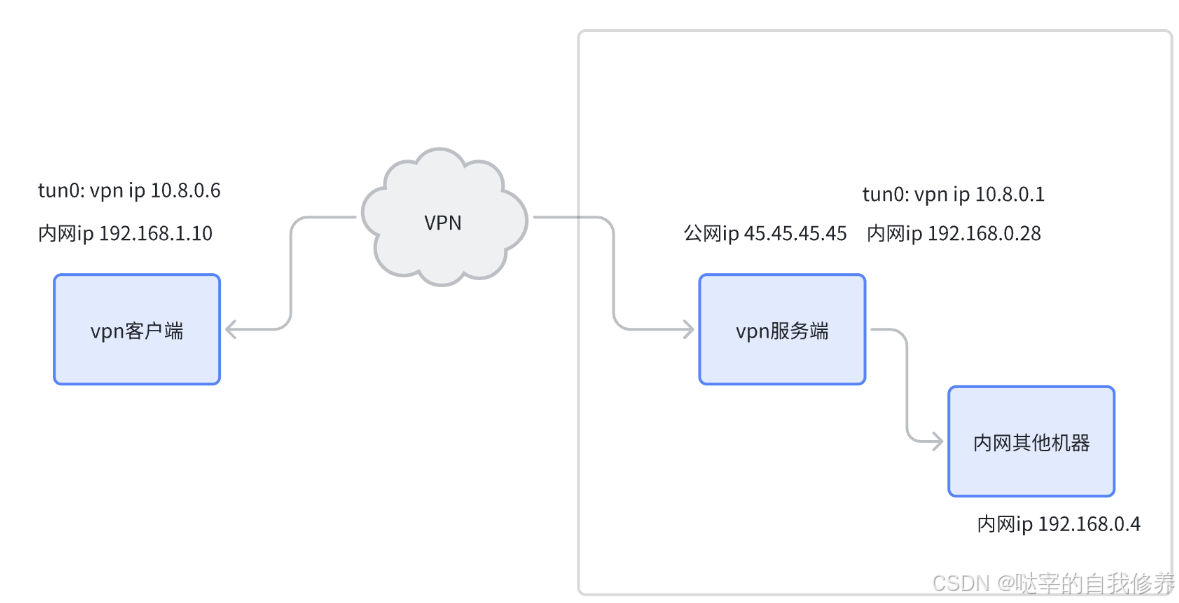
使用OpenVPN友好快捷的搭建了异地局域网的问题,在使用的过程中对配置的理解还是很重要的,在此以tun模式为例,说明其在实际使用过程的作用与意义。
第一步:常规配置:
首先我们讲下都会讲到的常规配置,由于基本上所有的文章都会讲到,所以在此对部分常用的进行简单阐述:
port:
说明服务运行的端口号,该端口号不能被其它的应用占用,同时需要在防火墙(如有)中做好允许访问的策略。
port 1194
udp:
协议,可选为tcp和udp,由于udp的速度更快,一般默认使用该选项:
proto udp
dev:
dev猜想应该是device设备的简称,这里指把OpenVPN做为一个什么类型的网络设备,分别可以设置成服务于3层的TUN(Tunnel)设备,以及服务于2层的TAP(Terminal Access Point)设备。
本文主要阐述 TUN 模式,后面的主要配置其实也是围绕着3层的路由配置来进行的。
dev tun
ca,cert,key:
这里涉及到一些非对称加密的知识,简单来讲就是密钥会成对出现。一个自己保留的叫做私钥,另一个公开传给其它计算机的叫做公钥。
使用公钥进行加密后的数据只能通过私钥进行解密,同样通过私钥进行加密的数据则需要只能公钥来进行解密。
由于公钥与私钥的互相解密的性质,所以它们必然成对出现。在客户端(假设名称为client)为1个的时候,会生成3个密钥对。
1.服务端私钥server.key,以及带有签名信息的服务端公钥server.crt
2.客户端私钥client.key,以及带有签名信息的客户端公钥client.crt
3.用于对公钥生成签名信息的私钥ca.key,以及用于验证签名信息的公钥ca.crt
OpenVPN的连接验证大概是这样:
1.客户端向服务端传送自己的公钥client.crt,服务端接收到使用ca.crt验证client.crt签名是否正确,不正确禁止连接。
2.客户端获取服务端公钥server.crt,使用使用ca.crt验证server.crt签名是否正确,不正确终止连接。
3.通过各自的公钥私钥发送一些测试信息,以保证各自的秘钥对是正确的。
所以对于服务端而言,在安全认证方法,需要设置以下3个信息:
1.用于验证证书签名是否正确的 ca.crt
2.用于发送加密验证信息的私钥server.key
3.用于客户端获取后解密测试数据的公钥server.crt
这套理论也适用于客户端。
dh:
dh指的是Diffie-Hellman算法,这个算法有个神奇的地方在于可以在大庭广众下商量一个只有两个人知道的密钥。
过程简单如下:
1.服务端初始化两个数字:p = 23 和 g = 5(实际会大的多,本例中dh.pem中实际存储的就是23与5两个数字)
2.客户端请求服务端获取到这两个数字:p = 23 和 g = 5
3.客户端随机选择一个整数,比如6,然后计算 (g^a) mod p 并得到17。
4.服务端也随机选择一个整数,比如b = 15,计算 (g^b) mod p 得到19。
5.客户端把17传给服务端,服务端把19传给客户端。
6.客户端 19^6 mod 23 = 2
7.服务端 17^15 mod 23 = 2
此时,服务端与客户端同时得到2这个数字,2即为服务端与客户端后面在通讯过程中使用的密钥。上述算法由于客户端使用的6与服务端使用的15并没有进行过任何传递,所以除客户端与服务端外,第三方无法计算出密钥2。
ta.key:
ta.key主要是提供了额外的认证机构,在进行认证时,除了进行签名认证,使用密钥对进行测试信息的加密解密外,还要求客户端与服务端的ta.key的值是一致的。需要说明的是:ta.key是一种对称密钥,也就是说:双方使用ta.key加密的数据均可以使用ta.key解密。 ta.key在服务器上存一份的同时,在每个客户端上均需要存储一份。
server:
server设置了OpenVPN的服务网段,以下例配置为例:
server 10.8.0.0 255.255.255.0
则服务端的IP 将被设置为 10.8.0.1,然后客户端 IP也将设置为10.8.0.0/24段中的唯一 IP。这里需要根据客户端的数量来设置子网掩码的长度。在tun模式下,一个TUN会占用两个 IP,也就是说启用一个客户端则会占用两个 IP,所以在24位掩码(255.255.255.0)的情况下,大概可以连接125个客户端。
ifconfig-pool-persist:
ifconfig = 网卡配置
pool = 池
persist = 持久化所以它的意思是说固定客户端的 IP 地址,比如客户端client 在第一次请求时获取的 IP 为 10.8.0.4,则在客户端client断开重连后,其 IP 地址仍然会被设置为 10.8.0.4
示例配置:
ifconfig-pool-persist ipp.txt
第二步:核心配置:
核心配置决定了客户端与服务端,客户端与客户端,服务端与客户端所在网络的计算机是否能够正常通读,所以把它们弄懂非常的有必要。
同时由于一般的PC做为客户端时,并不需要执行数据转发等操作,所以基本上0配置,所以在此我们主要阐述路由器做为客户端时的各项配置。
首先我们配置下ccd的目录,这样后面我们就可以为客户端进行一些简单的配置。
client-config-dir ccd
以下示例中,我们假设防火墙均已放行OpenVPN的连接。
仅连接路由器:
拓扑图如下:
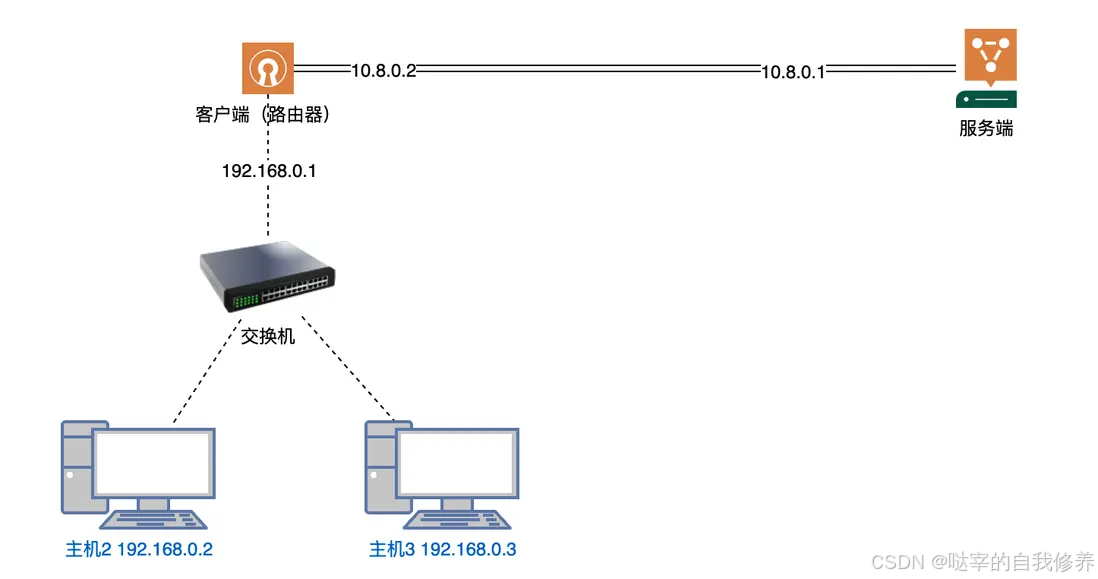
目标:
1.VPN服务端能够与路由器连通
客户端和服务端的openVPN配置设置好后即可连接成功。
2.VPN服务端能够与路由器,主机2,主机3连通
需在服务端配置对应路由:
route 192.168.0.0 255.255.255.0
除此以外,并不需要其它配置。
当主机2向服务端10.8.0.1发送数据时,路径如下:
1.主机2:发送给网关(路由器)192.168.0.1
2.路由器:目标地址与tun路由匹配,发送给tun -> 10.8.0.1
3.发送完毕
当服务端10.8.0.1向主机2发送数据时,路径如下:
1.服务端:目标地址与路由192.168.0.0/24 -> tun匹配,发送给客户端(路由器)10.8.0.2
2.路由器:目标地址为lan段,发送给lan段的主机2
3.发送完毕
双独立客户端:
拓扑图如下:
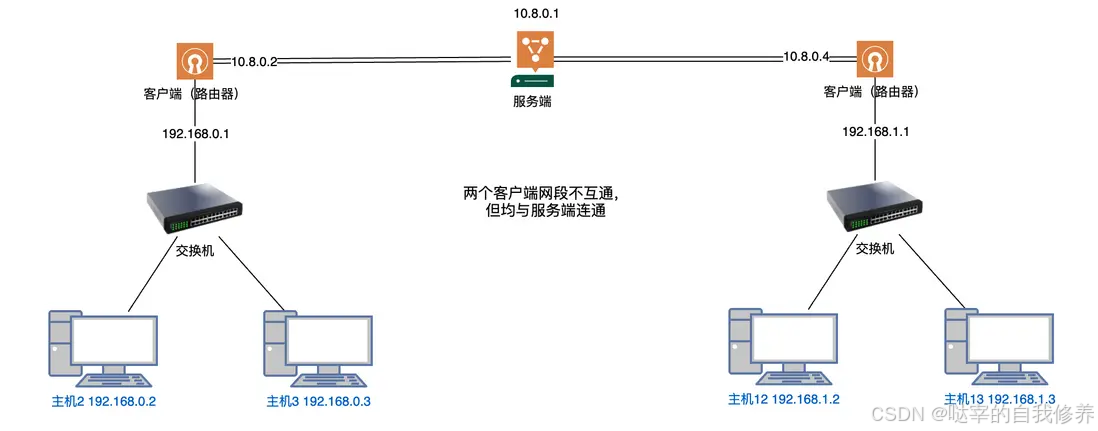
目标:
1.VPN服务端能够与两个路由器均连通
2.VPN服务端能够与主机2,主机3连通
3.VPN服务端能够与主机12,主机13连通
4.主机2与主机3,路由器1与路由器2,均连通。
默认情况下client-to-client配置项并未启用,所以客户端间是不能够进行连接的,要开启该功能,需要先在配置文件中加入:
client-to-client
配置路由:
然后告诉VPN服务器,除了VPN本身的网段需要通过TUN转发外,
192.168.0.0/24以及192.168.1.0/24段也需要通过TUN进行转发,配置如下:
route 192.168.0.0 255.255.255.0
route 192.168.1.0 255.255.255.0
路由推送:
2个网段互通的前提是:
当向对向网段发起请求时,将数据包转发给TUN,所以在服务端配置下发给客户端的路由:
push "route 192.168.0.0 255.255.255.0"
push "route 192.168.1.0 255.255.255.0"
此时客户端在连接服务端后,则会在本地添加两条路由:
192.168.0.0/24 -> tun
192.168.1.0/24 -> tun
该路中的下发会引发客户端的路由地址冲突,因为客户端本身就存在192.168.0.0/24或192.168.1.0/24的路由段,该段的路由转发目的地为网关。会导致局域网访问不通的问题。
所以在配置推送(下发)的路由时,必须与ccd配置相结合。
ccd配置:
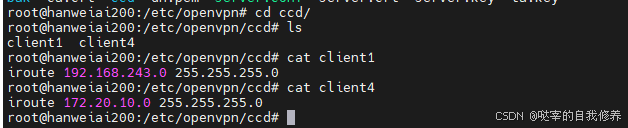
ccd文件夹中存放客户端的配置,比如两个客户端名称分别为client, client1,对应0.0以1.0网段。
则在ccd需要创建文件:client,然后存放以下内容:
iroute 192.168.0.0 255.255.255.0
此配置有2个作用:
1.为服务端添加路由表,在 VPN 服务端进行数据转发时,将192.168.0.0 255.255.255.0转发给 client
2.在进行路由推送时,忽略192.168.0.0 255.255.255.0对client的推送。
所以此时client对应的路由器将仅仅得到下发的路由:192.168.1.0 255.255.255.0
同时,还需要在ccd中创建client1:
iroute 192.168.1.0 255.255.255.0
最后:
路由器1得到的路由(示意,实际路由条件会多,但效果相同)如下:
192.168.1.0/24 -> tun
10.8.0.1 -> tun
路由器2得到的路由(示意,实际路由条件会多,但效果相同)如下:
192.168.0.0/24 -> tun
10.8.0.1 -> tun
服务端路由:
192.168.0.0/24 -> client
192.168.1.0/24 -> client1
数据流:
192.168.0.2 -> 192.168.1.2
1.192.168.0.2将数据发送给网关192.168.0.1
2.192.168.0.1接收到目标地址为 192.168.1.2 的数据包,根据路由表将其转发给VPN 服务端 10.8.0.1
3.10.8.0.1接收到目标地址为 192.168.1.2 的数据包,根据路由表将其转发给client1路由器
4.client1路由器接收到目标地址为 192.168.1.2 的数据包,路由表显示其为局域网地址,直接转发给 192.168.1.2
192.168.1.2 -> 192.168.0.2 原理相同
全连通:
还有时候,我们还需要连通服务端所在的局域网:
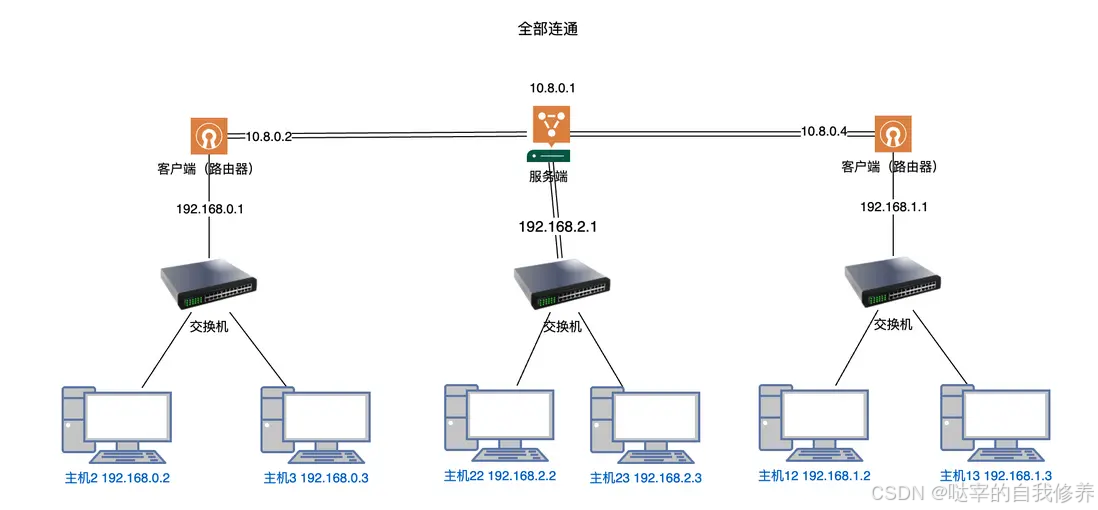
此时需要在 双客户端互连互通 配置的基础上,完善服务端的路由信息:
route 192.168.0.0 255.255.255.0
route 192.168.1.0 255.255.255.0
route 192.168.2.0 255.255.255.0
以及增加路由推送:
push "route 192.168.0.0 255.255.255.0"
push "route 192.168.1.0 255.255.255.0"
push "route 192.168.2.0 255.255.255.0"
则可以实现所有的客户端均可连接的目的。
补充1(可选):如何设置客户端的 IP 为固定 IP:
如何给 OpenVPN 的客户端电脑设置固定 IP?网上查出来一堆文章,大概的意思是服务器端启用 ccd 功能(修改服务器端配置文件的:),然后在服务器端的 config 目录底下,建立一个子目录:ccd,然后,在这个 ccd 目录底下,为每个客户端创建一个以该客户端的名字(common Name)为文件名,没有后缀的文本文件,文件内容是:
说法一:ifconfig-push 10.8.0.10 10.8.0.9
说法二:ifconfig-push 10.8.0.10 2255.255.255.0
要启用 ccd 模式,服务器端配置文件的修改如下:
- client-config-dir ccd
- 在 ccd 文件夹底下为该客户端名字(common Name,也就是为该客户端创建客户端证书时使用的名字)为文件名(没有扩展名)的文件里面添加 ifconfig-push 10.8.0.10 10.8.0.9 则是为该客户端固定了 IP 为 10.8.0.10;
补充2(可选):关于客户端的名字:
启动 ccd 模式,就要求需要被固定 IP 的客户端,有个独立的名字,而不是都用 client 这个名字。这个名字不是简单修改客户端的名字,而是要为该客户端单纯创建证书。创建证书时的命令:./easyrsa build-client-full client nopass 里面的这个【client】就要改为其它名字,比如 client1 或者其它字符串。这个 client1 就是它的 common Name;因此,这个客户端的 config 底下,相应的证书文件和 key 文件就是用这条命令创建的 client1.crt 和 client1.key;对于的客户端的配置参数文件,文件名最好修改为 client1.ovpn,并且里面的内容,关于证书文件的地方,要从 client.crt 改为 client1.crt;client.key 改为 client1.key。
另外,客户端配置文件的开头,有一个【client】字符串作为名称,这个没必要改。我的理解,服务器端是根据客户端的证书来确认客户端的名字。
补充3(可选):客户端的某台电脑开机自动连接 VPN;
问题描述:当前的 VPN 连接,是用户开机登录进入桌面后,在桌面右下角的 OpenVPN 图标右键点击菜单里面选择【连接】,它才建立和服务器的连接,获得 VPN 的 IP 地址。然后其它电脑才能通过 VPN 地址访问它。
如果我们想要那台电脑开机后自动连接 VPN 服务器,做以下操作:
- 把客户端的配置文件从 config 文件夹,搬移到 config-auto 文件夹底下就可以了。
- Windows 系统里面的 OpenVPN 服务(Windows Service),设置为自动启动。
做完上述操作,亲测,重新启动电脑后不登录,ping 它的 VPN IP 成功。说明它自动连接 VPN 了。
第三步:示例配置:
示例配置1:
全连通的示例配置如下,该配置工作在OpenWRT下,如果工作在其它的操作系统上,注意替换user与group的值。
port 1194

proto udp

dev tun

ca  /etc/openvpn/ca.crt
cert /etc/openvpn/openvpn-server.crt
key /etc/openvpn/openvpn-server.key  # This file should be kept secret
dh /etc/openvpn/dh.pem
tls-auth /etc/openvpn/ta.key 0 # This file is secret

server 172.29.253.0 255.255.255.0

ifconfig-pool-persist ipp.txt

# push to client route
# lan
push "route 192.168.20.0 255.255.255.0"
# tute
push "route 192.168.8.0 255.255.248.0"
# tute -> vpn services
push "route 172.29.248.0 255.255.248.0"
# laoting
push "route 172.29.0.0 255.255.248.0"

client-config-dir ccd
# config host route
# tute
route 192.168.8.0  255.255.248.0
# laoting
route 172.29.0.0 255.255.248.0
route 172.29.248.0 255.255.248.0


client-to-client

keepalive 10 120

cipher AES-256-CBC

user root
group root


persist-key
persist-tun
status openvpn-status.log

log         /var/log/openvpn.log

verb 3

explicit-exit-notify 1
ccd下文件配置如下:
客户端: laoting
iroute 172.29.0.0 255.255.248.0
客户端:tute
iroute 172.29.248.0 255.255.248.0
iroute 192.168.8.0 255.255.248.0
配置完成后,可通过检测服务端和客户端的路由表来进行确认。
示例配置2:
#################################################
# Sample OpenVPN 2.0 config file for            #
# multi-client server.                          #
#                                               #
# This file is for the server side              #
# of a many-clients <-> one-server              #
# OpenVPN configuration.                        #
#                                               #
# OpenVPN also supports                         #
# single-machine <-> single-machine             #
# configurations (See the Examples page         #
# on the web site for more info).               #
#                                               #
# This config should work on Windows            #
# or Linux/BSD systems.  Remember on            #
# Windows to quote pathnames and use            #
# double backslashes, e.g.:                     #
# "C:\\Program Files\\OpenVPN\\config\\foo.key" #
#                                               #
# Comments are preceded with '#' or ';'         #
#################################################

# Which local IP address should OpenVPN
# listen on? (optional)
;local a.b.c.d

# Which TCP/UDP port should OpenVPN listen on?
# If you want to run multiple OpenVPN instances
# on the same machine, use a different port
# number for each one.  You will need to
# open up this port on your firewall.
port 1194

# TCP or UDP server?
proto tcp
;proto udp

# "dev tun" will create a routed IP tunnel,
# "dev tap" will create an ethernet tunnel.
# Use "dev tap0" if you are ethernet bridging
# and have precreated a tap0 virtual interface
# and bridged it with your ethernet interface.
# If you want to control access policies
# over the VPN, you must create firewall
# rules for the the TUN/TAP interface.
# On non-Windows systems, you can give
# an explicit unit number, such as tun0.
# On Windows, use "dev-node" for this.
# On most systems, the VPN will not function
# unless you partially or fully disable
# the firewall for the TUN/TAP interface.
;dev tap
dev tun

# Windows needs the TAP-Win32 adapter name
# from the Network Connections panel if you
# have more than one.  On XP SP2 or higher,
# you may need to selectively disable the
# Windows firewall for the TAP adapter.
# Non-Windows systems usually don't need this.
;dev-node MyTap

# SSL/TLS root certificate (ca), certificate
# (cert), and private key (key).  Each client
# and the server must have their own cert and
# key file.  The server and all clients will
# use the same ca file.
#
# See the "easy-rsa" directory for a series
# of scripts for generating RSA certificates
# and private keys.  Remember to use
# a unique Common Name for the server
# and each of the client certificates.
#
# Any X509 key management system can be used.
# OpenVPN can also use a PKCS #12 formatted key file
# (see "pkcs12" directive in man page).
ca /etc/openvpn/ca.crt
cert /etc/openvpn/server.crt
key /etc/openvpn/server.key  # This file should be kept secret

# Diffie hellman parameters.
# Generate your own with:
#   openssl dhparam -out dh2048.pem 2048
dh /etc/openvpn/dh.pem

# Network topology
# Should be subnet (addressing via IP)
# unless Windows clients v2.0.9 and lower have to
# be supported (then net30, i.e. a /30 per client)
# Defaults to net30 (not recommended)
;topology subnet

# Configure server mode and supply a VPN subnet
# for OpenVPN to draw client addresses from.
# The server will take 10.8.0.1 for itself,
# the rest will be made available to clients.
# Each client will be able to reach the server
# on 10.8.0.1. Comment this line out if you are
# ethernet bridging. See the man page for more info.
server 10.8.0.0 255.255.255.0

# Maintain a record of client <-> virtual IP address
# associations in this file.  If OpenVPN goes down or
# is restarted, reconnecting clients can be assigned
# the same virtual IP address from the pool that was
# previously assigned.
ifconfig-pool-persist /var/log/openvpn/ipp.txt

# Configure server mode for ethernet bridging.
# You must first use your OS's bridging capability
# to bridge the TAP interface with the ethernet
# NIC interface.  Then you must manually set the
# IP/netmask on the bridge interface, here we
# assume 10.8.0.4/255.255.255.0.  Finally we
# must set aside an IP range in this subnet
# (start=10.8.0.50 end=10.8.0.100) to allocate
# to connecting clients.  Leave this line commented
# out unless you are ethernet bridging.
;server-bridge 10.8.0.4 255.255.255.0 10.8.0.50 10.8.0.100

# Configure server mode for ethernet bridging
# using a DHCP-proxy, where clients talk
# to the OpenVPN server-side DHCP server
# to receive their IP address allocation
# and DNS server addresses.  You must first use
# your OS's bridging capability to bridge the TAP
# interface with the ethernet NIC interface.
# Note: this mode only works on clients (such as
# Windows), where the client-side TAP adapter is
# bound to a DHCP client.
;server-bridge

# Push routes to the client to allow it
# to reach other private subnets behind
# the server.  Remember that these
# private subnets will also need
# to know to route the OpenVPN client
# address pool (10.8.0.0/255.255.255.0)
# back to the OpenVPN server.
;push "route 192.168.10.0 255.255.255.0"
;push "route 192.168.20.0 255.255.255.0"
;push "route 192.168.1.0 255.255.255.0"
push "route 192.168.100.0 255.255.255.0"
push "route 172.20.10.0 255.255.255.0"
push "route 192.168.243.0 255.255.255.0"

# To assign specific IP addresses to specific
# clients or if a connecting client has a private
# subnet behind it that should also have VPN access,
# use the subdirectory "ccd" for client-specific
# configuration files (see man page for more info).

# EXAMPLE: Suppose the client
# having the certificate common name "Thelonious"
# also has a small subnet behind his connecting
# machine, such as 192.168.40.128/255.255.255.248.
# First, uncomment out these lines:
client-config-dir /etc/openvpn/ccd
route 192.168.243.0 255.255.255.0
route 172.20.10.0 255.255.255.0
# Then create a file ccd/Thelonious with this line:
#   iroute 192.168.40.128 255.255.255.248
# This will allow Thelonious' private subnet to
# access the VPN.  This example will only work
# if you are routing, not bridging, i.e. you are
# using "dev tun" and "server" directives.

# EXAMPLE: Suppose you want to give
# Thelonious a fixed VPN IP address of 10.9.0.1.
# First uncomment out these lines:
;client-config-dir ccd
;route 10.9.0.0 255.255.255.252
# Then add this line to ccd/Thelonious:
#   ifconfig-push 10.9.0.1 10.9.0.2

# Suppose that you want to enable different
# firewall access policies for different groups
# of clients.  There are two methods:
# (1) Run multiple OpenVPN daemons, one for each
#     group, and firewall the TUN/TAP interface
#     for each group/daemon appropriately.
# (2) (Advanced) Create a script to dynamically
#     modify the firewall in response to access
#     from different clients.  See man
#     page for more info on learn-address script.
;learn-address ./script

# If enabled, this directive will configure
# all clients to redirect their default
# network gateway through the VPN, causing
# all IP traffic such as web browsing and
# and DNS lookups to go through the VPN
# (The OpenVPN server machine may need to NAT
# or bridge the TUN/TAP interface to the internet
# in order for this to work properly).
;push "redirect-gateway def1 bypass-dhcp"

# Certain Windows-specific network settings
# can be pushed to clients, such as DNS
# or WINS server addresses.  CAVEAT:
# http://openvpn.net/faq.html#dhcpcaveats
# The addresses below refer to the public
# DNS servers provided by opendns.com.
;push "dhcp-option DNS 208.67.222.222"
;push "dhcp-option DNS 208.67.220.220"

# Uncomment this directive to allow different
# clients to be able to "see" each other.
# By default, clients will only see the server.
# To force clients to only see the server, you
# will also need to appropriately firewall the
# server's TUN/TAP interface.
client-to-client

# Uncomment this directive if multiple clients
# might connect with the same certificate/key
# files or common names.  This is recommended
# only for testing purposes.  For production use,
# each client should have its own certificate/key
# pair.
#
# IF YOU HAVE NOT GENERATED INDIVIDUAL
# CERTIFICATE/KEY PAIRS FOR EACH CLIENT,
# EACH HAVING ITS OWN UNIQUE "COMMON NAME",
# UNCOMMENT THIS LINE OUT.
duplicate-cn

# The keepalive directive causes ping-like
# messages to be sent back and forth over
# the link so that each side knows when
# the other side has gone down.
# Ping every 10 seconds, assume that remote
# peer is down if no ping received during
# a 120 second time period.
keepalive 10 120

# For extra security beyond that provided
# by SSL/TLS, create an "HMAC firewall"
# to help block DoS attacks and UDP port flooding.
#
# Generate with:
#   openvpn --genkey tls-auth ta.key
#
# The server and each client must have
# a copy of this key.
# The second parameter should be '0'
# on the server and '1' on the clients.
tls-auth /etc/openvpn/ta.key 0 # This file is secret

# Select a cryptographic cipher.
# This config item must be copied to
# the client config file as well.
# Note that v2.4 client/server will automatically
# negotiate AES-256-GCM in TLS mode.
# See also the ncp-cipher option in the manpage
cipher AES-256-GCM

# Enable compression on the VPN link and push the
# option to the client (v2.4+ only, for earlier
# versions see below)
;compress lz4-v2
;push "compress lz4-v2"

# For compression compatible with older clients use comp-lzo
# If you enable it here, you must also
# enable it in the client config file.
;comp-lzo

# The maximum number of concurrently connected
# clients we want to allow.
;max-clients 100

# It's a good idea to reduce the OpenVPN
# daemon's privileges after initialization.
#
# You can uncomment this out on
# non-Windows systems.
;user nobody
;group nobody

# The persist options will try to avoid
# accessing certain resources on restart
# that may no longer be accessible because
# of the privilege downgrade.
persist-key
persist-tun

# Output a short status file showing
# current connections, truncated
# and rewritten every minute.
status /var/log/openvpn/openvpn-status.log

# By default, log messages will go to the syslog (or
# on Windows, if running as a service, they will go to
# the "\Program Files\OpenVPN\log" directory).
# Use log or log-append to override this default.
# "log" will truncate the log file on OpenVPN startup,
# while "log-append" will append to it.  Use one
# or the other (but not both).
;log         /var/log/openvpn/openvpn.log
;log-append  /var/log/openvpn/openvpn.log

# Set the appropriate level of log
# file verbosity.
#
# 0 is silent, except for fatal errors
# 4 is reasonable for general usage
# 5 and 6 can help to debug connection problems
# 9 is extremely verbose
verb 3

# Silence repeating messages.  At most 20
# sequential messages of the same message
# category will be output to the log.
;mute 20

# Notify the client that when the server restarts so it
# can automatically reconnect.
explicit-exit-notify 0
第四步:客户端配置(可选):
1.忽略路由:
忽略到服务端下发的所有路由。
所以想忽略某些特定的路由,比如忽略: 192.168.1.0/24 则可以进行如下指定:
pull-filter ignore "route 192.168.1.0 255.255.255.0"
2.设置路由:
除了可以忽略路由外,还可以在客户端的配置文件中手动的指定路由:
route 192.168.1.0 255.255.255.0
此时,在OpenVPN配置文件生效时,将会在路由表中添加192.168.1.0 255.255.255.0的出口为VPN。
总结:
其实还可以根据配置信息完成更复杂的配置,比如将某个客户端所在网络的其它网络加入到整个 VPN 大网络中。整体对配置总结如下:
1.服务端路由的作用是配置当前 VPN 服务器的路由信息,在配置文件中声明的路由将加入到 VPN 服务端的路由表中,以达到当 VPN 服务器接收到目标地址的数据转发时,将数据交给 VPN 服务来处理。
2.路由下发中配置的路由将下发给客户端,客户端在接收到下发的路由后,更新本地路由表,符合路由表的数据将转发给VPN 服务端
3.ccd下的文件必须与客户端名称相同。在其中可以定义客户端所在的网段信息(可以是多个),它的作用有两个:一是告之 VPN 服务端,当目标地址符合配置的路由时,将数据转发给特定的客户端。二是在向客户端进行路由下发时,忽略配置中的路由地址以避免发生路由冲突。
另外,即使不启用client-to-client,路由的下发也是生效的,此时就会有个尴尬的事情发生:数据按路由指示转发给了VPN 服务端,但由于 VPN 服务端并没有开启client-to-client,从而使得通讯失败。所以如果在服务端上想关闭client-to-client功能,则需要同时删除到配置的所有路由推送。
参考文章:
> https://www.cnblogs.com/huangweimin/articles/7700892.html
https://segmentfault.com/a/1190000045251783#item-5
https://www.comway.com.cn/2018-solution-plc-lan.html
https://blog.csdn.net/damiaomiao666/article/details/139886164
https://blog.csdn.net/rockage/article/details/127190263
https://blog.csdn.net/pcplayer/article/details/135895249
https://cainiaojiaocheng.com/%E5%A6%82%E4%BD%95%E5%9C%A8Ubuntu22.04%E4%B8%8A%E8%AE%BE%E7%BD%AE%E5%92%8C%E9%85%8D%E7%BD%AEOpenVPN%E6%9C%8D%E5%8A%A1%E5%99%A8#.E7.AC.AC_2_.E6.AD.A5_.E2.80.94_.E4.B8.BA_OpenVPN_.E5.88.9B.E5.BB.BA_PKI

https://openatomworkshop.csdn.net/673ff056cd8b2677c3e4963d.html?dp_token=eyJ0eXAiOiJKV1QiLCJhbGciOiJIUzI1NiJ9.eyJpZCI6Mzc2ODgsImV4cCI6MTczMzExOTgwNSwiaWF0IjoxNzMyNTE1MDA1LCJ1c2VybmFtZSI6IndlaXhpbl80MDczNDUxNCJ9.g8pV11W6WGicmJLoJg14aHVVBeWdAepkJfU_3oDHvtQ&spm=1001.2101.3001.6661.1&utm_medium=distribute.pc_relevant_t0.none-task-blog-2%7Edefault%7ECTRLIST%7Eactivity-1-126337495-blog-135895249.235%5Ev43%5Econtrol&depth_1-utm_source=distribute.pc_relevant_t0.none-task-blog-2%7Edefault%7ECTRLIST%7Eactivity-1-126337495-blog-135895249.235%5Ev43%5Econtrol&utm_relevant_index=1


 5939
5939

 被折叠的 条评论
为什么被折叠?
被折叠的 条评论
为什么被折叠?
 到【灌水乐园】发言


