


1、原始模型
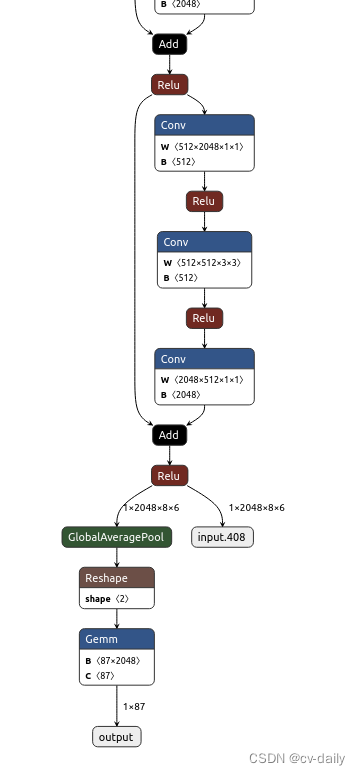
onnx转caffe报错没有globalaverage层。
于是转化成:

onnx转化caffe之后,修改prototxt文件,加上globalaverage和reshape层.
参考:https://blog.csdn.net/z649431508/article/details/113425275
layer {
name: “GlobalAveragePool_12”
type: “Pooling”
bottom: “107”
top: “108”
pooling_param {
pool: AVE
global_pooling: true
}
}
量化时报错,kernel size is too large, kernel_h = 9
改成
layer {
name: “GlobalAveragePool_12”
type: “Pooling”
bottom: “107”
top: “108”
pooling_param {
pool: AVE
kernel_h:6
stride_h:6
kernel_w:8
stride_w:8
}
}
还是报错,kernel size is too large, kernel_h = 6
改成
layer {
name: “GlobalAveragePool_12”
type: “Pooling”
bottom: “107”
top: “108”
pooling_param {
pool: AVE
kernel_h:4
stride_h:4
kernel_w:3
stride_w:3
}
}
还是报错,kernel size is too large, kernel_h = 4
应该是这样直接在prototxt里边改不对。
改模型结构
        # if pool == 'avg':
        #     self.pool = nn.AdaptiveAvgPool2d(1)
        # elif pool == 'max':
        #     self.pool = nn.AdaptiveMaxPool2d(1)
改成
            self.pool = nn.MaxPool2d(kernel_size=(4,3), stride=(4, 3), padding=1)
            self.pool1 = nn.MaxPool2d(kernel_size=(2,2), stride=(2, 2), padding=0)
在python中是正确的,但是转化caffe时报错。
I0420 17:26:17.114603  9605 net.cpp:86] Creating Layer /classifier/logits/logits.0/Gemm
I0420 17:26:17.114611  9605 net.cpp:408] /classifier/logits/logits.0/Gemm <- onnx::Gemm_192
I0420 17:26:17.114620  9605 net.cpp:382] /classifier/logits/logits.0/Gemm -> output
F0420 17:26:17.114662  9605 blob.cpp:133] Check failed: data_
*** Check failure stack trace: ***
排查问题在python的维度和caffe的不同。
python是:
(256,192)–(128,96)–(64,48)–(32,24)–(16,12)–(8,6)–两次maxpool–(1,1)–logistic
caffe模型变成了:
(256,192)–(128,96)–(65,49)–(33,25)–(17,13)–(9,7)–两次maxpool–(2,2)–logistic,所以报错了。
参考:https://blog.csdn.net/djfjkj52/article/details/117028618
将nn.MaxPool2d中加上ceil_model=True就可以不影响特征图尺寸
最终把所有的maxpooling改成:
# self.maxpool = nn.MaxPool2d(kernel_size=3, stride=2, padding=1)
self.maxpool = nn.MaxPool2d(kernel_size=3, stride=2, padding=0, ceil_mode=True)


    # self.pool = nn.AvgPool2d(kernel_size=(8,6), stride=(6, 6), padding=1, ceil_mode=True, count_include_pad=True)
    self.pool = nn.MaxPool2d(kernel_size=(4,3), stride=(4, 3), padding=0, ceil_mode=True)
    self.pool1 = nn.MaxPool2d(kernel_size=(2,2), stride=(2, 2), padding=0, ceil_mode=True)
部署成功了,但是结果不对。
hisi输出是
[Level]:Info,[Func]:SAMPLE_SVP_NNIE_Cnn_PrintResult [Line]:739 [Info]:0:-243
[Level]:Info,[Func]:SAMPLE_SVP_NNIE_Cnn_PrintResult [Line]:739 [Info]:5:-720
[Level]:Info,[Func]:SAMPLE_SVP_NNIE_Cnn_PrintResult [Line]:739 [Info]:10:-838
[Level]:Info,[Func]:SAMPLE_SVP_NNIE_Cnn_PrintResult [Line]:739 [Info]:4:-999
[Level]:Info,[Func]:SAMPLE_SVP_NNIE_Cnn_PrintResult [Line]:739 [Info]:12:-1232
正常应该是正数,因为后边要接sigmoid函数,作为概率输出。
排查问题。测试caffe模型的结果正确。
#coding=utf-8
import caffe
import numpy as np
# import readFCLayerWeights
# relu 激活函数
def relu(array):
    return np.maximum(array,0)
deploy_proto = "./v2.prototxt"
caffe_model = "./v2.caffemodel"
img = './test_0010.jpg'
net = caffe.Net(deploy_proto, caffe_model, caffe.TEST)
# 图片预处理 变更为模型中的尺寸
transformer = caffe.io.Transformer({'images': net.blobs['images'].data.shape})
transformer.set_transpose('images', (2,0,1))
im = caffe.io.load_image(img,False)
#执行上面设置的图片预处理操作,并将图片载入到blob中
net.blobs['images'].data[...] = transformer.preprocess('images',im)
out = net.forward()
cnn_result = out.get('output')    ##查看cnn的输出值正常
排查是否为量化问题,使用wk的simulation仿真功能。
最终排查是部署代码问题。换了一套代码NNIE-Lite,测试结果正确。
参考:https://zhuanlan.zhihu.com/p/154157011
https://github.com/mxsurui/NNIE-lite
以上修改不具有普适性。只适用于HEIGHT:WIDTH=8:6的,改成7:6就不能用了。


 1993
1993


 被折叠的 条评论
为什么被折叠?
被折叠的 条评论
为什么被折叠?
 到【灌水乐园】发言


