


隐私计算实训营第二期-第十课
第十课:基于SPU机器学习建模实践
首先必须感谢蚂蚁集团及隐语社区带来的隐私计算实训第二期的学习机会!
本节课由蚂蚁隐私计算部算法工程师吴豪奇老师讲解。

本节课主要内容为:
- 隐私保护机器学习背景
- SPU架构简介
- NN密态训练/推理示例
1 隐私保护机器学习背景
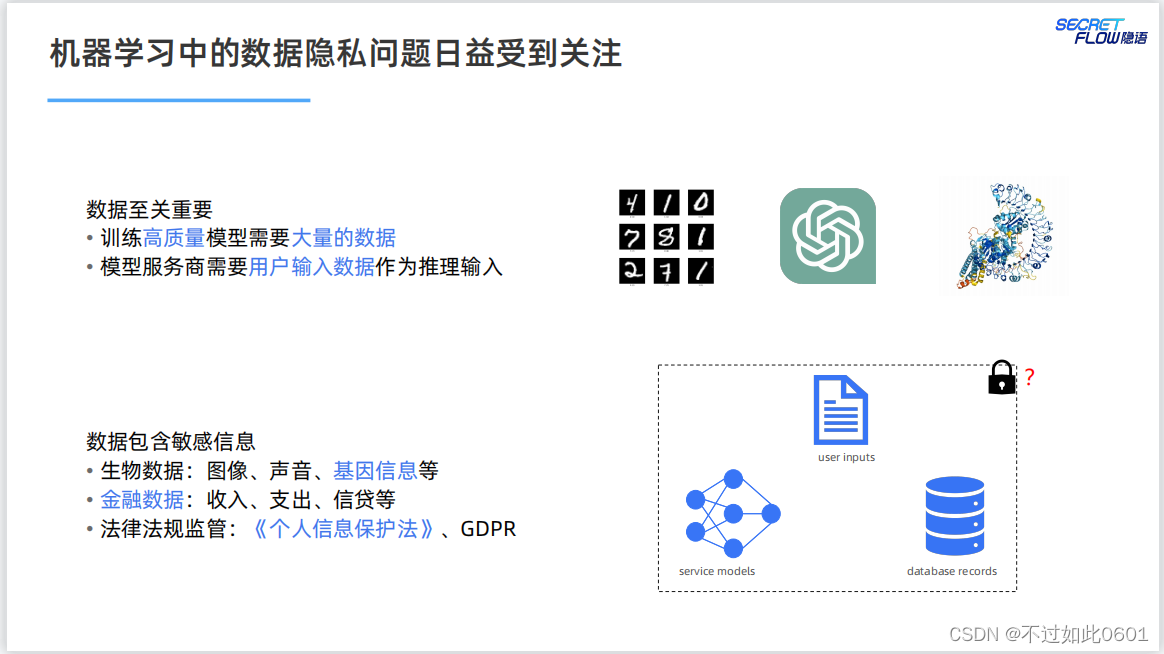
1.1 机器学习中隐私保护的需求
本节课前两个小节的内容,我们这之前的课程中已有一些了解,
本节课可以回顾一下。
数据和模型的隐私保护需求是产生隐私保护机器学习的根因。
1.2 PPML提供的技术解决方案
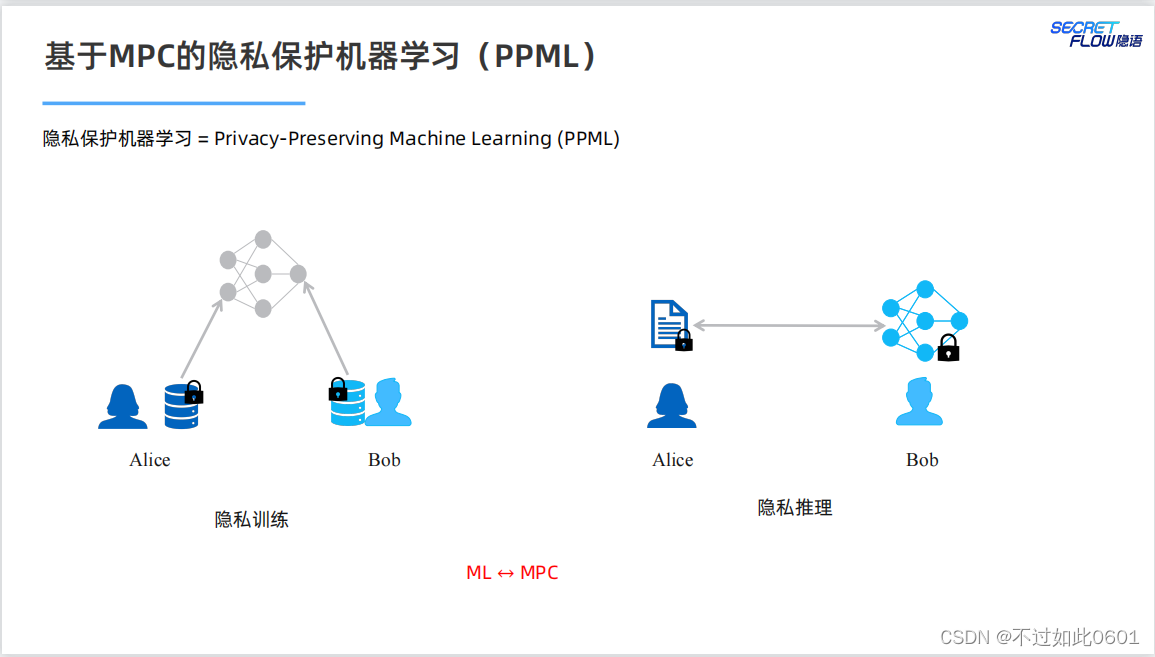
MPC提供了隐私保护的技术解决方案。
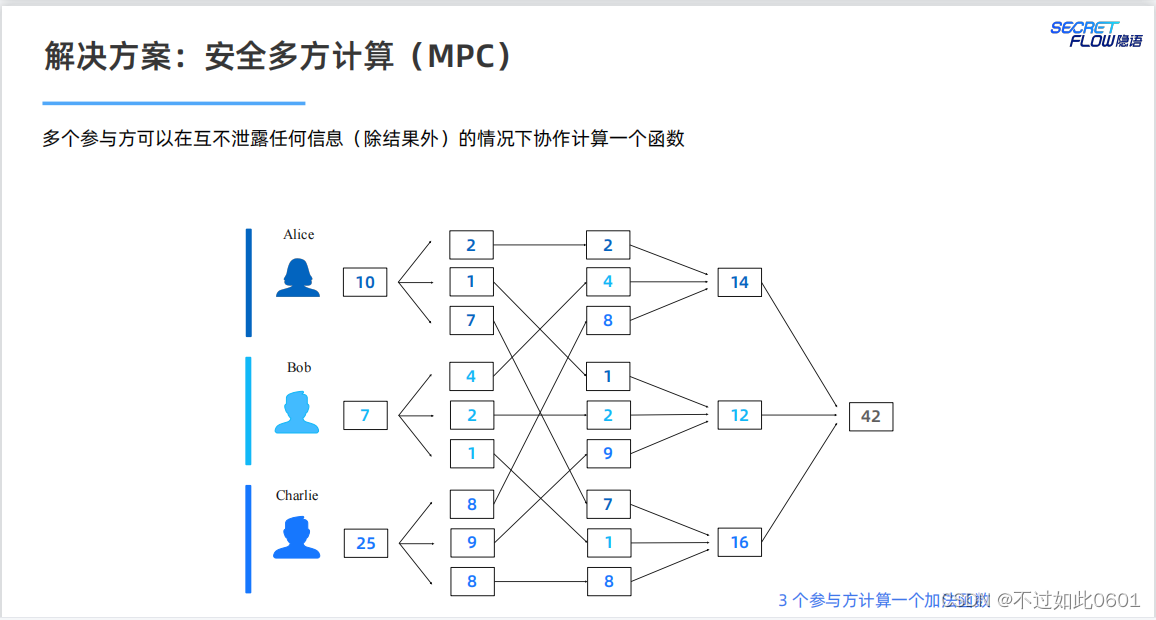
使用MPC结合机器学习,为模型训练和推理提供隐私保护。
问题:
我们是否可以直接以 MPC 的方式高效地运行已有的机器学习程序?
2 SPU架构
SPU架构我们在之前已经学习过,宏观上主要分为三部分:
- 前端部分
- 编译器
- 运行时
2.1 SPU前端
SPU前端尽量支持原生的AI编程方式,支持JAX、TensorFlow,Pytorch
等典型的AI编程框架。
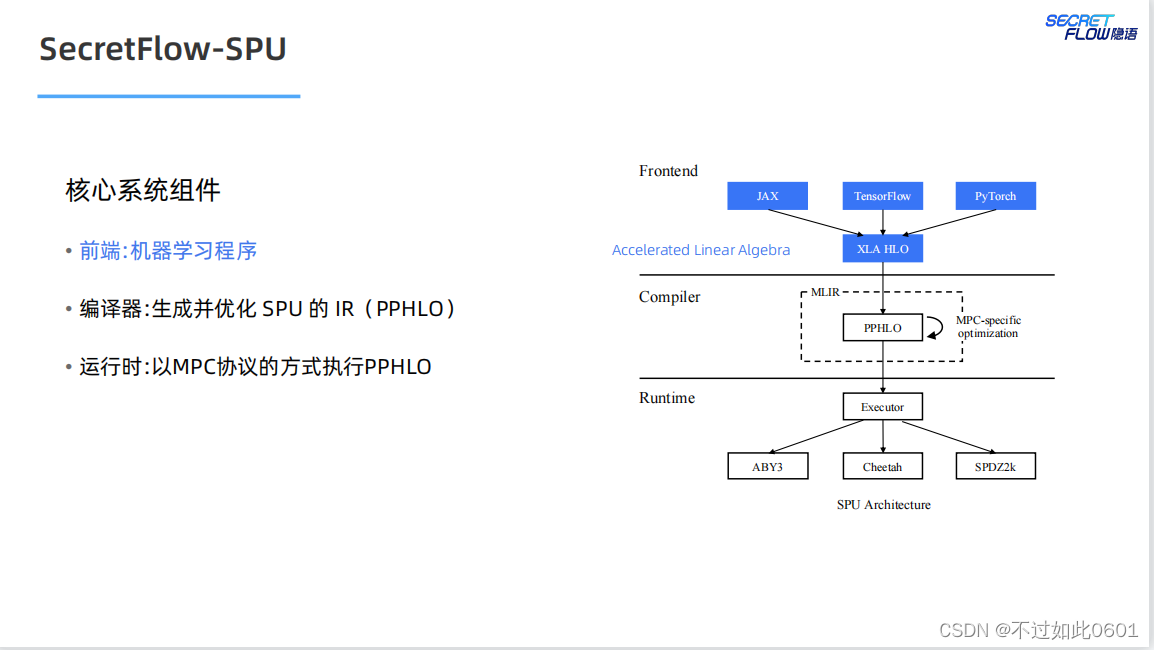
2.2 SPU编译器
SPU的编译器以优化方式生成SPU的密态中间语言。
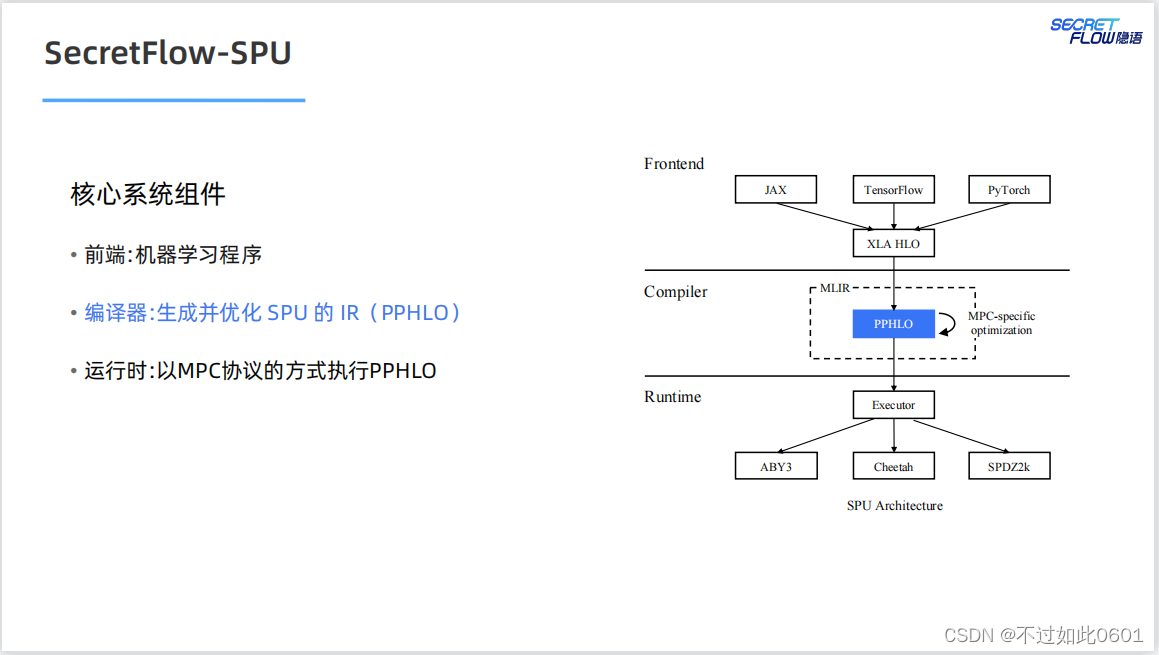
2.3 SPU运行时
SPU的运行时支持多种并行模式(数据并行+指令并行),多种MPC协议
以及多种部署模式。
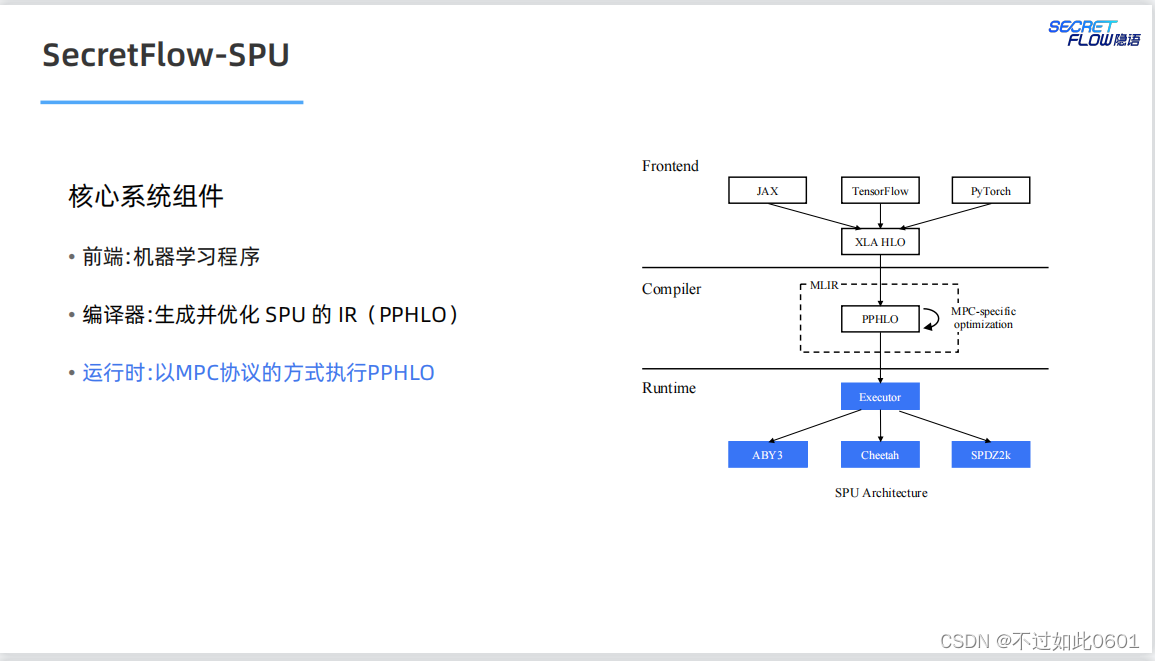
2.4 SPU目标
SPU的最终目标是实现易用、可扩展和高性能的密态计算虚拟设备。

3 密态训练与推理
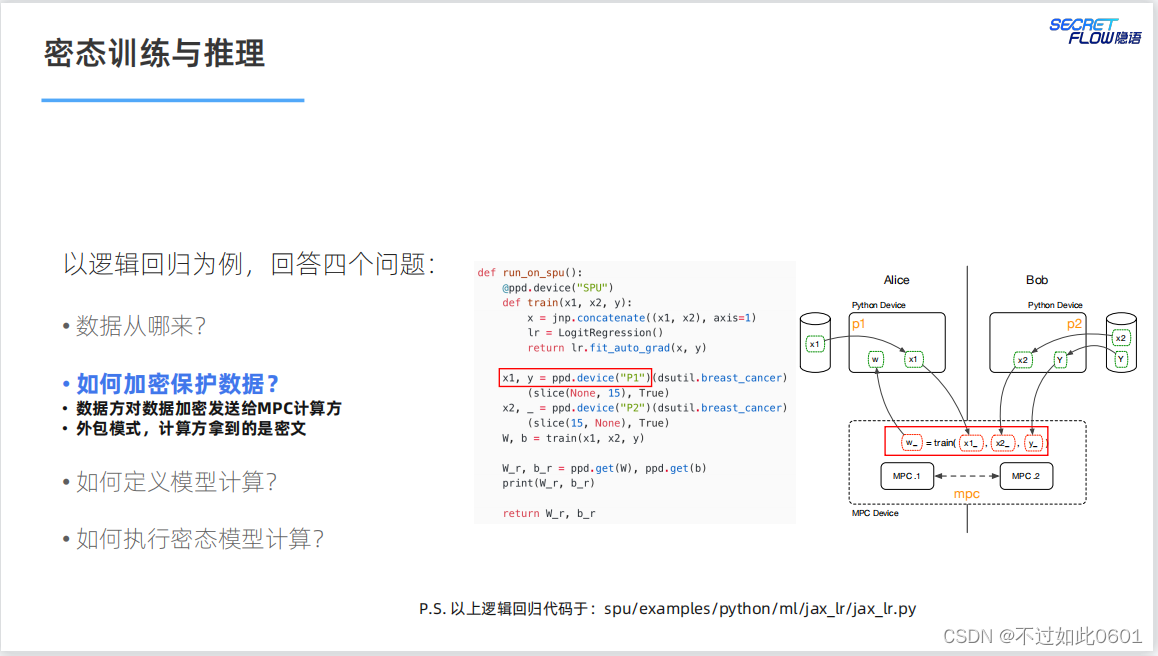
3.1 四个基本问题
密态的训练和推理需要解决的四个问题:
- 数据从哪来?
- 如何加密保护数据?
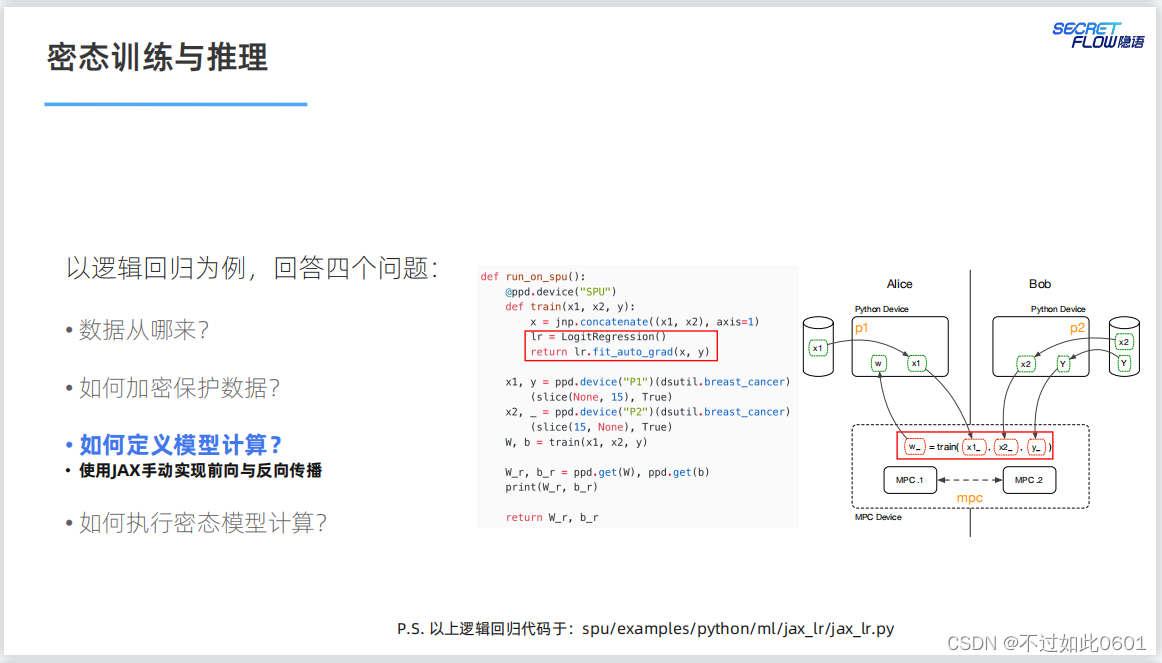
- 如何定义模型计算?
- 如何执行密态模型计算?
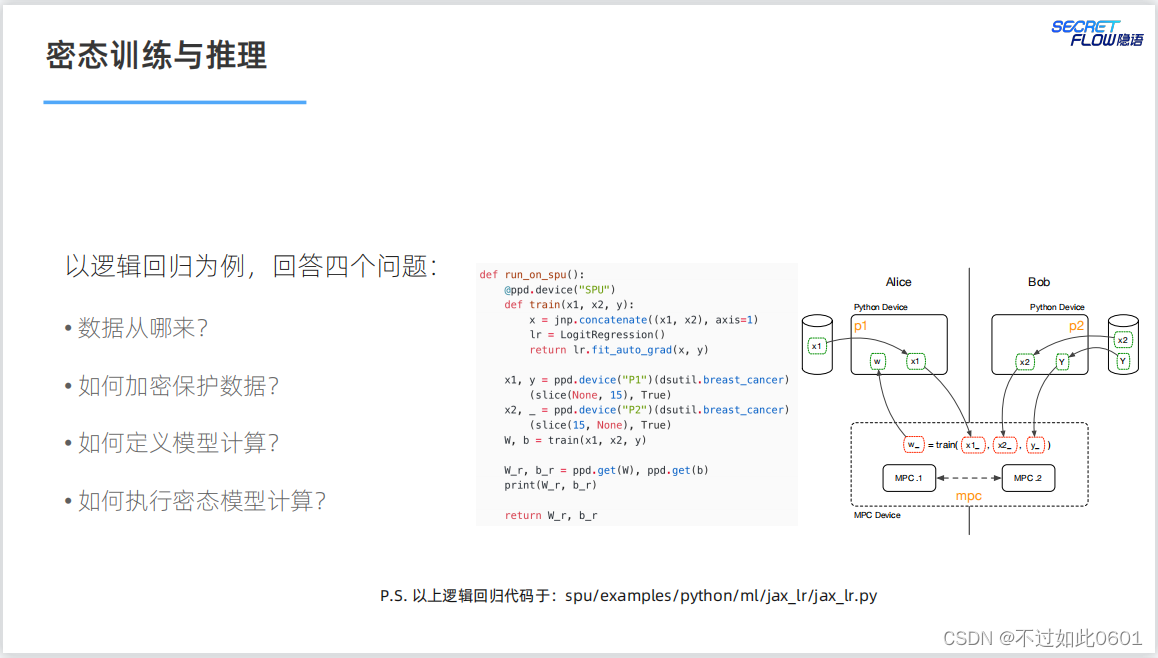
3.2 解决数据来源问题
数据由数据个参与方以密态的形式提供。
3.3 解决数据安全问题
数据安全通过MPC协议或者同态加密等外部模式解决。
3.4 解决模型计算问题
NN模型的计算问题通过JAX实现前向和反向传播。
3.5 解决密态计算问题
NN模型的密态计算SPU的编译器转换为密态算子,然后按照MPC协议
进行计算。
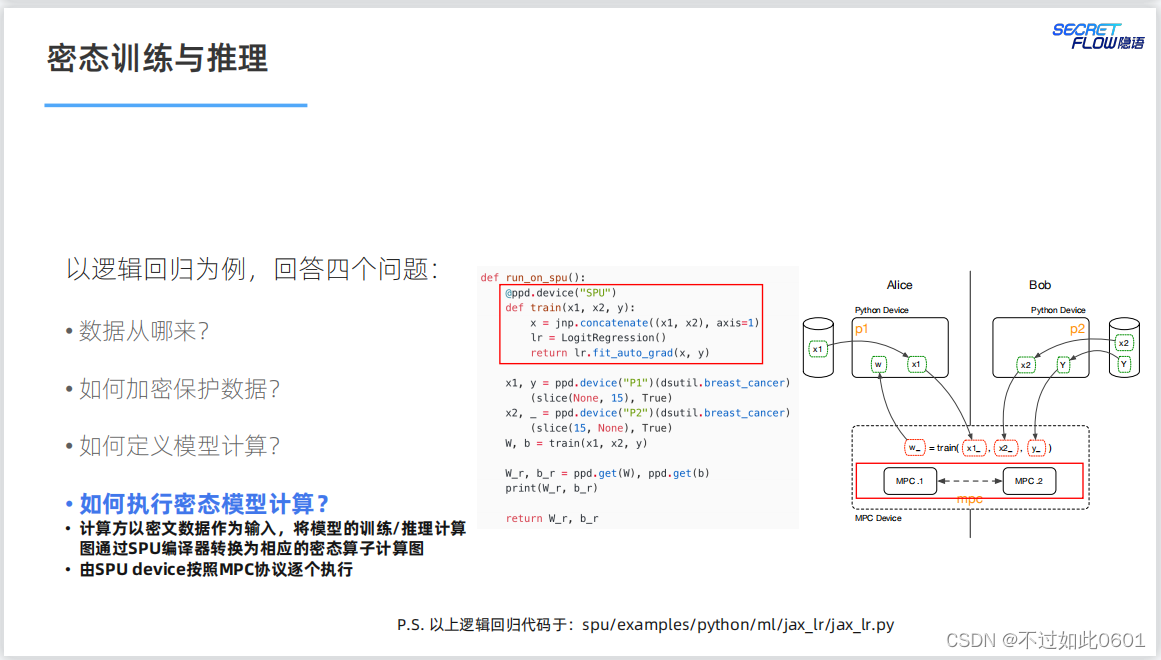
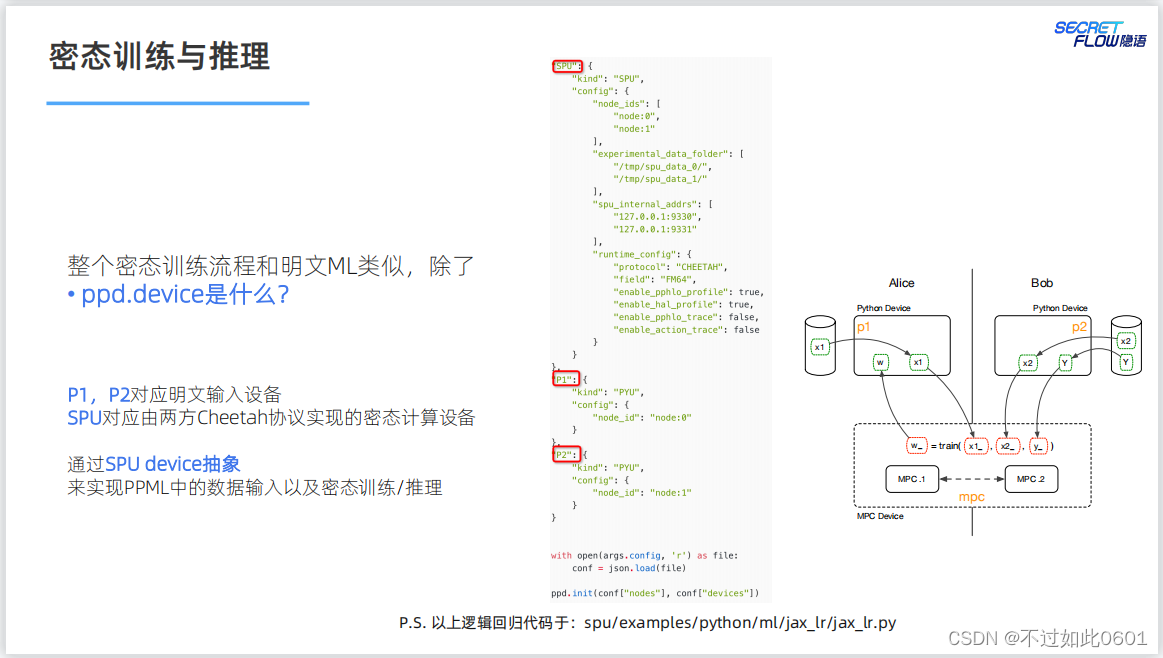
密态的计算过程与明文类似,通过SPU密态计算配置实现密态训练。
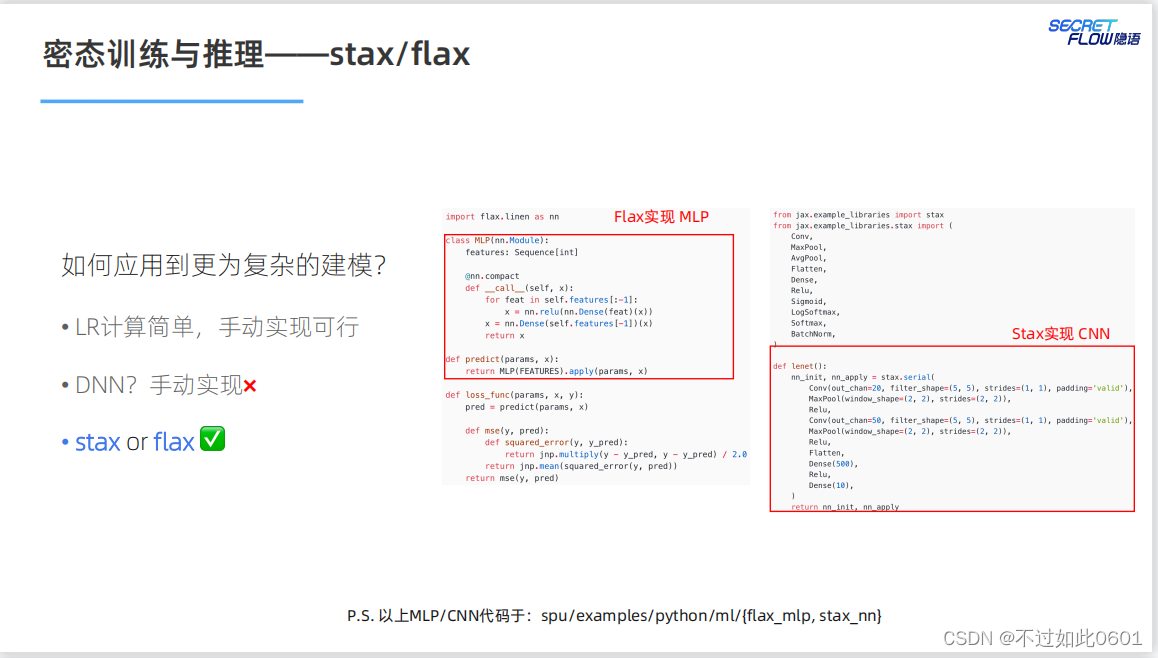
3.6 如何应对更复杂的模型
对于复杂模型,使用stax和flax来进行实现。
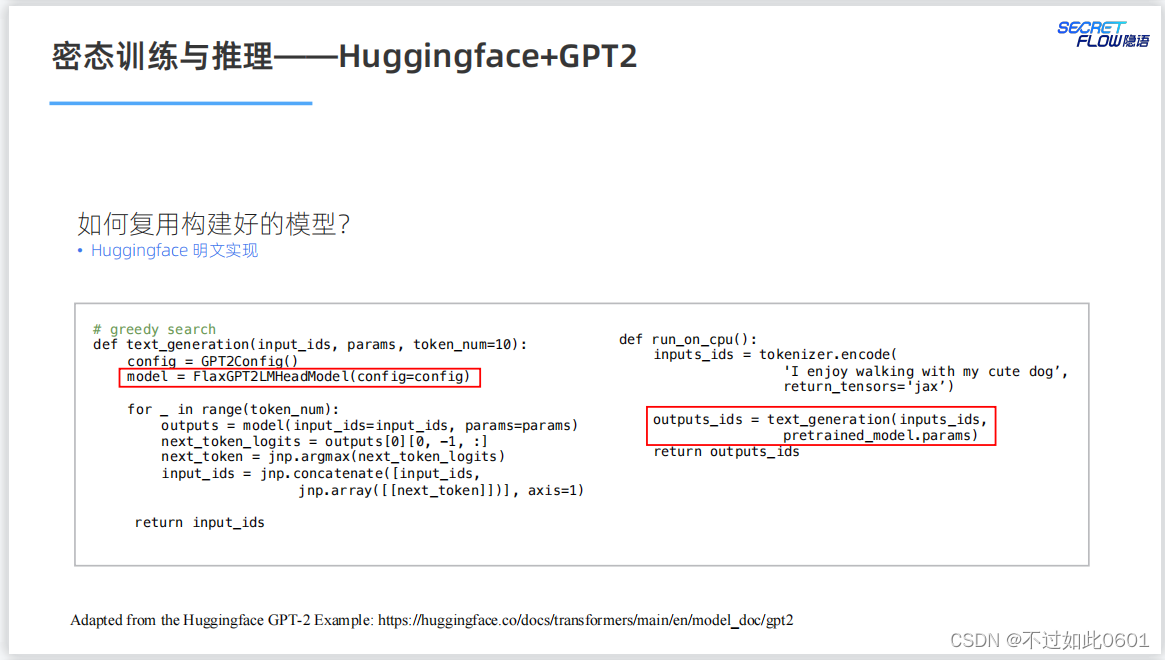
3.7 已有模型的复用
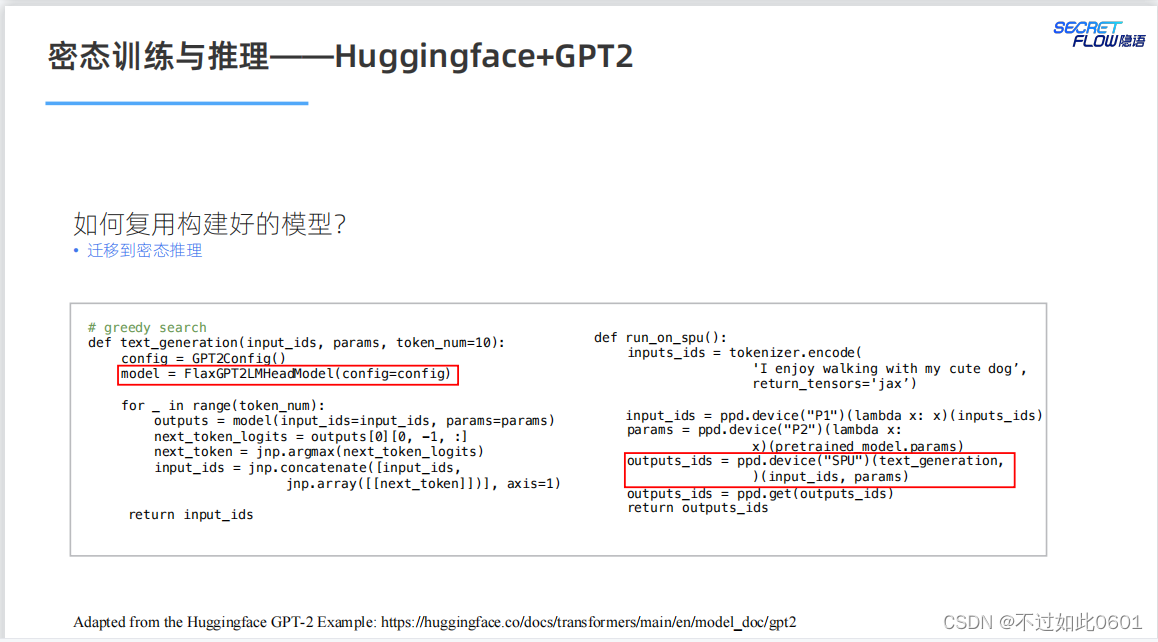
已有模型的复用问题,根据明文实现来进行密态计算的迁移。
比如,明文实现的GPT2模型。
然后进行密态迁移:
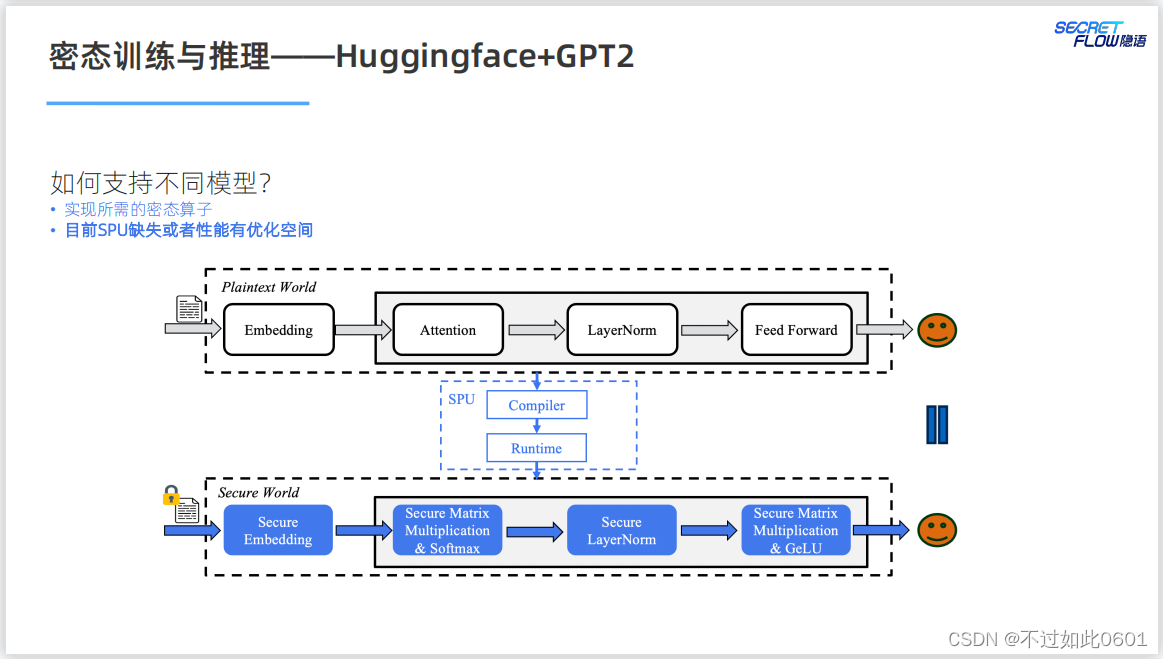
在支持不同的模型方面,SPU还需要更新和优化自己的实现以满足不同
模型的需求。
4 作业实践
4.1 基础NN模型作业
本次课程有两个作业,一个是基础的NN模型。另一个是进阶的Transformer
模型。
完成步骤如下:
1、加载数据集
import numpy as np
from sklearn.datasets import load_breast_cancer
from sklearn.model_selection import train_test_split
from sklearn.preprocessing import Normalizer


def breast_cancer(party_id=None, train: bool = True) -> (np.ndarray, np.ndarray):
    x, y = load_breast_cancer(return_X_y=True)
    x = (x - np.min(x)) / (np.max(x) - np.min(x))
    x_train, x_test, y_train, y_test = train_test_split(
        x, y, test_size=0.2, random_state=42
    )

    if train:
        if party_id:
            if party_id == 1:
                return x_train[:, :15], _
            else:
                return x_train[:, 15:], y_train
        else:
            return x_train, y_train
    else:
        return x_test, y_test
2、定义模型
from typing import Sequence
import flax.linen as nn


FEATURES = [30, 15, 8, 1]


class MLP(nn.Module):
    features: Sequence[int]

    @nn.compact
    def __call__(self, x):
        for feat in self.features[:-1]:
            x = nn.relu(nn.Dense(feat)(x))
        x = nn.Dense(self.features[-1])(x)
        return x
3、定义训练参数
import jax.numpy as jnp


def predict(params, x):
    # TODO(junfeng): investigate why need to have a duplicated definition in notebook,
    # which is not the case in a normal python program.
    from typing import Sequence
    import flax.linen as nn

    FEATURES = [30, 15, 8, 1]

    class MLP(nn.Module):
        features: Sequence[int]

        @nn.compact
        def __call__(self, x):
            for feat in self.features[:-1]:
                x = nn.relu(nn.Dense(feat)(x))
            x = nn.Dense(self.features[-1])(x)
            return x

    return MLP(FEATURES).apply(params, x)


def loss_func(params, x, y):
    pred = predict(params, x)

    def mse(y, pred):
        def squared_error(y, y_pred):
            return jnp.multiply(y - y_pred, y - y_pred) / 2.0

        return jnp.mean(squared_error(y, pred))

    return mse(y, pred)


def train_auto_grad(x1, x2, y, params, n_batch=10, n_epochs=10, step_size=0.01):
    x = jnp.concatenate((x1, x2), axis=1)
    xs = jnp.array_split(x, len(x) / n_batch, axis=0)
    ys = jnp.array_split(y, len(y) / n_batch, axis=0)

    def body_fun(_, loop_carry):
        params = loop_carry
        for x, y in zip(xs, ys):
            _, grads = jax.value_and_grad(loss_func)(params, x, y)
            params = jax.tree_util.tree_map(
                lambda p, g: p - step_size * g, params, grads
            )
        return params

    params = jax.lax.fori_loop(0, n_epochs, body_fun, params)
    return params


def model_init(n_batch=10):
    model = MLP(FEATURES)
    return model.init(jax.random.PRNGKey(1), jnp.ones((n_batch, FEATURES[0])))
4、验证参数
from sklearn.metrics import roc_auc_score
def validate_model(params, X_test, y_test):
    y_pred = predict(params, X_test)
    return roc_auc_score(y_test, y_pred)
5、开始明文训练
import jax

# Load the data
x1, _ = breast_cancer(party_id=1, train=True)
x2, y = breast_cancer(party_id=2, train=True)

# Hyperparameter
n_batch = 10
n_epochs = 10
step_size = 0.01

# Train the model
init_params = model_init(n_batch)
params = train_auto_grad(x1, x2, y, init_params, n_batch, n_epochs, step_size)

# Test the model
X_test, y_test = breast_cancer(train=False)
auc = validate_model(params, X_test, y_test)
print(f'auc={auc}')
这里输出的明文训练结果为:
6、开始密文训练
import secretflow as sf

# Check the version of your SecretFlow
print('The version of SecretFlow: {}'.format(sf.__version__))

# In case you have a running secretflow runtime already.
sf.shutdown()

sf.init(['alice', 'bob'], address='local')

alice, bob = sf.PYU('alice'), sf.PYU('bob')
spu = sf.SPU(sf.utils.testing.cluster_def(['alice', 'bob']))

x1, _ = alice(breast_cancer)(party_id=1, train=True)
x2, y = bob(breast_cancer)(party_id=2, train=True)
init_params = model_init(n_batch)

device = spu
x1_, x2_, y_ = x1.to(device), x2.to(device), y.to(device)
init_params_ = sf.to(alice, init_params).to(device)

params_spu = spu(train_auto_grad, static_argnames=['n_batch', 'n_epochs', 'step_size'])(
    x1_, x2_, y_, init_params_, n_batch=n_batch, n_epochs=n_epochs, step_size=step_size
)
7、检查参数
params_spu = spu(train_auto_grad)(x1_, x2_, y_, init_params)
params = sf.reveal(params_spu)
print(params)
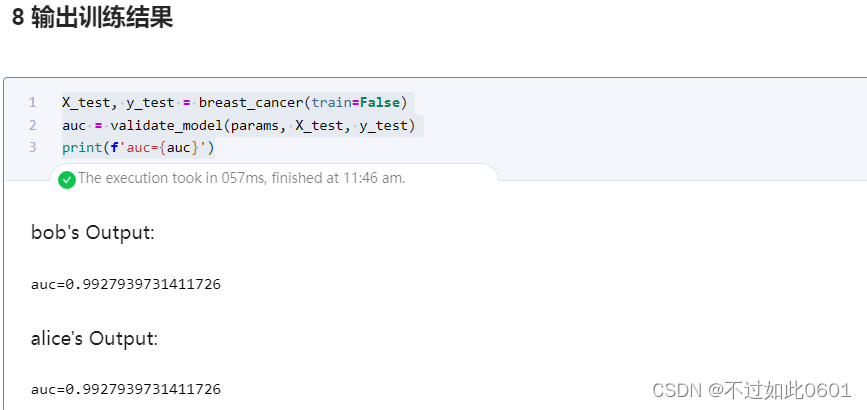
8、输出训练结果
X_test, y_test = breast_cancer(train=False)
auc = validate_model(params, X_test, y_test)
print(f'auc={auc}')
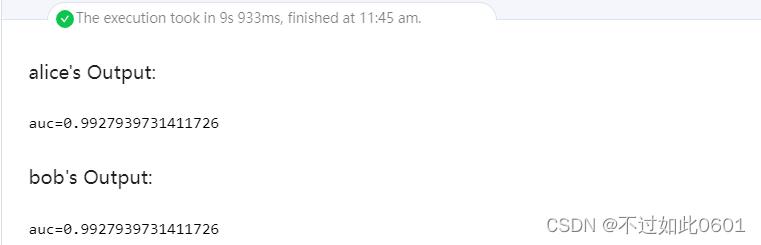
密文训练输出结果为:
可以看出,密文训练和明文训练的效果相同,本作业结束,
4.2 进阶Transformer模型作业
完成步骤如下:
1、安装Transformer模型
import sys
!{sys.executable} -m pip install transformers[flax] -i https://pypi.tuna.tsinghua.edu.cn/simple
2、设置镜像huggingface
import os
import sys
!{sys.executable} -m pip install huggingface_hub
os.environ['HF_ENDPOINT']='https://hf-mirror.com'
3、加载模型
from transformers import AutoTokenizer, FlaxGPT2LMHeadModel, GPT2Config
tokenizer = AutoTokenizer.from_pretrained("gpt2")
pretrained_model = FlaxGPT2LMHeadModel.from_pretrained("gpt2")
4、定义文本生成函数
def text_generation(input_ids, params):
    config = GPT2Config()
    model = FlaxGPT2LMHeadModel(config=config)

    for _ in range(10):
        outputs = model(input_ids=input_ids, params=params)
        next_token_logits = outputs[0][0, -1, :]
        next_token = jnp.argmax(next_token_logits)
        input_ids = jnp.concatenate([input_ids, jnp.array([[next_token]])], axis=1)
    return input_ids
5、进行明文的文本生成
import jax.numpy as jnp

inputs_ids = tokenizer.encode('I enjoy walking with my cute dog', return_tensors='jax')
outputs_ids = text_generation(inputs_ids, pretrained_model.params)

print('-' * 65 + '\nRun on CPU:\n' + '-' * 65)
print(tokenizer.decode(outputs_ids[0], skip_special_tokens=True))
print('-' * 65)
生成的输出结果为:
6、进行密文训练
import secretflow as sf

# In case you have a running secretflow runtime already.
sf.shutdown()

sf.init(['alice', 'bob', 'carol'], address='local')

alice, bob = sf.PYU('alice'), sf.PYU('bob')
conf = sf.utils.testing.cluster_def(['alice', 'bob', 'carol'])
conf['runtime_config']['fxp_exp_mode'] = 1
conf['runtime_config']['experimental_disable_mmul_split'] = True
spu = sf.SPU(conf)


def get_model_params():
    pretrained_model = FlaxGPT2LMHeadModel.from_pretrained("gpt2")
    return pretrained_model.params


def get_token_ids():
    tokenizer = AutoTokenizer.from_pretrained("gpt2")
    return tokenizer.encode('I enjoy walking with my cute dog', return_tensors='jax')


model_params = alice(get_model_params)()
input_token_ids = bob(get_token_ids)()

device = spu
model_params_, input_token_ids_ = model_params.to(device), input_token_ids.to(device)

output_token_ids = spu(text_generation)(input_token_ids_, model_params_)
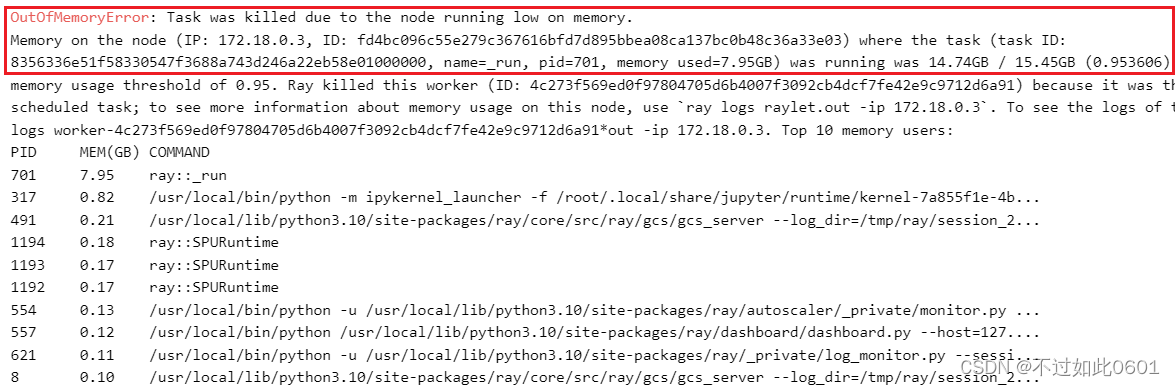
这里由于机器配置不够,内存不足,被系统kill进程,导致无法完成训练。小伙伴们机器好的应该可以跑完。
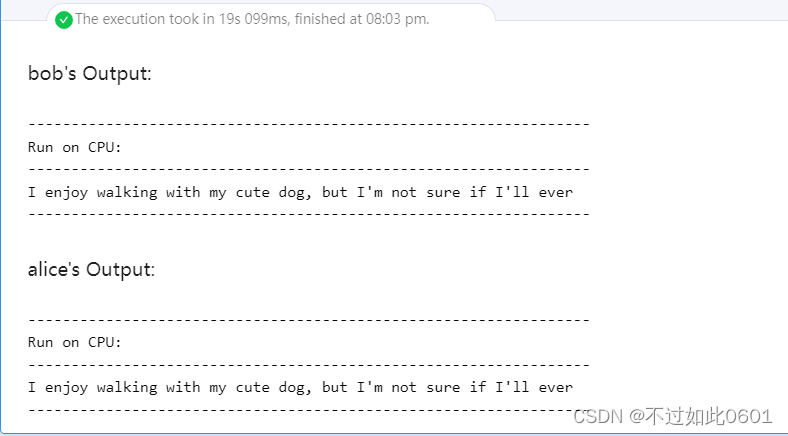
7、输出密文训练结果
outputs_ids = sf.reveal(output_token_ids)
print('-' * 65 + '\nRun on SPU:\n' + '-' * 65)
print(tokenizer.decode(outputs_ids[0], skip_special_tokens=True))
print('-' * 65)
至此,本次作业全部结束。


 1223
1223


 被折叠的 条评论
为什么被折叠?
被折叠的 条评论
为什么被折叠?
 到【灌水乐园】发言


