


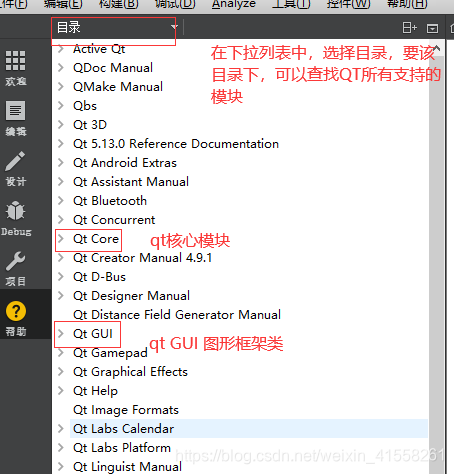
一、 QT中时间和日期
头文件:#include <QTime>
模块:在项目的pro文件中,查看是否包含模块:QT += core[static] QTime QTime::currentTime() //获取当前的系统时间,就是此时的时间,不会自动往下走②可以创建一个QTime对象,让后再指定该对象的时,分,秒
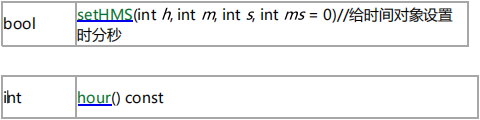
QTime(int h, int m, int s = 0, int ms = 0)
QTime time(0,0,0); //可以做为秒表的功能再通过增加毫秒的时间,增加到1000,秒针就会自动加1
2. 简单案例:
实现嵌入式产品的系统时间
第一步:通过currentTime() ----->得到QTime对象
第二步:将QTime时间更新UI(QLabel)-----> tostring()
QString QTime::toString(const QString &format) const ‐‐‐将时间对象转换成字符串,并且在转换字符串时,可以指定字符串显示的格式MainWindow::MainWindow(QWidget *parent)
: QMainWindow(parent)
, ui(new Ui::MainWindow)
,t1(0,0,0)
{
ui->setupUi(this);
//通过构造函数创建一个时间对象,并指定它的时分秒分别为0
QTime t(0,0,0); //t --- 0 0 0 0
//将时间对象转换成字符串并输出
qDebug() << "time = " << t.toString("hh:mm:ss:zzz"); //通过手册上的格式,指定时间显示的格式
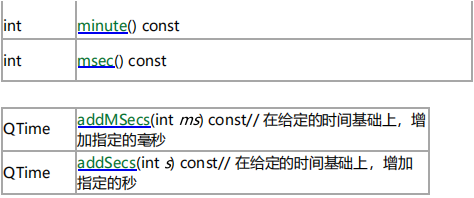
//通过 QTime addSecs(int s) const 给时间对象增加指定的秒
t = t.addSecs(5);
qDebug() << "time = " << t.toString("hh-mm-ss-zzz");
//通过 QTime addMSecs(int ms) const 给时间对象增加指定的毫秒
t = t.addMSecs(200);
qDebug() << "time = " << t.toString("hh:mm:ss:zzz");
//通过静态成员函数
t = QTime::currentTime(); //获取当前操作系统的时间
qDebug() << "time = " << t.toString("hh:mm:ss:zzz");
qDebug() << "time = " << t1.toString("hh:mm:ss:zzz");
}

使用格式如下: "hh:mm:ss" 或者 "hh-mm-ss"
3.QTime常用接口
①QString QTime::toString(QStringView format) const
功能说明:将一个时间对象以指定格式转换成字符串
指定格式:"hh:mm:ss" 或者 "hh-mm-ss“
②[static] QTime QTime::currentTime()
功能:获取系统当前的时间
③
2、日期类QDate
①.功能:获取系统当前的日期
②.创建对象的方法:
①构造函数:QDate(int y, int m, int d)
②静态函数:currentDate()
③.功能接口函数:
指定格式:

比如:"yyyy/MM/dd"
④.简单的小例子
MainWindow::MainWindow(QWidget *parent)
    : QMainWindow(parent)
    , ui(new Ui::MainWindow)
{
    ui->setupUi(this);

    QDate d(2021,6,8);

   qDebug() << d.toString("yyyy/MM/dd");

  QDate dd =  QDate::currentDate();

   qDebug() << dd.dayOfWeek(); //返回这周是这个月中的第几周

}
三 QT对话框类部件

1. QColorDialog---颜色对话框
[static] QColor QColorDialog::getColor(const QColor &initial = Qt::white,QWidget *parent = nullptr, const QString &title = QString(),QColorDialog::ColorDialogOptions options = ColorDialogOptions())功能:得到一个颜色(QColor)
参数说明:
②简单的案例:设置一个控件的背景颜色
void ColorWindow::on_colorSetButton_clicked()
{
//[1]打开颜色对话框,并选择一个颜色
QColor color = QColorDialog::getColor();
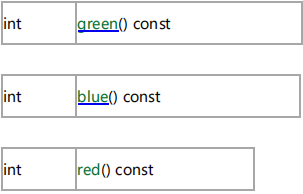
//[2] 将颜色值分别获取它的rgb
int red = color.red();
int green = color.green();
int blue = color.blue();
//[3] 将rgb设置给控件
ui‐>testLabel‐>setStyleSheet(QString("background‐color: rgb(%1, %2, % 3);").arg(red)
.arg(green)
.arg(blue));
}2.QFontDialog---字体对话框
函数原型:
[static] QFont QFontDialog::getFont(bool *ok, const QFont &initial,QWidget *parent = nullptr, const QString &title = QString(),QFontDialog::FontDialogOptions options = FontDialogOptions())bool ok;
QFont font = QFontDialog::getFont(&ok, QFont("Times", 12), this);
if (ok)
{
// font is set to the font the user selected
} else {
// the user canceled the dialog; font is set to the initial
// value, in this case Times, 12
}②一个简单的案例
void FontDialogWin::on_fontSetButton_clicked()
{
    //[1] 打开对话框
    bool ok;
    QFont font = QFontDialog::getFont(&ok,this);
    if(ok)
    {
        qDebug() << "ok = " << ok << font.toString();
        //[2] 如果获得成功,则将font设置给指定的控件
        ui‐>label‐>setFont(font);
    }else {
        qDebug() << " get font failed";
    }
}3.QFileDialog---文件对话框
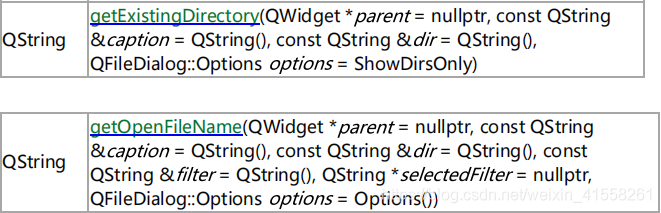
它经常结合QFile来进行读或者写文件
QString fileName =
QFileDialog::getOpenFileName(this, tr("Open File"),/*tr()‐‐‐国标化标准*/
"/home", //绝对路径
tr("Images (*.png *.xpm *.jpg)")); "Images (*.png *.xpm *.jpg);;Text files (*.txt);;XML files (*.xml)"void FileDialogWin::on_browseButton_clicked()
{
//[1]打开文件对话框
QString filePath = QFileDialog::getOpenFileName(this,"打开文件", "D:/Qt/qt_gz2057_workspace/DAY4/cpp_demo6_qfiledialog",Text files (*.cpp *.h)");
//[2] 将文件路径更新UI
ui‐>fileEdit‐>setText(filePath);
//[3]根据文件路径打开此文件
}4.QFile--文件
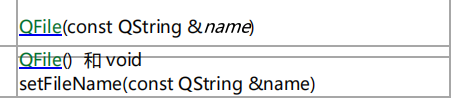
第二步:打开文件---- open


第三步:访问文件 ---- read 或者 write
第四步:关闭文件 ---- close
具体的实现代码:
void FileDialogWin::on_browseButton_clicked()
{
    //[1]打开文件对话框
    QString filePath = QFileDialog::getOpenFileName(this, "打开文件",                                                              "D:/Qt/qt_gz2057_workspace/DAY4/cpp_demo6_qfiledialog",
"Text files (*.cpp *.h)");

    //[2] 将文件路径更新UI
    ui‐> fileEdit‐> setText(filePath);

    //[3]根据文件路径打开此文件
    QFile file(filePath);

    //[4] 打开文件 ‐‐‐ open
    if (file.open(QIODevice::ReadOnly))
    {
        QByteArray array = file.readAll();
        qDebug() << "ARRAY= " << array;
    }
    file.close();
}
void SaveFileWin::on_saveButton_clicked()
{
    //[1] 打开另存为对话框,并手动设置文件的名字
    QString filename = QFileDialog::getSaveFileName(this);

    //[2] 创建文件和打开文件
    QFile file(filename);

    if (file.open(QIODevice::WriteOnly))

    {
        //[3] 获得UI控件上的内容,再将它写入到文件中
        QString data = ui‐> textEdit‐> toPlainText();
        //QString ‐‐‐‐> QByteArray ‐‐‐‐ QString::toUtf8() const : QByteArray
        file.write(data.toUtf8());
    }
    file.close();
}


 421
421


 被折叠的 条评论
为什么被折叠?
被折叠的 条评论
为什么被折叠?
 到【灌水乐园】发言


