


目录
6.4.2、控件模板ControlTemplate:EventTrigger、Trigger
引言
Windows Presentation Foundation (WPF) 提供了一组强大的图形和布局功能,使用户能够创建引起注意的用户界面和有吸引力的文档。 动画不仅可以使引起注意的用户界面更加引人注目,还可以使其更加便于使用。 只需对背景色进行动画处理或应用经过动画处理的 Transform,即可创造出生动的屏幕过渡效果或提供有帮助的视觉提示。
动画类型包括 “From/To/By” 动画、关键帧动画、路径动画和抽象类 AnimationBase,动画都是继承自 Timeline 类的时间线,具有 Duration、AutoReverse 和 RepeatBehavior 等计时属性。
动画结束后,FillBehavior (默认HoldEnd)属性决定了时间线结束时的行为方式,默认情况下会保持最终输出值(如果不希望保持,设置为Stop)。在代码中可以通过特定方法重新获得动画属性的控制权。
1、“From/To/By” 动画
From/To/By 动画是一种 AnimationTimeline 类型,可在起始值和终止值之间创建转换。 完成转换所需的时间取决于该动画的 Duration。WPF 提供以下 From/To/By 动画类。
-
起始值From
要显式指定动画起始值时,请使用 From 属性。 可以单独使用 From 属性,也可以与 To 或 By 属性结合使用。 如果仅指定 From 属性,则动画从该值转换到动画处理属性的基值。
-
终止值To
若要指定动画的终止值,请设置其 To 属性。 如果单独使用 To 属性,则动画从要进行动画处理的属性中获取其起始值,或者从应用到相同属性的另一个动画的输出中获取其起始值。 可以将 To 属性与 From 属性一起使用,以显式指定动画的起始值和终止值。
-
偏移值By
使用 By 属性,可以为动画指定偏移,而不是显式的起始或终止值。 动画的 By 属性指定动画在其持续时间内更改某个值的程度。 可以单独使用 By 属性,或者与 From 属性结合使用。 如果仅指定 By 属性,动画会将偏移值添加到属性的基值或另一个动画的输出。
1.1、示例
这里使用偏移值:By="10",该值会直接与属性值相加得到最终值(即To值),动画结束行为设置为Stop(即不保持动画终止结果)
<Window.Resources>
    <Storyboard
        x:Key="story1"
        FillBehavior="Stop"
        Storyboard.TargetName="label"
        Storyboard.TargetProperty="FontSize">
        <DoubleAnimation By="10" Duration="0:0:0.5" />
    </Storyboard>
</Window.Resources>
<Grid HorizontalAlignment="Center" VerticalAlignment="Center">
    <Label Name="label" Content="Label">
        <Label.Triggers>
            <EventTrigger RoutedEvent="MouseEnter">
                <BeginStoryboard Storyboard="{StaticResource story1}" />
            </EventTrigger>
        </Label.Triggers>
    </Label>
</Grid>
A: 稍微更改一下:如果我们设置为保持动画结果(即默认值)会怎样?删除FillBehavior属性设置。
![]()
此时会越来越大,可以理解为动画结果已经将原来的属性值进行了更改。
B: 再更改一下:鼠标进入放大,鼠标离开还原。还是使用By偏移进行设置,看似没问题
![]()
 <Window.Resources>
     <Storyboard
         x:Key="story1"
         Storyboard.TargetName="label"
         Storyboard.TargetProperty="FontSize">
         <DoubleAnimation By="10" Duration="0:0:0.5" />
     </Storyboard>
     <Storyboard
         x:Key="story2"
         Storyboard.TargetName="label"
         Storyboard.TargetProperty="FontSize">
         <DoubleAnimation By="-10" Duration="0:0:0.5" />
     </Storyboard>
 </Window.Resources>
 <Grid HorizontalAlignment="Center" VerticalAlignment="Center">
     <Label Name="label" Content="Label">
         <Label.Triggers>
             <EventTrigger RoutedEvent="MouseEnter">
                 <BeginStoryboard Storyboard="{StaticResource story1}" />
             </EventTrigger>
             <EventTrigger RoutedEvent="MouseLeave">
                 <BeginStoryboard Storyboard="{StaticResource story2}" />
             </EventTrigger>
         </Label.Triggers>
     </Label>
 </Grid>
上面说到By会直接追加到属性的初始值上,当我们触发频率超过动画时长时,会出现叠加效果。
![]()
C: 如果想要确定的结果,我们需要对By偏移值追加一个初始值From,也即确定了终值To。
<Window.Resources>
    <Storyboard
        x:Key="story1"
        Storyboard.TargetName="label"
        Storyboard.TargetProperty="FontSize">
        <DoubleAnimation
            By="10"
            From="20"
            Duration="0:0:0.5" />
    </Storyboard>
    <Storyboard
        x:Key="story2"
        Storyboard.TargetName="label"
        Storyboard.TargetProperty="FontSize">
        <DoubleAnimation
            By="-10"
            From="30"
            Duration="0:0:0.5" />
    </Storyboard>
</Window.Resources>
<Grid HorizontalAlignment="Center" VerticalAlignment="Center">
    <Label Name="label" Content="Label">
        <Label.Triggers>
            <EventTrigger RoutedEvent="MouseEnter">
                <BeginStoryboard Storyboard="{StaticResource story1}" />
            </EventTrigger>
            <EventTrigger RoutedEvent="MouseLeave">
                <BeginStoryboard Storyboard="{StaticResource story2}" />
            </EventTrigger>
        </Label.Triggers>
    </Label>
</Grid>
D: 这里我们确定了初始值,通过计算得出终值,动画始终会从初始值开始,当动画未结束时触发另外动画,就会出现突变现象。如果想要避免,可以不设定初始值,只设定重点目标To
![]()
<Storyboard
    x:Key="story1"
    Storyboard.TargetName="label"
    Storyboard.TargetProperty="FontSize">
    <DoubleAnimation To="30" Duration="0:0:0.5" />
</Storyboard>
<Storyboard
    x:Key="story2"
    Storyboard.TargetName="label"
    Storyboard.TargetProperty="FontSize">
    <DoubleAnimation To="20" Duration="0:0:0.5" />
</Storyboard>
2、关键帧动画
与 From/To/By 动画类似,关键帧动画对目标属性的值进行动画处理。 它通过其 Duration 在目标值之间创建过渡。 但是,From/To/By 动画可以在两个值之间创建过渡,而单个关键帧动画可以在任意数量的目标值之间创建过渡。 不同于 From/To/By 动画,关键帧动画没有设置其目标值所需的 From、To 或 By 属性。 关键帧动画的目标值使用关键帧对象进行描述,因此称作“关键帧动画”。 若要指定动画的目标值,请创建关键帧对象并将其添加到动画的 KeyFrames 集合。 动画运行时,将在指定的帧之间过渡。
某些关键帧方法除支持多个目标值外,甚至还支持多个内插方法。 动画的内插方法定义了从一个值过渡到下一个值的方式。 有三种内插类型:离散、线性和曲线。
插值方法:
离散
<DiscreteDoubleKeyFrame Value="500" KeyTime="0:0:7" />
线性
<LinearDoubleKeyFrame Value="200" KeyTime="0:0:10" />
曲线
<SplineDoubleKeyFrame Value="350" KeyTime="0:0:15"  KeySpline="0.0,0.0 1.0,0.0"/>
2.1、 示例
A: 鼠标进入右移,鼠标离开还原关键帧动画
<Window.Resources>
    <Storyboard
        x:Key="story1"
        Storyboard.TargetName="MyAnimatedTranslateTransform"
        Storyboard.TargetProperty="X">
        <DoubleAnimationUsingKeyFrames Duration="0:0:0.5">
            <LinearDoubleKeyFrame KeyTime="0:0:0" Value="0" />
            <LinearDoubleKeyFrame KeyTime="0:0:0.25" Value="10" />
            <LinearDoubleKeyFrame KeyTime="0:0:0.5" Value="20" />
        </DoubleAnimationUsingKeyFrames>
    </Storyboard>
    <Storyboard
        x:Key="story2"
        Storyboard.TargetName="MyAnimatedTranslateTransform"
        Storyboard.TargetProperty="X">
        <DoubleAnimationUsingKeyFrames Duration="0:0:0.5">
            <LinearDoubleKeyFrame KeyTime="0:0:0" Value="20" />
            <LinearDoubleKeyFrame KeyTime="0:0:0.25" Value="10" />
            <LinearDoubleKeyFrame KeyTime="0:0:0.5" Value="0" />
        </DoubleAnimationUsingKeyFrames>
    </Storyboard>
</Window.Resources>
<Grid HorizontalAlignment="Center" VerticalAlignment="Center">
    <Label Name="label" Content="Label">
        <Label.RenderTransform>
            <TranslateTransform x:Name="MyAnimatedTranslateTransform" X="0" Y="0" />
        </Label.RenderTransform>
        <Label.Triggers>
            <EventTrigger RoutedEvent="MouseEnter">
                <BeginStoryboard Storyboard="{StaticResource story1}" />
            </EventTrigger>
            <EventTrigger RoutedEvent="MouseLeave">
                <BeginStoryboard Storyboard="{StaticResource story2}" />
            </EventTrigger>
        </Label.Triggers>
    </Label>
</Grid>
2.2、时间百分比
KeyTime不仅可以直接写时间,还可以写百分比。
<Storyboard
    x:Key="story1"
    Storyboard.TargetName="MyAnimatedTranslateTransform"
    Storyboard.TargetProperty="X">
    <DoubleAnimationUsingKeyFrames Duration="0:0:0.5">
        <LinearDoubleKeyFrame KeyTime="0" Value="0" />
        <LinearDoubleKeyFrame KeyTime="50%" Value="10" />
        <LinearDoubleKeyFrame KeyTime="100%" Value="20" />
    </DoubleAnimationUsingKeyFrames>
</Storyboard>
<Storyboard
    x:Key="story2"
    Storyboard.TargetName="MyAnimatedTranslateTransform"
    Storyboard.TargetProperty="X">
    <DoubleAnimationUsingKeyFrames Duration="0:0:0.5">
        <LinearDoubleKeyFrame KeyTime="0" Value="20" />
        <LinearDoubleKeyFrame KeyTime="50%" Value="10" />
        <LinearDoubleKeyFrame KeyTime="100%" Value="0" />
    </DoubleAnimationUsingKeyFrames>
</Storyboard>
2.3、时间等分Uniform
如果希望每个关键帧的持续时间都相同,应使用 Uniform 计时。Uniform 关键时间按关键帧的数量平均分配可用时间,以确定每个关键帧的结束时间。
<Storyboard
x:Key="story1"
Storyboard.TargetName="MyAnimatedTranslateTransform"
Storyboard.TargetProperty="X">
<DoubleAnimationUsingKeyFrames Duration="0:0:0.5">
<LinearDoubleKeyFrame KeyTime="Uniform" Value="0" />
<LinearDoubleKeyFrame KeyTime="Uniform" Value="10" />
<LinearDoubleKeyFrame KeyTime="Uniform" Value="20" />
</DoubleAnimationUsingKeyFrames>
</Storyboard>
<Storyboard
x:Key="story2"
Storyboard.TargetName="MyAnimatedTranslateTransform"
Storyboard.TargetProperty="X">
<DoubleAnimationUsingKeyFrames Duration="0:0:0.5">
<LinearDoubleKeyFrame KeyTime="Uniform" Value="20" />
<LinearDoubleKeyFrame KeyTime="Uniform" Value="10" />
<LinearDoubleKeyFrame KeyTime="Uniform" Value="0" />
</DoubleAnimationUsingKeyFrames>
</Storyboard>2.4、匀速变化Paced
如果希望以固定速率进行动画处理,应使用 Paced 计时。Paced 关键时间根据每一关键帧的长度来分配可用时间,以确定每帧的持续时间。 这样,动画的速度或速率将保持不变。
<Storyboard
    x:Key="story1"
    Storyboard.TargetName="MyAnimatedTranslateTransform"
    Storyboard.TargetProperty="X">
    <DoubleAnimationUsingKeyFrames Duration="0:0:0.5">
        <LinearDoubleKeyFrame KeyTime="Paced" Value="0" />
        <LinearDoubleKeyFrame KeyTime="Paced" Value="10" />
        <LinearDoubleKeyFrame KeyTime="Paced" Value="20" />
    </DoubleAnimationUsingKeyFrames>
</Storyboard>
<Storyboard
    x:Key="story2"
    Storyboard.TargetName="MyAnimatedTranslateTransform"
    Storyboard.TargetProperty="X">
    <DoubleAnimationUsingKeyFrames Duration="0:0:0.5">
        <LinearDoubleKeyFrame KeyTime="Paced" Value="20" />
        <LinearDoubleKeyFrame KeyTime="Paced" Value="10" />
        <LinearDoubleKeyFrame KeyTime="Paced" Value="0" />
    </DoubleAnimationUsingKeyFrames>
</Storyboard>
3、缓动函数
缓动函数允许将自定义的数学公式应用到动画。 例如,用户可能希望某个对象逼真地弹跳或表现出像在弹簧上一样。 可使用关键帧甚至 From/To/By 动画来近似地实现这些效果,但它将需要大量工作,并且动画不如使用数学公式准确。
-
BackEase:动画开始在指定路径上运动前稍微收缩动画的运行。
-
BounceEase:创建弹跳效果。
-
CircleEase:使用圆函数创建加速和/或减速的动画。
-
CubicEase:使用公式 f(t) = t^3 创建加速和/或减速的动画。
-
ElasticEase:创建一个动画,模拟弹簧的来回振荡运动,直到它达到停止状态。
-
ExponentialEase:使用指数公式创建加速和/或减速的动画。
-
QuadraticEase:使用公式 f(t) = t^2 创建加速和/或减速的动画。
-
QuarticEase:使用公式 f(t) = t^4 创建加速和/或减速的动画。
-
QuinticEase:使用公式 f(t) = t^5 创建加速和/或减速的动画。
-
SineEase:使用正弦公式创建加速和/或减速的动画。
<BackEase Amplitude="1" EasingMode="EaseOut" />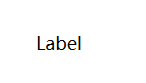
<BounceEase
    Bounces="2"
    Bounciness="2"
    EasingMode="EaseOut" />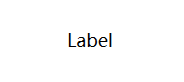
<CircleEase EasingMode="EaseOut"/>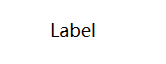
<CubicEase EasingMode="EaseOut"/>
<ElasticEase Oscillations="3" Springiness="1" EasingMode="EaseOut"/>
<ExponentialEase Exponent="6" EasingMode="EaseOut"/>
<PowerEase Power="20" EasingMode="EaseOut"/>
<QuadraticEase EasingMode="EaseOut"/>
<QuarticEase EasingMode="EaseOut"/>
<QuinticEase EasingMode="EaseOut"/>
<SineEase EasingMode="EaseOut"/>3.1、自定义缓动函数
除了使用包含在运行时中的缓动函数,还可以通过从 EasingFunctionBase 继承来创建自己的自定义缓动函数。 以下示例演示如何创建简单的自定义缓动函数。 可以通过重写 EaseInCore 方法来为缓动函数的行为方式添加自己的数学逻辑。
public class CustomSeventhPowerEasingFunction : EasingFunctionBase
{
    public CustomSeventhPowerEasingFunction()
        : base() { }

    protected override double EaseInCore(double normalizedTime)
    {
        return Math.Pow(normalizedTime, 7);
    }

    protected override Freezable CreateInstanceCore()
    {
        return new CustomSeventhPowerEasingFunction();
    }
}

xaml:
<DoubleAnimation.EasingFunction>
    <demoapp:CustomSeventhPowerEasingFunction EasingMode="EaseOut" />
</DoubleAnimation.EasingFunction>
4、路径动画
路径动画是一种使用 PathGeometry 作为输入的 AnimationTimeline。 可以定义一个几何路径并使用它来设置路径动画的 PathGeometry 属性,而不是设置 From、To 或 By 属性(如对 From/To/By 动画所执行的操作)或使用关键帧(如用于关键帧动画)。 路径动画运行时,会从路径中读取 x、y 和角度信息并使用该信息生成其输出。
DoesRotateWithTangent 属性设置为 true,因此矩形会沿着路径的切线旋转
<Window.Resources>
    <Storyboard x:Key="story1">
        <MatrixAnimationUsingPath
            DoesRotateWithTangent="True"
            RepeatBehavior="Forever"
            Storyboard.TargetName="MyMatrixTransform"
            Storyboard.TargetProperty="Matrix"
            Duration="0:0:5">
            <MatrixAnimationUsingPath.PathGeometry>
                <PathGeometry Figures="M 10,100 C 35,0 135,0 160,100 180,190 285,200 310,100" />
            </MatrixAnimationUsingPath.PathGeometry>
        </MatrixAnimationUsingPath>
    </Storyboard>
    <Storyboard
        x:Key="story2"
        Storyboard.TargetName="MyAnimatedTranslateTransform"
        Storyboard.TargetProperty="X">
        <DoubleAnimation To="0" Duration="0:0:0.5" />
    </Storyboard>
</Window.Resources>
<Grid HorizontalAlignment="Center" VerticalAlignment="Center">
    <Label Name="label" Content="Label">
        <Label.RenderTransform>
            <MatrixTransform x:Name="MyMatrixTransform">
                <MatrixTransform.Matrix>
                    <Matrix />
                </MatrixTransform.Matrix>
            </MatrixTransform>
        </Label.RenderTransform>
        <Label.Triggers>
            <EventTrigger RoutedEvent="MouseEnter">
                <BeginStoryboard Storyboard="{StaticResource story1}" />
            </EventTrigger>
        </Label.Triggers>
    </Label>
</Grid>
4.1、WPF 提供以下路径动画类
| 属性类型 | 相应的路径动画类 | 示例 |
|---|---|---|
| Double | DoubleAnimationUsingPath | 沿着路径针对对象进行动画处理(双重动画) |
| Matrix | MatrixAnimationUsingPath | 沿着路径针对对象进行动画处理(矩阵动画) |
| Point | PointAnimationUsingPath | 沿着路径针对对象进行动画处理(点动画) |
MatrixAnimationUsingPath 从其 PathGeometry 生成 Matrix 值。 与 MatrixTransform 一起使用时,MatrixAnimationUsingPath 可以沿路径移动对象。 如果将 MatrixAnimationUsingPath 的 DoesRotateWithTangent 属性设置为 true,它还会沿路径曲线旋转对象。
PointAnimationUsingPath 从其 PathGeometry 的 x 和 y 坐标生成 Point 值。 通过使用 PointAnimationUsingPath 对采用 Point 值的属性进行动画处理,可以沿路径移动对象。 PointAnimationUsingPath 不能旋转对象。
DoubleAnimationUsingPath 从其 PathGeometry 生成 Double 值。 通过设置 Source 属性,可以指定 DoubleAnimationUsingPath 是使用 x 坐标、y 坐标还是路径的角度作为其输出。 可以使用 DoubleAnimationUsingPath 来沿着 x 轴或 y 轴旋转或移动对象。
4.2、路径输入
每个路径动画类提供了 PathGeometry 属性,用于指定其输入。 路径动画使用 PathGeometry 生成其输出值。 PathGeometry 类能够描述组成弧线、曲线和直线的多个复杂图形。
PathGeometry 的核心是 PathFigure 对象的集合;这些对象之所以如此命名,是因为每个图都描述了 PathGeometry 中的一个离散形状。 每个 PathFigure 都由一个或多个 PathSegment 对象组成,其中每一个都描述了图的一个线段。
| 线段类型 | 说明 |
|---|---|
| ArcSegment | 在两点之间创建一条椭圆弧。 |
| BezierSegment | 创建两个点之间的三次方贝塞尔曲线。 |
| LineSegment | 创建两个点之间的直线。 |
| PolyBezierSegment | 创建一系列三次方贝塞尔曲线。 |
| PolyLineSegment | 创建一系列直线。 |
| PolyQuadraticBezierSegment | 创建一系列二次贝塞尔曲线。 |
| QuadraticBezierSegment | 创建一条二次贝塞尔曲线。 |
5、动画触发/开始
若要使用 Storyboard 组织和应用动画,可以将动画添加为 Storyboard 的子时间线。 Storyboard 类提供 Storyboard.TargetName 和 Storyboard.TargetProperty 附加属性。 可以在动画上设置这些属性以指定其目标对象和属性。
若要将动画应用于其目标,可以使用触发器操作或方法来开始 Storyboard。 在 XAML 中,将 BeginStoryboard 对象与 EventTrigger、Trigger 或 DataTrigger 一起使用。 在代码中,还可以使用 Begin 方法。
| 情节提要开始时使用… | 基于实例 | 样式 | 控件模板 | 数据模板 | 示例 |
|---|---|---|---|---|---|
| BeginStoryboard 和 EventTrigger | 是 | 是 | 是 | 是 | 使用情节提要对属性进行动画处理 |
| BeginStoryboard 和 Trigger 属性 | 否 | 是 | 是 | 是 | 在属性值更改时触发动画 |
| BeginStoryboard 和 MultiTrigger 属性 | 否 | 是 | 是 | 是 | MultiTrigger 类示例 |
| BeginStoryboard 和 DataTrigger | 否 | 是 | 是 | 是 | 如何:在数据更改时触发动画 |
| BeginStoryboard 和 MultiDataTrigger | 否 | 是 | 是 | 是 | MultiDataTrigger 类示例 |
| Begin 方法 | 是 | 否 | No | 否 | 使用情节提要对属性进行动画处理 |
6、其他指导
6.1、加速减速
AccelerationRatio 和 DecelerationRatio 设置的动画进行动画加减速处理。
6.2、重复循环中累加动画值
使用 IsCumulative 属性可在重复的周期中累积动画的基值。
可能需要设置AotoReverse = "True",让其自动还原,并设置From初始值,不然也会导致结果持续叠加。
 <DoubleAnimation
     AutoReverse="True"
     IsCumulative="True"
     RepeatBehavior="4x"
     From="0"
     To="20"
     Duration="0:0:0.5">
     <DoubleAnimation.EasingFunction>
         <PowerEase EasingMode="EaseOut" Power="2" />
     </DoubleAnimation.EasingFunction>
 </DoubleAnimation>
6.3、将动画终值设为下次的起始值
IsAdditive 属性指定是否要将动画的输出值添加到动画属性的起始值(基值)。

<DoubleAnimation
   IsAdditive="True"
    From="0"
    To="20"
    Duration="0:0:0.5">
    <DoubleAnimation.EasingFunction>
        <PowerEase EasingMode="EaseOut" Power="2" />
    </DoubleAnimation.EasingFunction>
</DoubleAnimation>
6.4、如何添加动画
6.4.1、控件的EventTrigger
对透明度动画时,TargetProperty写作:(Button.Opacity),(Brush.Opacity)
          <EventTrigger RoutedEvent="Button.Click">
            <BeginStoryboard>
              <Storyboard>
                <DoubleAnimation Storyboard.TargetName="myWidthAnimatedButton"
                  Storyboard.TargetProperty="Width"
                  From="200" To="300" Duration="0:0:3" />
              </Storyboard>
            </BeginStoryboard>
          </EventTrigger>
6.4.2、控件模板ControlTemplate:EventTrigger、Trigger
      <ControlTemplate.Triggers>
        <!-- Event Trigger Example -->
        <EventTrigger RoutedEvent="Border.MouseEnter" SourceName="innerBorder">
          <BeginStoryboard>
            <Storyboard>
              <ColorAnimation
                Storyboard.TargetName="innerBorderBackgroundBrush"
                Storyboard.TargetProperty="Color"
                From="White" To="#CCCCFF"
                Duration="0:0:3" AutoReverse="True" />
            </Storyboard>
          </BeginStoryboard>
        </EventTrigger>

        <!-- Property Trigger Example -->
        <Trigger Property="IsMouseOver" Value="True" SourceName="contentPanel">
          <Trigger.EnterActions>
            <BeginStoryboard>
              <Storyboard>
                <ColorAnimation
                  Storyboard.TargetName="contentPanelBrush"
                  Storyboard.TargetProperty="Color"
                  To="Purple" Duration="0:0:1" />
              </Storyboard>
            </BeginStoryboard>
          </Trigger.EnterActions>
          <Trigger.ExitActions>
            <BeginStoryboard>
              <Storyboard>
                <ColorAnimation
                  Storyboard.TargetName="contentPanelBrush"
                  Storyboard.TargetProperty="Color"
                  To="White" Duration="0:0:1" />
              </Storyboard>
            </BeginStoryboard>
          </Trigger.ExitActions>
        </Trigger>
      </ControlTemplate.Triggers>
6.4.3、样式Style:EventTrigger
     <Style.Triggers>
       <!-- Animates the button's opacity on mouse over. -->
        <EventTrigger RoutedEvent="Button.MouseEnter">
          <EventTrigger.Actions>
            <BeginStoryboard>
              <Storyboard>
                <DoubleAnimation
                  Storyboard.TargetProperty="(Button.Opacity)"
                  From="1.0" To="0.5" Duration="0:0:0.5" AutoReverse="True"
                  RepeatBehavior="Forever" />
              </Storyboard>
            </BeginStoryboard>
          </EventTrigger.Actions>
        </EventTrigger>

        <!-- Returns the button's opacity to 1 when the mouse leaves. -->
        <EventTrigger RoutedEvent="Button.MouseLeave">
          <EventTrigger.Actions>
            <BeginStoryboard>
              <Storyboard>
                <DoubleAnimation
                  Storyboard.TargetProperty="(Button.Opacity)"
                  To="1" Duration="0:0:0.1" />
              </Storyboard>
            </BeginStoryboard>
          </EventTrigger.Actions>
        </EventTrigger>

        <!-- Changes the button's color when clicked.
             Notice that the animation can't target the
             SolidColorBrush used to paint the button's background
             directly. The brush must be accessed through the button's
             Background property. -->
        <EventTrigger RoutedEvent="Button.Click">
          <EventTrigger.Actions>
            <BeginStoryboard>
              <Storyboard>
                <ColorAnimation
                  Storyboard.TargetProperty="(Button.Background).(SolidColorBrush.Color)"
                  From="Orange" To="White" Duration="0:0:0.1" AutoReverse="True" />
              </Storyboard>
            </BeginStoryboard>
          </EventTrigger.Actions>
        </EventTrigger>
      </Style.Triggers>
6.5、动画终值保持并触发事件
处理 Completed 事件即可。
<DoubleAnimation
    From="0"
    To="20"
    FillBehavior="HoldEnd"
    Completed="DoubleAnimation_Completed"
    Duration="0:0:0.5"/>
6.6、不同起始时间的动画管理
同一个动画时间线中中可能会有许多个动画,这些动画的起始时间不同,为方便管理,可以使用 ParallelTimeline 对象来简化动画。每个 ParallelTimeline 都有自己的 BeginTime,并且 ParallelTimeline 的所有子元素都相对于此 BeginTime 开始,所以可以更好地封装时间。
         <Storyboard>
            <DoubleAnimation Storyboard.TargetName="FirstTextBlockSkew"
            Storyboard.TargetProperty="AngleX" Duration="0:0:1" BeginTime="0:0:2" From="0" To="45" />
            <ParallelTimeline BeginTime="0:0:4">
              <DoubleAnimation Storyboard.TargetName="SecondTextBlock"
              Storyboard.TargetProperty="Opacity" Duration="0:0:2" From="0" To="1" />
              <DoubleAnimation Storyboard.TargetName="SecondTextBlockSkew"
              Storyboard.TargetProperty="AngleX" Duration="0:0:2" From="90" To="180" />
            </ParallelTimeline>
          </Storyboard>
6.7、动画的过渡方式
对这样的场景:当鼠标光标移到它们上方时它们会放大,而当光标移开时它们会变小。 如果将鼠标悬停在按钮上,然后快速移开光标,则会在第一个动画完成之前应用第二个动画。 当两个动画像这样重叠时,应该如何处理过渡。 Compose 值合并了重叠动画,使动画之间的过渡更加平滑,而 SnapshotAndReplace 值使新动画立即替换之前的重叠动画。
<BeginStoryboard HandoffBehavior="Compose">


 504
504

 被折叠的 条评论
为什么被折叠?
被折叠的 条评论
为什么被折叠?
 到【灌水乐园】发言


