


threejs在页面内的应用
透明背景
默认情况下,使用threejs的renderer渲染出来的背景是黑色的,可以通过给renderer设置alpha: true来让其背景透明
const renderer = new THREE.WebGLRenderer({
    canvas: canvas,
    alpha: true
})
通常情况下我们应该给页面html、body元素设置背景色或background-img,而不是在threejs里给scene设置背景色或背景图片,否则可能会某些用户的电脑上出现滚动bug
页面滚动摄像机跟随

核心代码:
let scrollY = window.scrollY;
window.addEventListener("scroll", () => { // 1. 监听滚动事件
    scrollY = window.scrollY;
});

const tick = () => {
  // 按比例移动摄像机位置
  camera.position.y = (-scrollY / window.innerHeight) * objectDistance;
  // Render
  renderer.render(scene, camera);
  // Call tick again on the next frame
  window.requestAnimationFrame(tick);
};
- 监听滚动事件,记录下滚动的像素
- 计算滚动的比例,移动摄像机位置
objectDistance代表几何体与几何体之间的距离,初始生成几何体时,它们均坐落在原点位置,上例中,修改几何体的位置为:
第一个几何体:(2, 0, 0)
第二个几何体:(-2, -4, 0)
第三个几何体:(2, -8, 0)
所以,随着页面滚动,摄像机移动的数值应为-已滚动的像素 / 视口高度 * 几何体间距
初始时,摄像机在Y轴的位置为0,页面滚动的值是从
0 -> ∞的,所以滚动行为一开始,就要对摄像机移动的距离取负数
物体进入视野判断
物体滚入视野后添加一段旋转动画:
在当前案例中,几何体之间的间距是固定的,在页面上的体现约等于视口的高度,所以要判断屏幕滚动到了第几个几何体,可以通过对滚动距离 / 视口高度进行四舍五入来判断,如:
// ...
const sectionMeshes = [mesh1, mesh2, mesh3];
scene.add(mesh1, mesh2, mesh3);

let scrollY = window.scrollY;
let before = 0
window.addEventListener("scroll", () => {
    scrollY = window.scrollY;
    // 四舍五入判断滚动到了第几个几何体
    const current=Math.round(scrollY /sizes.height)
    if (current !== before) {
        before = current
        // 使用gsap库来滚动对应的几何体
        gsap.to(sectionMeshes[current].rotation, {
            duration: 1.5,
            ease: 'power2.inOut',
            x: "+=6",
            y: "+=3",
        })
    }
});
鼠标移动摄像机跟随
鼠标移动时,场景跟随移动

鼠标移动的同步也是通过修改摄像机的位置来实现的,但是上例中已经在每一帧里修改了camera.position,如果鼠标移动也修改camera.position就无法兼容同时滚动且鼠标移动的场景
要解决这个问题,可以将摄像机放进一个Group里,在鼠标移动时,修改这个Group的位置,即可避免页面滚动时修改摄像机位置的冲突,如:
const camera = new THREE.PerspectiveCamera(
  35,
  sizes.width / sizes.height,
  0.1,
  100
);
camera.position.z = 6;
const cameraGroup = new THREE.Group();
cameraGroup.add(camera);
scene.add(cameraGroup);
然后到核心实现,要实现鼠标移动的同步,本质就是监听mousemove事件,将屏幕的鼠标位移转为threejs坐标系内的移动幅度,如:
const cursor = {};
cursor.x = 0;
cursor.y = 0;
window.addEventListener("mousemove", (event) => {
  cursor.x = event.clientX / sizes.width - 0.5;
  cursor.y = event.clientY / sizes.height - 0.5;
});
在页面中,鼠标从左上角开始,水平和垂直方向的移动都是从0到正∞,但在threejs坐标系中,从左上角开始水平和垂直方向应该是负∞到正∞,所以应该用鼠标在屏幕上的位移 / 视口宽高获取到鼠标移动的幅度(0到1),减去0.5即为鼠标在threejs坐标系内实际移动的幅度
所以,每一帧中要处理的代码如下
const tick = () => {
  const parallaxX = cursor.x;
  const parallaxY = -cursor.y;
  cameraGroup.position.x = parallaxX
  cameraGroup.position.y = parallaxY

  // Render
  renderer.render(scene, camera);
  window.requestAnimationFrame(tick);
};
tick();
注意在Y轴方向的取负数操作,因为我们移动的是摄像机,所以相对于原点而言,水平方向鼠标往左 = 摄像机往左 = 物体往右移动
假如Y轴不取反,相对于原点而言,就等于垂直方向鼠标往上 = 摄像机往下 = 物体往上移动
所以为了便于用户理解,要么对X轴取反,要么对Y轴取反,但是对Y轴取反才更符合人对于视角的认知
平滑移动
按照上面的代码实现后会发现,视角移动起来比较“僵硬”,如图:

在现实生活中,人移动摄像机或者将摄像机架在滑轨上移动都不可能实现一步到位的效果,甚至会因为惯性的存在,让摄像机移动后有一点滞后性的效果
所以,为了优化用户体验,我们可以优化摄像机在每一帧移动的实现,比如:
let previousTime = 0;
const tick = () => {
  const elapsedTime = clock.getElapsedTime();
  const deltaTime = elapsedTime - previousTime;
  previousTime = elapsedTime;
  const parallaxX = cursor.x;
  const parallaxY = cursor.y;
  cameraGroup.position.x += (parallaxX - cameraGroup.position.x) *  deltaTime;
  cameraGroup.position.y += (parallaxY - cameraGroup.position.y) *  deltaTime;
  //   cameraGroup.position.x = parallaxX
  //   cameraGroup.position.y = parallaxY
  // Render
  renderer.render(scene, camera);
  // Call tick again on the next frame
  window.requestAnimationFrame(tick);
};
tick();
对代码的解释如下:
首先,平滑移动其实就是在移动速度上呈现出先快后慢,越来越慢的效果
deltaTime是上一帧到当前帧的时间差,基本上等于一个固定值,通过控制台可以看到其变化:

计算的基准量是parallexX - cameraGroup.position.x,开始时,parallexX = 0.5,cameraGroup.position.x = 0,此时(parallaxX - cameraGroup.position.x) * deltaTime;计算出来的值最大,摄像机在第一帧要加上的移动的距离最大
随着逐帧的计算进行,因为每次加上的值是一个“差值”,差值会越来愈小,所以每帧移动的幅度会越来越小,从控制台打印也可以看出这种趋势:

先快后慢,越来越慢的效果实现了,但是快与慢的区别还不够明显,所以这里可以再调整一下变化的幅度,通过乘上一个倍数来实现,比如5倍:
  cameraGroup.position.x += (parallaxX - cameraGroup.position.x) *  deltaTime * 5;
  cameraGroup.position.y += (parallaxY - cameraGroup.position.y) *  deltaTime * 5;
效果是很明显的:

完整的代码实现:
import * as THREE from "three";
import GUI from "lil-gui";
import gsap from "gsap";
/**
 * Debug
 */
const gui = new GUI();

const parameters = {
  materialColor: "#ffeded",
};

gui.addColor(parameters, "materialColor").onChange(() => {
  material.color.set(parameters.materialColor);
  // particleMaterial.color.set(parameters.materialColor)
});

/**
 * Base
 */
// Canvas
const canvas = document.querySelector("canvas.webgl");

// Scene
const scene = new THREE.Scene();
scene.add(new THREE.AxesHelper(30));

// TEXTURE
const textureLoader = new THREE.TextureLoader();
const gradientTexture = textureLoader.load("textures/gradients/3.jpg");
gradientTexture.magFilter = THREE.NearestFilter;

// Objects
const objectDistance = 4;
const material = new THREE.MeshToonMaterial({
  color: parameters.materialColor,
  gradientMap: gradientTexture,
});

const mesh1 = new THREE.Mesh(new THREE.TorusGeometry(1, 0.4, 16, 60), material);
const mesh2 = new THREE.Mesh(new THREE.ConeGeometry(1, 2, 32), material);
const mesh3 = new THREE.Mesh(
  new THREE.TorusKnotGeometry(0.8, 0.35, 100, 16),
  material
);

mesh1.position.x = 2;
mesh2.position.x = -2;
mesh3.position.x = 2;

mesh1.position.y = -objectDistance * 0;
mesh2.position.y = -objectDistance * 1;
mesh3.position.y = -objectDistance * 2;

const sectionMeshes = [mesh1, mesh2, mesh3];
scene.add(mesh1, mesh2, mesh3);

// particles

const particlesCount = 200;
const positions = new Float32Array(particlesCount * 3);
const colors = new Float32Array(particlesCount * 3);
for (let i = 0; i < particlesCount; i++) {
  const i3 = i * 3;
  positions[i3] = (Math.random() - 0.5) * 10;
  positions[i3 + 1] =
    objectDistance * 0.5 -
    Math.random() * objectDistance * sectionMeshes.length;
  positions[i3 + 2] = (Math.random() - 0.5) * 10;

  colors[i3] = Math.random();
  colors[i3 + 1] = Math.random();
  colors[i3 + 2] = Math.random();
}
const particleGeometry = new THREE.BufferGeometry();
particleGeometry.setAttribute(
  "position",
  new THREE.BufferAttribute(positions, 3)
);
particleGeometry.setAttribute("color", new THREE.BufferAttribute(colors, 3));
const particleMaterial = new THREE.PointsMaterial({
  // color: parameters.materialColor,
  sizeAttenuation: true,
  size: 0.2,
  vertexColors: true,
});
const particles = new THREE.Points(particleGeometry, particleMaterial);
scene.add(particles);

// lights
const directionalLight = new THREE.DirectionalLight("#ffffff", 1);
directionalLight.position.set(1, 1, 0);
scene.add(directionalLight);
scene.add(new THREE.DirectionalLightHelper(directionalLight));

/**
 * Sizes
 */
const sizes = {
  width: window.innerWidth,
  height: window.innerHeight,
};

window.addEventListener("resize", () => {
  // Update sizes
  sizes.width = window.innerWidth;
  sizes.height = window.innerHeight;

  // Update camera
  camera.aspect = sizes.width / sizes.height;
  camera.updateProjectionMatrix();

  // Update renderer
  renderer.setSize(sizes.width, sizes.height);
  renderer.setPixelRatio(Math.min(window.devicePixelRatio, 2));
});

/**
 * Camera
 */
// Base camera
const camera = new THREE.PerspectiveCamera(
  35,
  sizes.width / sizes.height,
  0.1,
  100
);
camera.position.z = 6;
const cameraGroup = new THREE.Group();
cameraGroup.add(camera);
scene.add(cameraGroup);

/**
 * Renderer
 */
const renderer = new THREE.WebGLRenderer({
  canvas: canvas,
  alpha: true,
});
renderer.setSize(sizes.width, sizes.height);
renderer.setPixelRatio(Math.min(window.devicePixelRatio, 2));

/**
 * Animate
 */
const clock = new THREE.Clock();

// cursor
const cursor = {};
cursor.x = 0;
cursor.y = 0;
window.addEventListener("mousemove", (event) => {
  cursor.x = event.clientX / sizes.width - 0.5;
  cursor.y = event.clientY / sizes.height - 0.5;
});

// scroll
let scrollY = window.scrollY;
let before = 0
window.addEventListener("scroll", () => {
    scrollY = window.scrollY;
    const current=Math.round(scrollY /sizes.height)
    if (current !== before) {
        before = current
        gsap.to(sectionMeshes[current].rotation, {
            duration: 1.5,
            ease: 'power2.inOut',
            x: "+=6",
            y: "+=3",
        })
    }
});
let previousTime = 0;
const tick = () => {
  const elapsedTime = clock.getElapsedTime();
  const deltaTime = elapsedTime - previousTime;
  previousTime = elapsedTime;
  camera.position.y = (-scrollY / sizes.height) * objectDistance;

  const parallaxX = cursor.x;
  const parallaxY = cursor.y;
  cameraGroup.position.x += (parallaxX - cameraGroup.position.x) *  deltaTime * 5;
  cameraGroup.position.y += (parallaxY - cameraGroup.position.y) *  deltaTime * 5;

  // Render
  renderer.render(scene, camera);
  sectionMeshes.forEach((mesh) => {
    mesh.rotation.x += deltaTime * 0.1;
    mesh.rotation.y += deltaTime * 0.12;
  });
  // Call tick again on the next frame
  window.requestAnimationFrame(tick);
};

tick();
物理效果
一般的物理效果都可以理解成物体的位置以某种规律或运动曲线进行运动,从而看起来像是现实世界中的物理效果
所以,页面上的物理效果实际上就是在每一帧更新物体的位置从而实现物理效果,关键就在于如何获取到每一帧物体的位置
目前市面上成熟的方案是模拟一个物理世界,在物理世界中模拟物体的碰撞、运动等行为,然后在每一时刻获物体模拟取该行为运动的位置,同步更新到threejs的场景中以实现

比如在上面这张图中,左边是threejs中的场景,右边是假想的一个物理世界,我们在物理世界中模拟小球从空中落下,砸到平面后停止的行为。在这段时间中,我们可以通过物理第三方库提供的API获取到每一帧或每一时刻小球的位置,将位置更新到我们实际的threejs场景中,即可实现所谓的物理效果
下面是常用的一些3D或2D物理效果的库:
3D物理效果:
Ammo.js:没文档,https://github.com/kripken/ammo.js
Cannon.js(推荐):有文档,但是全英,体积小,基于Ammojs和threejs实现的物理库,https://schteppe.github.io/cannon.js/
Oimo.js:没文档,https://lo-th.github.io/Oimo.js/#basic
2D物理效果:
Matter.js(推荐): 比较完善且轻量,全英文档 https://brm.io/matter-js/
P2.js
Planck.js
Box2D.js
3D - 小球落到平面
使用Cannon.js作为示例,实现以下效果:

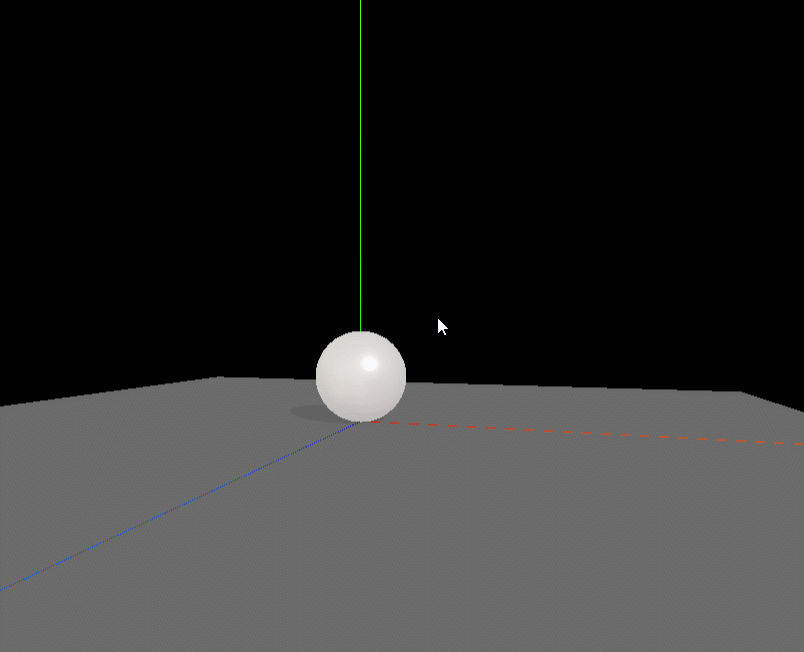
首先,按照其实现原理,场景中初始时有一个平面当作”地板“,有一个位于(0,0.5,0)的小球,其半径是0.5(这样就可以让小球初始时处于平面之上),如图:

然后,按照原理,需要一个物理世界来模拟物体运动,项目中执行npm install cannon安装cannon.js,然后进行初始化:
import CANNON from "cannon";
// 创建一个物理效果世界
const world = new CANNON.World();
// 声明y轴方向的重力,取负数是因为Y轴向下为负
world.gravity.set(0, -9.82, 0);
这里创建了一个物理世界,然后给物理世界设置垂直方向也就是Y轴的加速度为9.82,取负数是因为Y轴向下为负
然后在物理世界中需要创建我们的物理对象,和threejs的场景一样,也需要一个平面和小球,代码如下:
// Sphere
// 创建一个半径0.5的球形状
const sphereShape = new CANNON.Sphere(0.5);
// 使用球形状创建球体
const sphereBody = new CANNON.Body({
  mass: 1, // 球的质量
  position: new CANNON.Vec3(0, 3, 0), // 球的初始位置
  shape: sphereShape,
});
// 将球体放到世界中
world.addBody(sphereBody);

// physic Floor
// 创建一个平面形状
const floorShape = new CANNON.Plane();
// 创建平面“体”
const floorBody = new CANNON.Body({
  mass: 0, // 质量为0 相当于一堵空气墙
  shape: floorShape,
});
world.addBody(floorBody);
现在,在屏幕中,就存在一个threejs的场景(肉眼可见)和一个物理世界了(不可见)
然后,我们需要threejs渲染的每一帧里,在物理世界中触发运动,添加如下代码:
const clock = new THREE.Clock();
let oldElapsedTime = 0;
const tick = () => {
  const elapsedTime = clock.getElapsedTime();
  const deltaTime = elapsedTime - oldElapsedTime;
  oldElapsedTime = elapsedTime;
  // update physics world
  world.step(1 / 60, deltaTime, 3);
  console.log('sphereBody.position', sphereBody.position.y)
  controls.update();
  renderer.render(scene, camera);
  window.requestAnimationFrame(tick);
};

tick();
world.step用于推进物理世界的状态,第一个参数表示固定的逻辑时间步长,即每次step调用之间模拟的时间间隔,通常设为1 / 60,表示每秒60次更新,即符合屏幕的刷新率
第二个参数代表实际经过的时间,通常设为上一帧与当前帧的时间差,可以用来更准确地模拟物理状态的变化
第三个参数是可选的, 表示在每一帧内进行的子步骤数量,增加这个数量可以在物理模拟过程中提供更高的精度
通过打印物理世界中小球的位置(sphereBody.position.y)可以看到具体数值的变化,它的值从3一直无线递减:

这是因为当前物理世界中,并没有东西将他挡住或,所以它会无限地朝着虚空进行下落,虽然我们之前创建了一个地板floor,但是floor默认情况是下垂直于X轴的,这个和threejs是一样的(初始化创建的plane也是竖直的)
所以,我们需要在物理世界中对屏幕进行旋转,使其能够平行于X轴,添加代码如下:
// 创建一个平面形状
const floorShape = new CANNON.Plane();
// 创建平面“体”
const floorBody = new CANNON.Body({
  mass: 0, // 质量为0 相当于一堵空气墙
  shape: floorShape,
});
// 旋转平面使其水平(初始时默认是垂直的)
floorBody.quaternion.setFromAxisAngle(new CANNON.Vec3(-1, 0, 0), Math.PI / 2);
在物理世界旋转物体比较复杂,需要使用四元数来实现,不懂暂时也没事,这时候再打印就会发现数值是从3到0.5左右保持了:

最后,将这个数值和threejs里的数值关联起来,即可实现小球的掉落效果了:
 // update physics world
 world.step(1 / 60, deltaTime,3);
 // 根据物理世界的值更新threejs里球的位置
 sphere.position.copy(sphereBody.position);
材质连接
cannon提供了contactMaterial这个API来定义当两种材质发生接触时会产生怎样的效果
对于上面的小球示例,假设小球是塑料小球,而平面是正常的水泥地,小球肯定会弹起来,接下来我们就来实现这一效果:
// Materials
const concreteMaterial = new CANNON.Material("concrete");
const plasticMaterial = new CANNON.Material("plastic");

const concretePlasticContactMaterial = new CANNON.ContactMaterial(
  concreteMaterial,
  plasticMaterial,
  {
    friction: 0.1, // 摩擦力
    restitution: 0.7, // 弹跳力,默认为0.3
  }
);
world.addContactMaterial(concretePlasticContactMaterial);
首先,使用CANNON.Material创建两个物理世界中的材质,第一个参数是我们自定义的材质名称
接着通过ContactMaterial来定义这两个材质接触时的摩擦力、弹跳力等因素,最后将这一”限制“添加到物理世界中
然后,给小球、地板绑定上这两种材质即可:
sphereBody.material = plasticMaterial
floorBody.material = concreteMaterial;
在这个例子里,两个material除了名字不同,其他都是相同的,所以可以简单地设置一个defaultMaterial来节省代码,因为通常在业务场景中,我们只需要一种统一的物理碰撞效果即可
// Materials
const defaultMaterial = new CANNON.Material("default");
const defaultContactMaterial = new CANNON.ContactMaterial(
  defaultMaterial,
  defaultMaterial,
  {
    friction: 0.1, // 摩擦力
    restitution: 0.7, // 弹跳力,默认为0.3
  }
);
world.defaultContactMaterial = defaultContactMaterial
添加外力
两个API,body.applyLocalForce或body.applyForce
例如模拟一道往X轴正半轴方向吹的风,风力为300,风从原点开始吹,可以使用applyLocalForce:
sphereBody.applyLocalForce(new CANNON.Vec3(300, 0,0), new CANNON.Vec3(0,0,0))
也可以在每一帧对物体施加一个力来达成这种效果:
// ...
const tick = () => {
  sphereBody.applyForce(new CANNON.Vec3(0.5,0,0), new CANNON.Vec3(0,0,0))
};
tick();

到目前为止的所有代码:
import * as THREE from "three";
import { OrbitControls } from "three/examples/jsm/controls/OrbitControls.js";
import GUI from "lil-gui";
import CANNON from "cannon";
/**
 * Debug
 */
const gui = new GUI();

/**
 * Base
 */
// Canvas
const canvas = document.querySelector("canvas.webgl");

// Scene
const scene = new THREE.Scene();
scene.add(new THREE.AxesHelper(30));
/**
 * Textures
 */
const textureLoader = new THREE.TextureLoader();
const cubeTextureLoader = new THREE.CubeTextureLoader();

const environmentMapTexture = cubeTextureLoader.load([
  "/textures/environmentMaps/0/px.png",
  "/textures/environmentMaps/0/nx.png",
  "/textures/environmentMaps/0/py.png",
  "/textures/environmentMaps/0/ny.png",
  "/textures/environmentMaps/0/pz.png",
  "/textures/environmentMaps/0/nz.png",
]);

// physics
const world = new CANNON.World();
world.gravity.set(0, -9.82, 0);

// Materials
const concreteMaterial = new CANNON.Material("concrete");
const plasticMaterial = new CANNON.Material("plastic");

const concretePlasticContactMaterial = new CANNON.ContactMaterial(
  concreteMaterial,
  plasticMaterial,
  {
    friction: 0, // 摩擦力
    restitution: 0.7, // 弹跳力,默认为0.3
  }
);
world.addContactMaterial(concretePlasticContactMaterial);
// Sphere
const sphereShape = new CANNON.Sphere(0.5);
const sphereBody = new CANNON.Body({
  mass: 1,
  position: new CANNON.Vec3(0, 3, 0),
  shape: sphereShape,
});
sphereBody.applyLocalForce(new CANNON.Vec3(300, 0,0), new CANNON.Vec3(0,0,0))
sphereBody.material = plasticMaterial
world.addBody(sphereBody);

// physic Floor
const floorShape = new CANNON.Plane();
const floorBody = new CANNON.Body({
  mass: 0, // 质量为0 代表地板相当于一堵空气墙
  shape: floorShape,
  material: concreteMaterial
});
floorBody.material = concreteMaterial;
world.addBody(floorBody);
floorBody.quaternion.setFromAxisAngle(new CANNON.Vec3(-1, 0, 0), Math.PI / 2);

/**
 * Test sphere
 */
const sphere = new THREE.Mesh(
  new THREE.SphereGeometry(0.5, 32, 32),
  new THREE.MeshStandardMaterial({
    metalness: 0.3,
    roughness: 0.4,
    envMap: environmentMapTexture,
    envMapIntensity: 0.5,
  })
);
sphere.castShadow = true;
sphere.position.y = 0.5;
scene.add(sphere);

/**
 * Floor
 */
const floor = new THREE.Mesh(
  new THREE.PlaneGeometry(10, 10),
  new THREE.MeshStandardMaterial({
    color: "#777777",
    // metalness: 0.3,
    // roughness: 0.4,
    // envMap: environmentMapTexture,
    // envMapIntensity: 0.5,
  })
);
floor.receiveShadow = true;
floor.rotation.x = -Math.PI * 0.5;
scene.add(floor);

/**
 * Lights
 */
const ambientLight = new THREE.AmbientLight(0xffffff, 2.1);
scene.add(ambientLight);

const directionalLight = new THREE.DirectionalLight(0xffffff, 0.6);
directionalLight.castShadow = true;
directionalLight.shadow.mapSize.set(1024, 1024);
directionalLight.shadow.camera.far = 15;
directionalLight.shadow.camera.left = -7;
directionalLight.shadow.camera.top = 7;
directionalLight.shadow.camera.right = 7;
directionalLight.shadow.camera.bottom = -7;
directionalLight.position.set(5, 5, 5);
scene.add(directionalLight);

/**
 * Sizes
 */
const sizes = {
  width: window.innerWidth,
  height: window.innerHeight,
};

window.addEventListener("resize", () => {
  // Update sizes
  sizes.width = window.innerWidth;
  sizes.height = window.innerHeight;

  // Update camera
  camera.aspect = sizes.width / sizes.height;
  camera.updateProjectionMatrix();

  // Update renderer
  renderer.setSize(sizes.width, sizes.height);
  renderer.setPixelRatio(Math.min(window.devicePixelRatio, 2));
});

/**
 * Camera
 */
// Base camera
const camera = new THREE.PerspectiveCamera(
  75,
  sizes.width / sizes.height,
  0.1,
  100
);
camera.position.set(2, 1, 6);
camera.lookAt(new THREE.Vector3(0, 3, 0));
scene.add(camera);

// Controls
const controls = new OrbitControls(camera, canvas);
controls.enableDamping = true;

/**
 * Renderer
 */
const renderer = new THREE.WebGLRenderer({
  canvas: canvas,
});
renderer.shadowMap.enabled = true;
renderer.shadowMap.type = THREE.PCFSoftShadowMap;
renderer.setSize(sizes.width, sizes.height);
renderer.setPixelRatio(Math.min(window.devicePixelRatio, 2));

/**
 * Animate
 */
const clock = new THREE.Clock();
let oldElapsedTime = 0;
const tick = () => {
  const elapsedTime = clock.getElapsedTime();
  const deltaTime = elapsedTime - oldElapsedTime;
  oldElapsedTime = elapsedTime;
  // update physics world
  world.step(1 / 60, deltaTime, 3);
  // console.log(sphereBody.position)
  // sphereBody.applyForce(new CANNON.Vec3(0.5,0,0), new CANNON.Vec3(0,0,0))
  sphere.position.copy(sphereBody.position);

  // Update controls
  controls.update();

  // Render
  renderer.render(scene, camera);

  // Call tick again on the next frame
  window.requestAnimationFrame(tick);
};

tick();
多个物体
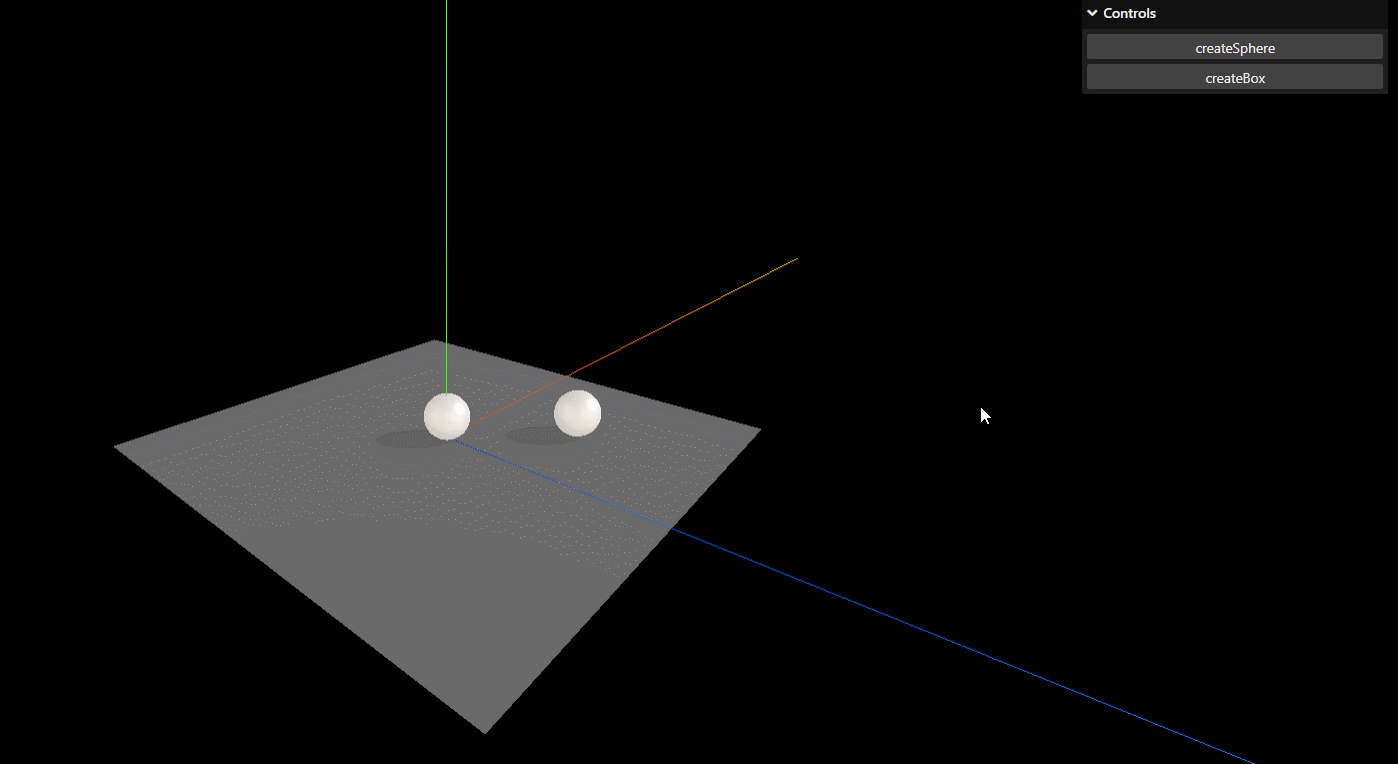
我们可以将球状几何体的创建封装成函数,然后绑定到一个按钮上,通过多次点击来创建多个球状几何体,如:
// 方便在每一帧中更新所有物体的位置
const objectsUpdate = []
const sphereGeometry = new THREE.SphereGeometry(1, 32, 32)
const material = new THREE.MeshStandardMaterial({
  metalness: 0.3,
  roughness: 0.4,
  envMap: environmentMapTexture,
})
const createSphere = (radius, position) => {
  // Three.js mesh
  const mesh = new THREE.Mesh(
    sphereGeometry,
    material
  );
  // 这里因为本身将球状几何体的半径设为了1,所以要创建不同半径的球,只需要对其进行对应比例的缩放即可
  mesh.scale.set(radius, radius,radius)
  mesh.castShadow = true
  mesh.position.copy(position)
  scene.add(mesh);

  // Cannon.JS body
  const shape = new CANNON.Sphere(radius)
  const  body = new CANNON.Body({
    mass: 1,
    position: new CANNON.Vec3(0,3,0),
    shape,
    material: defaultMaterial
  })
  body.position.copy(position)
  world.addBody(body)

  // 方便后续更新物体位置
  objectsUpdate.push({mesh, body})
}
将该函数绑定到gui按钮上:
const debugObj = {
  createSphere: () => {
    createSphere(Math.random() * 0.5, {
      x: (Math.random() - 0.5) * 3,
      y: 3,
      z: (Math.random() - 0.5) * 3
    })
  }
}
gui.add(debugObj, 'createSphere')
gui.add(debugObj, 'createBox')
然后在每一帧里,更新球几何体的位置即可:
const tick = () => {
  for(const obj of objectsUpdate){
    obj.mesh.position.copy(obj.body.position)
  }
};
现在试着创建盒子的物理效果,到这里就有几个要注意的点了
在threejs中,创建几何体是通过设置指定的长宽高实现
const boxGeometry = new THREE.BoxGeometry(1,1,1)
但是在CANNONJS里,创建几何体不是从边缘顶点算起,而是从中心向四周扩散,如图:
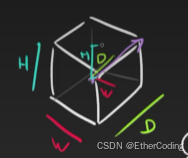
所以它只需要一半的长宽高:
const shape = new CANNON.Box(0.5, 0.5, 0.5)
仿造球状几何体的创建,实现一个盒子几何体的创建函数,然后绑定到按钮上即可
const objectsUpdate = []
const boxGeometry = new THREE.BoxGeometry(1,1,1)
const createBox = (width,height, depth, position) => {
  // Three.js mesh
  const mesh = new THREE.Mesh(
    boxGeometry,
    material
  );
  // 直接设置了boxGeometry的长宽高都是1,所以传参的长宽高可以直接当作scale进行设置
  // 同时创建的geometry只有一个,大大提高了性能表现
  mesh.scale.set(width, height,depth)
  mesh.castShadow = true
  mesh.position.copy(position)
  scene.add(mesh);

  // Cannon.JS body
  // CANNON中创建盒子取得是threejs里长宽高的一半
  const shape = new CANNON.Box(new CANNON.Vec3(width * 0.5, height * 0.5, depth * 0.5))
  const  body = new CANNON.Body({
    mass: 1,
    position: new CANNON.Vec3(0,3,0),
    shape,
    material: defaultMaterial
  })
  body.position.copy(position)
  world.addBody(body)

  // save in objects to update
  objectsUpdate.push({mesh, body})
}
const debugObj = {
  // ...
  createBox: () => {
    createBox(
      Math.random(),
      Math.random(),
      Math.random(),
      {
        x: (Math.random() - 0.5) * 3,
        y: 3,
        z: (Math.random() - 0.5) * 3
      }
    )
  }
}
gui.add(debugObj, 'createBox')
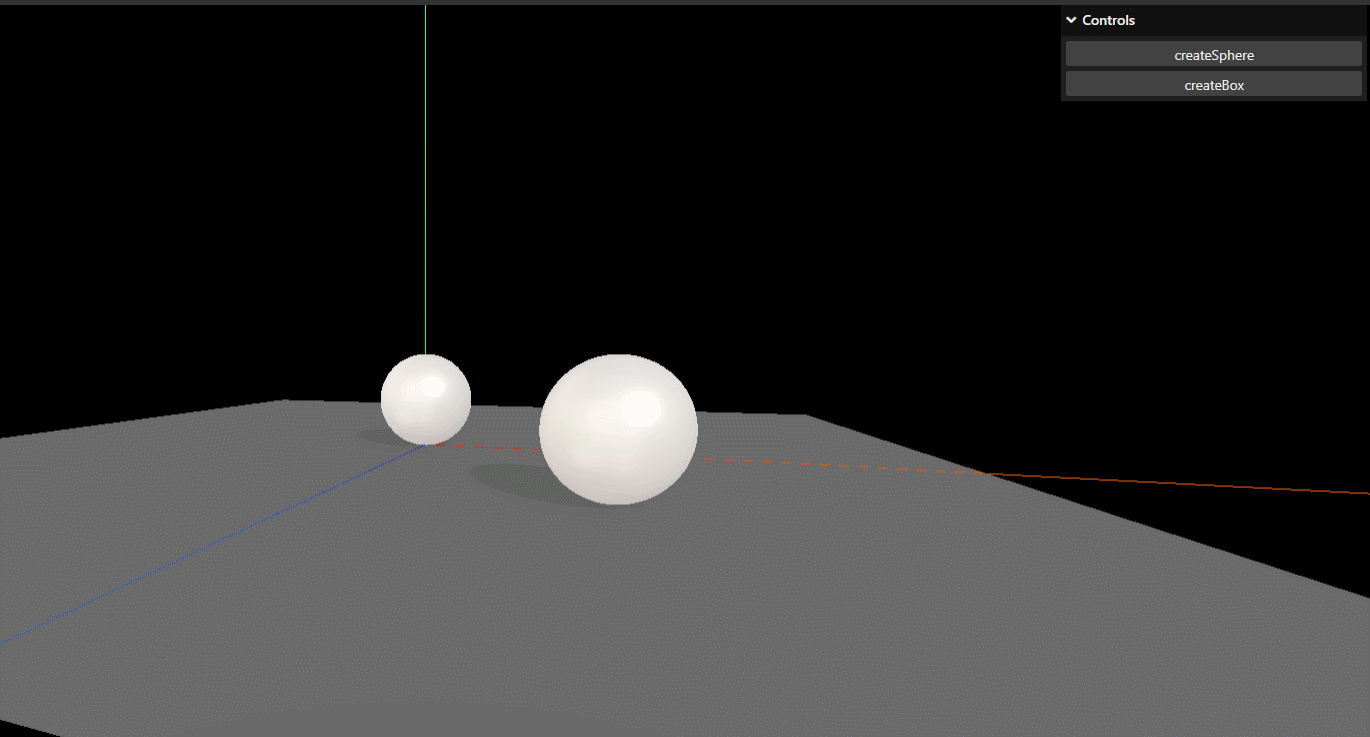
这时候看效果,会发现物理效果差那么点意思:
因为按理说,盒子在碰撞到物体之后,应该会发生一定比例的旋转的,而不是这样"直上直下"的
所幸的是,CANNONJS的物理效果已经涵盖了这种旋转的效果,直接在update方法中使用CANNONJS的四元数进行更新即可:
for(const obj of objectsUpdate){
  obj.mesh.position.copy(obj.body.position)
  obj.mesh.quaternion.copy(obj.body.quaternion)
}

物理性能
BroadPhase
在物理引擎中,broadphase 是一个重要的概念,它负责检测哪些物体之间可能存在碰撞。broadphase的主要目的是提高碰撞检测的效率,避免不必要的细粒度碰撞检测,以此来提高性能
CANNONJS提供了三种broadphase:
NaiveBroadphase:默认的情况,会对所有物体进行碰撞检测,每次添加一个物体,这个新物体会和之前所有的物体进行一次碰撞检测,时间复杂度为O(n^2)
适用于物体数量较少的场景
GridBroadphase:基于网格进行检测,相当于把物理世界用网格区分开,每个网格内从存储位于该网格内的物体,只对有物体的网格和其相邻的网格进行检测,通常情况下时间复杂度为O(n),但是某些情况下可能退化成O(n^2)
适用于物体分布均匀的大规模场景
SAPBroadphase:基于排序和修剪的算法,它会维护一个排序列表,记录每个物体在各个轴上的边界。其内部通过定期更新排序列表来判断相邻物体是否相交,平均情况下时间复杂度为O(n * log(n)),某些情况下可以优化到O(n)
适用于物体多且变化较大的场景
在CANNONJS里修改Broadphase的方式:
world.broadphase = new CANNON.SAPBroadphase(world)
sleep
通过设置world.allowSleep = true来让物理引擎自动判断场景中的物体是否处于休眠状态,处于休眠状态的物体不会参与各种计算,如果性能出现了问题,可以试着把这个打开
交互事件
CANNONJS提供了事件监听,可以对物体使用addEventlistener来实现监听
最常用的是碰撞的事件,通过collide事件实现
body.addEventListener('collide', func)
基于之前的demo代码,可以实现一个碰撞后发出声音的需求:
const hitSound = new Audio('/sounds/hit.mp3')
const playSound = () => {
  hitSound.play()
}

const createBox = () => {
  // ...
  // 创建盒子时,给盒子绑定上碰撞监听事件
  body.addEventListener('collide', playSound)
}
更进一步的,每一次碰撞都应该产生新的声音,所以在每次playSound的时候应该将声音的播放位置重置:
const playSound = () => {
  hitSound.currentTime = 0
  hitSound.play()
}
既然是碰撞,那就肯定存在强度之分,物体addEventlistener的回调也同样存在一个event参数:
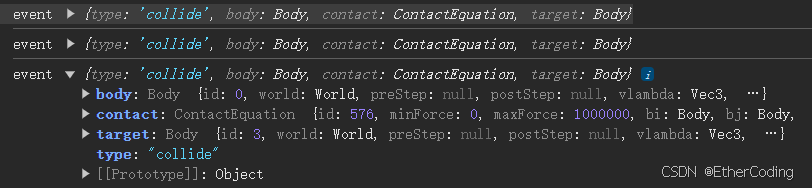
这里可以通过event.contact.getImpactVelocityAlongNormal获取本次碰撞的强度:

所以,为了实现更逼真的音效模拟,我们可以对声音的大小使用碰撞强度来控制
const playSound = (event) => {
  const impactVelocity = event.contact.getImpactVelocityAlongNormal()
  const threshHold = 8
  if(impactVelocity > threshHold) {
    hitSound.volume = 1
  } else {
    hitSound.volume = impactVelocity / threshHold
  }
  hitSound.currentTime = 0
  hitSound.play()
}
通过控制台的打印会发现,每次碰撞实际上会触发4次eventListener的回调,这个是因为物体间的接触取决于接触点的多少,所以我们也可以适当的添加防抖来解决该问题
demo地址
git@github.com:JohnWicc/threejs-demo.git
约束
cannonjs里提供了Constraint类来实现物体与物体间的约束
比如假设threejs场景里要实现一根绳子连着两个物体,那么在物理世界中就需要通过constraint来进行配置,模拟出两个物体相连的物理效果
你只需要知道它能做到这些,不需要知道它怎么做到的,实际需要的时候再去深入阅读文档对应内容来实现即可;这一方法同样适用于
cannonjs里的其他API
卡死的问题
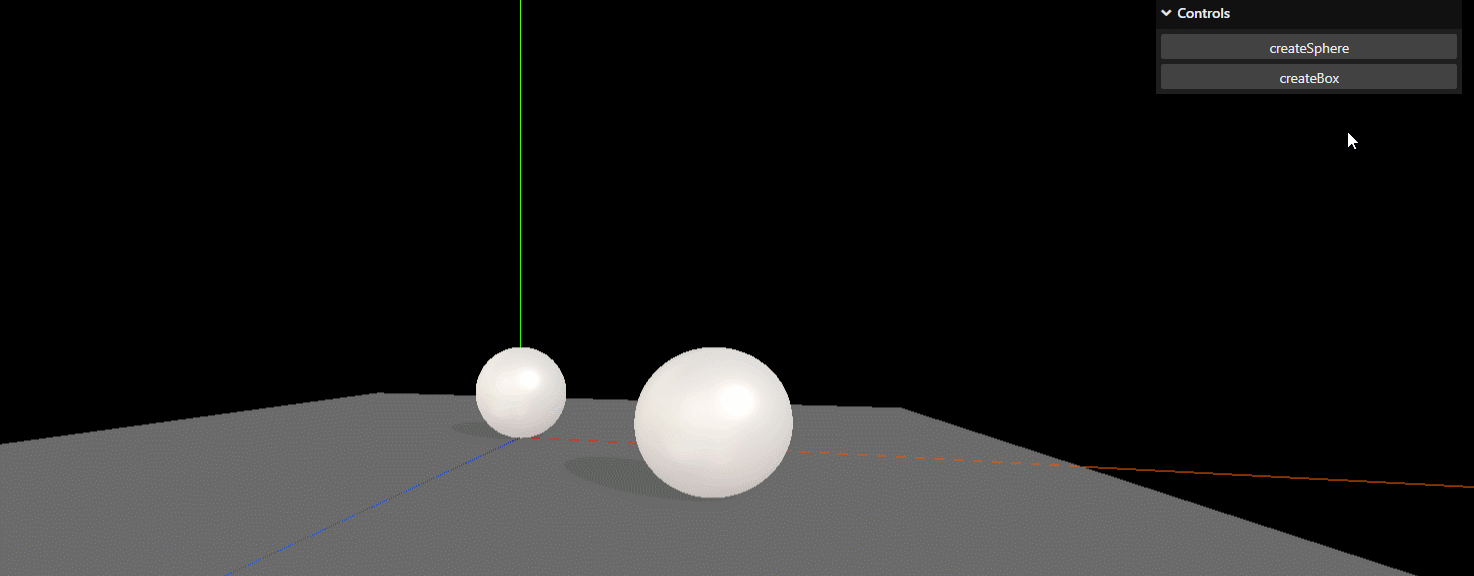
当往场景中添加物体过多时,可能会导致页面卡死,比如:
这是因为cannonjs物理世界的运算是在CPU里跑的,而不是GPU,当前浏览器页面默认只会使用一条CPU的主线程来执行,所以卡死是因为CPU计算超载了
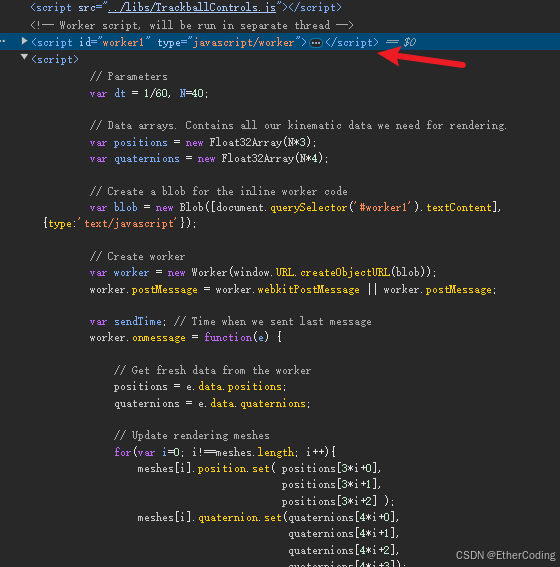
要解决这个问题,可以使用Worker来单独为物理世界的运算分配一个进程处理,参考官网提供的例子来实现即可:
https://schteppe.github.io/cannon.js/examples/worker.html
cannon-es
cannon.js已经很久没有更新了,cannon-es是由社区在其基础上继续维护的库,同时它支持typescript,开发时的提示更加友好
physijs
physijs是与threejs高度整合的一个物理插件,本身是基于Ammo.js的二次开发,用他可以更快速地给threejs场景添加上物理效果,但是它目前还处于起步阶段,并且可自定义的配置没那么多
https://chandlerprall.github.io/Physijs/
three-to-cannon
一个可以快速将threejs的几何体转为cannonjs里的shape的库,比如未来我们有了一个外部导入的模型,要对其实现一些物理效果,就可以使用这个库快速地在物理世界构建出对应形状得物体来进行模拟:
https://github.com/donmccurdy/three-to-cannon


 8026
8026

 被折叠的 条评论
为什么被折叠?
被折叠的 条评论
为什么被折叠?
 到【灌水乐园】发言


