安装配置MySQL
-
下载并解压至磁盘,可以去官网下载: https://www.mysql.com/cn/downloads/
-
这里提供
8.0.27版本,链接:https://pan.baidu.com/s/119G47gU2D0tMC2xsBi6thA
提取码:es39 -
解压,这里解压至F盘
F:\Program Files (x86)\mysql-8.0.27-winx64 -
以管理员身份打开
cmd,定位置以下路径F:\Program Files (x86)\mysql-8.0.27-winx64\bin,如下图所示。一定要以管理员身份进入cmd,否则在后续执行mysqld -install安装命令时会被Denied.

-
在
F:\Program Files (x86)\mysql-8.0.27-winx64\bin路径下执行mysqld -install安装命令,成功后如下图:

-
配置MYSQL,仍然在
F:\Program Files (x86)\mysql-8.0.27-winx64\bin路径下,执行mysqld --initialize命令进行数据库初始化,如没有报错,则初始化成功,同时在F:\Program Files (x86)\mysql-8.0.27-winx64路径下生成data文件夹,如下图

-
在
F:\Program Files (x86)\mysql-8.0.27-winx64\data路径下找到一个后缀为.err的文件,如图,这个文件中包含着初次使用MYSQL时生成的一个临时用随机密码(MYSQL5.7以上版本在初次使用时会生成一个随机密码,我们需要找到这个密码才能登录使用)

-
打开
DESKTOP-MHVIOIK文件,找到随机密码:RUGp%4oqh5lL

-
在MYSQL的解压目录
F:\Program Files (x86)\mysql-8.0.27-winx64下新建一个.ini格式文件my.ini,然后以记事本格式打开写入下面代码,注意修改自己的路径
[mysqld]
basedir=F:\Program Files (x86)\mysql-8.0.27-winx64
datadir=F:\Program Files (x86)\mysql-8.0.27-winx64\data
port=3306
- 现在,在
F:\Program Files (x86)\mysql-8.0.27-winx64\bin环境下启动MyAQL服务,执行net start mysql,如下;

- 输入命令
mysql -u root -p,登录Mysql,输入生成的随机密码RUGp%4oqh5lL,登录成功,如下

至此为止,已经成功安装并配置好MYSQL了,但还有一个问题是在上面我们使用命令mysql -u root -p登录MYSQL时是在F:\Program Files (x86)\mysql-8.0.27-winx64\bin环境下调用此命令的,如果下次重新打开cmd窗口你输入登录命令,可能系统就无法识别此命令了,因此,这里我们可以设置下系统的path环境变量,这样每次打开cmd窗口后直接就可以调用MYSQL的登录命令了。 - 修改密码
命令为ALTER USER 'root'@'localhost' IDENTIFIED BY '12345678';,其中12345678为密码,如下图

在C#中对MySQL的操作
这里使用MySql.Data.dll动态链接库对MySQL进行操作,包括连接、增删改查(CRUD)
关于MySql.Data库的官方介绍,MySQL documentation
几个常用的类包括:
- MySqlConnection: MySqlConnection类是用来连接MySQL数据库的,它接收一个连接用的字符串,返回一个MySqlConnection对象。
- MySqlCommand:执行一条sql语句,MySqlCommand对象实例化时接收两个参数:SQL语句(命令)以及和数据库的连接,即MySqlConnection连接对象,例如
string sql = "SELECT * from writer;" ;
MySqlCommand cmd = new MySqlCommand(sql, conn) ;
- MySqlDataReader: 包含sql语句执行的结果,并提供一个方法从结果中阅读一行。
- MySqlTransaction: 代表一个SQL事务在一个MySQL数据库
用MySql.Data库操作数据库的方式如下图。
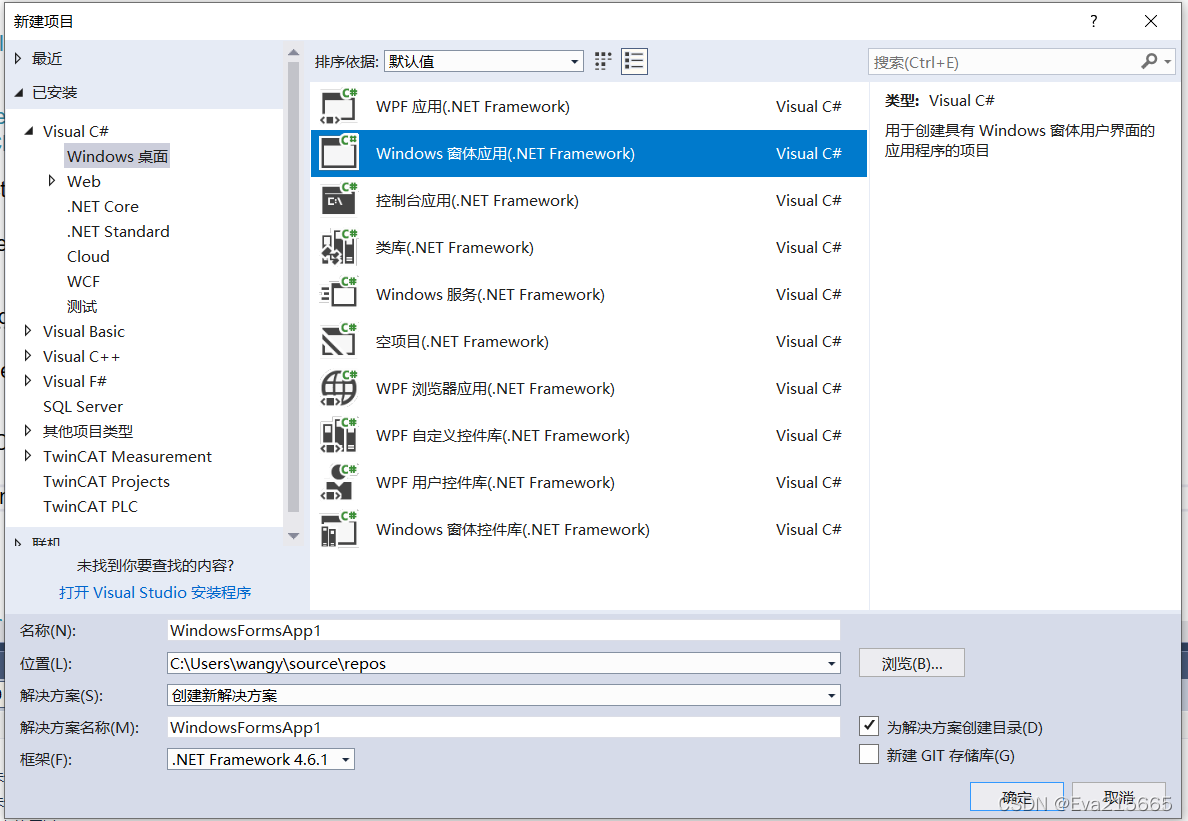
1 首先构建一个C# Windows 窗体应用
2 安装MySql.Data.dll动态链接库
在Visual Studio里,项目->管理NuGet程序包->浏览->在搜索框内搜索“MySql.Data”->安装
添加四个button空间和一个dataGridView控件

仅仅为测试验证C#与数据库的连接,所以UI做的非常粗糙,上述控件对应的对象为
        private System.Windows.Forms.Button button1_SetupConnection;
        private System.Windows.Forms.Button button2_QueryAllRecords;
        private System.Windows.Forms.Button button1_InsertRecord;
        private System.Windows.Forms.Button button1_deleteOneRecord;
        private System.Windows.Forms.ComboBox comboBox1;
        private System.Windows.Forms.Label label1;
        private System.Windows.Forms.Button button1_query;
        private System.Windows.Forms.TextBox textBox1;
        private System.Windows.Forms.DataGridView dataGridView1;
        private System.Windows.Forms.DataGridViewTextBoxColumn Column_name;
        private System.Windows.Forms.DataGridViewTextBoxColumn Column_gender;
        private System.Windows.Forms.DataGridViewTextBoxColumn Column_ID_Number;
        private System.Windows.Forms.DataGridViewTextBoxColumn Column_Student_Number;
        private System.Windows.Forms.GroupBox groupBox1;
        private System.Windows.Forms.DataGridView dataGridView2;
        private System.Windows.Forms.DataGridViewTextBoxColumn Column1_name;
        private System.Windows.Forms.DataGridViewTextBoxColumn Column1_gender;
        private System.Windows.Forms.DataGridViewTextBoxColumn Column1_ID_card_number;
        private System.Windows.Forms.DataGridViewTextBoxColumn Column1_Student_Number;
        private System.Windows.Forms.GroupBox groupBox2;
3 在C#工程中创建CRUD类,实现增删改查业务功能
这里重新创建一个类CRUD,实现连接、增删改查功能,从而达到业务或UI分离的目的,所创建的类如下
using System;
using System.Collections.Generic;
using System.Linq;
using System.Text;
using System.Threading.Tasks;


using System.ComponentModel;
using System.Data;
using System.Drawing;
using System.Windows.Forms;

using MySql.Data.MySqlClient;

public class CRUD
{
    private static CRUD crudIns = new CRUD(); //类的静态成员

    public static CRUD getIns() //类的静态方法,调用静态方法不需要构建对象
    { return crudIns; }

    public MySqlConnection setupConnetctiontoMySQL()
    {
        // 以下为与服务器的连接,其中 wangyiweitable1为所创建的数据库,内包含一张名为student的表
        String connectStr = "server = localhost; port = 3306; user = root; password = 12345678; " +
                "database = wangyiweitable1;";
        MySqlConnection conn = new MySqlConnection(connectStr);
        try
        {
            conn.Open(); //打开通道,建立连接
            // MessageBox.Show("已经建立连接");
            return conn;
        }
        catch (MySqlException ex)
        {
            switch (ex.Number)
            {
                case 0:
                    MessageBox.Show("连接失败!");
                    break;
                case 1045:
                    MessageBox.Show("用户名/密码错误!");
                    break;
                default:
                    Console.WriteLine(ex.Message);
                    break;
            }
            return conn;
        }
    }

// 按关键字查询,该函数的参数KeyValue由textbox内用户输入的值传递
    public MySqlDataReader QueryAccordingtoKeyValye(string KeyValue)
    {
        MySqlConnection conn = setupConnetctiontoMySQL();
        // 写SQL查询语句
        string sql = "select * from student where name = @name"; // 和下文的"@name"对应
        MySqlCommand cmd = new MySqlCommand(sql, conn); //生成命令构造器对象
        cmd.Parameters.AddWithValue("@name", KeyValue);
        MySqlDataReader reader = cmd.ExecuteReader();
        return reader;
    }

// 查询所有记录的业务实现
    public MySqlDataReader QueryAllRecords()
    {
        MySqlConnection conn = setupConnetctiontoMySQL();
        String sql = "select * from student"; // student 是表名
        MySqlCommand cmd = new MySqlCommand(sql, conn);
        MySqlDataReader reader = cmd.ExecuteReader();
        return reader;
     }

    public void InsertRecord(string recordContent) // recordContent
    {
        MySqlConnection conn = setupConnetctiontoMySQL();
        MySqlCommand cmd = new MySqlCommand(recordContent, conn);
        int result = cmd.ExecuteNonQuery(); //3.执行插入、删除、更改语句。执行成功返回受影响的数据的行数,返回1可做true判断。执行失败不返回任何数据,报错,下面代码都不执行
        if (result != null)
            MessageBox.Show("插入记录成功");
    }

    public void DeleteRecord(string DeleteContent)
    {
        MySqlConnection conn = setupConnetctiontoMySQL();
        MySqlCommand cmd = new MySqlCommand(DeleteContent, conn);
    }
}
4 实现UI端四个按钮的回调函数
由于增删改查的业务已经在CRUD类中实现,因此UI端按钮的回调函数就非常简洁
例如,建立连接按钮的回调函数实现为
private void button1_SetupConnection_Click(object sender, EventArgs e)
        {
            MySqlConnection conn = CRUD.getIns().setupConnetctiontoMySQL();
        }
插入一条记录的回调函数实现为
private void button1_InsertRecord_Click(object sender, EventArgs e)
        {
            string sql = "insert into student (id, name, gender, ID_card_number, Student_Number) values (3, '张三', '男', '1234', '1256879')";
            CRUD.getIns().InsertRecord(sql);
        }
删除一条记录的回调函数实现为
        private void button1_deleteOneRecord_Click(object sender, EventArgs e)  //删除一条id值为3的记录
        {
            string sql = "delete from student where id = @id";
            CRUD.getIns().DeleteRecord(sql);
        }
查询按钮的回调函数实现如下:
        private void button1_query_Click(object sender, EventArgs e)
        {
            string value_retrieve_key = textBox1.Text; //从textBox1中读取值
            MySqlDataReader reader = CRUD.getIns().QueryAccordingtoKeyValye(value_retrieve_key);
            reader.Read();
            dataGridView1.Rows[0].Cells[0].Value = reader.GetString("name");
            dataGridView1.Rows[0].Cells[1].Value = reader.GetString("gender");
            dataGridView1.Rows[0].Cells[2].Value = reader.GetString("ID_card_number");
            dataGridView1.Rows[0].Cells[3].Value = reader.GetString("Student_Number");
         }
查询所有记录按钮的回调函数实现如下
private void button2_QueryAllRecords_Click(object sender, EventArgs e)
        {
            MySqlConnection conn = CRUD.getIns().setupConnetctiontoMySQL();
            MySqlDataReader reader = CRUD.getIns().QueryAllRecords();
            int i = 0;
            while (reader.Read())
            {
                DataGridViewRow row = new DataGridViewRow();
                dataGridView1.Rows.Add(row);
                dataGridView1.Rows[i].Cells[0].Value = reader.GetString("name");
                dataGridView1.Rows[i].Cells[1].Value = reader.GetString("gender");
                dataGridView1.Rows[i].Cells[2].Value = reader.GetString("ID_card_number");
                dataGridView1.Rows[i].Cells[3].Value = reader.GetString("Student_Number");
                i++;
            }
后续
安装mysql5.7时遇到了不能插入中文的问题,插入中文时报错Incorrect string value: '\xD5\xC5\xC8\xFD' for column 'Sname' at row 1,这是因为数据库没手动配置之前默认是拉丁文,这时候需要将数据库配置成utf8,实在不想改的在创建数据库的时候指定字符集,但是在server还是有一些问题。
解决方法,修改配置文件my.ini成以下内容:
# For advice on how to change settings please see
# http://dev.mysql.com/doc/refman/5.6/en/server-configuration-defaults.html
# *** DO NOT EDIT THIS FILE. It's a template which will be copied to the
# *** default location during install, and will be replaced if you
# *** upgrade to a newer version of MySQL.
[client]
default-character-set = utf8mb4
[mysql]
default-character-set = utf8mb4
[mysqld]
character-set-client-handshake = FALSE
character-set-server = utf8mb4
collation-server = utf8mb4_bin
init_connect='SET NAMES utf8mb4'
# Remove leading # and set to the amount of RAM for the most important data
# cache in MySQL. Start at 70% of total RAM for dedicated server, else 10%.
innodb_buffer_pool_size = 128M
# Remove leading # to turn on a very important data integrity option: logging
# changes to the binary log between backups.
# log_bin
# These are commonly set, remove the # and set as required.
basedir = E:\mysql-5.7.37-winx64
datadir = E:\mysql-5.7.37-winx64\data
port = 3306
# server_id = .....
# Remove leading # to set options mainly useful for reporting servers.
# The server defaults are faster for transactions and fast SELECTs.
# Adjust sizes as needed, experiment to find the optimal values.
join_buffer_size = 128M
sort_buffer_size = 16M
read_rnd_buffer_size = 16M
sql_mode=NO_ENGINE_SUBSTITUTION,STRICT_TRANS_TABLES
然后删除服务,删掉data文件夹,将上述配置过程重新来一遍,问题解决。
如何删除服务参考这里
进入mysql后,查看字符集,可以看到,字符集都变成了utf8格式编码。
show variables like 'character_%';


 7278
7278

 被折叠的 条评论
为什么被折叠?


