


文章目录
编译安装前的文件目录:
这里的 csrc 应该不是指 pytorch 项目中的 /torch/csrc
csrc
├─ cpu
│    ├─ test.cpp
│    └─ test.h
└─ setup.py
第一步:编写 C++ 模块
test.h
#include <torch/extension.h>
#include <vector>

// 前向传播
torch::Tensor Test_forward_cpu(const torch::Tensor& inputA, const torch::Tensor& inputB);

// 反向传播
std::vector<torch::Tensor> Test_backward_cpu(const torch::Tensor& gradOutput);
test.cpp
#include "test.h"

// 前向传播
torch::Tensor Test_forward_cpu(const torch::Tensor& x, const torch::Tensor& y){
    AT_ASSERTM(x.sizes() == y.sizes(), "x must be the same size as y");
    torch::Tensor z = torch::zeros(x.sizes());
    z = 2 * x + y;
    return z;
}

// 反向传播
std::vector<torch::Tensor> Test_backward_cpu(const torch::Tensor& gradOutput){
    torch::Tensor gradOutputX = 2 * gradOutput * torch::ones(gradOutput.sizes());
    torch::Tensor gradOutputY = gradOutput * torch::ones(gradOutput.sizes());
    return {gradOutputX, gradOutputY};
}

// pybind11 绑定
PYBIND11_MODULE(TORCH_EXTENSION_NAME, m){
    m.def("forward", &Test_forward_cpu, "TEST forward");
    m.def("backward", &Test_backward_cpu, "TEST backward");
}
第二步:编写 setup.py
from setuptools import setup
import os
import glob
from torch.utils.cpp_extension import BuildExtension, CppExtension

# 头文件目录
include_dirs = os.path.dirname(os.path.abspath(__file__))
# 源代码目录
source_cpu = glob.glob(os.path.join(include_dirs, 'cpu', '*.cpp'))

setup(
    name='test_cpp', # 模块名称,需要在 python 中调用
    version="0.1",
    ext_modules=[
        CppExtension('test_cpp', sources=source_cpu, include_dirs=[include_dirs]),
    ],
    cmdclass={
        'build_ext': BuildExtension
    }
)
第三步:安装 C++ 模块
在 csrc 文件夹下运行命令
python setup.py install
第一次尝试的报错信息:
/home/zjma/.conda/envs/debugtest/lib/python3.8/site-packages/setuptools/_distutils/cmd.py:66: SetuptoolsDeprecationWarning: setup.py install is deprecated.
!!

        ********************************************************************************
        Please avoid running ``setup.py`` directly.
        Instead, use pypa/build, pypa/installer or other
        standards-based tools.

        See https://blog.ganssle.io/articles/2021/10/setup-py-deprecated.html for details.
        ********************************************************************************

!!
  self.initialize_options()
/home/zjma/.conda/envs/debugtest/lib/python3.8/site-packages/setuptools/_distutils/cmd.py:66: EasyInstallDeprecationWarning: easy_install command is deprecated.
!!

        ********************************************************************************
        Please avoid running ``setup.py`` and ``easy_install``.
        Instead, use pypa/build, pypa/installer or other
        standards-based tools.

        See https://github.com/pypa/setuptools/issues/917 for details.
        ********************************************************************************

!!
  self.initialize_options()
参考 SetuptoolsDeprecationWarning: setup.py install is deprecated. Use build and pip 后得知是 setuptools 版本太高,于是降低 setuptools 版本,pip install setuptools==58.2.0。
第二次尝试的运行结果:
running install
running bdist_egg
running egg_info
writing test_cpp.egg-info/PKG-INFO
writing dependency_links to test_cpp.egg-info/dependency_links.txt
writing top-level names to test_cpp.egg-info/top_level.txt
reading manifest file 'test_cpp.egg-info/SOURCES.txt'
writing manifest file 'test_cpp.egg-info/SOURCES.txt'
installing library code to build/bdist.linux-x86_64/egg
running install_lib
running build_ext
building 'test_cpp' extension
creating /home/zjma/pytorch_v1.13.1/csrc/build/temp.linux-x86_64-3.8
creating /home/zjma/pytorch_v1.13.1/csrc/build/temp.linux-x86_64-3.8/home
creating /home/zjma/pytorch_v1.13.1/csrc/build/temp.linux-x86_64-3.8/home/zjma
creating /home/zjma/pytorch_v1.13.1/csrc/build/temp.linux-x86_64-3.8/home/zjma/pytorch_v1.13.1
creating /home/zjma/pytorch_v1.13.1/csrc/build/temp.linux-x86_64-3.8/home/zjma/pytorch_v1.13.1/csrc
creating /home/zjma/pytorch_v1.13.1/csrc/build/temp.linux-x86_64-3.8/home/zjma/pytorch_v1.13.1/csrc/cpu
Emitting ninja build file /home/zjma/pytorch_v1.13.1/csrc/build/temp.linux-x86_64-3.8/build.ninja...
Compiling objects...
Allowing ninja to set a default number of workers... (overridable by setting the environment variable MAX_JOBS=N)
[1/1] c++ -MMD -MF /home/zjma/pytorch_v1.13.1/csrc/build/temp.linux-x86_64-3.8/home/zjma/pytorch_v1.13.1/csrc/cpu/test.o.d -pthread -B /home/zjma/.conda/envs/debugtest/compiler_compat -Wl,--sysroot=/ -Wsign-compare -DNDEBUG -g -fwrapv -O3 -Wall -Wstrict-prototypes -fPIC -I/home/zjma/pytorch_v1.13.1/csrc -I/home/zjma/pytorch_v1.13.1/torch/include -I/home/zjma/pytorch_v1.13.1/torch/include/torch/csrc/api/include -I/home/zjma/pytorch_v1.13.1/torch/include/TH -I/home/zjma/pytorch_v1.13.1/torch/include/THC -I/home/zjma/.conda/envs/debugtest/include/python3.8 -c -c /home/zjma/pytorch_v1.13.1/csrc/cpu/test.cpp -o /home/zjma/pytorch_v1.13.1/csrc/build/temp.linux-x86_64-3.8/home/zjma/pytorch_v1.13.1/csrc/cpu/test.o -DTORCH_API_INCLUDE_EXTENSION_H '-DPYBIND11_COMPILER_TYPE="_gcc"' '-DPYBIND11_STDLIB="_libstdcpp"' '-DPYBIND11_BUILD_ABI="_cxxabi1016"' -DTORCH_EXTENSION_NAME=test_cpp -D_GLIBCXX_USE_CXX11_ABI=1 -std=c++14
cc1plus: warning: command-line option ‘-Wstrict-prototypes’ is valid for C/ObjC but not for C++
creating build/lib.linux-x86_64-3.8
g++ -pthread -shared -B /home/zjma/.conda/envs/debugtest/compiler_compat -L/home/zjma/.conda/envs/debugtest/lib -Wl,-rpath=/home/zjma/.conda/envs/debugtest/lib -Wl,--no-as-needed -Wl,--sysroot=/ /home/zjma/pytorch_v1.13.1/csrc/build/temp.linux-x86_64-3.8/home/zjma/pytorch_v1.13.1/csrc/cpu/test.o -L/home/zjma/pytorch_v1.13.1/torch/lib -lc10 -ltorch -ltorch_cpu -ltorch_python -o build/lib.linux-x86_64-3.8/test_cpp.cpython-38-x86_64-linux-gnu.so
creating build/bdist.linux-x86_64/egg
copying build/lib.linux-x86_64-3.8/test_cpp.cpython-38-x86_64-linux-gnu.so -> build/bdist.linux-x86_64/egg
creating stub loader for test_cpp.cpython-38-x86_64-linux-gnu.so
byte-compiling build/bdist.linux-x86_64/egg/test_cpp.py to test_cpp.cpython-38.pyc
creating build/bdist.linux-x86_64/egg/EGG-INFO
copying test_cpp.egg-info/PKG-INFO -> build/bdist.linux-x86_64/egg/EGG-INFO
copying test_cpp.egg-info/SOURCES.txt -> build/bdist.linux-x86_64/egg/EGG-INFO
copying test_cpp.egg-info/dependency_links.txt -> build/bdist.linux-x86_64/egg/EGG-INFO
copying test_cpp.egg-info/top_level.txt -> build/bdist.linux-x86_64/egg/EGG-INFO
writing build/bdist.linux-x86_64/egg/EGG-INFO/native_libs.txt
zip_safe flag not set; analyzing archive contents...
__pycache__.test_cpp.cpython-38: module references __file__
creating 'dist/test_cpp-0.1-py3.8-linux-x86_64.egg' and adding 'build/bdist.linux-x86_64/egg' to it
removing 'build/bdist.linux-x86_64/egg' (and everything under it)
Processing test_cpp-0.1-py3.8-linux-x86_64.egg
removing '/home/zjma/.conda/envs/debugtest/lib/python3.8/site-packages/test_cpp-0.1-py3.8-linux-x86_64.egg' (and everything under it)
creating /home/zjma/.conda/envs/debugtest/lib/python3.8/site-packages/test_cpp-0.1-py3.8-linux-x86_64.egg
Extracting test_cpp-0.1-py3.8-linux-x86_64.egg to /home/zjma/.conda/envs/debugtest/lib/python3.8/site-packages
test-cpp 0.1 is already the active version in easy-install.pth

Installed /home/zjma/.conda/envs/debugtest/lib/python3.8/site-packages/test_cpp-0.1-py3.8-linux-x86_64.egg
Processing dependencies for test-cpp==0.1
Finished processing dependencies for test-cpp==0.1
编译安装后的文件目录:
csrc
├─ build
│    ├─ bdist.linux-x86_64
│    ├─ lib.linux-x86_64-3.8
│    │    └─ test_cpp.cpython-38-x86_64-linux-gnu.so
│    ├─ lib.linux-x86_64-cpython-38
│    │    └─ test_cpp.cpython-38-x86_64-linux-gnu.so
│    ├─ temp.linux-x86_64-3.8
│    │    ├─ .ninja_deps
│    │    ├─ .ninja_log
│    │    ├─ build.ninja
│    │    └─ home
│    └─ temp.linux-x86_64-cpython-38
│           ├─ .ninja_deps
│           ├─ .ninja_log
│           ├─ build.ninja
│           └─ home
├─ cpu
│    ├─ test.cpp
│    └─ test.h
├─ dist
│    └─ test_cpp-0.1-py3.8-linux-x86_64.egg
├─ setup.py
└─ test_cpp.egg-info
       ├─ PKG-INFO
       ├─ SOURCES.txt
       ├─ dependency_links.txt
       └─ top_level.txt
第四步:验证安装
1、在虚拟环境的路径 /lib/python3.8/site-packages 下看到 test_cpp-0.1-py3.8-linux-x86_64.egg 文件

2、conda list 查看当前虚拟环境下已经安装的包
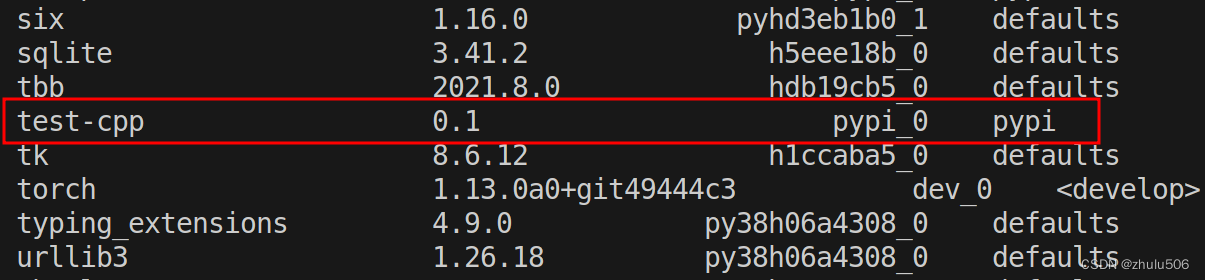 3、进入 python 的交互模式,
import test_cpp 后报错:
>>> import test_cpp
Traceback (most recent call last):
  File "<stdin>", line 1, in <module>
ImportError: libc10.so: cannot open shared object file: No such file or directory
参考 通过Python setup.py install的第三方包,import时却无法导入是什么问题呢? - 神经的网络里挣扎的回答 - 知乎,因为编译的 test_cpp 包需要依赖 torch 包,导致无法导入。所以,在 import test_cpp 前要先 import torch。
第五步:C++ 模块使用
test_cpp1.py
import torch
import test_cpp
from torch.autograd import Function

class TestFunction(Function):

    @staticmethod
    def forward(ctx, x, y):
        return test_cpp.forward(x, y)

    @staticmethod
    def backward(ctx, gradOutput):
        gradX, gradY = test_cpp.backward(gradOutput)
        return gradX, gradY

class Test(torch.nn.Module):
    def __init__(self):
        super(Test, self).__init__()
    def forward(self, inputA, inputB):
        return TestFunction.apply(inputA, inputB)
test_cpp2.py
import torch
from torch.autograd import Variable

from test_cpp1 import Test

x = Variable(torch.Tensor([1,2,3]), requires_grad=True)
y = Variable(torch.Tensor([4,5,6]), requires_grad=True)

test = Test()
z = test(x, y)
z.sum().backward()

print('x: ', x)
print('y: ', y)
print('z: ', z)
print('x.grad: ', x.grad)
print('y.grad: ', y.grad)
运行结果
/home/zjma/.conda/envs/debugtest/bin/python /home/zjma/PycharmProjects/pythonProject/test_cpp2.py
x:  tensor([1., 2., 3.], requires_grad=True)
y:  tensor([4., 5., 6.], requires_grad=True)
z:  tensor([ 6.,  9., 12.], grad_fn=<TestFunctionBackward>)
x.grad:  tensor([2., 2., 2.])
y.grad:  tensor([1., 1., 1.])

进程已结束,退出代码为 0
运行结果符合预期。
扩展阅读
- pytorch之c++/cuda拓展(讲得很详细,举的例子和上文基本一样,但用到了CUDA,很多内容可以扩展去看)
- 官方教程 相关内容的笔记(后面可以复现一下)


 663
663


 被折叠的 条评论
为什么被折叠?
被折叠的 条评论
为什么被折叠?
 到【灌水乐园】发言


