


首先将树莓派pico 安装Micropython环境 并且下载安装Thonny。这点就不赘述了。
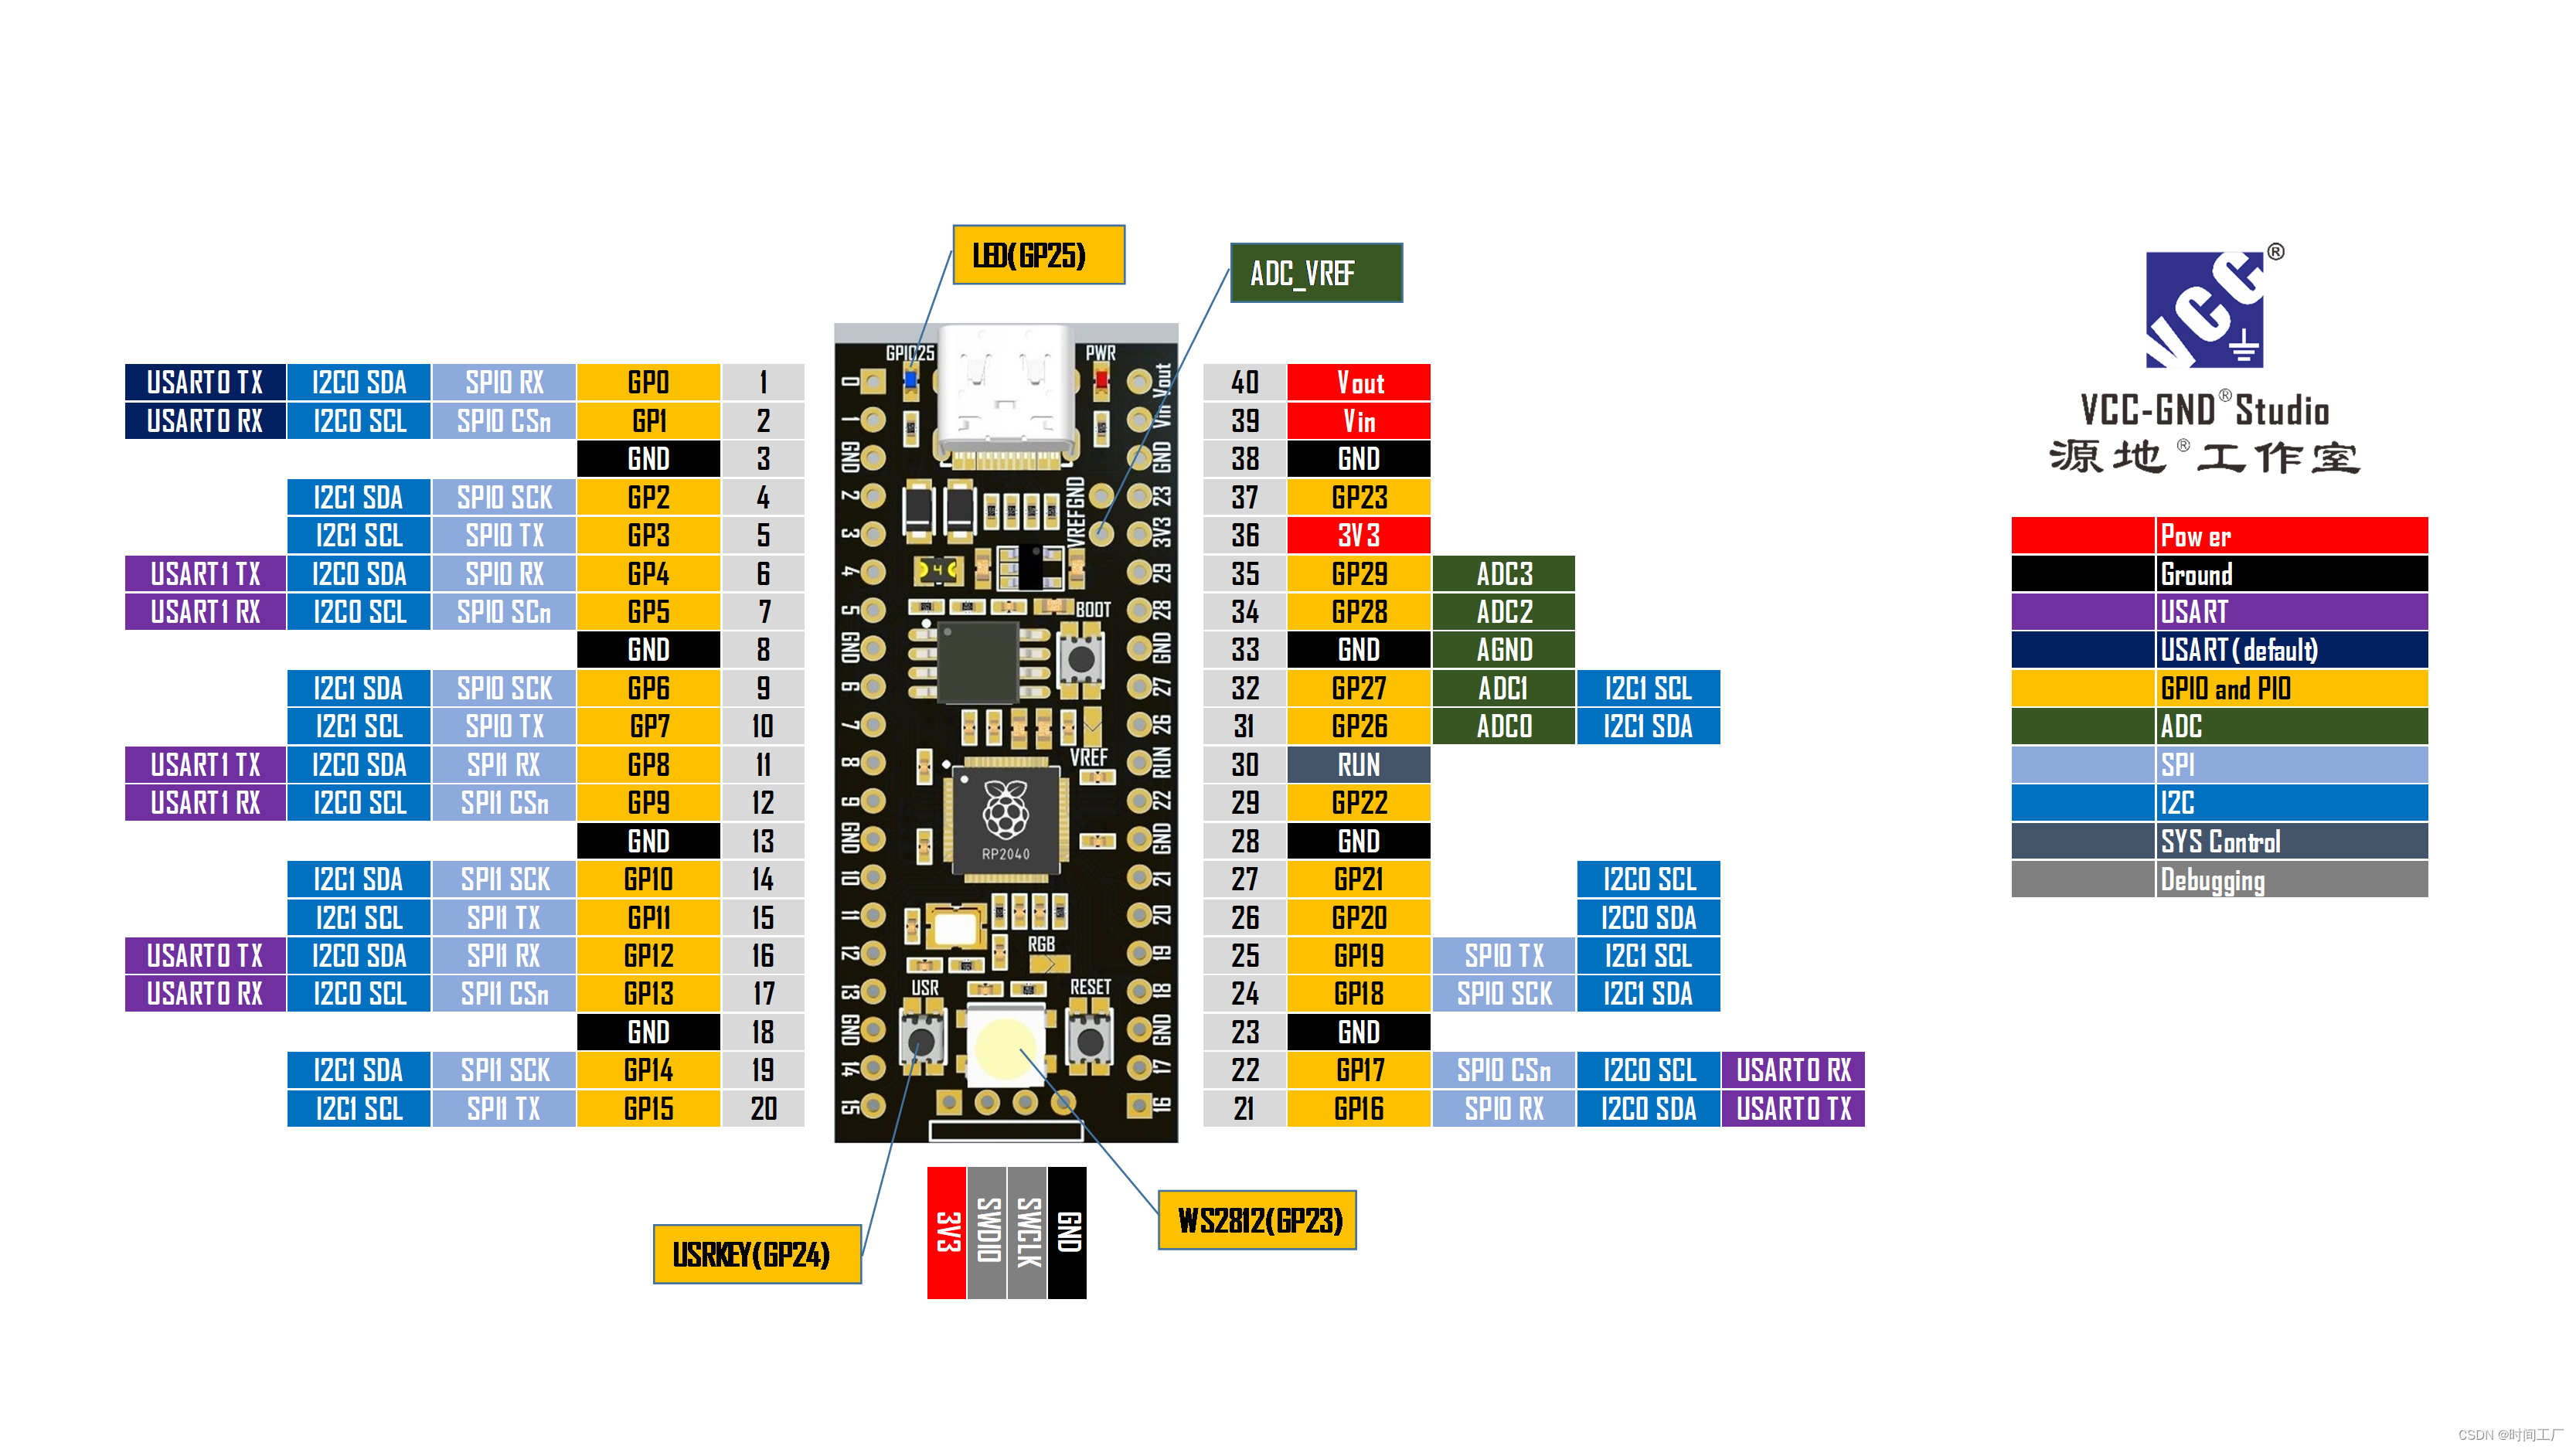
我这里用的是最便宜的YD-RP2040,9.9包邮。针脚图和官方pico基本一样。
接线图如下
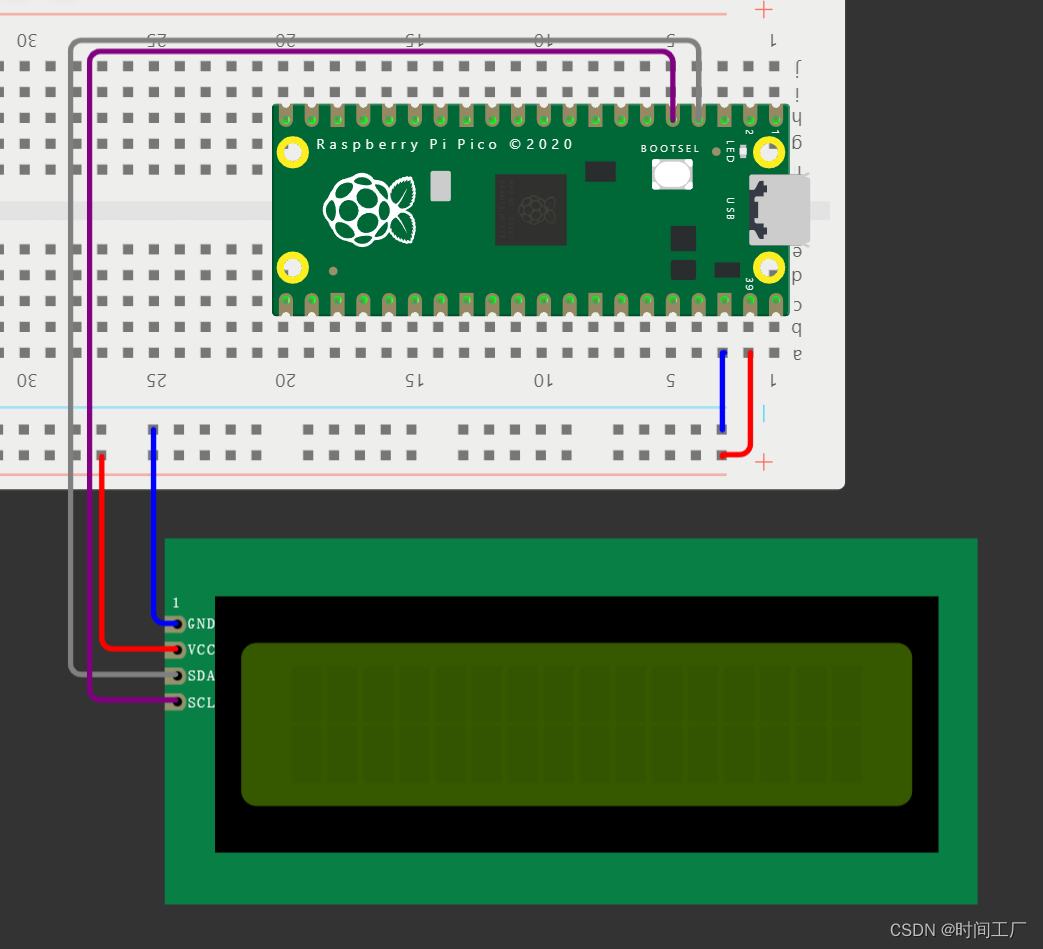
连接SDA到GP2
连接SCL到GP3
VCC连接到5v
GND连接到GND

把pico连接到电脑 选择自己的pico

工具-管理包
搜索lcd
选择micropython-i2c-lcd安装

安装后会多出圈出的文件

新建 lcd.py
复制代码 代码在下面

from lcd_i2c import LCD
from machine import I2C, Pin

# 定义 LCD 的 I2C 地址、行数和列数
I2C_ADDR = 0x27
NUM_ROWS = 2
NUM_COLS = 16

# 定义 I2C 接口对象,使用指定的引脚和频率初始化
i2c = I2C(1, scl=Pin(3), sda=Pin(2), freq=800_000)

# 创建 LCD 对象,并传入所需的参数
lcd = LCD(addr=I2C_ADDR, cols=NUM_COLS, rows=NUM_ROWS, i2c=i2c)

# 初始化 LCD 显示屏
lcd.begin()

# 在 LCD 显示屏上打印字符串 "Hello World"
lcd.print("Hello World!")
运行代码

点亮成功
lcd_i2c库功能演示 大家可以自由选择。
"""I2C LCD showcase"""

from lcd_i2c import LCD
from machine import I2C, Pin
from time import sleep

# 定义 LCD 的 I2C 地址、行数和列数
I2C_ADDR = 0x27
I2C_NUM_ROWS = 2
I2C_NUM_COLS = 16
FREQ = 800000   # 如果出现 "Errno 5" 错误,可以尝试降低该值

def print_and_wait(text: str, sleep_time: int = 2) -> None:
    """
    打印文本并等待一段时间。

    :param      text:        要打印的文本
    :type       text:        str
    :param      sleep_time:  等待时间(秒)
    :type       sleep_time:  int
    """
    print(text)
    sleep(sleep_time)

# 定义 I2C 接口,默认为 'I2C(0)',具体根据设备文档和引脚信息进行调整
i2c = I2C(1, scl=Pin(3), sda=Pin(2), freq=FREQ)
lcd = LCD(addr=I2C_ADDR, cols=I2C_NUM_COLS, rows=I2C_NUM_ROWS, i2c=i2c)

# 获取 LCD 的信息和属性
print("LCD is on I2C address {}".format(lcd.addr))
print("LCD has {} columns and {} rows".format(lcd.cols, lcd.rows))
print("LCD is used with a charsize of {}".format(lcd.charsize))
print("Cursor position is {}".format(lcd.cursor_position))

# 启动 LCD,因为为了与 Arduino 兼容,初始化时不会自动调用此方法
lcd.begin()

# 在 LCD 上打印文本,显示在第一行第一列
lcd.print("Hello World")
print_and_wait("Show 'Hello World' on LCD")

# 关闭 LCD 背光
lcd.no_backlight()
print_and_wait("Turn LCD backlight off")

# 获取当前背光值
print("Backlight value: {}".format(lcd.get_backlight()))

# 打开 LCD 背光
lcd.backlight()
print_and_wait("Turn LCD backlight on")

# 获取当前背光值
print("Backlight value: {}".format(lcd.get_backlight()))

# 清空 LCD 显示内容
lcd.clear()
print_and_wait("Clear display content")

# 打开光标(显示光标)
lcd.cursor()
print_and_wait("Turn cursor on (show)")

# 光标闪烁
lcd.blink()
print_and_wait("Blink cursor")

# 将光标返回到起始位置
lcd.home()
print_and_wait("Return cursor to home position")

# 停止光标闪烁
lcd.no_blink()
print_and_wait("Stop blinking cursor")

# 关闭光标(隐藏光标)
lcd.no_cursor()
print_and_wait("Turn cursor off (hide)")

# 在屏幕上打印文本
lcd.print("Hello again")
print_and_wait("Show 'Hello again' on LCD")

# 关闭显示
lcd.no_display()
print_and_wait("Turn LCD off")

# 打开显示
lcd.display()
print_and_wait("Turn LCD on")

# 向左滚动显示
for _ in "Hello again":
    lcd.scroll_display_left()
    sleep(0.5)
print_and_wait("Scroll display to the left")

# 向右滚动显示
for _ in "Hello again":
    lcd.scroll_display_right()
    sleep(0.5)
print_and_wait("Scroll display to the right")

# 设置文本从右到左流动
lcd.clear()
lcd.set_cursor(col=12, row=0)
lcd.right_to_left()
lcd.print("Right to left")
print_and_wait("Set text flow right to left")

# 设置文本从左到右流动
lcd.clear()
lcd.set_cursor(col=0, row=0)
lcd.left_to_right()
lcd.print("Left to right")
print_and_wait("Set text flow left to right")

# 激活自动滚动
lcd.autoscroll()
print_and_wait("Activate autoscroll")

# 禁用自动滚动
lcd.no_autoscroll()
print_and_wait("Disable autoscroll")

# 将光标设置到第二行第七列
lcd.clear()
lcd.cursor()
lcd.set_cursor(col=7, row=1)
print_and_wait("Set cursor to row 1, column 7")
lcd.no_cursor()

# 设置自定义字符号 0 为 :-)
# 自定义字符号可以设置在位置 0 到 7
lcd.create_char(
    location=0,
    charmap=[0x00, 0x00, 0x11, 0x04, 0x04, 0x11, 0x0E, 0x00]
    # 这是二进制矩阵,可以感受和查看
    # 00000
    # 00000
    # 10001
    # 00100
    # 00100
    # 10001
    # 01110
    # 00000
)
print_and_wait("Create custom char ':-)'")

# 显示存储在位置 0 的自定义字符
lcd.print(chr(0))
print_and_wait("Show custom char")
MicroPython I2C LCD github https://github.com/brainelectronics/micropython-i2c-lcd/tree/main


 1737
1737

 被折叠的 条评论
为什么被折叠?
被折叠的 条评论
为什么被折叠?
 到【灌水乐园】发言


