


一、项目简介
- 语音识别是人工智能领域的一个重要的应用场景,那么程序究竟是如何听懂语音的呢?
- 本文将用真实的音频案例,用代码呈现语音识别的基本原理和流程。
- 同时,将各种声音信号的MFCC矩阵进行可视化,“把声音的美丽画成图”。
1、基本原理
计算机只能识别二进制的数字信息,是无法直接识别音频信息的。因此让机器具有听懂“人话”的功能,必须要将声音的模拟信号转化为数字信号;就是利用模型将声音的音频数据进行量化,并根据需求进行特征提取(一般提取声音信号的MFCC-梅尔频率倒谱系数矩阵),转化为特征矩阵。然后利用大量的相关特征举证对模型进行训练,使模型具备声音分类的功能。
详细原理见:https://blog.csdn.net/bvngh3247/article/details/80778165
2、案例数据
- 本文采集7类声音数据(7种水果的英文读音wav文件)
- 7类分别为:apple(苹果),banana(香蕉),orange(橘子),lime(青柠檬),
kiwi(猕猴桃),peach(桃子),pineapple(菠萝) - 训练集各准备14个样本,测试集各一个样本
3、源代码及数据集地址
二、模型创建
1、导入相关工具包
- 核心工具包:hmmlearn,scipy.io.wavfile,python_speech_features
import os
import warnings
import numpy as np
import scipy.io.wavfile as wf
import python_speech_features as sf
import matplotlib.pyplot as mp
import hmmlearn.hmm as hl
# 过滤代码运行中无关的警告日志
warnings.filterwarnings(
    'ignore', category=DeprecationWarning)
np.seterr(all='ignore')
2、定义语音识别的各类函数
# 定义声音文件的标签和路径的映射字典函数
def search_speeches(directory, speeches):
    # 如果路径不是文件夹则报出异常
    if not os.path.isdir(directory):
        raise IOError("路径" + directory + '不是文件夹')
    # 获取文件夹中的子目录
    for entry in os.listdir(directory):
        # 获取分类文件夹的名称作为分类标签
        label = directory[directory.rfind(
            os.path.sep) + 1:]
        # 拼接新的文件路径
        path = os.path.join(directory, entry)
        # 如果路径为文件夹则继续递归向内查询
        if os.path.isdir(path):
            search_speeches(path, speeches)
        # 如果路径为'.wav'后缀的文件名
        elif os.path.isfile(path) and \
                path.endswith('.wav'):
            # 判断speeches中是否存在label标签
            if label not in speeches:
                speeches[label] = []
            speeches[label].append(path)
    return speeches
# 获取数据集的MFCC矩阵和标签列表
def gen_matrix(speeches):
    path_x, path_y = [], []
    # 获取wav文件类型标签和文件集
    for label, filenames in speeches.items():
        mfccs = np.array([])
        # 遍历每一个wav文件
        for filename in filenames:
            # 提取wav文件的采样率和信号值
            sample_rate, sigs = wf.read(filename)
            # 获取每个音频文件的mfcc
            mfcc = sf.mfcc(sigs, sample_rate)
            if len(mfccs) == 0:
                mfccs = mfcc
            else:
                mfccs = np.append(mfccs, mfcc, axis=0)
        path_x.append(mfccs)
        path_y.append(label)
    return path_x, path_y
# 进行模型训练,获取训练后的模型集
def model_train(path_x, path_y):
    models = {}
    for mfccs, label in zip(path_x, path_y):
        # 利用HMM算法创建模型
        model = hl.GaussianHMM(
            n_components=4, covariance_type='diag',
            n_iter=1000)
        # 获取每个训练样本训练得到的model
        models[label] = model.fit(mfccs)
    return models
# 模型预测,获取样本测试的标签集
def model_pred(path_x, path_y, models):
    pred_test_y = []
    for mfccs in path_x:
        # 初始化最优模型得分和对应的类别
        best_score, best_label = None, None
        # 获取模型和对应的标签
        for label, model in models.items():
            # 计算模型的测试得分
            score = model.score(mfccs)
            # 选择每个类别对应的最优模型参数
            if (best_score is None) or \
                    best_score < score:
                best_score, best_label = score, label
        pred_test_y.append(best_label)
    return pred_test_y
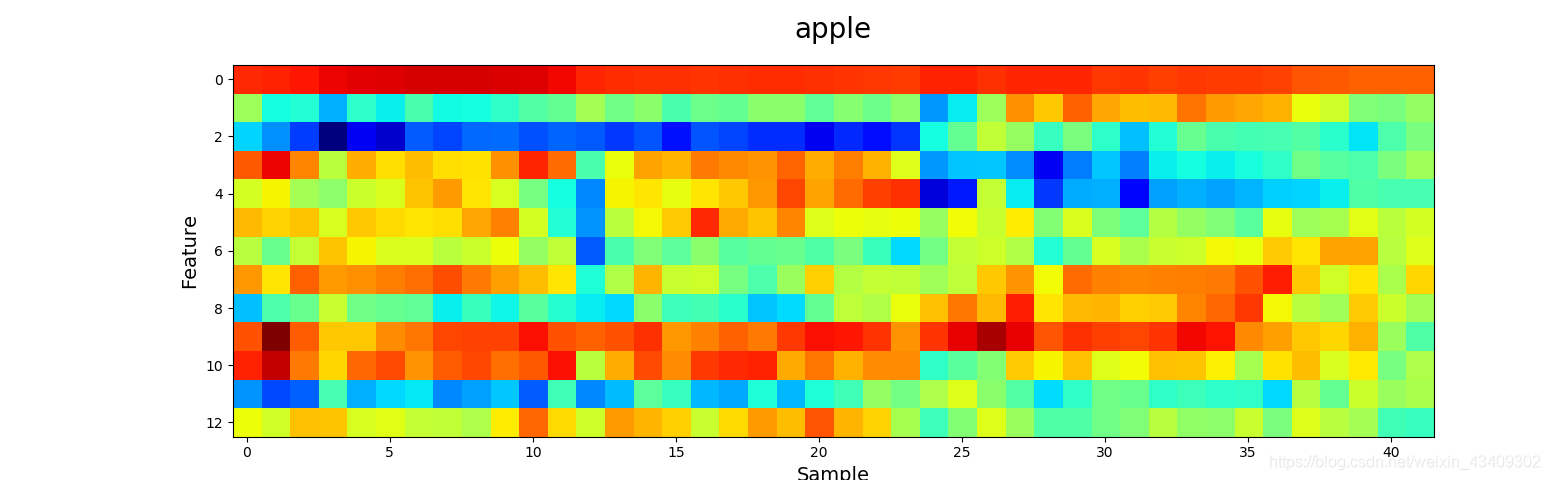
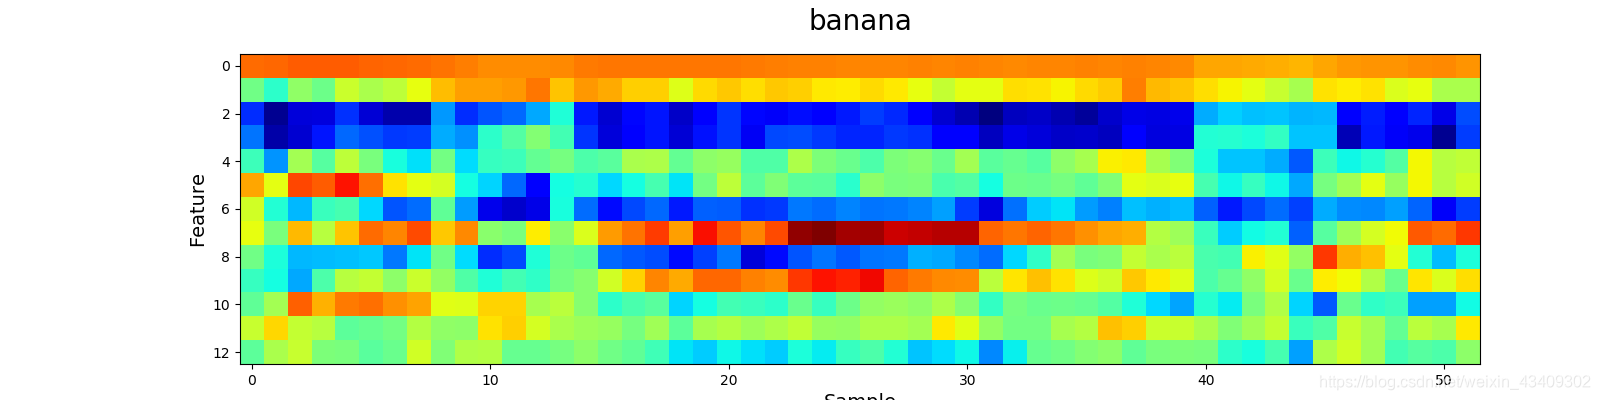
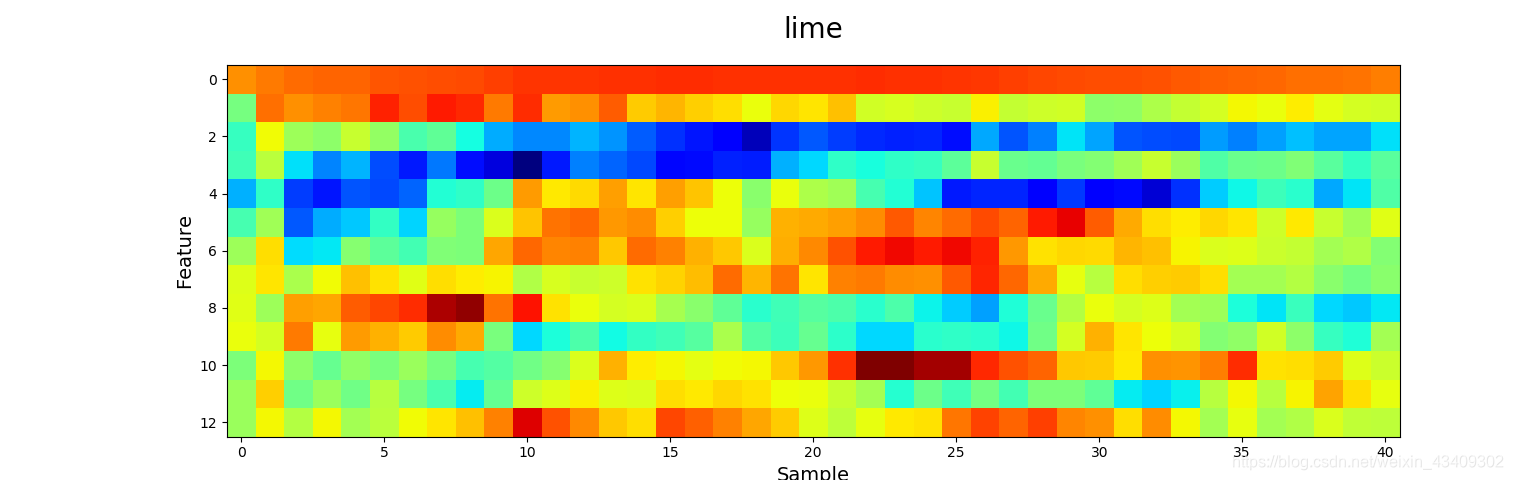
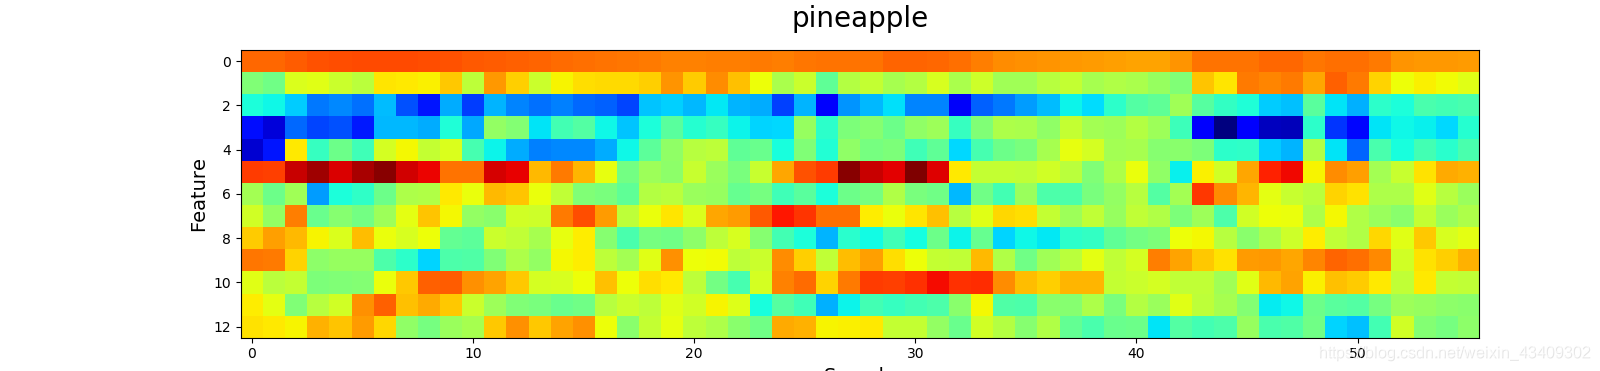
# 定义可视化函数,绘制wav文件对应的MFCC图像
def visualize(path_x, path_y):
    for mfcc, label in zip(path_x, path_y):
        mp.matshow(mfcc.T, cmap='jet', fignum=label)
        mp.title(label, fontsize=20)
        mp.xlabel('Sample', fontsize=14)
        mp.ylabel('Feature', fontsize=14)
        mp.tick_params(which='both', top='False',
                       labeltop='False', labelbottom='True',
                       labelsize=10)
        mp.show()
3、模型训练阶段
# 训练模型阶段
# 获取训练集的标签、文件字典
train_path = 'speeches/training'
train_speeches = {}
train_speeches = search_speeches(
    train_path, train_speeches)
# print(train_speeches)
# 获取格式化训练样本数据集
train_x, train_y = gen_matrix(train_speeches)
# 获取训练模型集合
models = model_train(train_x, train_y)
# print(len(models))
4、模型测试阶段
# 模型预测阶段
# 获取测试集的标签、文件字典
test_path = 'speeches/testing'
test_speeches = {}
test_speeches = search_speeches(
    test_path, test_speeches)
# print(test_speeches)
# 获取格式化训练样本数据集
test_x, test_y = gen_matrix(test_speeches)
# 获取预测结果集
pred_test_y = model_pred(
    test_x, test_y, models)
print('True Value:\n', pred_test_y)
print('Predict Value:\n', test_y)

5、wav文件可视化
# 可视化各种类别的MFCC图像
visualize(test_x, test_y)
那么来看看声音到底长什么样吧?!


参考地址:https://blog.csdn.net/bvngh3247/article/details/80778165
https://blog.csdn.net/weixin_38246633/article/details/80648975
https://blog.csdn.net/qq_42584444/article/details/84345613


 4249
4249


 被折叠的 条评论
为什么被折叠?
被折叠的 条评论
为什么被折叠?
 到【灌水乐园】发言


