


matplotlib-cpp库见:传送门,本质上是C++调用python,该库将调用过程封装成了类,便于我们使用。
1. vscode配置g++编译环境
使用快捷键Ctrl+Shift+P,选择下图选项。

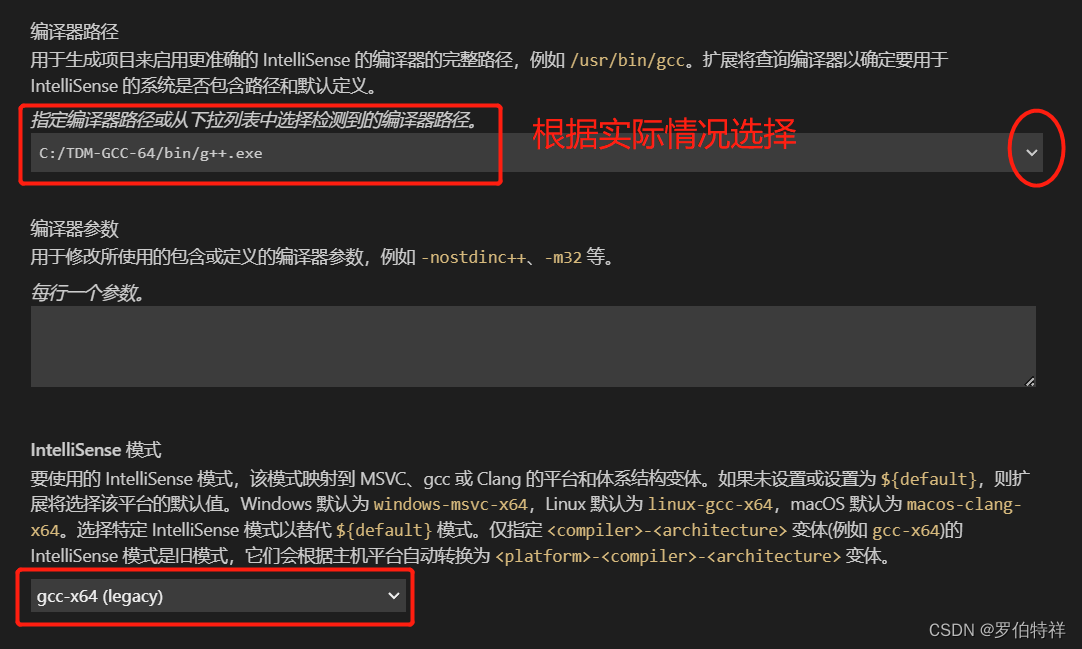
根据下图配置具体选项。
配置完成后,这时候你的工作目录下的.vscode中会出现一个c_cpp_properties.json文件。
2. 配置matplotlib-cpp编程环境
- step1:将库中的
matplotlibcpp.h下载到工作目录中 - step2:在
c_cpp_properties.json文件中,添加python及numpy的include路径,以本文为例,配置如下:
{
    "configurations": [
        {
            "name": "Win32",
            "includePath": [
                "${workspaceFolder}/**",
                "D:\\Program Files\\Python38\\include",//这个
                "C:\\Users\\Jack\\AppData\\Roaming\\Python\\Python38\\site-packages\\numpy\\core\\include"//这个
            ],
            "defines": [
                "_DEBUG",
                "UNICODE",
                "_UNICODE"
            ],
            "windowsSdkVersion": "8.1",
            "compilerPath": "C:/TDM-GCC-64/bin/g++.exe",
            "cStandard": "c11",
            "cppStandard": "c++11",
            "intelliSenseMode": "gcc-x64"
        }
    ],
    "version": 4
}
- step3:配置编译任务
tasks.json
{
	"version": "2.0.0",
	"tasks": [
		{
			"type": "cppbuild",
			"label": "C/C++: g++.exe 生成活动文件",
			"command": "C:/TDM-GCC-64/bin/g++.exe",//g++具体目录,根据实际情况改成你自己的
			"args": [
				"-fdiagnostics-color=always",
				"-g","${file}",
				"-o","${fileDirname}\\${fileBasenameNoExtension}.exe",
                "-I","D:\\Program Files\\Python38\\include",// 包含python3.8安装目录下的include目录,matplotlib-cpp用,根据实际情况改成你自己的
				"-I","C:\\Users\\admin\\AppData\\Roaming\\Python\\Python38\\site-packages\\numpy\\core\\include",//包含numpy的include目录,matplotlib-cpp用,根据实际情况改成你自己的
                "-L","D:\\Program Files\\Python38",//包含python38.dll动态链接库,根据实际情况改成你自己的
                "-l","python38",
				"-std=c++11"
			],
			"options": {
				"cwd": "C:/TDM-GCC-64/bin"
			},
			"problemMatcher": [
				"$gcc"
			],
			"group": "build",
			"detail": "编译器: C:/TDM-GCC-64/bin/g++.exe"
		}
	]
}
3. 代码开发

从matplotlib-cpp-master\examples中copy案例如下:
#define _USE_MATH_DEFINES
#include <iostream>
#include <cmath>
#include "matplotlibcpp.h"

namespace plt = matplotlibcpp;

int main()
{
    // Prepare data.
    int n = 5000;
    std::vector<double> x(n), y(n), z(n), w(n,2);
    for(int i=0; i<n; ++i) {
        x.at(i) = i*i;
        y.at(i) = sin(2*M_PI*i/360.0);
        z.at(i) = log(i);
    }

    // Set the size of output image = 1200x780 pixels
    plt::figure_size(1200, 780);

    // Plot line from given x and y data. Color is selected automatically.
    plt::plot(x, y);

    // Plot a red dashed line from given x and y data.
    plt::plot(x, w,"r--");

    // Plot a line whose name will show up as "log(x)" in the legend.
    plt::named_plot("log(x)", x, z);

    // Set x-axis to interval [0,1000000]
    plt::xlim(0, 1000*1000);

    // Add graph title
    plt::title("Sample figure");

    // Enable legend.
    plt::legend();

    // save figure
    const char* filename = "./basic.png";
    std::cout << "Saving result to " << filename << std::endl;;
    plt::save(filename);
}
使用快捷键Ctrl+Shift+B运行编译任务,发现报错信息如下:
* 正在执行任务: C/C++: g++.exe 生成活动文件
正在启动生成…
C:/TDM-GCC-64/bin/g++.exe -fdiagnostics-color=always -g G:\test\test.cpp -o G:\test\test.exe -I “D:\Program Files\Python38\include” -I C:\Users\Jack\AppData\Roaming\Python\Python38\site-packages\numpy\core\include -L “D:\Program Files\Python38” -l python38 -std=c++11
In file included from G:\test\test.cpp:4:0:
G:\test\matplotlibcpp.h:353:37: error: expected ‘,’ before ‘)’ token
static_assert(sizeof(long long) == 8);
^
G:\test\matplotlibcpp.h:353:37: error: expected string-literal before ‘)’ token
G:\test\matplotlibcpp.h:354:20: error: redefinition of ‘struct matplotlibcpp::detail::select_npy_type’
template <> struct select_npy_type { const static NPY_TYPES type = NPY_INT64; };
^
G:\test\matplotlibcpp.h:345:20: error: previous definition of ‘struct matplotlibcpp::detail::select_npy_type’
template <> struct select_npy_type<int64_t> { const static NPY_TYPES type = NPY_INT64; };
^
G:\test\matplotlibcpp.h:355:46: error: expected ‘,’ before ‘)’ token
static_assert(sizeof(unsigned long long) == 8);
^
G:\test\matplotlibcpp.h:355:46: error: expected string-literal before ‘)’ token
G:\test\matplotlibcpp.h:356:20: error: redefinition of ‘struct matplotlibcpp::detail::select_npy_type’
template <> struct select_npy_type { const static NPY_TYPES type = NPY_UINT64; };
^
G:\test\matplotlibcpp.h:349:20: error: previous definition of ‘struct matplotlibcpp::detail::select_npy_type’
template <> struct select_npy_type<uint64_t> { const static NPY_TYPES type = NPY_UINT64; };
^
生成已完成,但出现错误。

- 解决方案:
注释matplotlibcpp.h的Line 354和Line 356,并在Line 353和Line 355的右括号前面添加,"",然后保存文件即可,修改完成后的代码如下:
// Sanity checks; comment them out or change the numpy type below if you're compiling on
// a platform where they don't apply
static_assert(sizeof(long long) == 8,"");
// template <> struct select_npy_type<long long> { const static NPY_TYPES type = NPY_INT64; };
static_assert(sizeof(unsigned long long) == 8,"");
// template <> struct select_npy_type<unsigned long long> { const static NPY_TYPES type = NPY_UINT64; };

重新编译,即可生成exe文件,运行效果如下:

题外话1:
若编译时报:
In file included from G:\test\test.cpp:4:0:
G:\test\matplotlibcpp.h:20:33: fatal error: numpy/arrayobject.h: No such file or directory
compilation terminated.
是因为没有加入numpy/arrayobject.h的路径,在tasks.json里加入路径即可。
题外话2:
若想直接用g++在终端进行编译,可以参考运行tasks时终端的命令:
g++ G:\test\test.cpp -o G:\test\test.exe -I "D:\Program Files\Python38\include" -I "C:\Users\Jack\AppData\Roaming\Python\Python38\site-packages\numpy\core\include" -L "D:\Program Files\Python38" -l python38 -std=c++11
题外话3:
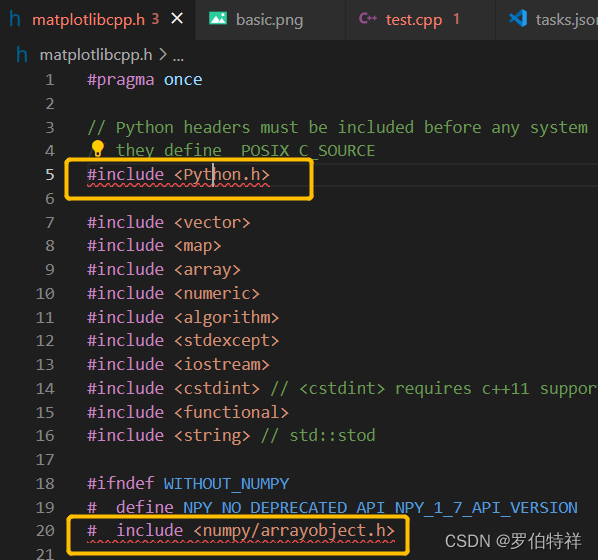
matplotlibcpp.h中包含Python.h和numpy/arrayobject.h时有红色波浪线,这是因为IDE检索不到该文件,此时也无法打开Python.h和numpy/arrayobject.h,解决方案参见【2. 配置matplotlib-cpp编程环境】的step2.
参考链接:
- https://blog.csdn.net/weixin_43769166/article/details/118365416
- https://matplotlib-cpp.readthedocs.io/en/latest/compiling.html
感谢@yuniversi的经验分享。


 738
738


 被折叠的 条评论
为什么被折叠?
被折叠的 条评论
为什么被折叠?
 到【灌水乐园】发言


