canvas实现锥形渐变
感谢大神LeaVerou
原本css中有个background:conic-gradient 可以实现,但是兼容性极差,我原本在项目中使用了,在电脑测试没有问题,效果出来了,但是一打包到手机,就废了,找了好多资料,LeaVerou提供了垫片库,polyfill 是一个开发术语,在 Web 开发中,polyfill 垫片库的准确意思为:用于实现浏览器并不支持的原生API的代码。现在引申为实现浏览器并不支持的某些功能的兼容库。
<script src="//cdnjs.cloudflare.com/ajax/libs/prefixfree/1.0.7/prefixfree.min.js"></script>
<script src="//leaverou.github.io/conic-gradient/conic-gradient.js"></script>
但是一开始我在移动端项目明明可以实现效果结果,这一周发现以前处理好的效果又突然失效了,蛋疼。
于是想到了canvas,还是自学一下吧,看看怎么填坑
不多说,直接上代码
组件canvas.vue文件中:
<template>
<div class="canvasBox">
    <x-header
      :left-options="{showBack:true,backText: ''}"
      :right-options="{showMore:true}"
      @on-click-more="showMenus = true"
      >
      {{titleName}}
    </x-header>
    <div class="testBox">
      <div class="test">
          <canvas id="canvas" width="300" height="300" style="border-radius: 50%">
          </canvas>
      </div>
    </div>

</div>
</template>
<script>
import { XHeader } from 'vux'
export default {
  components: {
    XHeader
  },
  data () {
    return {
      titleName: this.$route.params.name,
      colorObj: {
        // 圆的弧度
        radianPI: Math.PI * 2,
        // 每个颜色占的弧度比例
        radianPiRadian: 30,
        // 存储每段边框信息
        ballArr: [],
        // 范围颜色255
        colorScope: 255,
        // 计数器
        num: 0
      }
    }
  },
  computed: {
    bStart () {
      return this.colorObj.radianPI * (this.colorObj.radianPiRadian / 360) + (this.colorObj.radianPI * (60 / 360) / 255) * (this.colorObj.num - 1)
      // return this.colorObj.radianPI * (30 / 360) * (this.colorObj.radianPiRadian - 1)
    },
    bEnd () {
      return this.colorObj.radianPI * (this.colorObj.radianPiRadian / 360) + (this.colorObj.radianPI * (60 / 360) / 255) * this.colorObj.num
    },
    rgbNum () {
      // `rgb(0,255,${this.rgbNumUp})`
      let c = null
      if (this.colorObj.radianPiRadian === 30) {
        // 绿--青rgb(0,255,0)--(0,255,255)
        c = `rgb(0,255,${parseInt(255 / (this.colorObj.colorScope - 1) * (this.colorObj.num - 1))})`
      } else if (this.colorObj.radianPiRadian === 90) {
        // 青--蓝rgb(0,255,255)--(0,0,255)
        c = `rgb(0,${parseInt(255 - (255 / (this.colorObj.colorScope - 1) * (this.colorObj.num - 1)))},255)`
      } else if (this.colorObj.radianPiRadian === 150) {
        // 蓝--紫rgb(0,0,255)--(255,0,255)
        c = `rgb(${parseInt(255 / (this.colorObj.colorScope - 1) * (this.colorObj.num - 1))},0,255)`
      } else if (this.colorObj.radianPiRadian === 210) {
        // 紫--红rgb(255,0,255)--(255,0,0)
        c = `rgb(255,0,${parseInt(255 - (255 / (this.colorObj.colorScope - 1) * (this.colorObj.num - 1)))})`
      } else if (this.colorObj.radianPiRadian === 270) {
        // 红--黄rgb(255,0,0)--(255,255,0)
        c = `rgb(255,${parseInt(255 / (this.colorObj.colorScope - 1) * (this.colorObj.num - 1))},0)`
      } else if (this.colorObj.radianPiRadian === 330) {
        // 黄--绿rgb(255,255,0)--(0,255,0)
        c = `rgb(${parseInt(255 - (255 / (this.colorObj.colorScope - 1) * (this.colorObj.num - 1)))},255,0)`
      }
      return c
    }
  },
  methods: {
    constructionAperture () {
      function Ball (roundObj) {
        this.x = roundObj.x
        this.y = roundObj.y
        this.r = roundObj.r
        this.borderStart = roundObj.borderStart
        this.borderEnd = roundObj.borderEnd
        this.direction = roundObj.direction
        this.lineW = roundObj.lineW
        this.color = roundObj.color
      }
      Ball.prototype.render = function () {
        let myCanvas = document.querySelector('canvas')
        myCanvas.style.width = `100%`
        myCanvas.style.height = `100%`
        let ctx = myCanvas.getContext('2d')
        ctx.beginPath()
        ctx.arc(this.x, this.y, this.r, this.borderStart, this.borderEnd, this.direction)
        ctx.lineWidth = this.lineW
        ctx.strokeStyle = this.color
        ctx.stroke()
      }
      for (let k = 0; k < 6; k++) {
        this.colorObj.radianPiRadian = 30 + (60 * k)
        this.colorObj.num = 0
        this.repeatRender()
        for (let i = 0; i < this.colorObj.ballArr.length; i++) {
          new Ball(this.colorObj.ballArr[i]).render()
        }
      }
    },
    repeatRender () {
      for (let i = 0; i < this.colorObj.colorScope; i++) {
        this.colorObj.num++
        this.colorObj.roundObj = {
          x: 150,
          y: 150,
          r: 100,
          borderStart: this.bStart,
          borderEnd: this.bEnd,
          direction: false,
          lineW: 100,
          color: this.rgbNum
        }
        this.colorObj.ballArr.push(this.colorObj.roundObj)
      }
    }
  },
  mounted () {
    //修改html根字体,使用rem适配
    this.setHtmlFontToRem.setRootFont(640, document.querySelector('html'))
    //初始化画布
    this.constructionAperture()
  }
}

</script>
<style lang="scss" scoped>
.testBox{
  width: 100%;
  height: 100%;

  .test{
    width: 3rem;
    height: 3rem;
    margin: auto;
    margin-top: 1rem;
    border: 1px solid #333;
  }
}

</style>
适配的setHtmlFontToRem.js文件:
let getWinWH = () => {
  let offsetWid = null
  let offsetHei = null
  if (/(Android)/i.test(navigator.userAgent)) { // 判断是否为Android手机
    offsetWid = screen.width
    offsetHei = screen.height
  } else if (/(iPhone|iPad|iPod|iOS)/i.test(navigator.userAgent)) { // 判断是否为苹果手机
    offsetWid = document.documentElement.clientWidth
    offsetHei = document.documentElement.clientHeight
  } else {
    offsetWid = document.documentElement.clientWidth
    offsetHei = document.documentElement.clientHeight
  }
  return {
    offsetWid,
    offsetHei
  }
}
let setRootFont = (pageW, HtmlDom) => {
  // 屏幕宽高
  // console.log(pageW)
  // console.log(HtmlDom)
  // 设计稿宽度
  let pageWidth = pageW || 640
  // 假设根字体大小100,方便计算
  let rootFontSize = 100
  HtmlDom.style.fontSize = `${getWinWH().offsetWid / pageWidth * rootFontSize}px`
  window.onresize = function () {
    HtmlDom.style.fontSize = `${getWinWH().offsetWid / pageWidth * rootFontSize}px`
  }
  // console.log(getWinWH().offsetWid);
  // console.log(getWinWH().offsetHei);
  // console.log(HtmlDom.style.fontSize);
}
let setRootHtmlFont = { setRootFont }
export default setRootHtmlFont
在main.js中:
//引入setHtmlFontToRem.js文件
import setHtmlFontToRem from '@/assets/js/setHtmlFontToRem'
//方法添加到Vue实例中,以后可以在每个页面调用
Vue.prototype.setHtmlFontToRem = setHtmlFontToRem
效果图:
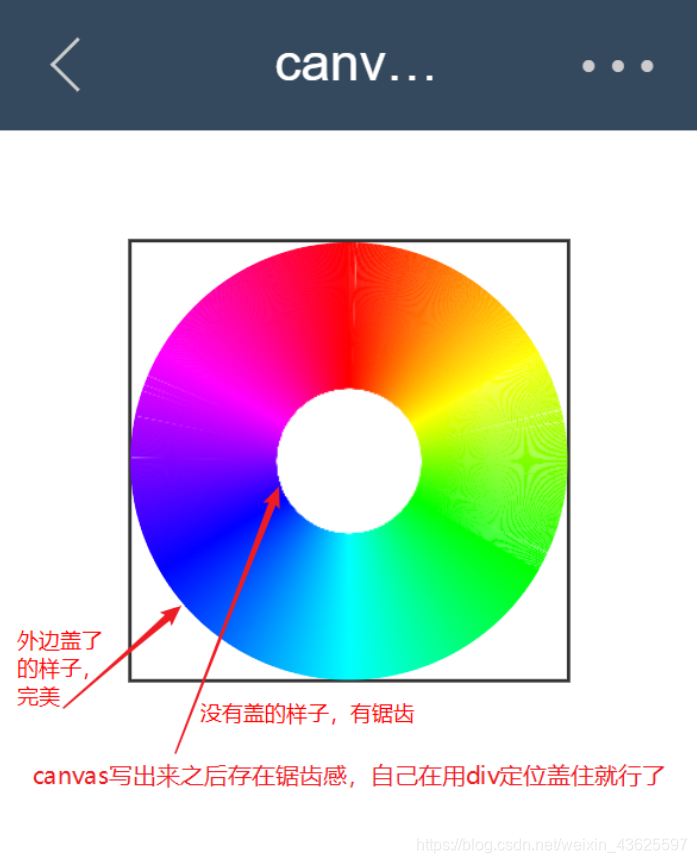
注:如有雷同,请多多包含。mao


 1498
1498

 被折叠的 条评论
为什么被折叠?
被折叠的 条评论
为什么被折叠?
 到【灌水乐园】发言


