


引入elastic-job分布式调用定时任务并封装成数据库表
有的时候微服务会用多个相同的项目实例进行负载均衡,但是这样同样项目的定时任务会重复执行,所以我们引入分布式定时任务elastic-job,我们需要用zookeeper作为注册中心,但是zookeeper要用3.4.10以上
引入依赖
<!-- https://mvnrepository.com/artifact/com.dangdang/elastic-job-lite-core -->
        <!--elastic-job-lite核心包-->
        <dependency>
            <groupId>com.dangdang</groupId>
            <artifactId>elastic-job-lite-core</artifactId>
            <version>2.1.5</version>
        </dependency>
撰写elastic-job核心封装类
@Slf4j
public class ElasticJobConfig {

    private String jobName;
    private String cron;
    private int totalCount;
    private String itemParam;
    private String className;
    private ZookeeperConfiguration zookeeperConfiguration;

    public ElasticJobConfig(String jobName,String cron,int totalCount,String itemParam,String className, ZookeeperConfiguration zookeeperConfiguration) {
        this.jobName = jobName;
        this.cron = cron;
        this.totalCount = totalCount;
        this.itemParam = itemParam;
        this.className = className;
        this.zookeeperConfiguration = zookeeperConfiguration;
    }


    /**
     * 开始执行
     */
    public void startTask(){
        Class<?> classType = null;
        try {
            classType = getClassType(className);
        } catch (ClassNotFoundException e) {
            throw new RuntimeException(e);
        }
        SimpleJob simpleJob = (SimpleJob) SpringContextUtils.getBean(classType);
        JobScheduler jobScheduler = simpleJobScheduler(simpleJob, jobName, cron, totalCount, itemParam, zookeeperConfiguration);
        jobScheduler.init();
    }

    /**
     * 定时任务动态配置
     *
     * @param simpleJob
     *              执行逻辑类
     * @param jobName
     *            任务名称(注册到zk的任务名)
     * @param cron
     *            任务启动时钟配置 "0/20 * * * * ?"
     * @param shardingTotalCount
     *            分片数
     * @param shardingItemParameters
     *            任务参数 例:0=bachelor,1=master,2=doctor
     * @return
     */
    public JobScheduler simpleJobScheduler(SimpleJob simpleJob, String jobName, String cron, int shardingTotalCount,
                                           String shardingItemParameters,ZookeeperConfiguration zookeeperConfiguration) {
        CoordinatorRegistryCenter coordinatorRegistryCenter = new ZookeeperRegistryCenter(zookeeperConfiguration);
        coordinatorRegistryCenter.init();
        JobScheduler jobScheduler = new JobScheduler(coordinatorRegistryCenter, getLiteJobConfiguration(simpleJob.getClass(), jobName, cron,
                shardingTotalCount, shardingItemParameters));
        return jobScheduler;
    }

    /**
     *
     * @param jobClass
     *            实现SimpleJob接口的实例
     * @param jobName
     *            任务名称(注册到zk的任务名)
     * @param cron
     *            任务启动时间 格式 "0/20 * * * * ?"
     * @param shardingTotalCount
     *            分片数
     * @param shardingItemParameters
     *            任务参数 ,例子:任务参数 例:0=bachelor,1=master,2=doctor
     * @return
     */
    private LiteJobConfiguration getLiteJobConfiguration(Class<? extends SimpleJob> jobClass, String jobName,
                                                         String cron, int shardingTotalCount, String shardingItemParameters) {

        return LiteJobConfiguration.newBuilder(new SimpleJobConfiguration(
                JobCoreConfiguration.newBuilder(jobName, cron, shardingTotalCount)
                        .shardingItemParameters(shardingItemParameters).jobParameter(shardingItemParameters).build(),
                jobClass.getCanonicalName())).overwrite(true).build();
    }

    /**
     * 转换class类
     * @param className
     * @return
     * @throws ClassNotFoundException
     */
    private Class<?> getClassType(String className) throws ClassNotFoundException {
        if(className != null){
            Class<?> aClass = Class.forName(className);
            return aClass;
        }
        return null;
    }
}
这里核心封装类里我们封装了elastic-job的各种配置操作,最主要的我们接收了六个参数,这六个参数分别代表jobName:zk的nodetree名称(每个项目实例的名称都要不一样);cron:时间表达式;totalCount:分片数(默认为1时不进行任务分片);itemParam:分片说明(默认为空时不进行任务分片);className:执行逻辑类全限定类名;zookeeperConfiguration:zk的链接;这六个参数除了zookeeperConfiguration我们再加上applicationName:项目实例名称(微服务项目可能多个微服务用同一张表,所以我们要区分是哪个微服务的任务)都要新增到数据库表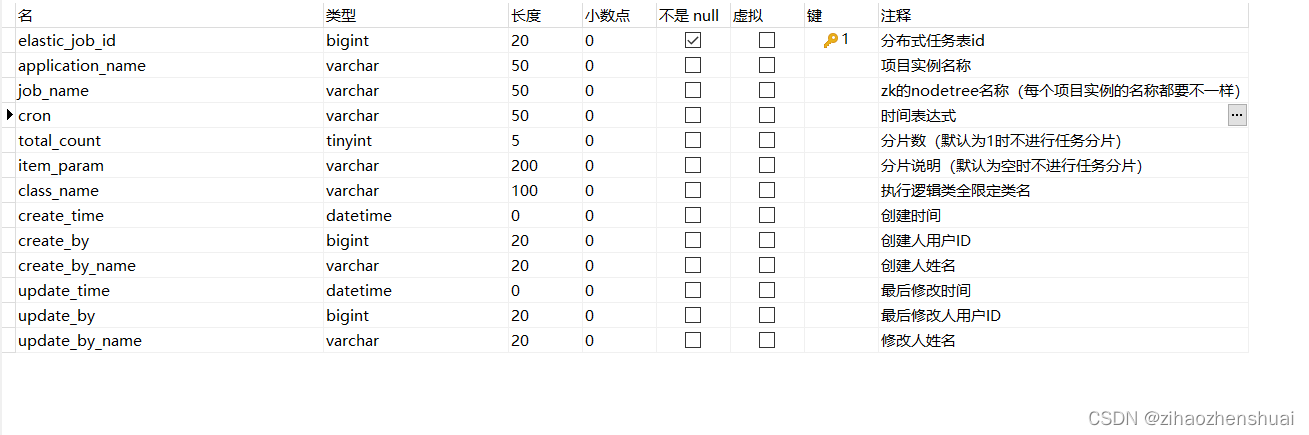
撰写elastic-job的执行逻辑类
@Slf4j
@Component // 将该类放入到spring容器去管理
public class TestJob implements SimpleJob {

    /**
     * 测试同时执行的定时任务
     * @param shardingContext
     */
    @Override
    public void execute(ShardingContext shardingContext) {
        log.info("===========>>>>当前分片测试类<<<<======================");
    }
}
这里是一个执行逻辑类,但是我们写两个测试一下是不是可以同时执行两个不同的任务,这里会遇到一个问题:就是在执行逻辑类里用@Autowired调用类是调不通的,因为在逻辑类里我们是无法调用bean对象容器的,所以我写了一个手动调用bean的方法类SpringContextUtils这样就可以调用了
@Component
public class SpringContextUtils implements ApplicationContextAware {

    /**
     * spring容器上下文对象
     */
    private static ApplicationContext applicationContext;

    @Override
    public void setApplicationContext(ApplicationContext applicationContext) throws BeansException {
        SpringContextUtils.applicationContext = applicationContext;
    }

    /**
     * 获取上下文对象实例
     *
     * @return
     */
    public static ApplicationContext getApplicationContext() {
        return applicationContext;
    }

    /**
     * 通过bean名称获取实例
     *
     * 该bean一般添加@Component注解就行了
     *
     * @param name
     *            bean名称
     * @return 实例对象
     */
    public static Object getBean(String name) {
        return getApplicationContext().getBean(name);
    }

    /**
     * 通过类class获取实例
     *
     * 该bean一般添加@Component注解就行了
     *
     * @param clazz
     * @return 实例对象
     */
    public static <T> T getBean(Class<T> clazz) {
        return getApplicationContext().getBean(clazz);
    }

    /**
     * 通过类name,class获取指定的实例
     *
     * 该bean一般添加@Component注解就行了
     *
     * @param name
     * @param clazz
     * @return 实例对象
     */
    public static <T> T getBean(String name, Class<T> clazz) {
        return getApplicationContext().getBean(name, clazz);
    }
}
@Slf4j
@Component // 将该类放入到spring容器去管理
public class ResumeJob implements SimpleJob {

    AccountDomainService accountDomainService = (AccountDomainService) SpringContextUtils.getBean(AccountDomainService.class);

    @PostConstruct
    public void someMethod(){
        log.info("================当前类已注册到bean=====================");
    }

    /**
     * 需求:resume表中未归档的数据归档到resume_bak表中,每次归档1条记录
     * execute方法中写我们的业务逻辑(execute方法每次定时任务执行都会执行一次)
     * @param shardingContext
     */
    @Override
    public void execute(ShardingContext shardingContext) {
        int shardingItem = shardingContext.getShardingItem();
        System.out.println("=====>>>>当前分片:" + shardingItem);
        // 获取分片参数
        String shardingParameter = shardingContext.getShardingParameter(); // 0=bachelor,1=master,2=doctor
        // 1 从resume表中查询出1条记录(未归档)
        ZResume zResume = new ZResume();
        zResume.setState("未归档");
        zResume.setEducation(shardingParameter);
        ZResume resumeOne = accountDomainService.selectZResume(zResume);
        if(resumeOne == null ) {
            log.info("数据已经处理完毕!!!!!!");
            return;
        }
        // 2 "未归档"更改为"已归档"
        Long id = resumeOne.getId();
        ZResume zResume1 = new ZResume();
        zResume1.setId(id);
        zResume1.setState("已归档");
        accountDomainService.updateZResume(zResume1);
        // 3 归档这条记录,把这条记录插入到resume_bak表
        accountDomainService.insertZResumeBak(resumeOne);
    }
这样我们就把两个逻辑类写好了,接下来写执行核心封装类的方法就行了
撰写elastic-job的执行
@Order(value = 1) // 加载顺序,值越小,优先级越高
@Slf4j
@Component
public class TaskRun implements CommandLineRunner {

    @Value("${zookeeper.host}")
    private  String  host;
    @Value("${spring.application.name}")
    private  String  applicationName;
    @Autowired
    private ElasticJobMapper elasticJobMapper;

    @Override
    public void run(String... args) throws Exception {
        log.info("============================定时任务执行=========================");
        List<ElasticJob> elasticJobs = elasticJobMapper.selectElasticJobListByApplicationName(applicationName);
        // 配置分布式协调服务(注册中心)Zookeeper
        ZookeeperConfiguration zookeeperConfiguration = new ZookeeperConfiguration(host,applicationName+"-job");
        if(elasticJobs != null && elasticJobs.size() > 0){
            for (ElasticJob elasticJob : elasticJobs) {
                //如果不想设置分片,可以将totalCount=1,itemParam=“”
                new ElasticJobConfig(applicationName + "-" + elasticJob.getJobName(), elasticJob.getCron(), elasticJob.getTotalCount(), elasticJob.getItemParam(), elasticJob.getClassName(),zookeeperConfiguration).startTask();
            }
        }
    }
}
先获取前边咱建的任务表的数据集合,然后批量调用核心封装类就行了,看看效果
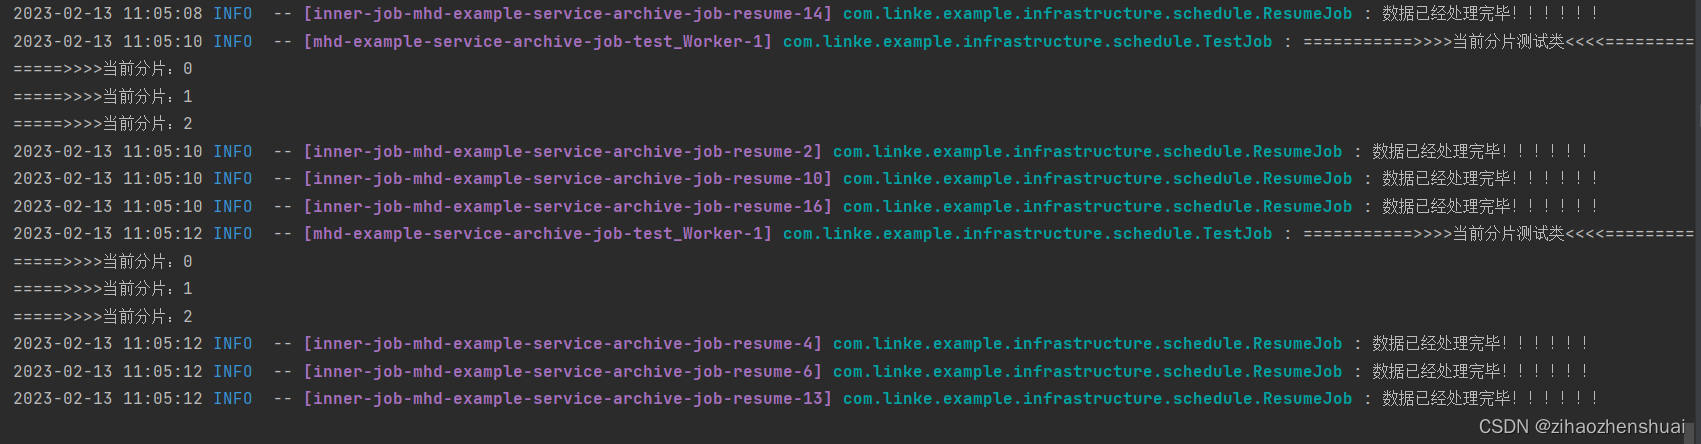
任务已经执行成功了,然后咱再看zk有没有注册成功,创建znode

zk也创建了,大功告成了


 820
820


 被折叠的 条评论
为什么被折叠?
被折叠的 条评论
为什么被折叠?
 到【灌水乐园】发言


