


记录在AutoDL服务器上配置mamba深度学习环境的过程。
一、创建并激活mamba虚拟环境:
conda create -n mamba python=3.10.13
conda activate mamba
二、安装PyTorch
conda install cudatoolkit==11.8 -c nvidia
pip install torch==2.1.1 torchvision==0.16.1 torchaudio==2.1.1 --index-url https://download.pytorch.org/whl/cu118
三、安装mamba
conda install -c "nvidia/label/cuda-11.8.0" cuda-nvcc
conda install packaging
pip install casual-conv1d==1.1.1
pip install mamba-ssm
测试mamba是否安装成功
python
import torch
from mamba-ssm import Mamba  # 不报错就代表安装成功了。
在mamba安装和后面使用时可能会遇到下面的问题:
1.安装mamba-ssm和causal-conv1d时,等待很长时间之后报错。可能是网络的问题。
2.安装好mamba,在后面训练时报错TypeError: causal_conv1d_fwd,这个原因是版本不对,作者的 GitHub - state-spaces/mamba 更新了适应新版本的causal_conv1d
通过报错的提示直接下载whl文件:
Building wheels for collected packages: causal_conv1d
  Building wheel for causal_conv1d (setup.py) ... error
  error: subprocess-exited-with-error

  × python setup.py bdist_wheel did not run successfully.
  │ exit code: 1
  ╰─> [8 lines of output]


      torch.__version__  = 2.1.1+cu118


      running bdist_wheel
      Guessing wheel URL:  https://github.com/Dao-AILab/causal-conv1d/releases/download/v1.2.0.post2/causal_conv1d-1.2.0.post2+cu118torch2.1cxx11abiFALSE-cp310-cp310-linux_x86_64.whl
      error: <urlopen error [Errno 110] Connection timed out>
      [end of output]

  note: This error originates from a subprocess, and is likely not a problem with pip.
  ERROR: Failed building wheel for causal_conv1d
  Running setup.py clean for causal_conv1d
Failed to build causal_conv1d
ERROR: Could not build wheels for causal_conv1d, which is required to install pyproject.toml-based projects
# 使用pip安装
pip install causal_conv1d-1.2.0.post2+cu118torch2.1cxx11abiFALSE-cp310-cp310-linux_x86_64.whl
四、Ubuntu(Linux)安装GDAL库
在这个网站large_image_wheels (girder.github.io)下载对应版本的GDAL库.whl文件,和虚拟环境中python的版本对应。
pip install GDAL-3.4.2-cp310-cp310-manylinux_2_17_x86_64.manylinux2014_x86_64.whl五、安装mmseg
pip install -U openmim
mim install mmengine
mim install "mmcv==2.1.0"
# 这里安装指导原来是mim install "mmcv>=2.0.0",但是后面会报错版本不匹配,参考的github上其他人的解决方案mim uninstall mmcv,然后mim install "mmcv==2.1.0" clone已经嵌入到mmseg中的Samba代码
git clone -b main https://github.com/zhuqinfeng1999/Samba.git
cd Samba
pip install -v -e .
测试:
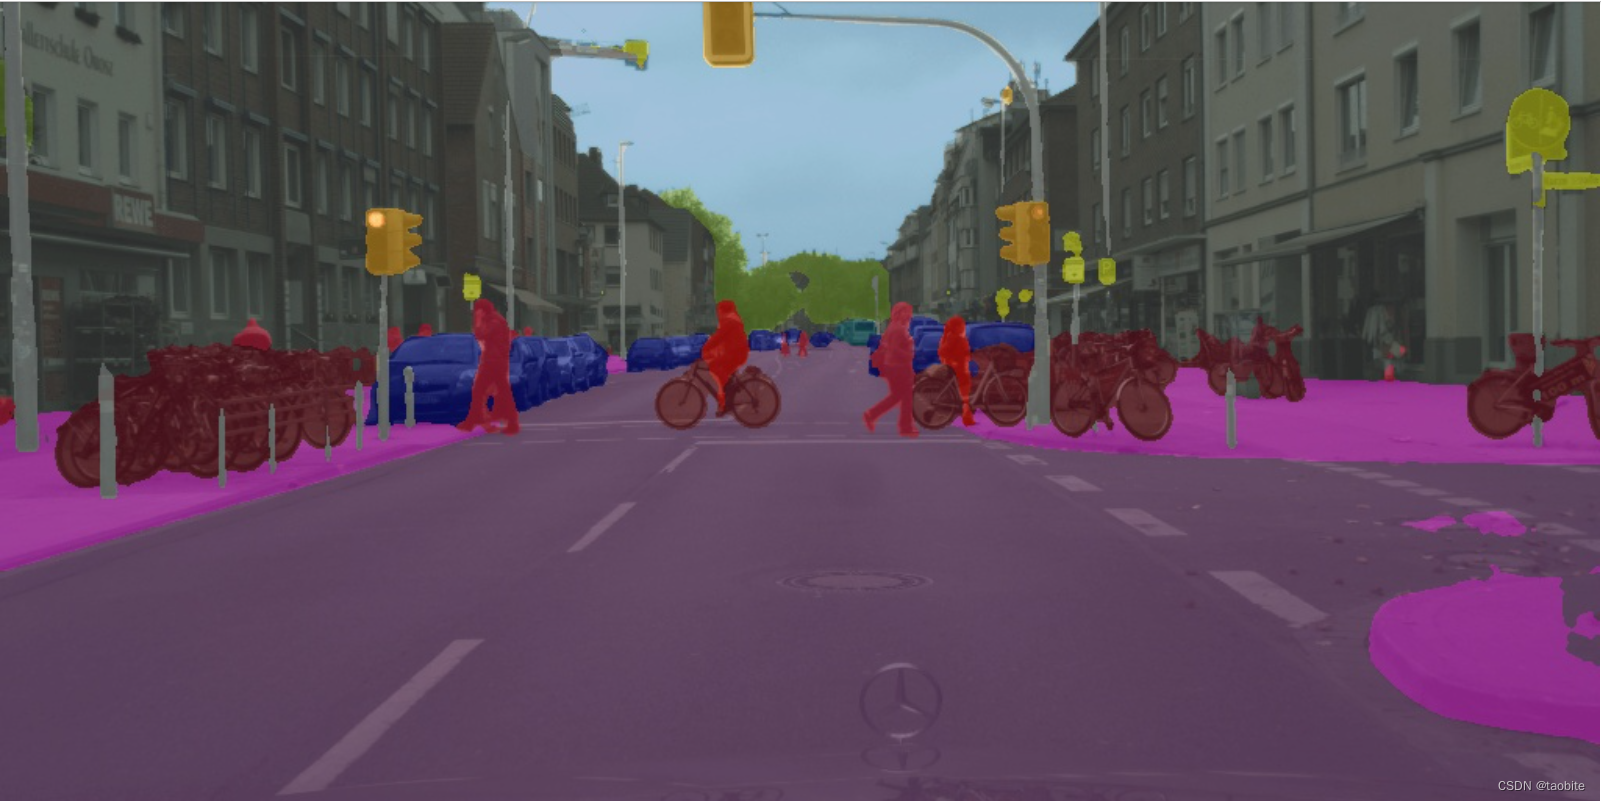
mim download mmsegmentation --config pspnet_r50-d8_4xb2-40k_cityscapes-512x1024 --dest .python demo/image_demo.py demo/demo.png configs/pspnet/pspnet_r50-d8_4xb2-40k_cityscapes-512x1024.py pspnet_r50-d8_512x1024_40k_cityscapes_20200605_003338-2966598c.pth --device cuda:0 --out-file result.jpg看到如下的结果图result.png代表mmseg已经可以用了。
Ubuntu(Linux)安装GDAL(Python)_ubuntu安装gdal并绑定python-CSDN博客
https://github.com/open-mmlab/mmsegmentation/blob/main/docs/en/get_started.md#installation
AutoDL服务器配置+配置深度学习环境(pytorch)_哔哩哔哩_bilibili
【Mamba】环境搭建教程文档分享,在云服务器上搭建Mamba_哔哩哔哩_bilibili


 1401
1401

 被折叠的 条评论
为什么被折叠?
被折叠的 条评论
为什么被折叠?
 到【灌水乐园】发言


