


1--相关讲解
LORA: LOW-RANK ADAPTATION OF LARGE LANGUAGE MODELS
LoRA 在 Stable Diffusion 中的三种应用:原理讲解与代码示例
2--基本原理
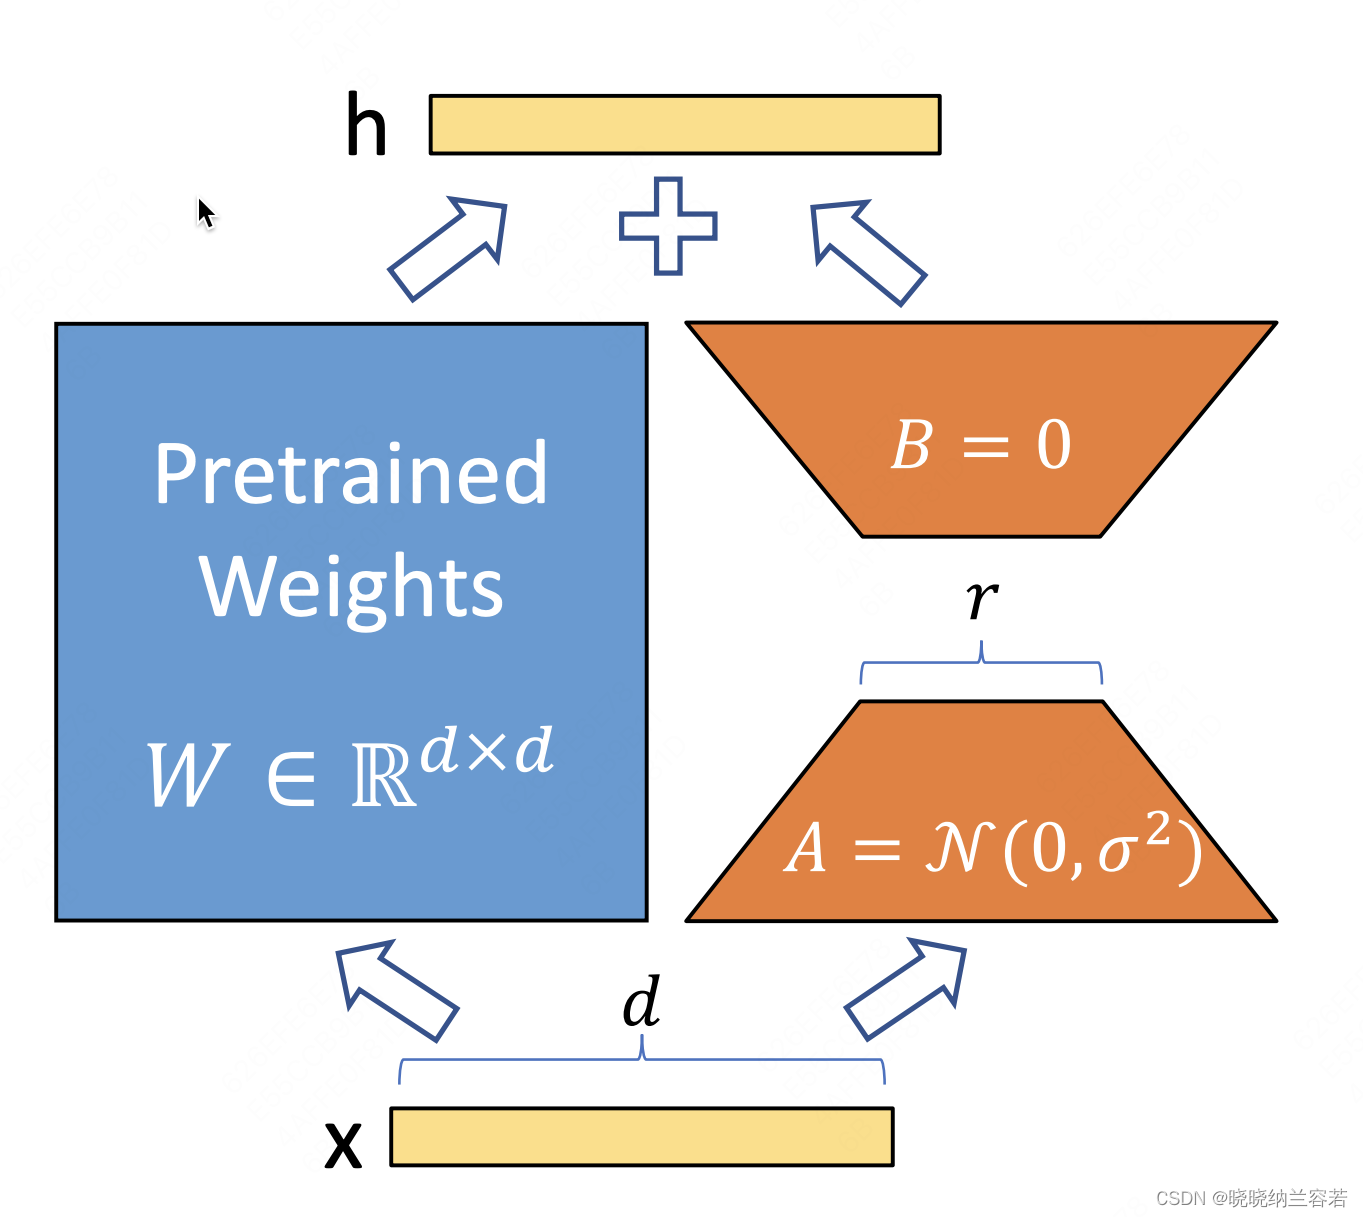
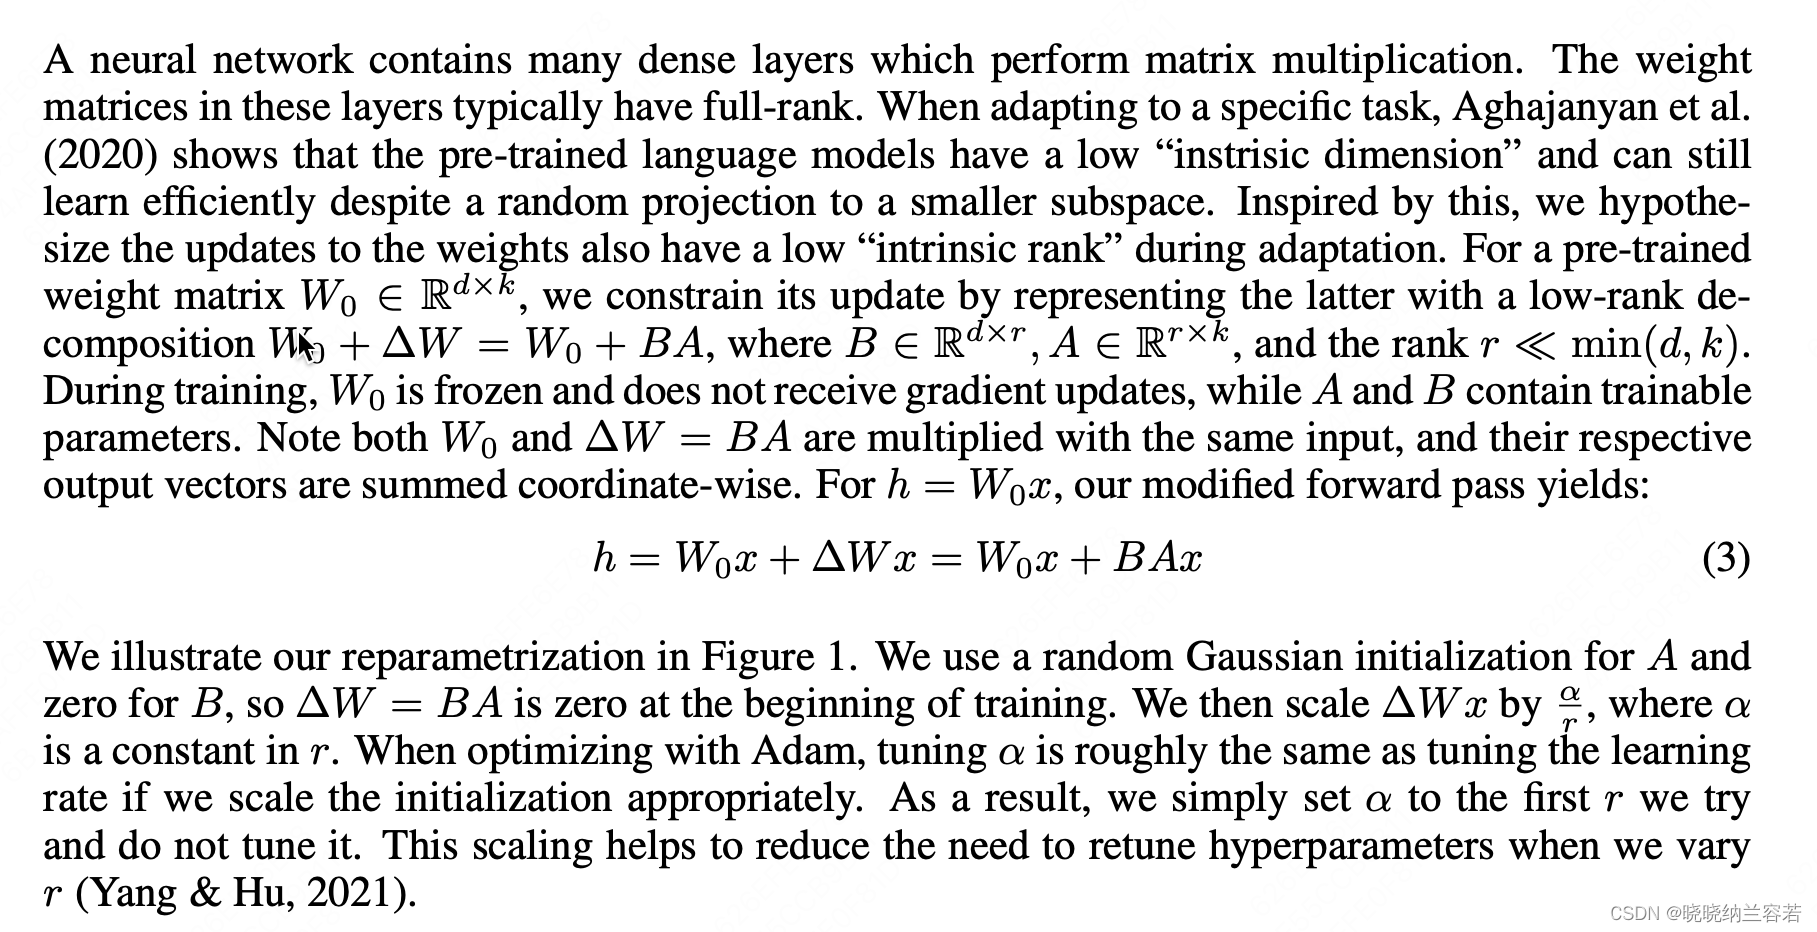
固定原始层,通过添加和训练两个低秩矩阵,达到微调模型的效果;
3--简单代码
import torch
import torch.nn as nn
from peft import LoraConfig, get_peft_model, LoraModel
from peft.utils import get_peft_model_state_dict

# 创建模型
class Simple_Model(nn.Module):
    def __init__(self):
        super().__init__()
        self.linear1 = nn.Linear(64, 128)
        self.linear2 = nn.Linear(128, 256)
    def forward(self, x: torch.Tensor):
        x = self.linear1(x)
        x = self.linear2(x)
        return x

if __name__ == "__main__":
    # 初始化原始模型
    origin_model = Simple_Model()

    # 配置lora config
    model_lora_config = LoraConfig(
        r = 32,
        lora_alpha = 32, # scaling = lora_alpha / r 一般来说,lora_alpha的参数初始化为与r相同,即scale=1
        init_lora_weights = "gaussian", # 参数初始化方式
        target_modules = ["linear1", "linear2"], # 对应层添加lora层
        lora_dropout = 0.1
    )

    # Test data
    input_data = torch.rand(2, 64)
    origin_output = origin_model(input_data)

    # 原始模型的权重参数
    origin_state_dict = origin_model.state_dict()

    # 两种方式生成对应的lora模型,调用后会更改原始的模型
    new_model1 = get_peft_model(origin_model, model_lora_config)
    new_model2 = LoraModel(origin_model, model_lora_config, "default")

    output1 = new_model1(input_data)
    output2 = new_model2(input_data)
    # 初始化时,lora_B矩阵会初始化为全0,因此最初 y = WX + (alpha/r) * BA * X == WX
    # origin_output == output1 == output2

    # 获取lora权重参数,两者在key_name上会有区别
    new_model1_lora_state_dict = get_peft_model_state_dict(new_model1)
    new_model2_lora_state_dict = get_peft_model_state_dict(new_model2)

    # origin_state_dict['linear1.weight'].shape -> [output_dim, input_dim]
    # new_model1_lora_state_dict['base_model.model.linear1.lora_A.weight'].shape -> [r, input_dim]
    # new_model1_lora_state_dict['base_model.model.linear1.lora_B.weight'].shape -> [output_dim, r]
    print("All Done!")
4--权重保存和合并
核心公式是:new_weights = origin_weights + alpha* (BA)
    # 借助diffuser的save_lora_weights保存模型权重
    from diffusers import StableDiffusionPipeline
    save_path = "./"
    global_step = 0
    StableDiffusionPipeline.save_lora_weights(
            save_directory = save_path,
            unet_lora_layers = new_model1_lora_state_dict,
            safe_serialization = True,
            weight_name = f"checkpoint-{global_step}.safetensors",
        )

    # 加载lora模型权重(参考Stable Diffusion),其实可以重写一个简单的版本
    from safetensors import safe_open
    alpha = 1. # 参数融合因子
    lora_path = "./" + f"checkpoint-{global_step}.safetensors"
    state_dict = {}
    with safe_open(lora_path, framework="pt", device="cpu") as f:
        for key in f.keys():
            state_dict[key] = f.get_tensor(key)

    all_lora_weights = []
    for idx,key in enumerate(state_dict):
        # only process lora down key
        if "lora_B." in key: continue

        up_key    = key.replace(".lora_A.", ".lora_B.") # 通过lora_A直接获取lora_B的键名
        model_key = key.replace("unet.", "").replace("lora_A.", "").replace("lora_B.", "")
        layer_infos = model_key.split(".")[:-1]

        curr_layer = new_model1

        while len(layer_infos) > 0:
            temp_name = layer_infos.pop(0)
            curr_layer = curr_layer.__getattr__(temp_name)

        weight_down = state_dict[key].to(curr_layer.weight.data.device)
        weight_up   = state_dict[up_key].to(curr_layer.weight.data.device)
        # 将lora参数合并到原模型参数中 -> new_W = origin_W + alpha*(BA)
        curr_layer.weight.data += alpha * torch.mm(weight_up, weight_down).to(curr_layer.weight.data.device)
        all_lora_weights.append([model_key, torch.mm(weight_up, weight_down).t()])
        print('Load Lora Done')


 2807
2807

 被折叠的 条评论
为什么被折叠?
被折叠的 条评论
为什么被折叠?
 到【灌水乐园】发言


