


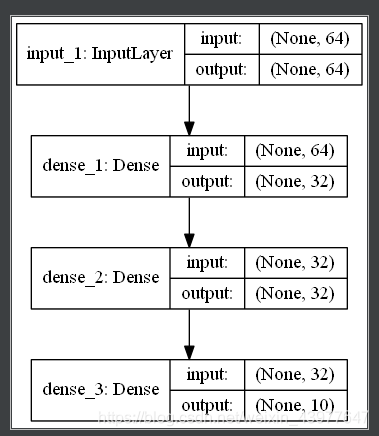
顺序模型举例
from keras import layers, Input, Model
input_tensor = Input(shape=(64,))
x = layers.Dense(32, activation='relu')(input_tensor)
x = layers.Dense(32, activation='relu')(x)
output_tensor = layers.Dense(10, activation='softmax')(x)
model = Model(input_tensor, output_tensor)
model.summary()
为了看出来这个模型的每层的输入输出,除了用model.summary(),我们还可以使用plot_model,它会返回一张图片,其中包含有每一层输入和输出的shape
plot_model使用
使用这个函数需要安装 Python 的pydotplus 库和 pydot-ng 库,还需要安装 graphviz 库,并且电脑中还需要下载graphviz这个软件来安装一波,最最重要的是还需要将graphviz这个安装文件下面的bin文件添加到系统路径里面,是不是听上去有点小麻烦
(1)安装pydotplus 库,pydot-ng 库, graphviz 库直接利用pip install安装就可以啦
需要注意的是需要修改keras>utils>vis_utils.py文件,把里面的pydot都替换为pydotplus
(2)安装graphviz,在电脑上装好之后可以里利用下面代码加入到系统路径下面
os.environ["PATH"] += os.pathsep + r'C:\Program Files (x86)\Graphviz 2.28\bin'
3.plot_model的使用
plot_model(model, to_file=r'./data/modle.png', show_shapes=True)
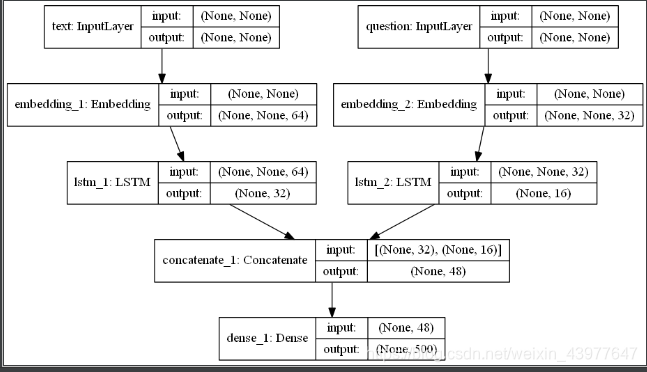
多输入模型
from keras import layers, Input, Model
text_vocabulary_size = 10000
question_vocabulary_size = 10000
answer_vocabulary_size = 500

text_input = Input(shape=(None,), dtype='int32', name='text')
embedded_text = layers.Embedding(text_vocabulary_size, 64)(text_input)
encoded_text = layers.LSTM(32)(embedded_text)
question_input = Input(shape=(None,),dtype='int32',name='question')
embedded_question = layers.Embedding(question_vocabulary_size, 32)(question_input)
encoded_question = layers.LSTM(16)(embedded_question)
concatenated = layers.concatenate([encoded_text, encoded_question],axis=-1)
answer = layers.Dense(answer_vocabulary_size,activation='softmax')(concatenated)
model = Model([text_input, question_input], answer)

model.compile(optimizer='rmsprop',
loss='categorical_crossentropy',
metrics=['acc'])
模型训练
model.fit({'text': text, 'question': question}, answers,
epochs=10, batch_size=128)
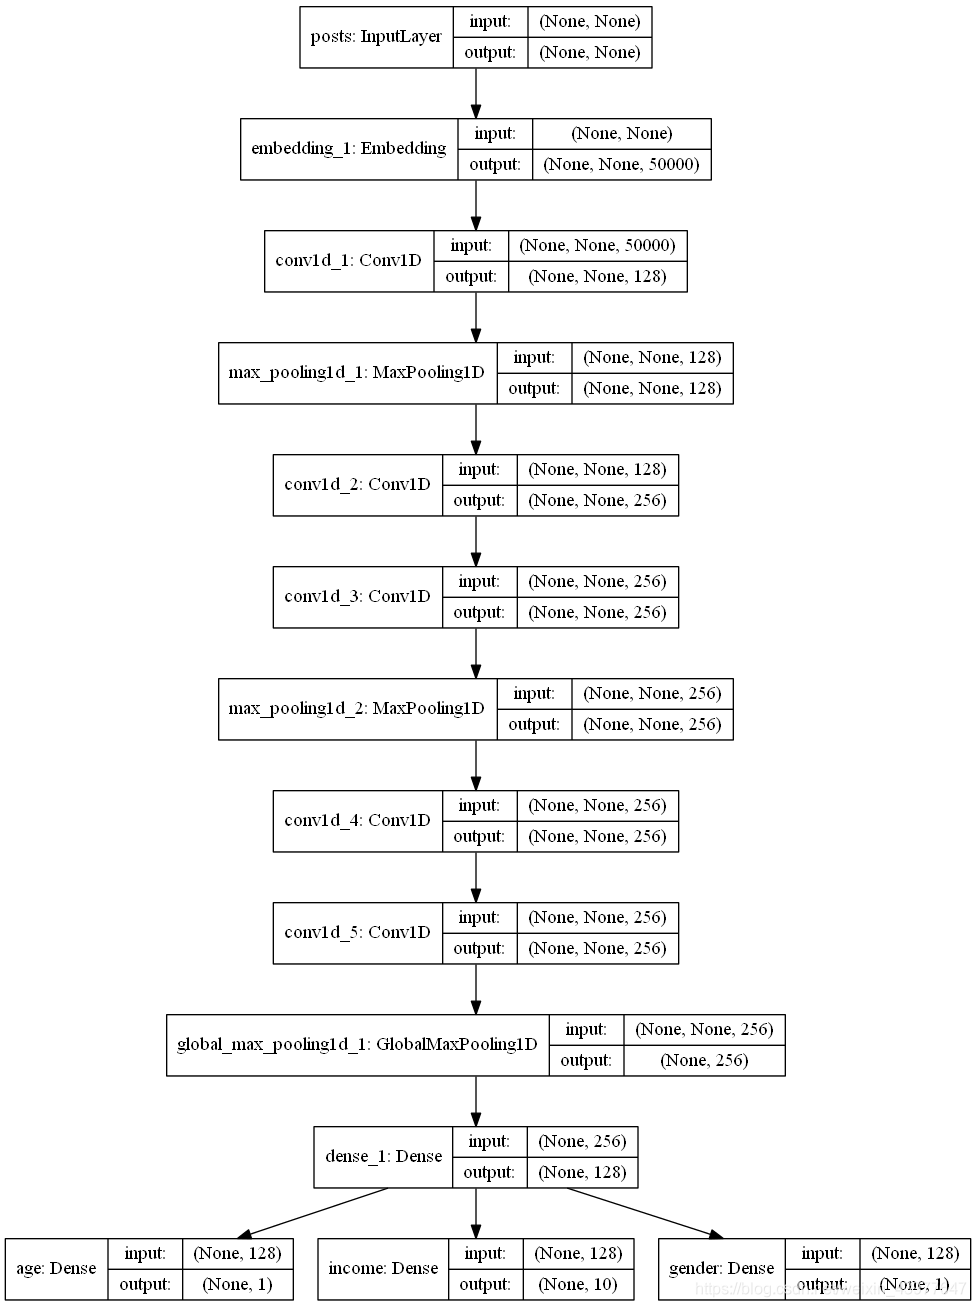
多输出模型
x = layers.Conv1D(256, 5, activation='relu')(x)
x = layers.Conv1D(256, 5, activation='relu')(x)
x = layers.MaxPooling1D(5)(x)
x = layers.Conv1D(256, 5, activation='relu')(x)
x = layers.Conv1D(256, 5, activation='relu')(x)
x = layers.GlobalMaxPooling1D()(x)
x = layers.Dense(128, activation='relu')(x)
age_prediction = layers.Dense(1, name='age')(x)
income_prediction = layers.Dense(num_income_groups,
activation='softmax',
name='income')(x)
gender_prediction = layers.Dense(1, activation='sigmoid', name='gender')(x)
model = Model(posts_input,
[age_prediction, income_prediction, gender_prediction])

model.compile(optimizer='rmsprop',
loss={'age': 'mse',
'income': 'categorical_crossentropy',
'gender': 'binary_crossentropy'},
loss_weights={'age': 0.25,
'income': 1.,
'gender': 10.})
模型训练
model.fit(posts, {'age': age_targets,
'income': income_targets,
'gender': gender_targets},
epochs=10, batch_size=64)
参考书籍:《python深度学习》


 224
224

 被折叠的 条评论
为什么被折叠?
被折叠的 条评论
为什么被折叠?
 到【灌水乐园】发言


