


WPF中的Behavior及Behavior在MVVM模式下的应用
在WPF中,Behaviors(行为)是一种可重用的组件,可以附加到任何UI元素上,以添加特定的交互行为或功能。Behaviors可以通过附加属性或附加行为的方式来实现。
Behavior并不是WPF组件中的内容,需要安装nuget包,使用行为需要nuget安装Microsoft.Xaml.Behaviors.Wpf,FrameWork版本安装System.Windows.Interactivity.WPF,同时添加命名空间xmlns:i="http://schemas.microsoft.com/xaml/behaviors"。
使用Interaction.Behaviors
<Border
    Width="100"
    Height="100"
    Background="Red">
    <!--直接使用Behavior实现可拖拽Border-->
    <i:Interaction.Behaviors>
        <i:MouseDragElementBehavior />
    </i:Interaction.Behaviors>
</Border>
官方内置了以下几种Behavior,可以根据需要使用。

自定义Behavior
可以根据需要,自定义Behavior,下面是一个鼠标触发MouseEnter事件改变背景色的Behavior
class MyBehavior:Behavior<Border>//必须制定泛型类型,因为某些属性是针对特定类型的
{
    //要重写两个方法
    //OnAttached()表示当挂载到对应的对象上的时候触发
    //OnDetaching()在对象销毁时触发
    protected override void OnAttached()
    {
        //AssociatedObject表示关联的对象
        AssociatedObject.MouseEnter += (_, _) => AssociatedObject.Background = Brushes.Orange;
    }
    protected override void OnDetaching()
    {
        base.OnDetaching();
    }
}
<Border
    Width="100"
    Height="100"
    Background="Red">
    <!--可以应用多个Behavior-->
    <i:Interaction.Behaviors>
        <i:MouseDragElementBehavior />
        <local:MyBehavior />
    </i:Interaction.Behaviors>
</Border>

案例:实现自动清空文本框内容
class ClearTextBehavior : Behavior<Button>
{

	//依赖属性,制定清空哪个文本框
    public TextBox Target
    {
        get { return (TextBox)GetValue(TargetProperty); }
        set { SetValue(TargetProperty, value); }
    }

    public static readonly DependencyProperty TargetProperty =
        DependencyProperty.Register("Target", typeof(TextBox), typeof(ClearTextBehavior), new PropertyMetadata(null));


    protected override void OnAttached()
    {
        AssociatedObject.Click += AssociatedObject_Click;
    }

    private void AssociatedObject_Click(object sender, RoutedEventArgs e)
    {
        Target?.Clear();
    }

    protected override void OnDetaching()
    {
        AssociatedObject.Click -= AssociatedObject_Click;
    }
}
<TextBox x:Name="tbx" />
<Button Width="30" Content="清空">
    <i:Interaction.Behaviors>
        <local:ClearTextBehavior Target="{Binding ElementName=tbx}" />
    </i:Interaction.Behaviors>
</Button>

使用Interaction.Triggers
使用EnentTrigger实现点击button关闭整个窗口
<Button Content="Close">
    <i:Interaction.Triggers>
        <i:EventTrigger EventName="Click">
            <!--一定要设置TargetObject不然默认的对象为dataContext-->
            <i:CallMethodAction MethodName="Close" TargetObject="{Binding RelativeSource={RelativeSource AncestorType=Window}}" />
        </i:EventTrigger>
    </i:Interaction.Triggers>
</Button>
同样,可以应用多个Trigger
<Button Content="Close">
    <i:Interaction.Triggers>
        <i:EventTrigger EventName="Click">
            <i:CallMethodAction MethodName="Close" TargetObject="{Binding RelativeSource={RelativeSource AncestorType=Window}}" />
        </i:EventTrigger>
        <!--实现鼠标悬浮后改变颜色-->
        <i:DataTrigger Binding="{Binding RelativeSource={RelativeSource AncestorType=Button}, Path=IsMouseOver}" Value="True">
            <i:ChangePropertyAction
                PropertyName="Background"
                TargetObject="{Binding RelativeSource={RelativeSource AncestorType=Button}}"
                Value="Red" />
        </i:DataTrigger>
    </i:Interaction.Triggers>
</Button>
还可以使用Command与VM绑定
<Button Width="150" Height="50" Content="Interaction.Triggers">
    <i:Interaction.Triggers>
        <i:EventTrigger EventName="Click">
            <i:InvokeCommandAction Command="{Binding myCommand}" />
        </i:EventTrigger>
    </i:Interaction.Triggers>
</Button>
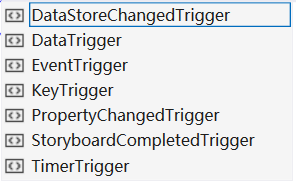
官方内置了以下几种Trigger,可以根据需要使用。
Style中的Trigger和控件中的Trigger
Style中的各种Trigger参见WPF的Style
继承自FrameworkElement类中控件也可以直接使用trigger
<Button
    Width="150"
    Height="100"
    Content="Button.Triggers">
    <Button.Triggers>
        <EventTrigger RoutedEvent="MouseEnter">
            <BeginStoryboard>
                <Storyboard>
                    <ColorAnimation
                        Storyboard.TargetProperty="(Button.Background).(SolidColorBrush.Color)"
                        To="Red"
                        Duration="0:0:0:5" />
                </Storyboard>
            </BeginStoryboard>
        </EventTrigger>
    </Button.Triggers>
</Button>
可以看出无论是Style中的Trigger还是控件下面的Trigger,都是使用的RoutedEvent属性来设置事件,但是有些事件是不属于RoutedEvent的,比如listbox的选择某个条目事件。而且这两种Trigger都是对故事板进行操作。
MVVM模式来实现获得鼠标的坐标
当鼠标在窗口上移动时,将坐标信息传到VM中,并在V中显示。那有人会问,这样还不如直接不经过VM直接在V中进行显示,关键在于,某些时候VM中需要坐标信息,而且要遵循MVVM模式。
- 自定义Behavior
class PositionBehavior : Behavior<Window>
{

   //设置两个依赖属性
    public double X
    {
        get { return (double)GetValue(XProperty); }
        set { SetValue(XProperty, value); }
    }
    public static readonly DependencyProperty XProperty =
        DependencyProperty.Register("X", typeof(double), typeof(PositionBehavior), new FrameworkPropertyMetadata(0.0,FrameworkPropertyMetadataOptions.BindsTwoWayByDefault));

    public double Y
    {
        get { return (double)GetValue(YProperty); }
        set { SetValue(YProperty, value); }
    }
    public static readonly DependencyProperty YProperty =
        DependencyProperty.Register("Y", typeof(double), typeof(PositionBehavior), new FrameworkPropertyMetadata(0.0, FrameworkPropertyMetadataOptions.BindsTwoWayByDefault));


    protected override void OnAttached()
    {
        AssociatedObject.MouseMove += AssociatedObject_MouseMove;
    }

    private void AssociatedObject_MouseMove(object sender, MouseEventArgs e)
    {
        var pos = e.GetPosition(this.AssociatedObject);
        X = pos.X;
        Y = pos.Y;
    }

    protected override void OnDetaching()
    {
        AssociatedObject.MouseMove -= AssociatedObject_MouseMove;
    }
}
- VM
class ViewModel1 : INotifyPropertyChanged
{
    private double x;
    private double y;
    public double X
    {
        get { return x; }
        set
        {
            x = value;
            PropertyChanged.Invoke(this, new PropertyChangedEventArgs("X"));
            PropertyChanged.Invoke(this, new PropertyChangedEventArgs("Position"));
        }
    }
    public double Y
    {
        get { return y; }
        set
        {
            y = value;
            PropertyChanged.Invoke(this, new PropertyChangedEventArgs("Y"));
            PropertyChanged.Invoke(this, new PropertyChangedEventArgs("Position"));
        }
    }

    public string Position
    {
        get { return $"坐标为:{X:F2},{Y:F2}"; }
    }
    public event PropertyChangedEventHandler? PropertyChanged;
}
- View
<Window
    ......
    xmlns:i="http://schemas.microsoft.com/xaml/behaviors">
    <!--双向模式绑定VM中的X,Y-->
    <i:Interaction.Behaviors>
        <local:PositionBehavior X="{Binding X}" Y="{Binding Y}"/>
    </i:Interaction.Behaviors>
    <StackPanel Orientation="Vertical">
        <TextBox x:Name="tbx" FontSize="30" Text="{Binding Position,Mode=OneWay}" />
    </StackPanel>
</Window>


 1945
1945

 被折叠的 条评论
为什么被折叠?
被折叠的 条评论
为什么被折叠?
 到【灌水乐园】发言


