


canvas图形交互
- canvas 图形没有监听事件的方法
- 比如用鼠标选择图形时,我们只能用canvas 画布监听事件,获取鼠标或触摸点在canvas 中的位置,再基于图形在canvas 中的位置和形状,判断鼠标在canvas中的点位是否在图形中。
获取canvas 中鼠标位置的方法
canvas.addEventListener('mousedown', getPos);

function getPos(event){
    const {clientX,clientY}=event;
    const {left,top}=canvas.getBoundingClientRect();
    const [x,y]=[clientX-left,clientY-top];
}
获取触摸点点位的方法
canvas.addEventListener('mousedown', getPos);
function getPos(event){
    const {pageX, pageY}=event.changedTouches[0];
    const {left,top}=canvas.getBoundingClientRect();
    const [x,y]=[pageX -left, pageY -top];
    console.log(x,y);
}
实现矩形拖拽
<!DOCTYPE html>
<html>
<head>
    <meta charset="UTF-8">
    <title>矩形的拖拽</title>
    <style>
        body{margin: 0;overflow: hidden}
        #canvas{background: antiquewhite;}
    </style>
</head>
<body>
<canvas id="canvas"></canvas>
<script>
    const canvas=document.getElementById('canvas');
    canvas.width=window.innerWidth;
    canvas.height=window.innerHeight;
    const  ctx=canvas.getContext('2d');
    //矩形对象
    class Rectangle{
        constructor(width=0,height=0,color='#000'){
            this.width=width;
            this.height=height;
            this.color=color;
            this.x=0;
            this.y=0;
        }
        draw(ctx){
            const {x,y,width,height,color}=this;
            ctx.save();
            ctx.fillStyle=color;
            ctx.fillRect(x,y,width,height);
            ctx.restore();
        }
    }
    //实例化矩形对象
    const rect = new Rectangle(200,100);
    rect.x=100;
    rect.y=100;

    //鼠标位减图形位
    let subPos=null;
    //图形是否被选择
    let selected=false;
    //点击事件
    canvas.addEventListener('mousedown',mousedownFn);
    //移动
    canvas.addEventListener('mousemove',mousemoveFn);
    //鼠标抬起
    canvas.addEventListener('mouseup',mouseupFn);

    function mousedownFn(event){
        //鼠标位置
        const mousePos=getMousePos(event);

        //鼠标位减图形位
        subPos={
            x:mousePos.x-rect.x,
            y:mousePos.y-rect.y,
        }

        //判断鼠标是否在图形中
        selected=containPoint(rect,mousePos);
        console.log(selected);

    }
    function mousemoveFn(event){
        //鼠标位置
        const mousePos=getMousePos(event);
        /*如果鼠标选择了图形
        *   让图形跟着鼠标动
        *   按需渲染
        * */
        if(selected){
            rect.x=mousePos.x-subPos.x;
            rect.y=mousePos.y-subPos.y;
            render();
        }
    }
    function mouseupFn(event){
        //鼠标抬起,取消拖拽
        selected=false;
    }
    //判断点是否在图形中
    function containPoint(obj,mousePos){
        //解构图形位置和尺寸
        const {x,y,width,height}=obj;
        //解构鼠标位置
        const {x:mx,y:my}=mousePos;
        //计算鼠标和图形上、下、左、右边界的关系
        const l=mx>x;
        const r=mx<x+width;
        const t=my>y;
        const b=my<y+height;

        return l&&r&&t&&b;
    }
    //获取鼠标在canvas中的位置
    function getMousePos(event){
        //获取鼠标位置
        const {clientX,clientY}=event;
        //获取canvas 边界位置
        const {top,left}=canvas.getBoundingClientRect();
        //计算鼠标在canvas 中的位置
        const x=clientX-left;
        const y=clientY-top;
        return {x,y};
    }
    //渲染方法
    render();
    function render(){
        ctx.clearRect(0,0,canvas.width,canvas.height);
        rect.draw(ctx);
    }
</script>
</body>
</html>
判断一个点位是否在路径中
- isPointInPath(x,y) 是canvas 2d中的内置方法,它可以判断一个点位是否在路径中。
- isPointInPath(x,y) 面向的对象是路径,所以对文字、fillRect()、strokeRect()不好使。
回顾一下路径的基本概念:
- 在我使用canvas 的getContext(‘2d’) 方法获取canvas 上下文对象ctx 的时候, ctx上便挂载了一个空的路径集合。
- 在ctx.beginPath() 之后,所绘制的所有路径都会被添加到这个路径集合里,isPointInPath(x,y) 方法判断的就是x、y 点是否在这个路径集合的所有路径里。
- 这个路径可以不用画出来,只要路径集合里有路径即可。
注意,在下一次ctx.beginPath() 时,路径集合会被置空。
示例
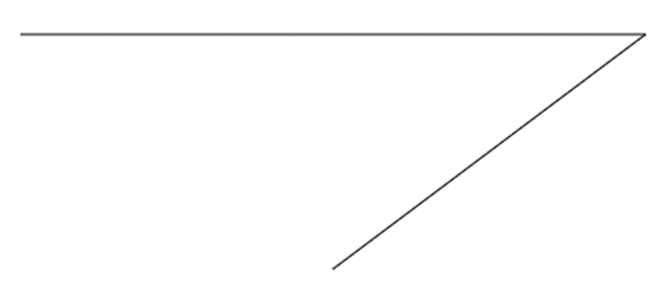
- 用三个点画了一条折线,没有将其闭合,然后对其进行选择。
const ctx=canvas.getContext('2d');
ctx.beginPath();
ctx.moveTo(50,50);
ctx.lineTo(450,50);
ctx.lineTo(250,200);
console.log(ctx.isPointInPath(250,100)); //true
ctx.stroke();


 252
252


 被折叠的 条评论
为什么被折叠?
被折叠的 条评论
为什么被折叠?
 到【灌水乐园】发言


