


前言
自己在跑JDE多目标跟踪代码时,总结的方法和教训。
一、数据集制作

1.可直接下载作者给的数据集,是制作好的
论文链接:https://arxiv.org/pdf/1909.12605v1.pdf
代码链接:https://github.com/Zhongdao/Towards-Realtime-MOT
作者给的数据集链接:https://github.com/Zhongdao/Towards-Realtime-MOT/blob/master/DATASET_ZOO.md
2.自己数据集作为训练集
数据集下载:
VisDrone2018(和VisDrone2020是同一个数据集):
https://www.jianshu.com/p/62e827306fca
VisDrone2019:
UAVDT-M:
a.移动图片,按照上图的格式放置
b.根据数据集自带的gt.txt,生成lables_with_ids文件夹的标签
gt.txt的标注格式为:
<frame>, <id>, <bb_left>, <bb_top>, <bb_width>, <bb_height>, <conf>, <x>, <y>, <z>  lables_with_ids文件夹的标签格式为:
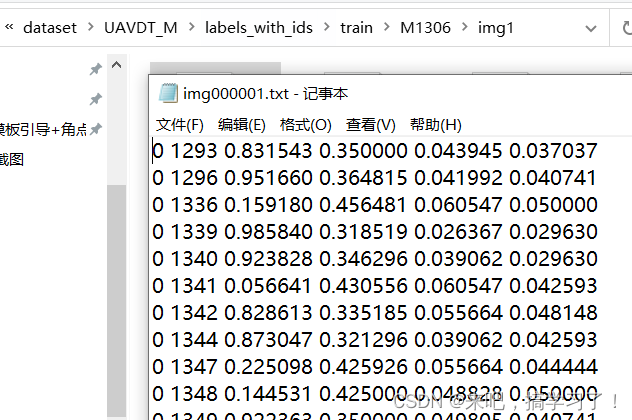
[class] [identity] [x_center] [y_center] [width] [height]不同的是,[x_center] [y_center] [width] [height]是归一化后的数值,并且原数据集的gt是一个序列所有帧的标注,而lables_with_ids文件夹的标签需要的是单个图片对应标注,每个图片对应一个标签(训练检测算法)
使用的是FairMOT的代码:
import os.path as osp
import os
import numpy as np
import cv2


# copy from D:\XYL\5.MOT\FairMOT-master\src\gen_labels_15.py


def mkdirs(d):
    if not osp.exists(d):
        os.makedirs(d)


seq_root = r'E:\XYL\dataset\\UAVDT_M\images\\test'
label_root = r'E:\XYL\dataset\\UAVDT_M\labels_with_ids\\test'  # JDE 处理后的标签格式
gt_root = r'E:\XYL\dataset\\visdrone2019-MOT\VisDrone2019-MOT-train\\annotations'  # VisDrone数据集自带标签, UAVDT数据集不需要改这里

mkdirs(label_root)
seqs = [s for s in os.listdir(seq_root)]
print('{} sequences are: \n {} \n'.format(len(seqs), seqs))

tid_curr = 0
tid_last = -1
for i, seq in enumerate(seqs):
    print('({}/{}): {}'.format(i, len(seqs), seq))
    if 'visdrone' in seq_root:
        img_path = osp.join(seq_root, seq, '0000001.jpg')
    elif 'UAVDT' in seq_root:  # 区分大小写
        img_path = osp.join(seq_root, seq, 'img1', 'img000001.jpg')
    img_sample = cv2.imread(img_path)  # 每个序列第一张图片 用于获取w, h
    seq_width, seq_height = img_sample.shape[1], img_sample.shape[0]  # w, h
    print('\t    w: {}, h: {}'.format(seq_width, seq_height))
    if 'visdrone' in seq_root:
        gt_txt = osp.join(gt_root, seq + '.txt')                  # for visdrone 数据集自带标签
    elif 'UAVDT' in seq_root:
        gt_txt = osp.join(seq_root, seq, 'gt', 'gt.txt')          #  for UAVDT and MOT 数据集自带标签
    gt = np.loadtxt(gt_txt, dtype=np.float64, delimiter=',')
    idx = np.lexsort(gt.T[:2, :])
    gt = gt[idx, :]

    if 'visdrone' in seq_root:
        seq_label_root = osp.join(label_root, seq)  # VisDrone 数据集没用img1文件夹
        mkdirs(seq_label_root)
        for fid, tid, x, y, w, h, mark, obj_cls, _, _ in gt:  # for visdrone 数据集自带的标签有10位
            if (mark == 0) or (obj_cls not in [4, 5, 6, 9]):  # 数据集中是ignored的标签, 或者不满足特定类(车辆:4,5,6,9)就略过
                continue
            fid = int(fid)
            tid = int(tid)
            if not tid == tid_last:
                tid_curr += 1
                tid_last = tid
            x += w / 2
            y += h / 2
            label_fpath = osp.join(seq_label_root, '{:07d}.txt'.format(fid))  # VisDrone 名字 有7位
            label_str = '0 {:d} {:.6f} {:.6f} {:.6f} {:.6f}\n'.format(
                tid_curr, x / seq_width, y / seq_height, w / seq_width, h / seq_height)
            with open(label_fpath, 'a') as f:
                f.write(label_str)
    elif 'UAVDT' in seq_root:
        seq_label_root = osp.join(label_root, seq, 'img1')  # UAVDT 数据集有img1文件夹
        mkdirs(seq_label_root)
        for fid, tid, x, y, w, h, mark, _, _ in gt:  # for MOT17, UAVDT数据集自带的标签有9位
            if (mark == 0):  # 忽略数据集中是ignored的标签,UAVDT中目标类别全是车辆,不用筛选
                continue
            fid = int(fid)
            tid = int(tid)
            if not tid == tid_last:
                tid_curr += 1
                tid_last = tid
            x += w / 2
            y += h / 2
            label_fpath = osp.join(seq_label_root, 'img{:06d}.txt'.format(fid))  # MOT17, UAVDT数据集 名字 有6位,前缀为img
            label_str = '0 {:d} {:.6f} {:.6f} {:.6f} {:.6f}\n'.format(
                tid_curr, x / seq_width, y / seq_height, w / seq_width, h / seq_height)
            with open(label_fpath, 'a') as f:
                f.write(label_str)
print('gt.txt --> 00000x.txt successful !!!')
推荐一个脚本显示出这些标注框,看看是否有错:
# from https://blog.csdn.net/sinat_33486980/article/details/105684839?spm=1001.2014.3001.5502
#-*- coding:utf-8 -*-
import os
import cv2
'''
显示跟踪训练数据集标注
'''
# root_path="E:\XYL\dataset\\visdrone2019-MOT\VisDrone2019-MOT-test-dev"  # VisDrone数据集
root_path= r"E:\XYL\dataset\\UAVDT_M"  # UAVDT 数据集
img_dir="images\\test"
label_dir="labels_with_ids\\test"

imgs=os.listdir(root_path+"/"+img_dir)
for i,img in enumerate(imgs) :
    # img_name=img[:-4]  # for MOT
    img_name = img
    if 'visdrone' in root_path:
        label_path = os.path.join(root_path+"/"+label_dir+"/"+img_name+"/"+"0000001.txt")  # 可视化第一帧的标签
    elif 'UAVDT' in root_path:  # 区分大小写
        label_path = os.path.join(root_path+"/"+label_dir+"/"+img_name+"/img1/"+"img000001.txt")
    label_f = open(label_path, "r")
    lines = label_f.readlines()
    if 'visdrone' in root_path:
        img_path = os.path.join(root_path+"/"+img_dir+"/"+img_name+"/"+"0000001.jpg")  # 没有img1文件夹,命名是7位数
    elif 'UAVDT' in root_path:  # 区分大小写
        img_path = os.path.join(root_path+"/"+img_dir+"/"+img_name+"/img1/"+"img000001.jpg")  # 有img1文件夹,命名是6位数
    img_data=cv2.imread(img_path)
    H,W,C=img_data.shape
    for line in lines:
        line_list=line.strip().split()
        class_num=int(line_list[0]) #类别号
        obj_ID=int(line_list[1])    #目标ID
        x,y,w,h=line_list[2:]       #中心坐标,宽高(经过原图宽高归一化后)
        x=int(float(x)*W)
        y=int(float(y)*H)
        w=int(float(w)*W)
        h=int(float(h)*H)
        left=int(x-w/2)
        top=int(y-h/2)
        right=left+w
        bottom=top+h
        cv2.circle(img_data,(x,y),1,(0,0,255))
        cv2.rectangle(img_data, (left,top),(right,bottom), (0,255,0), 2)
        cv2.putText(img_data, str(obj_ID), (left,top), cv2.FONT_HERSHEY_COMPLEX, 0.5, (0,0,255), 1)
    resized_img=cv2.resize(img_data,(W, H))
    cv2.imshow("label",resized_img)
    cv2.waitKey(1000)
检查结果为:

c.根据放置好的数据集,制作.train文件
# 多目标跟踪算法JDE在 UA-DETRAC数据集上训练
# https://blog.csdn.net/sinat_33486980/article/details/106213731

import os
root_path = r"E:\XYL\dataset\UAVDT_M"
label_flder = "labels_with_ids\\test"
img_folder = "images\\test"
train_f = open("../data/UAVDT-1.val", "w")
seqs = os.listdir(root_path+"/"+label_flder)
count = 0
for seq in seqs:
    print("seq:",seq)
    if 'visdrone' in root_path:
        labels = os.listdir(root_path+"/"+label_flder+"/"+seq+"/")
    elif 'UAVDT' in root_path:  # 区分大小写
        labels = os.listdir(root_path+"/"+label_flder+"/"+seq+"/img1/")
    for label in labels:
        img_name=label[:-4]+".jpg"
        if 'visdrone' in root_path:
            save_str=root_path+"/"+img_folder+"/"+seq+'/'+img_name+"\n"
        elif 'UAVDT' in root_path:
            save_str=root_path+"/"+img_folder+"/"+seq+'/img1/'+img_name+"\n"
        print("img:", save_str)
        count += 1
        train_f.write(save_str)
train_f.close()
print('图片数量为:', count)
参考:
多目标跟踪算法JDE在 UA-DETRAC数据集上训练_村民的菜篮子的博客-CSDN博客_ua-detrac
到这里为止,数据集准备完成!
二、训练
1.修改cfg文件
修改网络定义配置cfg。JDE中使用的是YOLO v3,其中3个yolo层的anchor,尺寸都是针对行人比例大小特殊设置的,因为UA-DETRAC所有标注数据都是车辆,且车辆大多数都是近似1:1的框(没有像行人那么大的宽高比),因此我直接将三层yolo层的anchor都按照原始416x416大小的yolov3的cfg设置来修改,此外需要注意的是,类别个数,JDE中全部是行人,所以类别数为1,检测和分类分支的卷积通道数为24=4*(1+5),4表示每一个yolo层的anchor数,1表示类别数,5表示conf,x,y,w,h。
我这里的anchor是使用kmeas来得到的,因为原来的anchor不适合车辆的检测

2.修改ccmcpe.json文件
这文件是代码的训练集和测试集路径,得根据自己的路径来修改

3.设置训练参数

这里需要把
cfg/yolov3.cfg 改成 cfg/yolov3_1088x608.cfg
不然就会报错
No such file or directory: 'cfg/yolo3.cfg'4.更改代码文件
a. 在train.py中 line171 上增加:
mkdir_if_missing(weights_to+"/cfg") # 判断文件夹是否存在
b. 注释掉train.py中line182 上的 Calculate mAP 这部分代码

这部分是在验证集上测试模型,但这里的参数,多输入了img_size=img_size,nID=dataset.nID
不注释掉就会报错,我觉得删去了应该也可以,就会在ccmcpe上的验证集上进行测试。
5.开始训练
下载预训练模型
下载yolov3的预训练模型 darknet53.conv.74 ,在工程目录新建weights文件夹,放进去
下载链接:https://pan.baidu.com/s/1D-uEE9eiW214npVjTXaf8Q
提取码:krzp
参考
多目标跟踪算法(JDE)Towards Real-Time Multi-Object Tracking训练方法_耳东广大木木的博客-CSDN博客
输入训练命令:
python train.py --cfg cfg/yolov3_1088x608.cfg --batch-size 8
参考:
多目标跟踪算法JDE在 UA-DETRAC数据集上训练_村民的菜篮子的博客-CSDN博客_ua-detrac
可视化工具
1.demo.py上输入图片
原始的JDE只支持mp4格式的视频demo,参数是--input-video,我这里主要大多是图片,为了方便,我修改了代码,可以测视频,也可以测图片,修改下如下代码:
# ------------------------------------------------------  # xyl 20221019 测试图片文件夹
    if opt.input_video.endswith('avi') or opt.input_video.endswith('mp4'):
        dataloader = datasets.LoadVideo(opt.input_video, opt.img_size)
    else:
        dataloader = datasets.LoadImages(opt.input_video, opt.img_size)
# ------------------------------------------------------
添加位置为:
还需要在dataset.py中增加LoadImages代码
class LoadImages:  # for inference
    def __init__(self, path, img_size=(1088, 608)):
        if os.path.isdir(path):
            image_format = ['.jpg', '.jpeg', '.png', '.tif']
            self.files = sorted(glob.glob('%s/*.*' % path))
            self.files = list(filter(lambda x: os.path.splitext(x)[1].lower() in image_format, self.files))
        elif os.path.isfile(path):
            self.files = [path]

        self.nF = len(self.files)  # number of image files
        self.width = img_size[0]
        self.height = img_size[1]
        self.count = 0

        self.frame_rate = 30  # xyl 20221019

        assert self.nF > 0, 'No images found in ' + path

    def __iter__(self):
        self.count = -1
        return self

    def __next__(self):
        self.count += 1
        if self.count == self.nF:
            raise StopIteration
        img_path = self.files[self.count]

        # Read image
        img0 = cv2.imread(img_path)  # BGR
        assert img0 is not None, 'Failed to load ' + img_path

        # Padded resize
        img, _, _, _ = letterbox(img0, height=self.height, width=self.width)

        # Normalize RGB
        img = img[:, :, ::-1].transpose(2, 0, 1)
        img = np.ascontiguousarray(img, dtype=np.float32)
        img /= 255.0

        # cv2.imwrite(img_path + '.letterbox.jpg', 255 * img.transpose((1, 2, 0))[:, :, ::-1])  # save letterbox image
        return img_path, img, img0

    def __getitem__(self, idx):
        idx = idx % self.nF
        img_path = self.files[idx]

        # Read image
        img0 = cv2.imread(img_path)  # BGR
        assert img0 is not None, 'Failed to load ' + img_path

        # Padded resize
        img, _, _, _ = letterbox(img0, height=self.height, width=self.width)

        # Normalize RGB
        img = img[:, :, ::-1].transpose(2, 0, 1)
        img = np.ascontiguousarray(img, dtype=np.float32)
        img /= 255.0

        return img_path, img, img0

    def __len__(self):
        return self.nF  # number of files
2.demo上展示检测结果
代码修改如下:multitracker.py中的 def update(self, im_blob, img0):函数,增加显示代码:
# --------------------------------------------------------------------------------------- 展示检测的结果 xyl 20221019
            if self.opt.debug_detection_results:
                for det in dets[:,:5]:
                    # print("\n", det.numpy())
                    x1 = int(det[0])
                    y1 = int(det[1])
                    x2 = int(det[2])
                    y2 = int(det[3])
                    cv2.rectangle(img0,(x1,y1),(x2,y2),color=(0,255,0),thickness=2)
                    show_im = cv2.resize(img0,(1024, 540))  # UAVDT的分辨率(1024, 540)
                    cv2.imshow("detection result", show_im)
                cv2.waitKey(0)
# ---------------------------------------------------------------------------------------
还需要在demo.py增加一个参数
parser.add_argument('--debug-detection-results', action='store_true', help='whether visualzie detection result') # xyl 20221019 检查检查结果
跑demo时的命令为:
python demo.py --output-format video --output-root results --input-video E:\XYL\dataset\MOT17\images\train\MOT17-09-DPM\img1 --weights weights/JDE-1088x608.pt --debug-detection-results多了一个 --debug-detection-results
检测结果为:
踩坑:
1.Windows安装ffmpeg
不能通过pip install来安装,装成功了,也没用。
会报错:
'ffmpeg' 不是内部或外部命令,也不是可运行的程序
这是因为电脑系统环境未配置ffmpeg,应该是下安装然后添加到环境变量
参考:
Windows安装ffmpeg_隐形的角落的博客-CSDN博客_ffmpeg windows安装
2.Windows安装cython
不能通过pip install来安装
解决方法:
1、把 依赖包 下载下来
ps: pip install 下载安装时 的 URL / Pypi 搜索:地址
2、解压文件
3、找到steup.py 文件
修改:extra_compile_args=[’-Wno-cpp’]
替换:extra_compile_args = {'gcc': ['/Qstd=c99']}
4、文件目录下运行
python setup.py build_ext install参考
Win10 安装 cython-bbox__yuki_的博客-CSDN博客
https://github.com/Zhongdao/Towards-Realtime-MOT/issues/117
https://stackoverflow.com/questions/60349980/is-there-a-way-to-install-cython-bbox-for-windows
https://zhuanlan.zhihu.com/p/463235082
3.num_workers的更改:
由于我笔记本性能不高,所以在跑train.py时报错:
BrokenPipeError: [Errno 32] Broken pipe查了一下才发现是这里的num_workers太大,笔记本不行,我改成了4,原来是8。但在我服务器上就能跑,不用改
dataloader = torch.utils.data.DataLoader(dataset, batch_size=batch_size, shuffle=True,
                                             num_workers=4, pin_memory=True, drop_last=True, collate_fn=collate_fn)
4.训练中total loss出现负值,不知道为何,total loss会是负数
去各个博客看了一下:有大佬说正常现象,那我就试试吧。

参考:
CVPR 2020 多目标跟踪算法JDE 训练_村民的菜篮子的博客-CSDN博客多目标跟踪算法JDE在 UA-DETRAC数据集上训练_村民的菜篮子的博客-CSDN博客_ua-detrac
5.训练完成的模型,跑demo时torch.Size不匹配
你或许会得到如下报错,我觉得这是作者代码的bug
报错:
2021-12-15 19:19:17 [INFO]: Error(s) in loading state_dict for Darknet:
size mismatch for classifier.weight: copying a param with shape torch.Size([4814, 512]) from checkpoint, the shape in current model is torch.Size([14455, 512]).
size mismatch for classifier.bias: copying a param with shape torch.Size([4814]) from checkpoint, the shape in current model is torch.Size([14455]).
解决办法:
torch.Size不匹配,需要修改multitracker.py的第163行
self.model = Darknet(opt.cfg, nID=14455) 把nID改为nID=4814。
然后在运行demo.py就不会报错了。
最终会在results文件夹下生成跟踪结果。
参考:多目标跟踪算法(JDE)Towards Real-Time Multi-Object Tracking训练方法_耳东广大木木的博客-CSDN博客
6.JDE过滤掉了宽高比大于1.6的跟踪框
由于JDE原始是做行人跟踪,所以过滤掉了宽高比大于1.6的跟踪框,所以导致很多符合这种比例的车辆全部被过滤,显示不出来。好了到此问题查清楚了,注释掉过滤语句,重新跑demo,天下太平,一切正常了。

多目标跟踪算法JDE在 UA-DETRAC数据集上训练_村民的菜篮子的博客-CSDN博客_ua-detrac
后记
自己是刚开始接触的多目标跟踪,跑代码记录的问题也会随时更新。有什么问题,希望大家互相交流。


 2814
2814


 被折叠的 条评论
为什么被折叠?
被折叠的 条评论
为什么被折叠?
 到【灌水乐园】发言


