


1. 下载miniconda
官网地址:https://docs.conda.io/projects/miniconda/en/latest/
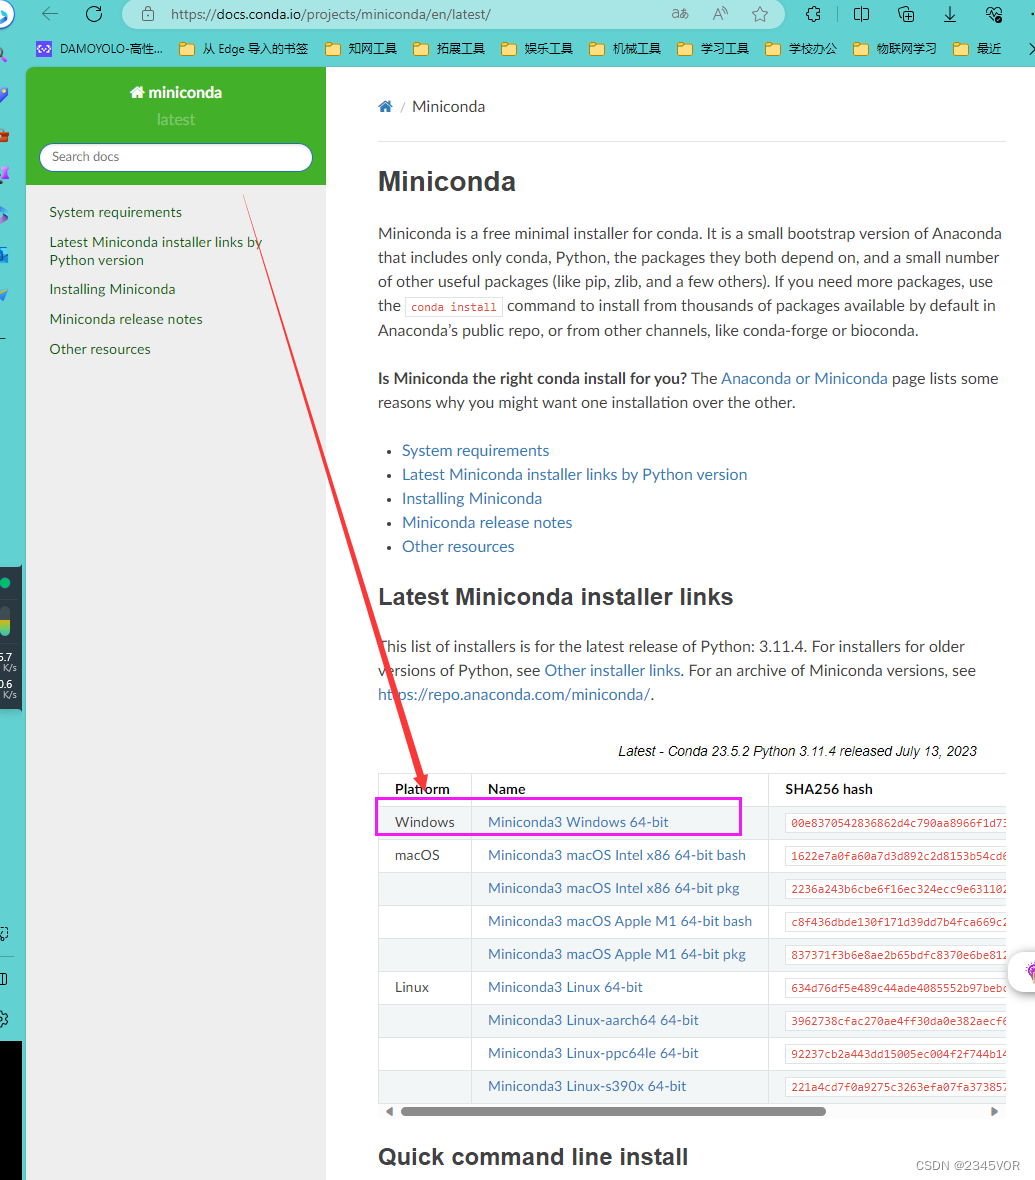
点击Miniconda3 Windows 64-bit下载
如果想体验全面的功能可下载完整版:https://www.anaconda.com/download

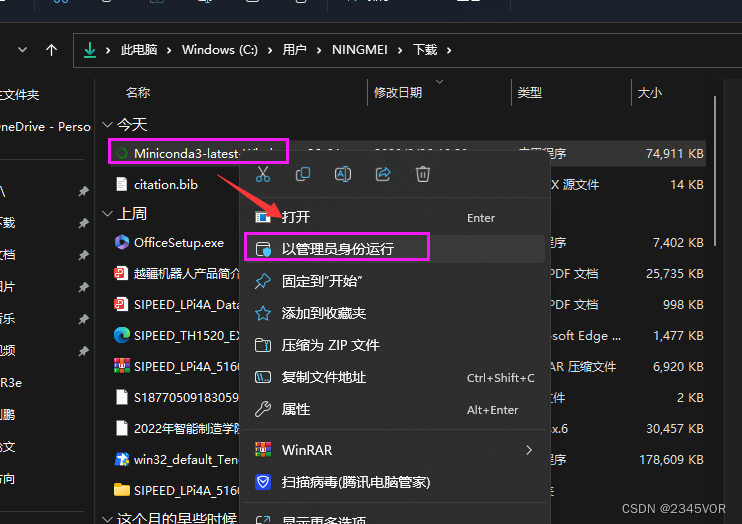
2. 安装miniconda
以管理员方式运行
点击下一步

点击我同意

点击下一步
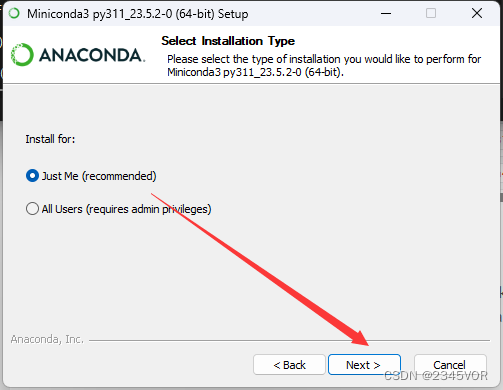
选择合适的安装路径,点击下一步

点击全选,第二项一定需要勾选,此处是添加环境变量,方便后期Vscode找到,点击安装

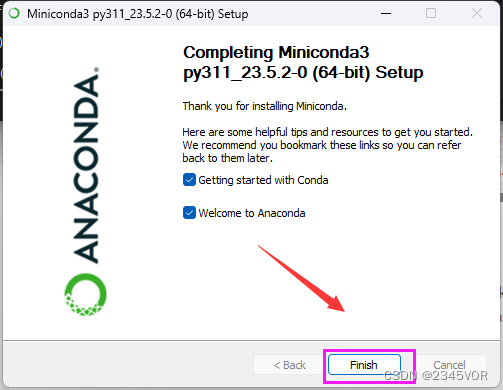
点击完成
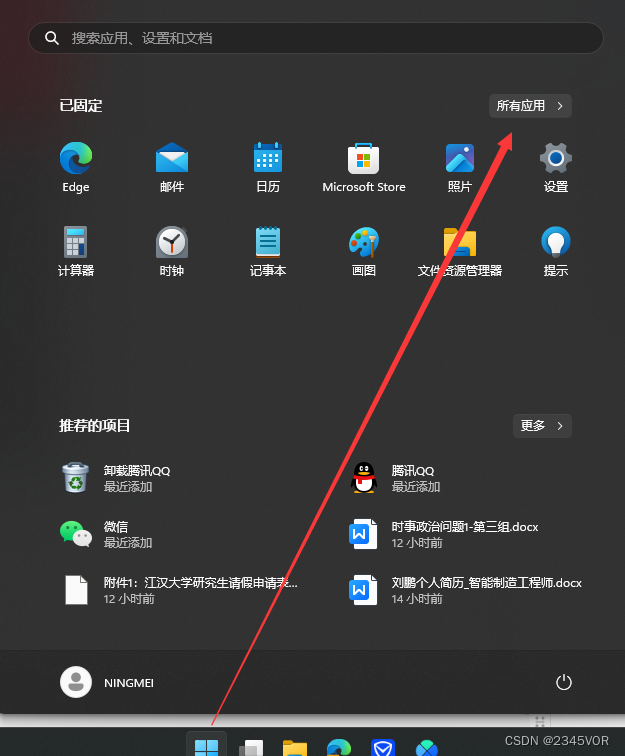
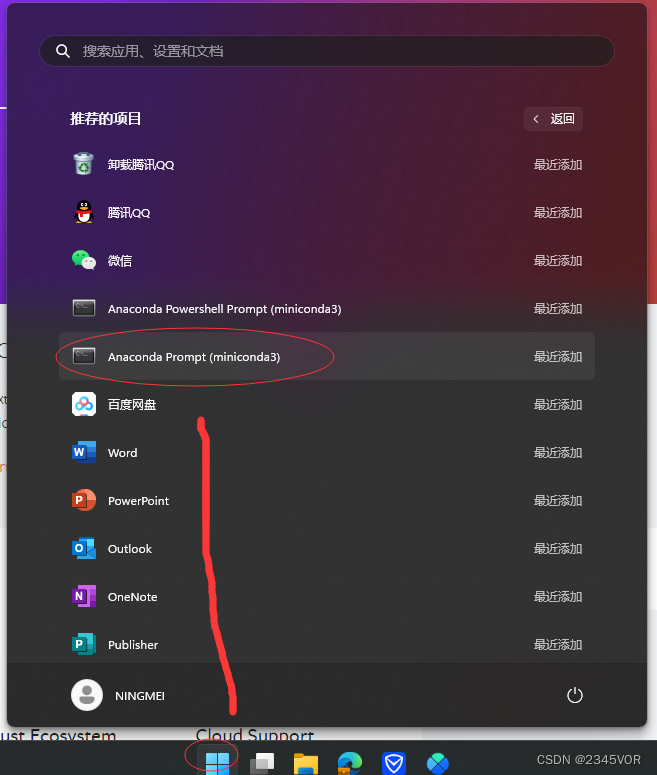
在菜单中选择应用,搜索miniconda,打开miniconda终端
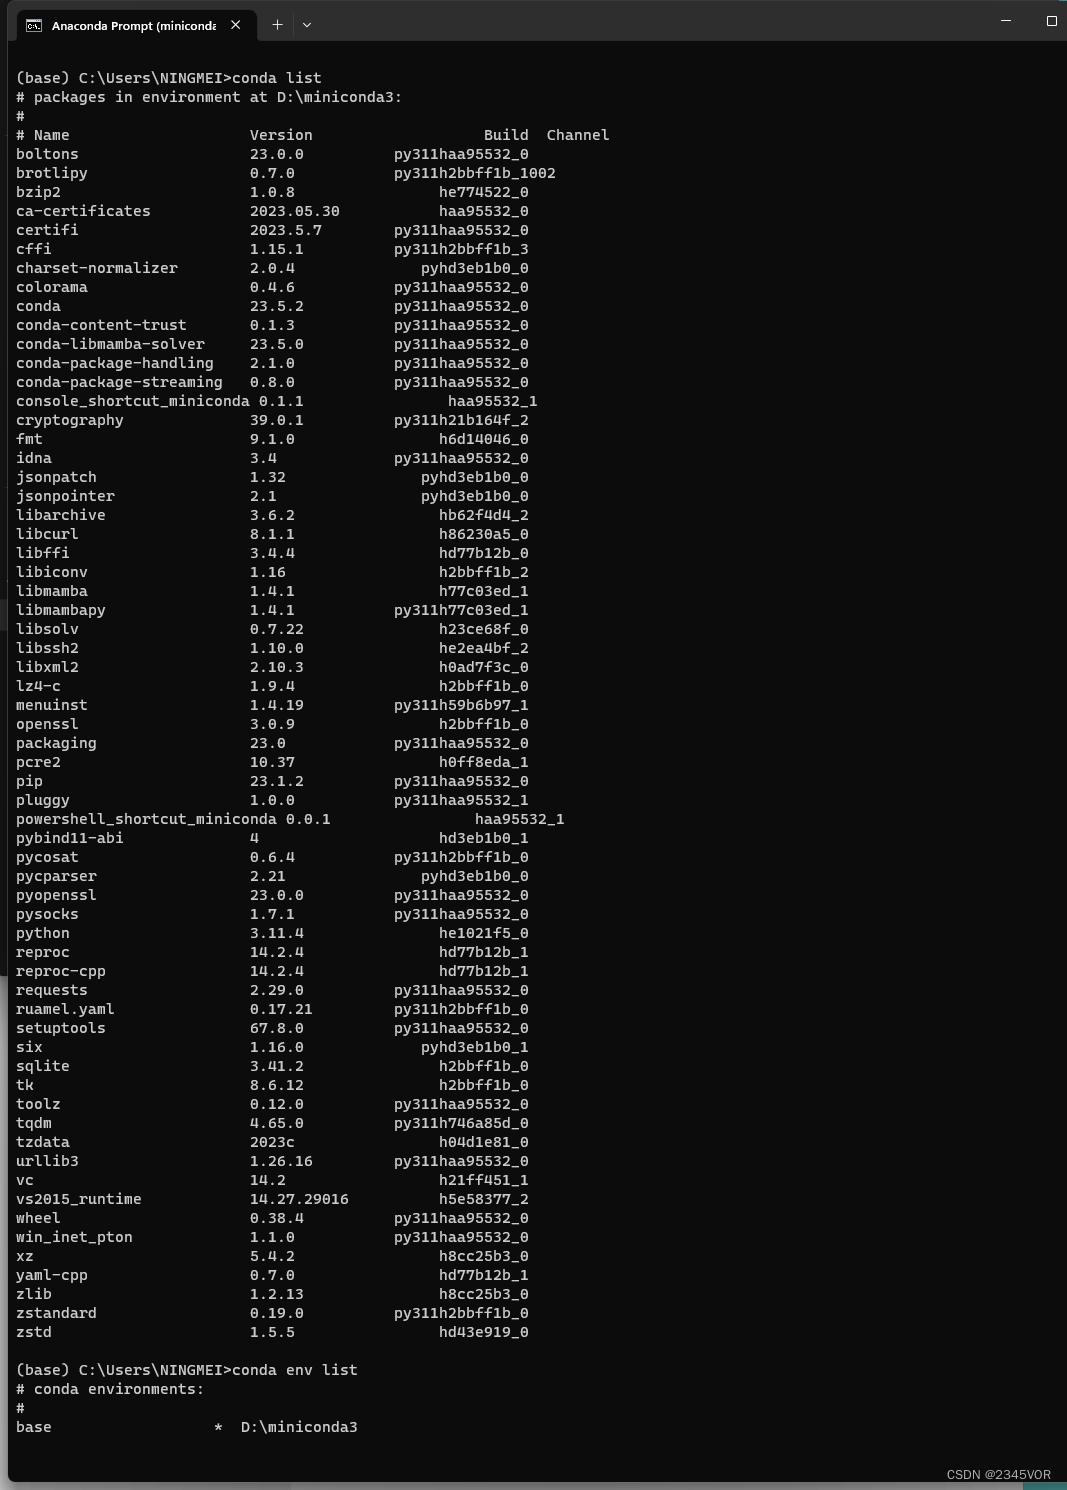
# 查看有那些虚拟环境
conda env list
# 查看有某个虚拟环境有那些包
conda list
值得注意的是。若采用conda环境配置后续环境,需要注意python版本与Pytorch、Tensorflow等的版本对应关系!接下来的安装与配置均建立在系统环境基础上,不建立在conda环境基础上
3. miniconda换源
windows环境下conda更换为国内清华镜像源
或者
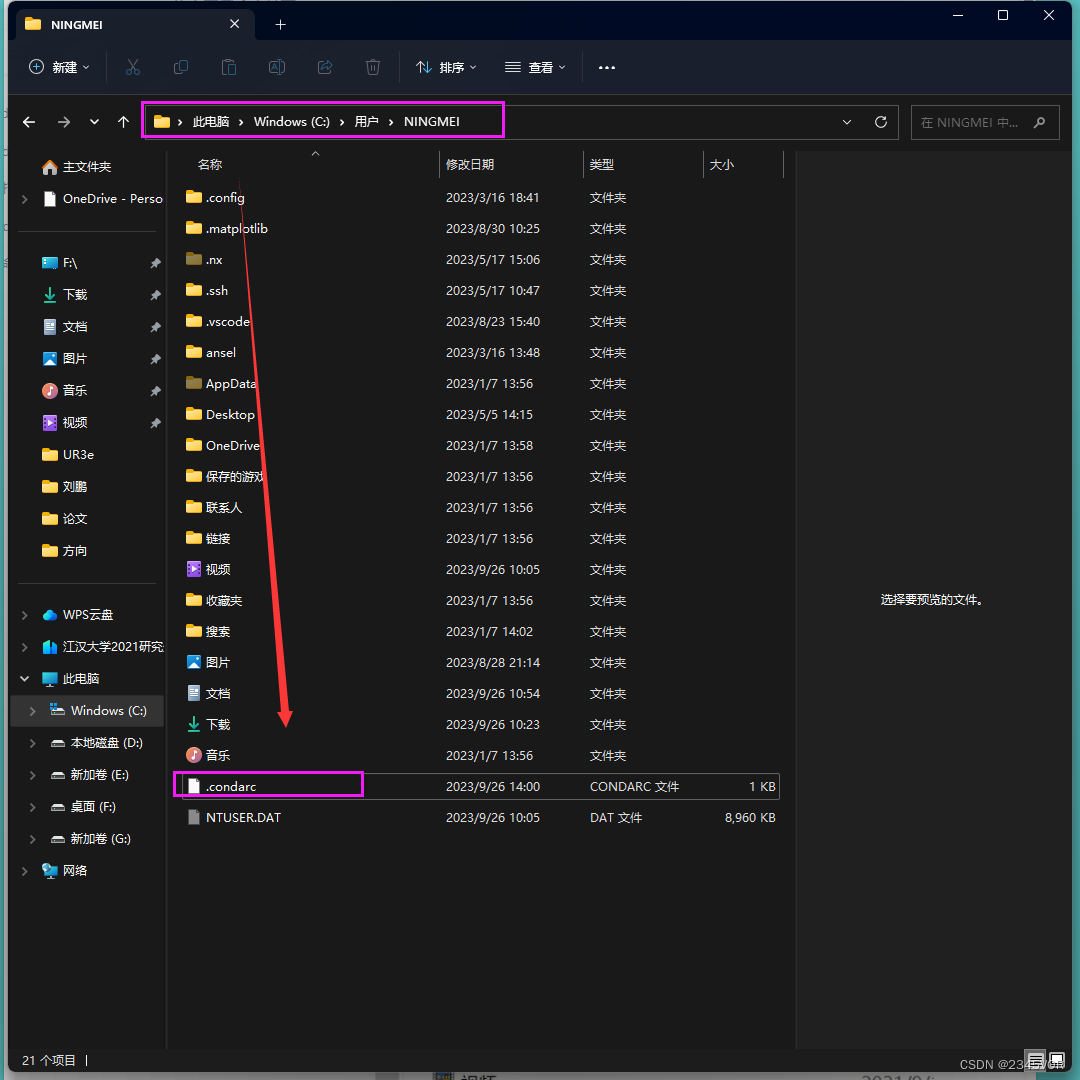
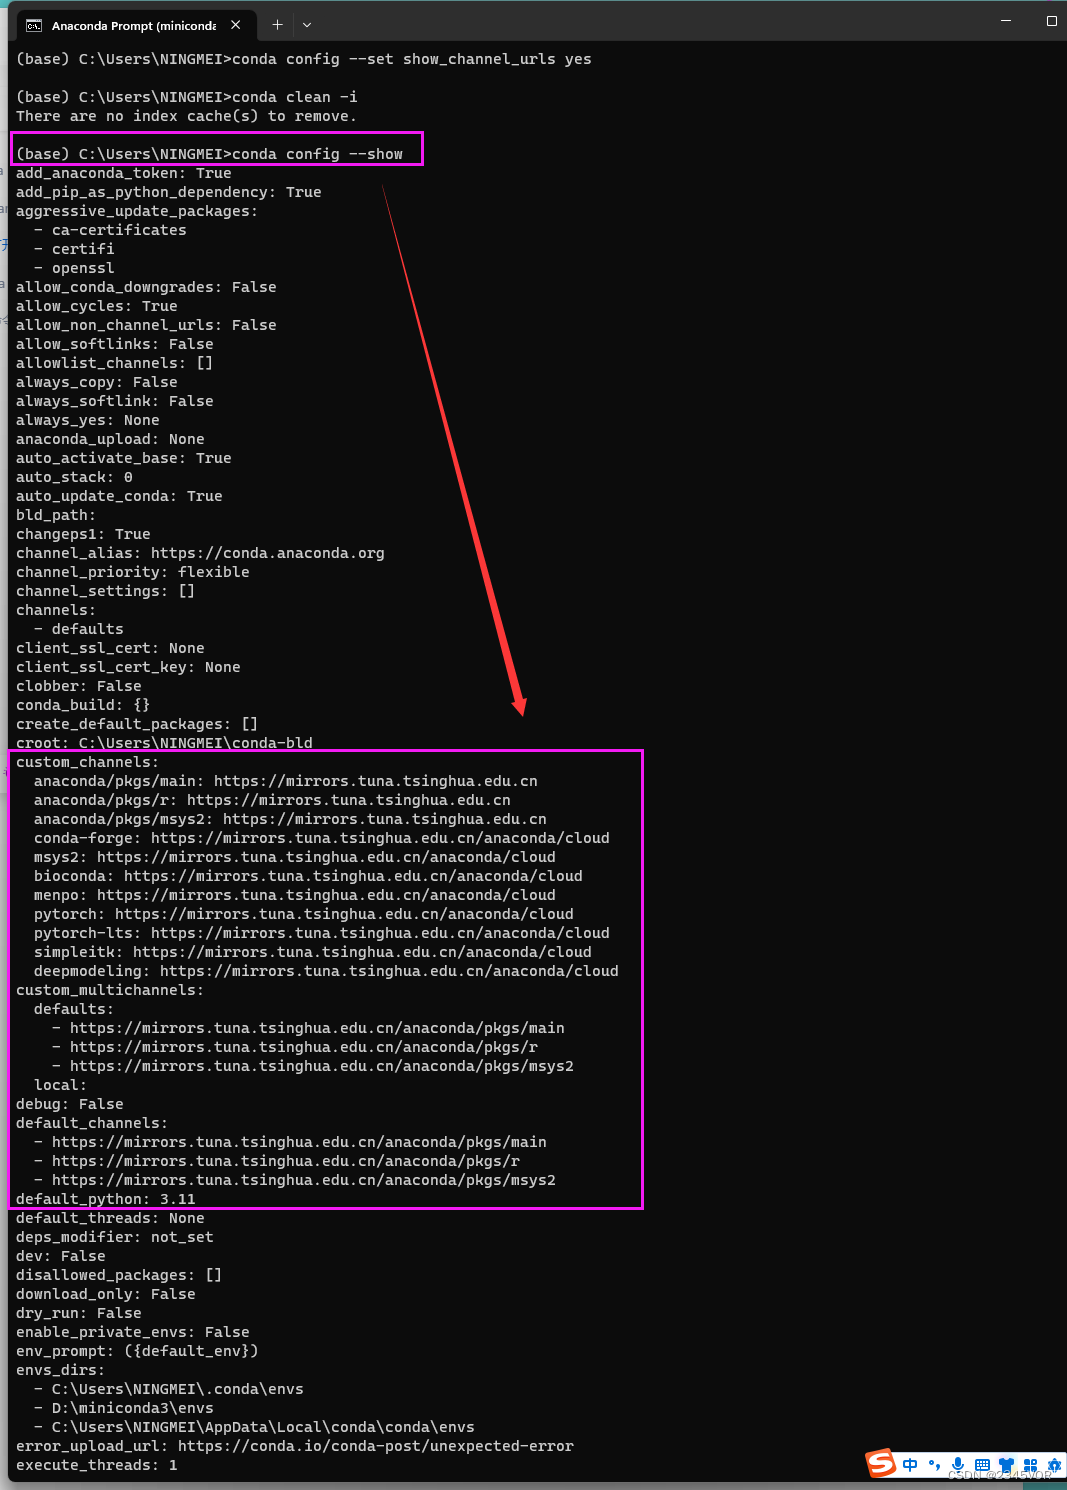
step1 Anaconda Prompt下输入以下命令 生成.condarc文件
conda config --set show_channel_urls yes
step2 找到.condarc文件,一般该文件在目录C:\Users\用户名 路径下
step3 以记事本打开.condarc,修改内容为:
channels:
  - defaults
show_channel_urls: true
default_channels:
  - https://mirrors.tuna.tsinghua.edu.cn/anaconda/pkgs/main
  - https://mirrors.tuna.tsinghua.edu.cn/anaconda/pkgs/r
  - https://mirrors.tuna.tsinghua.edu.cn/anaconda/pkgs/msys2
custom_channels:
  conda-forge: https://mirrors.tuna.tsinghua.edu.cn/anaconda/cloud
  msys2: https://mirrors.tuna.tsinghua.edu.cn/anaconda/cloud
  bioconda: https://mirrors.tuna.tsinghua.edu.cn/anaconda/cloud
  menpo: https://mirrors.tuna.tsinghua.edu.cn/anaconda/cloud
  pytorch: https://mirrors.tuna.tsinghua.edu.cn/anaconda/cloud
  pytorch-lts: https://mirrors.tuna.tsinghua.edu.cn/anaconda/cloud
  simpleitk: https://mirrors.tuna.tsinghua.edu.cn/anaconda/cloud
  deepmodeling: https://mirrors.tuna.tsinghua.edu.cn/anaconda/cloud/
step4 运行 conda clean -i 清除索引缓存,保证用的是镜像站提供的索引。
conda clean -i
step5 输入以下命令将会显示conda的配置信息, 换源成功!!
conda config --show
4. 安装pytorch
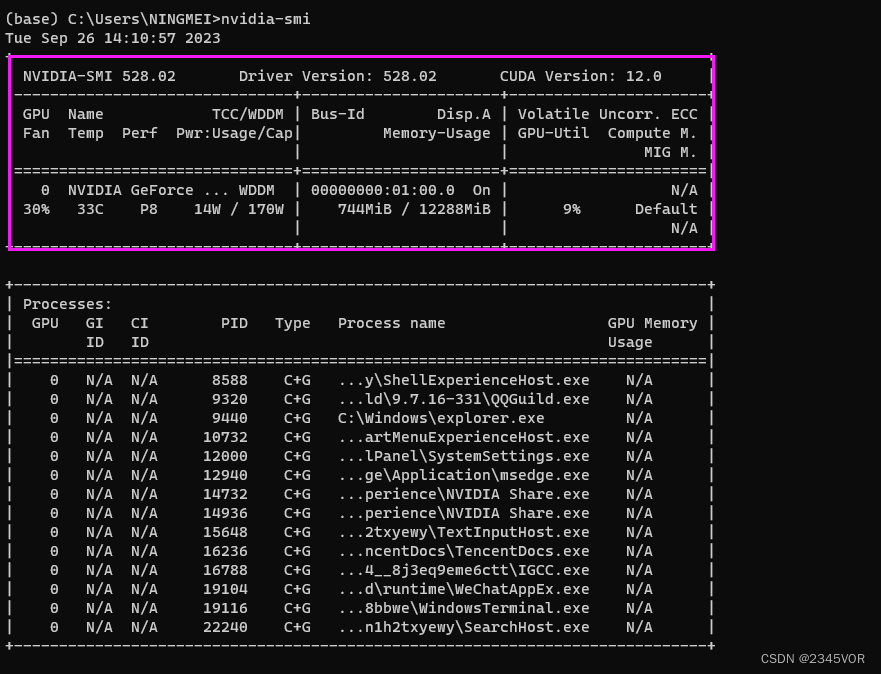
输入如下的命令。
nvidia-smi
得到如下图的信息图,可以看到驱动的版本是528.02;最高支持的CUDA版本是12.0版本。得到显卡的最高支持的CUDA版本,我们就可以根据这个信息来安装环境了。
大家需要根据自己开发环境选择合适版本,可参考:https://github.com/pytorch/vision
The following is the corresponding torchvision versions and supported Python
versions.
torch | torchvision | Python |
|---|---|---|
main / nightly | main / nightly | >=3.8, <=3.11 |
2.1 | 0.16 | >=3.8, <=3.11 |
2.0 | 0.15 | >=3.8, <=3.11 |
1.13 | 0.14 | >=3.7.2, <=3.10 |
older versions
torch | torchvision | Python |
|---|---|---|
1.12 | 0.13 | >=3.7, <=3.10 |
1.11 | 0.12 | >=3.7, <=3.10 |
1.10 | 0.11 | >=3.6, <=3.9 |
1.9 | 0.10 | >=3.6, <=3.9 |
1.8 | 0.9 | >=3.6, <=3.9 |
1.7 | 0.8 | >=3.6, <=3.9 |
1.6 | 0.7 | >=3.6, <=3.8 |
1.5 | 0.6 | >=3.5, <=3.8 |
1.4 | 0.5 | ==2.7, >=3.5, <=3.8 |
1.3 | 0.4.2 / 0.4.3 | ==2.7, >=3.5, <=3.7 |
1.2 | 0.4.1 | ==2.7, >=3.5, <=3.7 |
1.1 | 0.3 | ==2.7, >=3.5, <=3.7 |
<=1.0 | 0.2 | ==2.7, >=3.5, <=3.7 |
考虑后期开发需要yolov8,所以创建python3.8.10虚拟环境 torch=1.12 ,torchvision =0.13
# 创建新的环境
conda create -n mytorch python==3.8.10
# 激活环境
conda activate mytorch
# 删除环境
conda remove -n mytorch --all
# 退出当前环境
conda deactivate
输入y
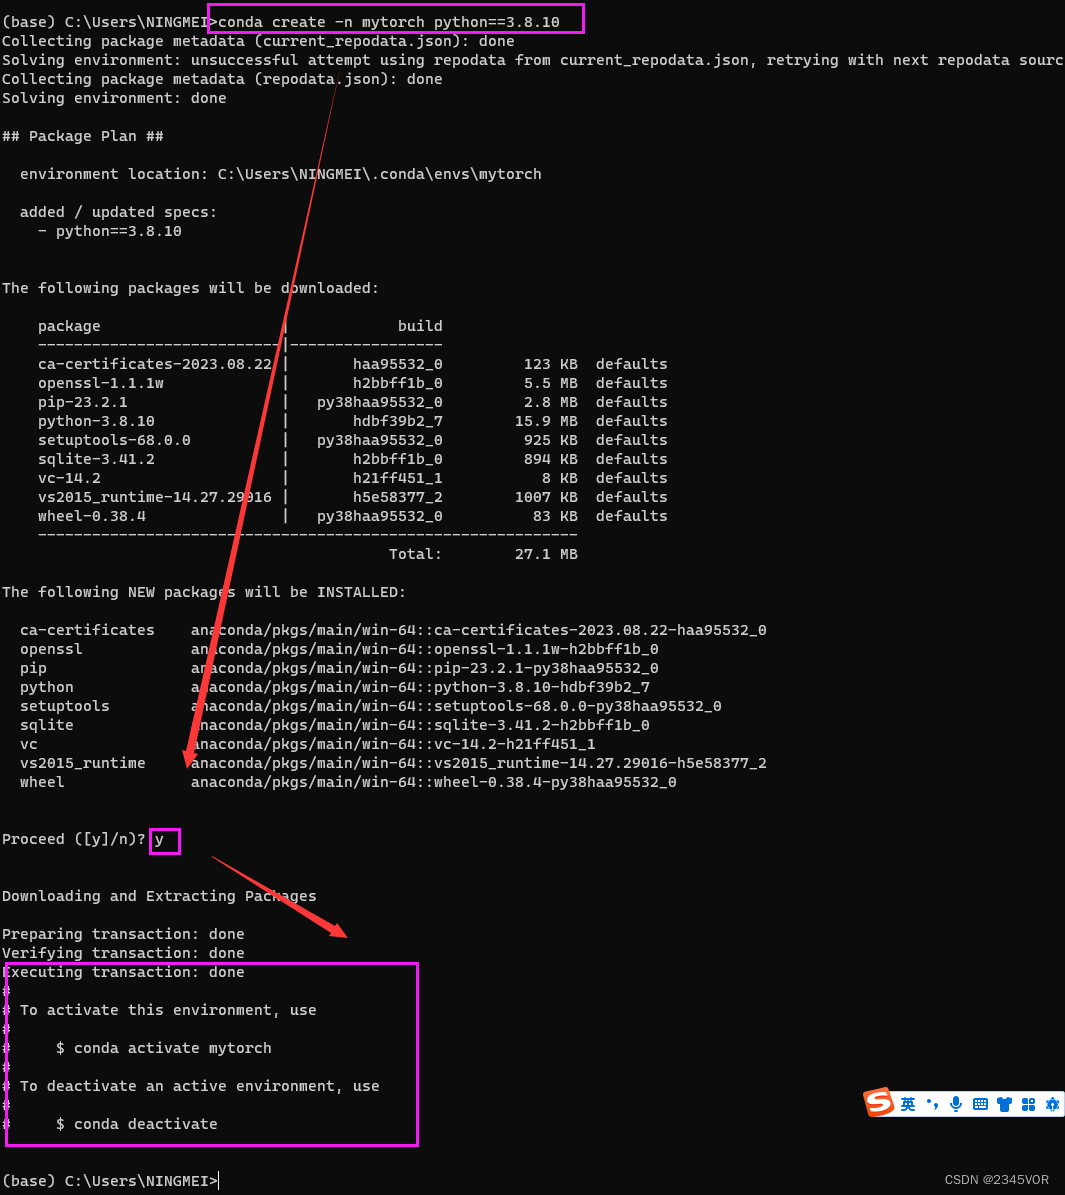
进入mytorch环境
# 激活环境
conda activate mytorch
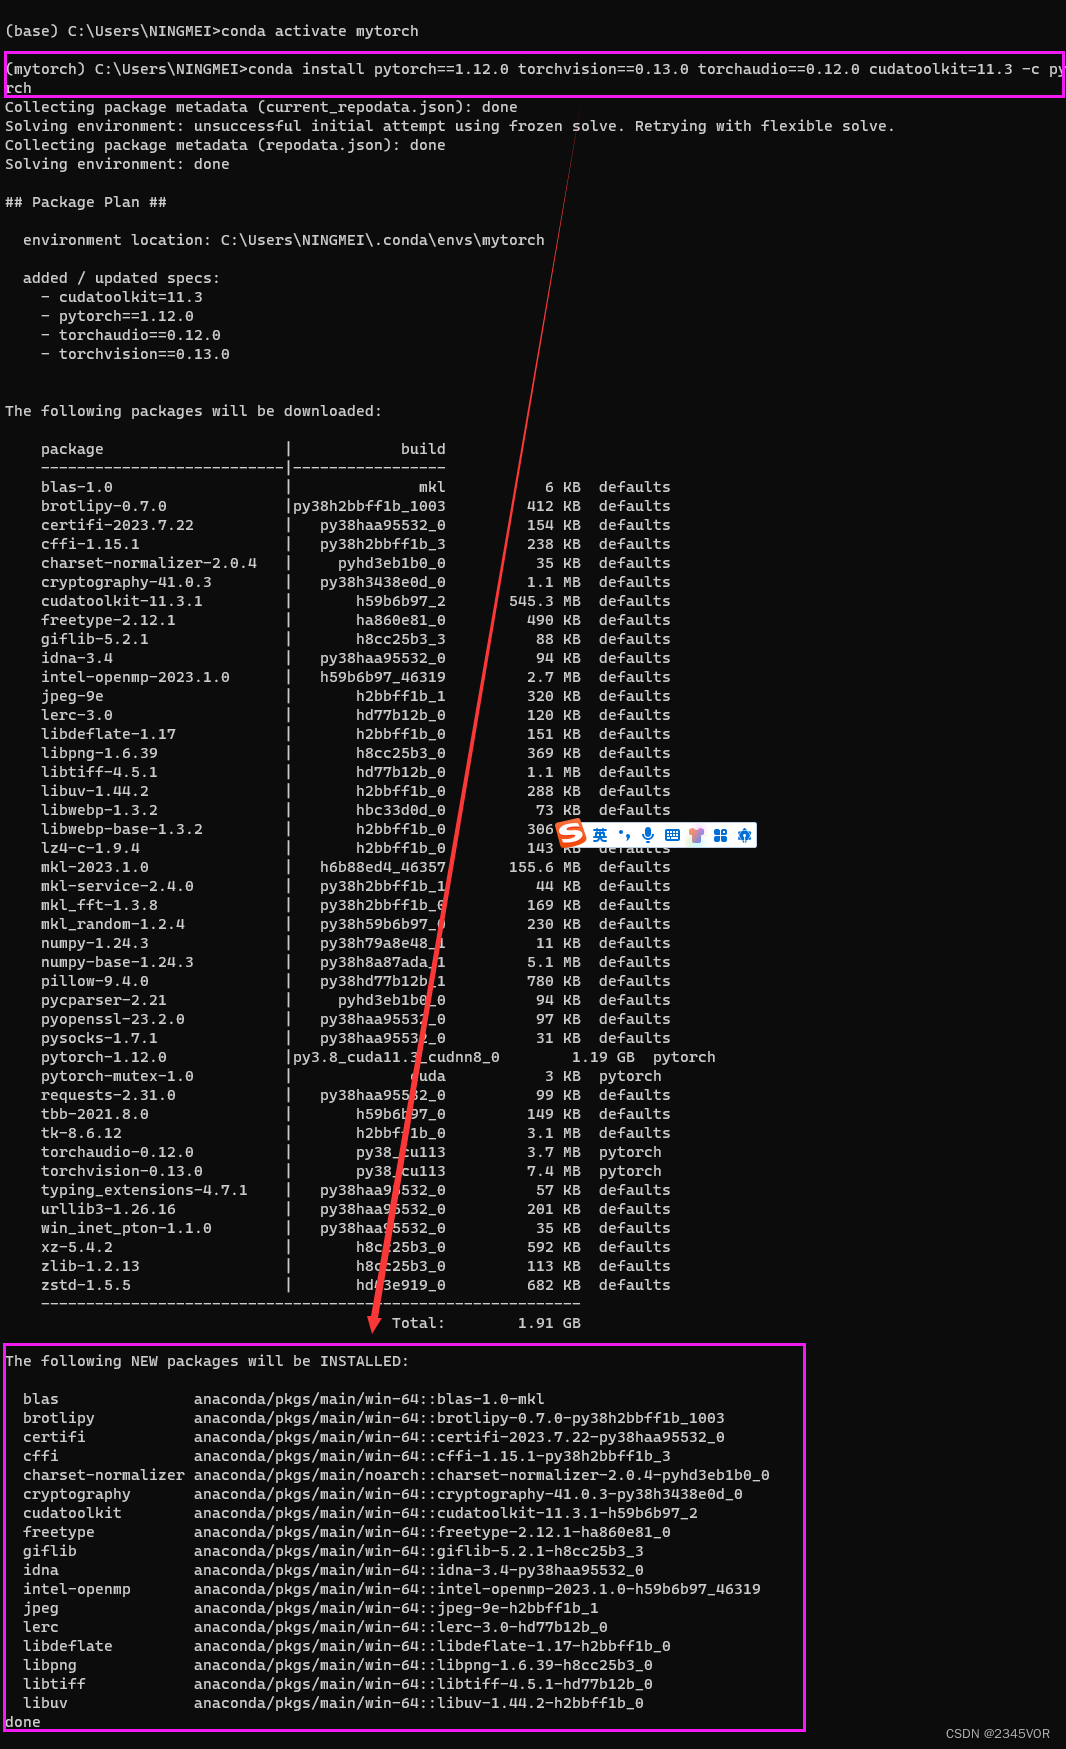
根据官网提供的一键安装
#3.安装cuda,注意30系需要cudatoolkit11以上

# CUDA 10.2
conda install pytorch==1.12.0 torchvision==0.13.0 torchaudio==0.12.0 cudatoolkit=10.2 -c pytorch
# CUDA 11.3
conda install pytorch==1.12.0 torchvision==0.13.0 torchaudio==0.12.0 cudatoolkit=11.3 -c pytorch
# CUDA 11.6
conda install pytorch==1.12.0 torchvision==0.13.0 torchaudio==0.12.0 cudatoolkit=11.6 -c pytorch -c conda-forge
# CPU Only
conda install pytorch==1.12.0 torchvision==0.13.0 torchaudio==0.12.0 cpuonly -c pytorch
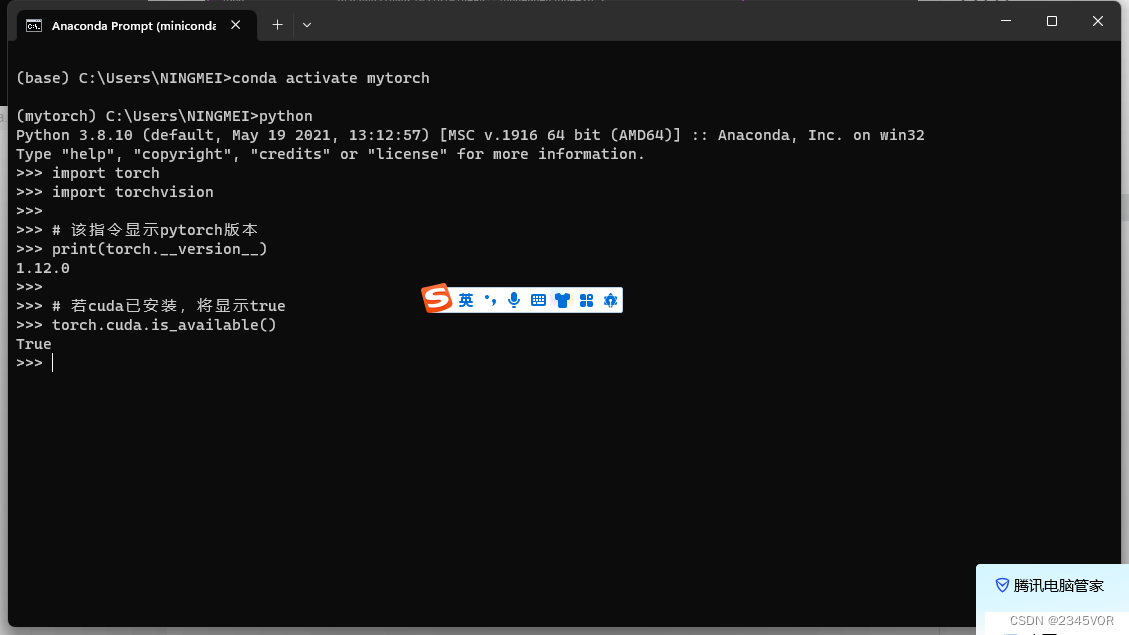
5. 测试是否安装成功
在终端激活环境后,输入python,输入下列指令:
import torch
import torchvision

# 该指令显示pytorch版本
print(torch.__version__)

# 若cuda已安装,将显示true
torch.cuda.is_available()
返回
有时可用使用pip临时更换镜像源
国内使用 pip命令安装包时,有时候会因为国外服务器的原因,安装速度过慢,使用国内镜像源安装包,速度会灰常快滴。以下是国内镜像源:
清华:https://pypi.tuna.tsinghua.edu.cn/simple
阿里云:http://mirrors.aliyun.com/pypi/simple/
豆瓣:http://pypi.douban.com/simple/
pip 后面 加上 -i参数,再加上面的镜像源即可,示例如下:
pip install requests -i http://mirrors.aliyun.com/pypi/simple/
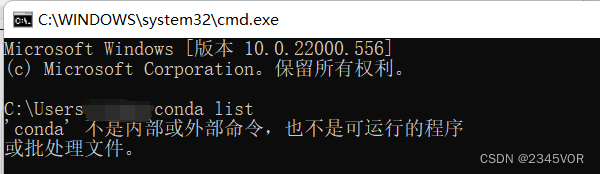
6. 问题
如果anaconda无法使用,可以考虑是否添加环境变量
说明
在Win11系统上正常安装完Anaconda之后,在cmd命令行窗口:
设置环境变量
1.此电脑-》属性-》高级系统设置-》环境变量
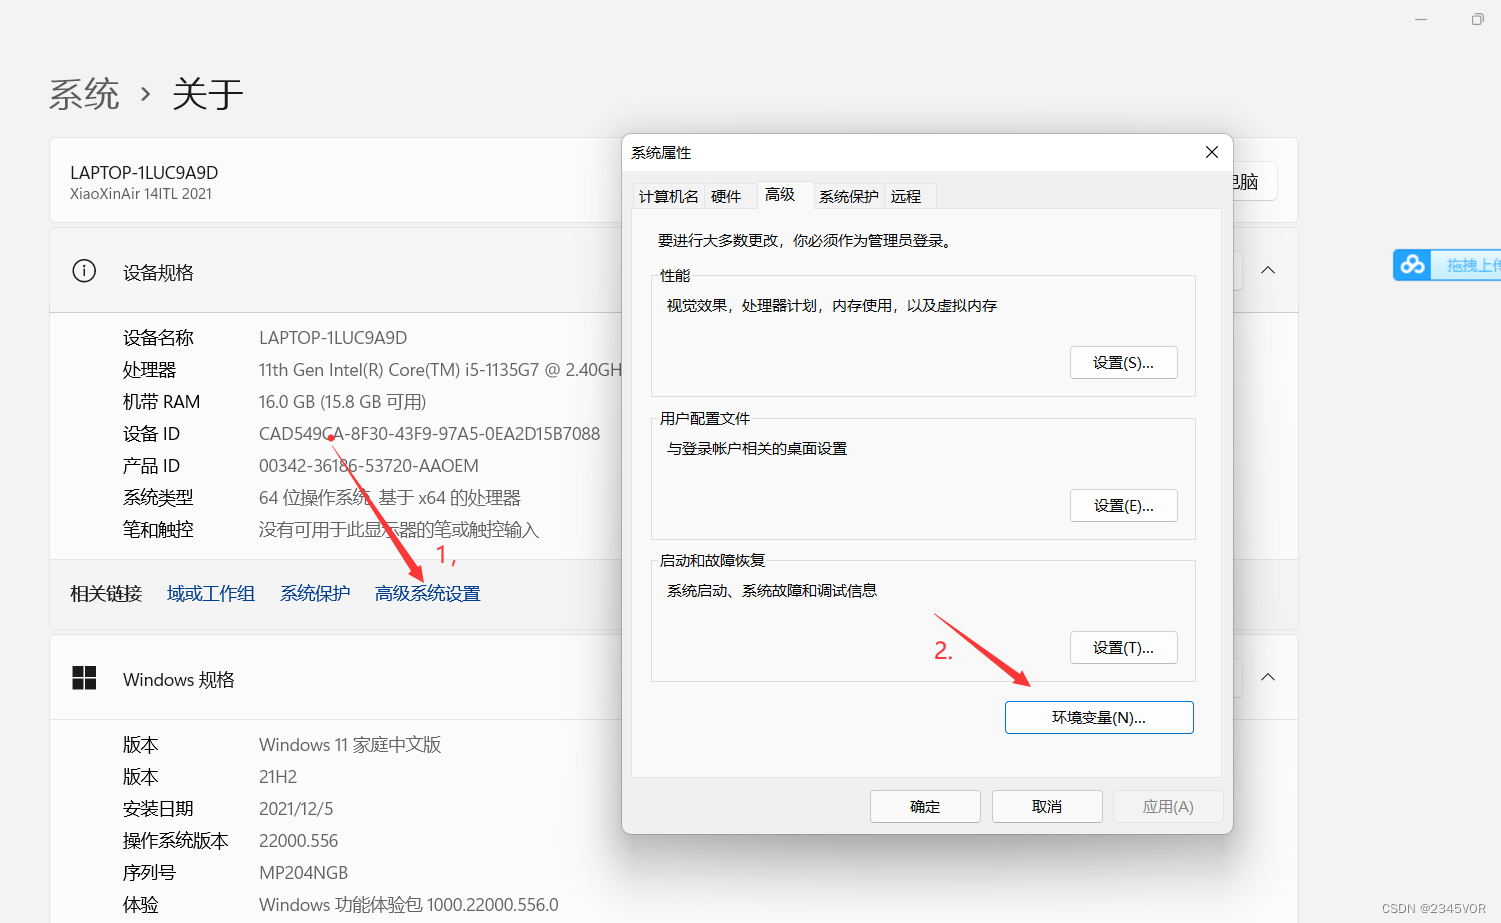
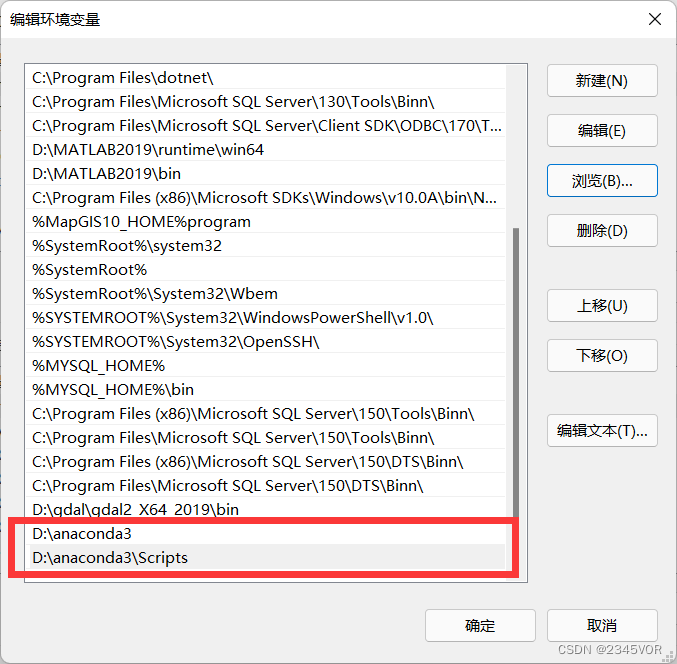
2.系统变量找到Path,在Path中添加如下两个变量
3.测试

至此,OK!!!
7. 总结
不管环境怎么更新,只要掌握其精髓,自然水到渠成。🎉🎉🎉🤣🤣🤣
import os
import time

import matplotlib.pyplot as plt
import numpy as np
import torch

from UR_Robot_real import UR_Robot_real
from inference.post_process import post_process_output
from utils.data.camera_data import CameraData
from utils.dataset_processing.grasp import detect_grasps
from utils.visualisation.plot import plot_grasp
import cv2
from PIL import Image
import torchvision.transforms as transforms
import yaml
import pyrealsense2 as rs
from ultralytics.yolo.utils.torch_utils import select_device, time_sync
# from utils.general import (
#     check_img_size, non_max_suppression, apply_classifier, scale_coords,
#     xyxy2xywh, strip_optimizer, set_logging)
from ultralytics.yolo.utils.checks import check_imgsz
from ultralytics.yolo.utils.ops import non_max_suppression, scale_coords
from ultralytics.yolo.utils import LOGGER
from ultralytics import YOLO
from ultralytics.yolo.data.dataloaders.v5loader import LoadStreams, LoadImages, letterbox
# from models.experimental import attempt_load,
from ultralytics.nn.tasks import attempt_load_weights, attempt_load_one_weight
from ultralytics import YOLO
tool_xyz = np.asarray([-0.1, 0.25, 0.34])
tool_orientation = np.asarray([-np.pi,0,0])
hole_xyz = np.asarray([-0.105, -0.305, 0.345])
hole_orientation = np.asarray([np.pi/2,np.pi,0])
camera_target_position = np.asarray([[0],[0],[0],[1]])
target_position = np.asarray([-0.105, -0.305, 0.345])
image_wide_size = 640
image_high_size = 480
# PyTorch
# YoloV5-PyTorch


BH_yaml_path = 'weights/yolov8n.yaml'
with open(BH_yaml_path, 'r', encoding='utf-8') as f:
    yolov8 = yaml.load(f.read(), Loader=yaml.SafeLoader)

color_dict = {}  # 创建一个空的字典来存储数字与颜色的对应关系

# 生成每个类别的颜色
for class_id in range(yolov8['nc']):
    color = [np.random.randint(0, 255) for _ in range(3)]  # 生成一个随机颜色
    color_dict[class_id] = color  # 将数字和颜色添加到字典中


class PlaneGraspClass:
    def __init__(self, saved_model_path=None,use_cuda=True,visualize=False,include_rgb=True,include_depth=True,output_size=300):
        if saved_model_path==None:
             saved_model_path = 'logs\\230802_1421_training_jacquard\epoch_30_iou_1.00'
            # saved_model_path = 'trained-models/jacquard-rgbd-grconvnet3-drop0-ch32/epoch_48_iou_0.93'
        self.model = torch.load(saved_model_path)
        # YOLOV5模型配置文件(YAML格式)的路径 yolov5_yaml_path
        self.model1 = YOLO("weights/best1.pt")
        # model = YoloV8(yolov8_yaml_path='ultralytics/models/v8/yolov8.yaml')
        print("[INFO] 完成YoloV8模型加载")
        self.device = "cuda:0" if use_cuda else "cpu"
        self.visualize = visualize

        self.cam_data = CameraData(include_rgb=include_rgb,include_depth=include_depth,output_size=output_size)

        # Load camera pose and depth scale (from running calibration)
        self.ur_robot = UR_Robot_real(tcp_host_ip="192.168.56.10", tcp_port=30003, workspace_limits=None, is_use_robotiq85=True,
                            is_use_camera=True)
        self.cam_pose = self.ur_robot.cam_pose
        self.cam_depth_scale = self.ur_robot.cam_depth_scale
        self.intrinsic = self.ur_robot.cam_intrinsics

        if self.visualize:
            self.fig = plt.figure(figsize=(6, 6))
        else:
            self.fig = None

    def get_aligned_images(self):
        # frames = pipeline.wait_for_frames()  # 等待获取图像帧
        # aligned_frames = align.process(frames)  # 获取对齐帧
        # aligned_depth_frame = aligned_frames.get_depth_frame()  # 获取对齐帧中的depth帧
        # color_frame = aligned_frames.get_color_frame()  # 获取对齐帧中的color帧
        aligned_depth_frame, color_frame= self.ur_robot.get_camera_data1() # meter

        ############### 相机参数的获取 #######################
        intr = color_frame.profile.as_video_stream_profile().intrinsics  # 获取相机内参
        depth_intrin = aligned_depth_frame.profile.as_video_stream_profile(
        ).intrinsics  # 获取深度参数(像素坐标系转相机坐标系会用到)
        '''camera_parameters = {'fx': intr.fx, 'fy': intr.fy,
                            'ppx': intr.ppx, 'ppy': intr.ppy,
                            'height': intr.height, 'width': intr.width,
                            'depth_scale': profile.get_device().first_depth_sensor().get_depth_scale()
                            }'''

        # 保存内参到本地
        # with open('./intrinsics.json', 'w') as fp:
        # json.dump(camera_parameters, fp)
        #######################################################

        depth_image = np.asanyarray(aligned_depth_frame.get_data())  # 深度图(默认16位)
        depth_image_8bit = cv2.convertScaleAbs(depth_image, alpha=0.03)  # 深度图(8位)
        depth_image_3d = np.dstack(
            (depth_image_8bit, depth_image_8bit, depth_image_8bit))  # 3通道深度图
        color_image = np.asanyarray(color_frame.get_data())  # RGB图

        # 返回相机内参、深度参数、彩色图、深度图、齐帧中的depth帧
        return intr, depth_intrin, color_image, depth_image, aligned_depth_frame


    def camera_xyz_list_function(self):
        # Wait for a coherent pair of frames: depth and color
        intr, depth_intrin, color_image, depth_image, aligned_depth_frame = self.get_aligned_images()  # 获取对齐的图像与相机内参
        time.sleep(4)
        intr, depth_intrin, color_image, depth_image, aligned_depth_frame = self.get_aligned_images()  # 获取对齐的图像与相机内参
        # Convert images to numpy arrays
        # Apply colormap on depth image (image must be converted to 8-bit per pixel first)
        depth_colormap = cv2.applyColorMap(cv2.convertScaleAbs(
            depth_image, alpha=0.03), cv2.COLORMAP_JET)
        # Stack both images horizontally
        images = np.hstack((color_image, depth_colormap))

        # Show images
        camera_xyz_list = []
        t_start = time.time()  # 开始计时
        # YoloV8 目标检测
        results = self.model1.predict(color_image)
        xyxy_list = results[0].boxes.xyxy
        conf_list = results[0].boxes.conf
        class_id_list = results[0].boxes.cls
        canvas = np.copy(color_image)

        t_end = time.time()  # 结束计时
        for i in range(len(xyxy_list)):
            if conf_list[i] > 0.6:
                x_min = int(xyxy_list[i][0])
                y_min = int(xyxy_list[i][1])
                x_max = int(xyxy_list[i][2])
                y_max = int(xyxy_list[i][3])
                if x_min < image_wide_size and y_min < image_high_size and x_max < image_wide_size and y_max < image_high_size:
                    dis_min = aligned_depth_frame.get_distance(x_min, y_min)
                    dis_max = aligned_depth_frame.get_distance(x_max, y_max)
                    dis = (dis_min + dis_max) / 2
                    ux = int((x_min + x_max) / 2)
                    uy = int((y_min + y_max) / 2)
                    camera_xyz = rs.rs2_deproject_pixel_to_point(
                        depth_intrin, (ux, uy), dis)  # 计算相机坐标系的xyz
                    camera_xyz = np.round(np.array(camera_xyz), 3)  # 转成3位小数
                    camera_xyz = camera_xyz.tolist()
                    camera_xyz_list.append(camera_xyz)

                    num_cls = int(class_id_list[i].item())
                    label = '%s ' % (yolov8['class_name'][num_cls])
                    color = color_dict[num_cls]

                    cv2.putText(canvas, label + str(round(conf_list[i].item(), 2)),
                                (int(xyxy_list[i][0]), int(xyxy_list[i][1])), cv2.FONT_HERSHEY_SIMPLEX, 1,
                                (255, 255, 255),
                                2)
                    cv2.rectangle(canvas, (int(xyxy_list[i][0]), int(xyxy_list[i][1])),
                                    (int(xyxy_list[i][2]), int(xyxy_list[i][3])), color, 2)

                    cv2.circle(canvas, (ux, uy), 4, (255, 255, 255), 5)  # 标出中心点
                    cv2.putText(canvas, str(camera_xyz), (ux + 20, uy + 10), 0, 1,
                                [225, 255, 255], thickness=2, lineType=cv2.LINE_AA)  # 标出坐标
                    fps = int(1.0 / (t_end - t_start))
                    cv2.putText(canvas, text="FPS: {}".format(fps), org=(50, 50),
                                fontFace=cv2.FONT_HERSHEY_SIMPLEX, fontScale=1, thickness=2,
                                lineType=cv2.LINE_AA, color=(0, 0, 0))
                    cv2.namedWindow('detection', flags=cv2.WINDOW_NORMAL |
                                                        cv2.WINDOW_KEEPRATIO | cv2.WINDOW_GUI_EXPANDED)
                    cv2.imshow('detection', canvas)
        return camera_xyz_list, t_end, t_start, canvas

    def generate(self):
        target1_position=  [0,0,0]
        destination1=np.append(hole_xyz,hole_orientation)
        self.ur_robot.move_j_p(destination1)
        xyz_list, t_end, t_start, canvas = self.camera_xyz_list_function()
        xyz_list = np.asarray(xyz_list)
        index=xyz_list.shape[0]
        print(xyz_list)
        # target1_position[0] = hole_xyz[0]+xyz_list[0,0]-0.043
        # target1_position[1] = hole_xyz[1]- xyz_list[0,2]+0.28
        # target1_position[2] = hole_xyz[2]+xyz_list[0,1]+0.075
        # target1_position= np.asarray(target1_position)
        # target1_position = np.append(target1_position,hole_orientation)
        # print(target1_position)
        # self.ur_robot.move_j_p(target1_position)
        for i in range(index):

        # time.sleep(1.5)
        # # 添加fps显示

            self.ur_robot.move_j([-(0 / 360.0) * 2 * np.pi, -(90 / 360.0) * 2 * np.pi,
                             (0 / 360.0) * 2 * np.pi, -(90 / 360.0) * 2 * np.pi,
                             -(0 / 360.0) * 2 * np.pi, 0.0])# return home
        # time.sleep(1.5)

        ## if you want to use RGBD from camera,use me
        # Get RGB-D image from camera
            grasp_home = np.append(tool_xyz,tool_orientation)
            self.ur_robot.move_j_p(grasp_home)
            time.sleep(1.5)
            rgb, depth= self.ur_robot.get_camera_data() # meter
            depth = depth *self.cam_depth_scale
            depth[depth >1]=0 # distance > 1.2m ,remove it

            ## if you don't have realsense camera, use me
            # num =2 # change me num=[1:6],and you can see the result in '/result' file
            # rgb_path = f"./cmp{num}.png"
            # depth_path = f"./hmp{num}.png"
            # rgb = np.array(Image.open(rgb_path))
            # depth = np.array(Image.open(depth_path)).astype(np.float32)
            # depth = depth * self.cam_depth_scale
            # depth[depth > 1.2] = 0  # distance > 1.2m ,remove it
            depth= np.expand_dims(depth, axis=2)
            x, depth_img, rgb_img = self.cam_data.get_data(rgb=rgb, depth=depth)
            time.sleep(1.5)
            x, depth_img, rgb_img = self.cam_data.get_data(rgb=rgb, depth=depth)
            rgb = cv2.cvtColor(rgb,cv2.COLOR_BGR2RGB)

            with torch.no_grad():
                xc = x.to(self.device)
                pred = self.model.predict(xc)
            q_img, ang_img, width_img = post_process_output(pred['pos'], pred['cos'], pred['sin'], pred['width'])

            grasps = detect_grasps(q_img, ang_img, width_img)
            # np.save(self.grasp_pose, grasp_pose)
            if self.visualize:
                plot_grasp(fig=self.fig, rgb_img=self.cam_data.get_rgb(rgb, False), grasps=grasps, save=True)

            if len(grasps) ==0:
                print("Detect 0 grasp pose!")
                if self.visualize:
                    plot_grasp(fig=self.fig, rgb_img=self.cam_data.get_rgb(rgb, False), grasps=grasps, save=True)
                return False
            ## For real UR robot
            # Get grasp position from model output
            pos_z = depth[grasps[0].center[0] + self.cam_data.top_left[0], grasps[0].center[1] + self.cam_data.top_left[1]]
            pos_x = np.multiply(grasps[0].center[1] + self.cam_data.top_left[1] - self.intrinsic[0][2],
                                pos_z / self.intrinsic[0][0])
            pos_y = np.multiply(grasps[0].center[0] + self.cam_data.top_left[0] - self.intrinsic[1][2],
                                pos_z / self.intrinsic[1][1])
            if pos_z == 0:
                return False

            target = np.asarray([pos_x, pos_y, pos_z])
            target.shape = (3, 1)

            # Convert camera to robot coordinates
            camera2tool = self.cam_pose
            target_position = self.ur_robot.target1_position(camera2tool, tool_orientation, tool_xyz, target)
            # print(target_position)
            # Convert camera to robot angle
            angle = np.asarray([0, 0, grasps[0].angle])
            angle.shape = (3, 1)
            target_angle = self.ur_robot.target1_angle(camera2tool, tool_orientation, angle)
            angle.shape = (1,3)
            # print(target_angle)
            # target_angle = np.dot(camera2robot[0:3, 0:3], angle)

            # compute gripper width
            width = grasps[0].length # mm
            if width < 25:    # detect error
                width = 70
            elif width <40:
                width =45
            elif width > 85:
                width = 85

            # Concatenate grasp pose with grasp angle
            grasp_pose = np.append(target_position, target_angle[2])
            print('grasp_pose: ', grasp_pose)
            print('grasp_width: ',grasps[0].length)
            destination=np.append([grasp_pose[0],grasp_pose[1],grasp_pose[2]],tool_orientation)
            print(destination)
            # self.ur_robot.move_j_p(destination)
            # hole targrt destination
            target1_position[0] = hole_xyz[0]+xyz_list[i,0]-0.037
            target1_position[1] = hole_xyz[1]- xyz_list[i,2]+0.18
            target1_position[2] = hole_xyz[2]+xyz_list[i,1]+0.066
            target1_position= np.asarray(target1_position)
            target1_position = np.append(target1_position,hole_orientation)
            print(target1_position)
            # self.ur_robot.move_j_p(target1_position)
            # target_position[0] = hole_xyz[0]+xyz_list[i,0]
            # target_position[1] = hole_xyz[1]- xyz_list[i,2]+0.25
            # target_position[2] = hole_xyz[2]+xyz_list[i,1]
            # target_position = np.append(target_position,hole_orientation)
            # self.ur_robot.move_j_p(target_position)
            success = self.ur_robot.plane_grasp_hole([grasp_pose[0],grasp_pose[1],grasp_pose[2]],target1_position, yaw=grasp_pose[3], open_size=width/100)
            if success==True:
                print("success:",i+1)
            elif success==False:
                print("unsuccess")
                break
        print("Grasp and full success:",i+1)
        self.ur_robot.move_j([-(0 / 360.0) * 2 * np.pi, -(90 / 360.0) * 2 * np.pi,
                             (0 / 360.0) * 2 * np.pi, -(90 / 360.0) * 2 * np.pi,
                             -(0 / 360.0) * 2 * np.pi, 0.0])# return home

        ## For having not real robot
        # if self.visualize:
        #     plot_grasp(fig=self.fig, rgb_img=self.cam_data.get_rgb(rgb, False), grasps=grasps, save=True)
        # return True


if __name__ == '__main__':
    g = PlaneGraspClass(
        # saved_model_path='/home/robot/UR_grasping_net/robotic-grasping-explosives/logs/230801_0934_training_jacquard/epoch_34_iou_1.00',
        # saved_model_path='/home/robot/UR_grasping_net/robotic-grasping-explosives/logs/230801_2225_training_jacquard/epoch_44_iou_1.00',
        saved_model_path = 'logs/230802_0918_training_jacquard/epoch_31_iou_1.00',
        # saved_model_path='/home/robot/UR_grasping_net/robotic-grasping-explosives/logs/230802_1421_training_jacquard/epoch_20_iou_1.00',
        visualize=True,
        include_rgb=True
    )
    g.generate()


 4074
4074


 被折叠的 条评论
为什么被折叠?
被折叠的 条评论
为什么被折叠?
 到【灌水乐园】发言


