前言
最近我在做论文实验时从MSCOCO数据集中筛选了符合条件的1260张图片,但数据样本太少了,于是我就利用数据增强的方法实现了带标签的样本扩充,最后扩充为7560张图片。本文就来记录一下过程,有不懂的地方欢迎留言噢~
目录
前言
一、什么是数据增强
二、数据增强的作用
三、常见的数据增强
四、如何在YOLO中实现数据增强
第①步 前期准备
第②步 加入数据增强的代码
第③步 运行
第④步 将xml文件转化为txt文件
一、什么是数据增强
数据增强是一种重要的机器学习方法之一,是基于已有的训练样本数据来生成更多的训练数据,其目的就是为了使扩增的训练数据尽可能接近真实分布的数据,从而提高检测精度。此外,数据增强能够迫使模型学习到更多鲁棒性的特征,从而有效提高模型的泛化能力。
在实际的应用场景中,足量且高保真的优质数据集通常是可遇不可求的,这不仅费钱费时费力,而且隐私保护和极端概率问题,数据集的获取变得尤为困难。因此,一种低成本且有效的方法便是利用数据增强来减少对训练数据的依赖,从而帮助开发人员更好更快地构建高精度的 AI 模型。

二、数据增强的作用
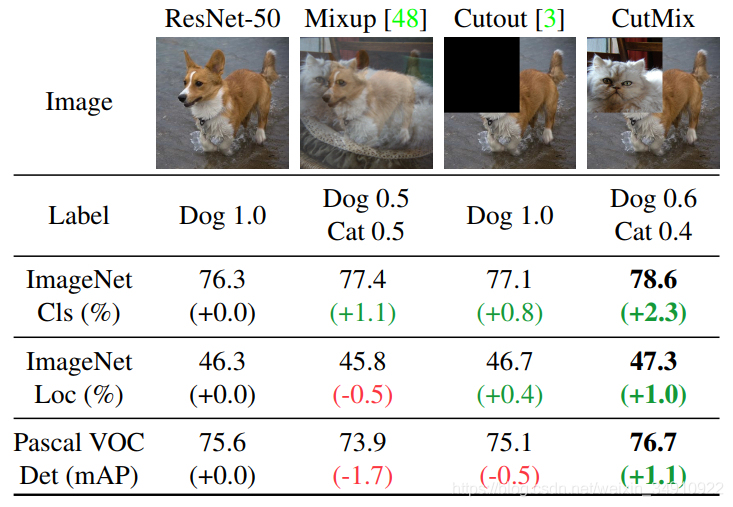
(1) 避免过拟合。当数据集具有某种明显的特征,例如数据集中图片基本在同一个场景中拍摄,使用Cutout方法和风格迁移变化等相关方法可避免模型学到跟目标无关的信息。
(2)提升模型鲁棒性,降低模型对图像的敏感度。**当训练数据都属于比较理想的状态,碰到一些特殊情况,如遮挡,亮度,模糊等情况容易识别错误,对训练数据加上噪声,掩码等方法可提升模型鲁棒性。
(3)增加训练数据,提高模型泛化能力。
(4)避免样本不均衡。在工业缺陷检测方面,医疗疾病识别方面,容易出现正负样本极度不平衡的情况,通过对少样本进行一些数据增强方法,降低样本不均衡比例。
三、常见的数据增强
(1)比较常用的几何变换方法主要有:
- 翻转
- 旋转
- 裁剪
- 缩放
- 平移
- 抖动
值得注意的是,在某些具体的任务中,当使用这些方法时需要主要标签数据的变化,如目标检测中若使用翻转,则需要将gt框进行相应的调整。
(2)比较常用的像素变换方法主要有:
- 加椒盐噪声
- 高斯噪声
- 进行高斯模糊
- 调整HSV对比度
- 调节亮度
- 饱和度
- 直方图均衡化
- 调整白平衡等
四、如何在YOLO中实现数据增强
第①步 前期准备
实验前我们首先要准备好数据集图片以及标注好的xml文件

在扩充前,数据集只有1260张图片。

第②步 加入数据增强的代码
在项目中新建一个文件,然后复制下面的代码:
# -*- coding=utf-8 -*-

import time
import random
import copy
import cv2
import os
import math
import numpy as np
from skimage.util import random_noise
from lxml import etree, objectify
import xml.etree.ElementTree as ET
import argparse


# 显示图片
def show_pic(img, bboxes=None):
    '''
    输入:
        img:图像array
        bboxes:图像的所有boudning box list, 格式为[[x_min, y_min, x_max, y_max]....]
        names:每个box对应的名称
    '''
    for i in range(len(bboxes)):
        bbox = bboxes[i]
        x_min = bbox[0]
        y_min = bbox[1]
        x_max = bbox[2]
        y_max = bbox[3]
        cv2.rectangle(img, (int(x_min), int(y_min)), (int(x_max), int(y_max)), (0, 255, 0), 3)
    cv2.namedWindow('pic', 0)  # 1表示原图
    cv2.moveWindow('pic', 0, 0)
    cv2.resizeWindow('pic', 1200, 800)  # 可视化的图片大小
    cv2.imshow('pic', img)
    cv2.waitKey(0)
    cv2.destroyAllWindows()


# 图像均为cv2读取
class DataAugmentForObjectDetection():
    def __init__(self, rotation_rate=0.5, max_rotation_angle=5,
                 crop_rate=0.5, shift_rate=0.5, change_light_rate=0.5,
                 add_noise_rate=0.5, flip_rate=0.5,
                 cutout_rate=0.5, cut_out_length=50, cut_out_holes=1, cut_out_threshold=0.5,
                 is_addNoise=True, is_changeLight=True, is_cutout=True, is_rotate_img_bbox=True,
                 is_crop_img_bboxes=True, is_shift_pic_bboxes=True, is_filp_pic_bboxes=True):

        # 配置各个操作的属性
        self.rotation_rate = rotation_rate
        self.max_rotation_angle = max_rotation_angle
        self.crop_rate = crop_rate
        self.shift_rate = shift_rate
        self.change_light_rate = change_light_rate
        self.add_noise_rate = add_noise_rate
        self.flip_rate = flip_rate
        self.cutout_rate = cutout_rate

        self.cut_out_length = cut_out_length
        self.cut_out_holes = cut_out_holes
        self.cut_out_threshold = cut_out_threshold

        # 是否使用某种增强方式
        self.is_addNoise = is_addNoise
        self.is_changeLight = is_changeLight
        self.is_cutout = is_cutout
        self.is_rotate_img_bbox = is_rotate_img_bbox
        self.is_crop_img_bboxes = is_crop_img_bboxes
        self.is_shift_pic_bboxes = is_shift_pic_bboxes
        self.is_filp_pic_bboxes = is_filp_pic_bboxes

    # ----1.加噪声---- #
    def _addNoise(self, img):
        '''
        输入:
            img:图像array
        输出:
            加噪声后的图像array,由于输出的像素是在[0,1]之间,所以得乘以255
        '''
        # return cv2.GaussianBlur(img, (11, 11), 0)
        return random_noise(img, mode='gaussian', seed=int(time.time()), clip=True) * 255

    # ---2.调整亮度--- #
    def _changeLight(self, img):
        alpha = random.uniform(0.35, 1)
        blank = np.zeros(img.shape, img.dtype)
        return cv2.addWeighted(img, alpha, blank, 1 - alpha, 0)

    # ---3.cutout--- #
    def _cutout(self, img, bboxes, length=100, n_holes=1, threshold=0.5):
        '''
        原版本:https://github.com/uoguelph-mlrg/Cutout/blob/master/util/cutout.py
        Randomly mask out one or more patches from an image.
        Args:
            img : a 3D numpy array,(h,w,c)
            bboxes : 框的坐标
            n_holes (int): Number of patches to cut out of each image.
            length (int): The length (in pixels) of each square patch.
        '''

        def cal_iou(boxA, boxB):
            '''
            boxA, boxB为两个框,返回iou
            boxB为bouding box
            '''
            # determine the (x, y)-coordinates of the intersection rectangle
            xA = max(boxA[0], boxB[0])
            yA = max(boxA[1], boxB[1])
            xB = min(boxA[2], boxB[2])
            yB = min(boxA[3], boxB[3])

            if xB <= xA or yB <= yA:
                return 0.0

            # compute the area of intersection rectangle
            interArea = (xB - xA + 1) * (yB - yA + 1)

            # compute the area of both the prediction and ground-truth
            # rectangles
            boxAArea = (boxA[2] - boxA[0] + 1) * (boxA[3] - boxA[1] + 1)
            boxBArea = (boxB[2] - boxB[0] + 1) * (boxB[3] - boxB[1] + 1)
            iou = interArea / float(boxBArea)
            return iou

        # 得到h和w
        if img.ndim == 3:
            h


 最低0.47元/天 解锁文章


 4万+
4万+

 被折叠的 条评论
为什么被折叠?


