


轻量化模块整理,即插即用(持续更新)
整理一些轻量化的结构,作为知识储备,可以用到后续的项目和研究中
Mobilenetv3 深度可分离卷积
MobileNetV3 是一个轻量级的深度学习模型,专为移动和边缘设备上的高效推理而设计。MobileNetV3 是在 MobileNetV1 和 MobileNetV2 的基础上进行了进一步的优化,主要包括了网络架构的搜索和修改、硬件感知网络优化、以及使用了轻量级的注意力模块 SE(Squeeze-and-Excitation)和 h-swish 激活函数等
import torch
import torch.nn as nn
import torch.nn.functional as F

class h_swish(nn.Module):
    def forward(self, x):
        return x * torch.sigmoid(x + 3) / 6

class SEBlock(nn.Module):
    def __init__(self, in_channels, reduction=4):
        super(SEBlock, self).__init__()
        self.avg_pool = nn.AdaptiveAvgPool2d(1)
        self.fc = nn.Sequential(
            nn.Linear(in_channels, in_channels // reduction, bias=False),
            nn.ReLU(inplace=True),
            nn.Linear(in_channels // reduction, in_channels, bias=False),
            nn.Sigmoid()
        )

    def forward(self, x):
        b, c, _, _ = x.size()
        y = self.avg_pool(x).view(b, c)
        y = self.fc(y).view(b, c, 1, 1)
        return x * y.expand_as(x)

class InvertedResidual(nn.Module):
    def __init__(self, inp, oup, stride, expand_ratio, use_se=False):
        super(InvertedResidual, self).__init__()
        assert stride in [1, 2]

        hidden_dim = int(round(inp * expand_ratio))
        self.use_res_connect = stride == 1 and inp == oup

        layers = []
        if expand_ratio != 1:
            # pw
            layers.append(nn.Conv2d(inp, hidden_dim, 1, 1, 0, bias=False))
            layers.append(nn.BatchNorm2d(hidden_dim))
            layers.append(h_swish())

        # dw
        layers.append(nn.Conv2d(hidden_dim, hidden_dim, 3, stride, 1, groups=hidden_dim, bias=False))
        layers.append(nn.BatchNorm2d(hidden_dim))
        layers.append(h_swish())

        if use_se:
            layers.append(SEBlock(hidden_dim))

        # pw-linear
        layers.append(nn.Conv2d(hidden_dim, oup, 1, 1, 0, bias=False))
        layers.append(nn.BatchNorm2d(oup))

        self.conv = nn.Sequential(*layers)

    def forward(self, x):
        if self.use_res_connect:
            return x + self.conv(x)
        else:
            return self.conv(x)

# 使用示例
# 输入通道数、输出通道数、步长、扩展比例、是否使用 SE 模块
block = InvertedResidual(inp=32, oup=16, stride=2, expand_ratio=6, use_se=True)
input_tensor = torch.randn(1, 32, 224, 224)
output_tensor = block(input_tensor)
print(output_tensor.shape)  # 输出张量的形状
上述代码定义了一个简化的 MobileNetV3 基础模块,包括一个 InvertedResidual(倒置残差)块和一个可选的 SE(Squeeze-and-Excitation)块。InvertedResidual 块是 MobileNetV3 的核心组件,它首先通过 1x1 卷积进行通道扩展,然后通过 3x3 深度可分离卷积进行空间卷积,最后通过 1x1 卷积恢复到目标通道数。SE 块则用于对特征进行自适应的重新加权。h_swish 是一种轻量级的激活函数,用于替换标准的 ReLU 或 swish 激活函数。
在pytorch中简单实现dw卷积
在PyTorch中实现深度可分离卷积(Depthwise Separable Convolution)可以通过两个步骤来完成:首先执行深度卷积(Depthwise Convolution),然后执行逐点卷积(Pointwise Convolution)。
深度卷积对输入的每个通道单独应用一个卷积核,因此输出的通道数与输入的通道数相同。而逐点卷积(也被称为1x1卷积)是对深度卷积的输出进行线性组合,以改变通道数。
以下是一个简单的PyTorch实现示例:
import torch
import torch.nn as nn
import torch.nn.functional as F

class DepthwiseSeparableConv(nn.Module):
    def __init__(self, in_channels, out_channels, kernel_size, stride=1, padding=0, dilation=1, bias=False):
        super(DepthwiseSeparableConv, self).__init__()
        self.depthwise = nn.Conv2d(in_channels, in_channels, kernel_size, stride, padding, dilation, groups=in_channels, bias=bias)
        self.pointwise = nn.Conv2d(in_channels, out_channels, 1, 1, 0, bias=bias)

    def forward(self, x):
        out = self.depthwise(x)
        out = self.pointwise(out)
        return out

# 使用示例
# 输入通道数、输出通道数、卷积核大小
in_channels = 3
out_channels = 16
kernel_size = 3

# 实例化深度可分离卷积层
depthwise_separable_conv = DepthwiseSeparableConv(in_channels, out_channels, kernel_size)

# 创建一个随机的输入张量
input_tensor = torch.randn(1, in_channels, 32, 32)

# 前向传播
output_tensor = depthwise_separable_conv(input_tensor)

# 打印输出张量的形状
print(output_tensor.shape)  # 应该是 [1, out_channels, 32, 32]
在这个例子中,DepthwiseSeparableConv 类包含两个卷积层:depthwise(深度卷积层)和 pointwise(逐点卷积层)。在 forward 方法中,输入 x 首先通过深度卷积层,然后通过逐点卷积层。
注意,nn.Conv2d 在定义深度卷积层时使用了 groups=in_channels 参数,这表示每个输入通道都有一个独立的卷积核。这确保了深度卷积只在其自己的输入通道上进行操作。
然后,逐点卷积层(即1x1卷积)将深度卷积的输出作为输入,并输出具有所需通道数的特征图。
这种实现方法相比标准卷积更加高效,因为它减少了参数数量和计算量,特别适合在移动和嵌入式设备上使用。
在dw卷积中,增加膨胀了
在深度卷积中再实现扩张卷积(也称为空洞卷积或 Atrous Convolution)需要调整卷积层的参数来包含扩张率(dilation rate)。扩张卷积允许卷积核在输入特征图上以指定的间隔进行采样,从而在不增加参数数量的情况下增大卷积核的感受野。
在 PyTorch 中,你可以在 nn.Conv2d 中通过 dilation 参数来指定扩张率。因此,要在 DWConv 类中实现扩张卷积,你需要在初始化 nn.Conv2d 时传入一个 dilation 参数。
下面是一个修改后的 DWConv 类,参考了YOLOv5中的DWconv,另外,实现了深度卷积并带有扩张率:
import torch
import torch.nn as nn
import torch.nn.functional as F

class Conv(nn.Module):
    # Standard convolution
    def __init__(self, c1, c2, k, s=1, p=None, g=1, act=True, dilation=1):
        super(Conv, self).__init__()
        self.conv = nn.Conv2d(c1, c2, k, s, autopad(k, p), groups=g, bias=False, dilation=dilation)
        self.bn = nn.BatchNorm2d(c2)
        self.act = nn.Hardswish() if act else nn.Identity()

    def forward(self, x):
        return self.act(self.bn(self.conv(x)))

def autopad(k, p=None):
    # Compute padding
    if p is None:
        p = k // 2
    return p

class DWConv(nn.Module):
    # Depthwise Separable Convolution with dilation and pointwise convolution
    def __init__(self, c1, c2, k=1, s=1, act=True, dilation=1):
        super(DWConv, self).__init__()

        # Depthwise Convolution
        self.depthwise = Conv(c1, c1, k, s, act=False, g=c1, dilation=dilation)

        # Pointwise Convolution (1x1 Convolution)
        self.pointwise = Conv(c1, c2, 1)

        # Activation function for the final output
        self.act = nn.Hardswish() if act else nn.Identity()

    def forward(self, x):
        # Apply depthwise convolution
        x = self.depthwise(x)
        # Apply pointwise convolution
        x = self.pointwise(x)
        # Apply activation function
        return self.act(x)

# Example usage:
# Create a depthwise separable convolution layer with dilation and pointwise convolution
dw_separable_conv = DWConv(c1=64, c2=128, k=3, s=1, act=True, dilation=2)

# Create an input tensor
input_tensor = torch.randn(1, 64, 32, 32)

# Forward pass through the layer
output_tensor = dw_separable_conv(input_tensor)
在这个例子中,dw_conv_layer 是一个深度卷积层,它使用 3x3 的卷积核,步长为 1,并且有一个扩张率为 2,这意味着卷积核在输入特征图上的采样间隔为 2,从而增大了感受野。同时,由于 groups=c1,它仍然是一个深度卷积层,每个输入通道有一个独立的卷积核。
与普通卷积的对比
直接上代码
import torch
import torch.nn as nn
import torch.nn.functional as F
class Conv(nn.Module):
# Standard convolution
def __init__(self, c1, c2, k, s=1, p=None, g=1, act=True, dilation=1):
super(Conv, self).__init__()
self.conv = nn.Conv2d(c1, c2, k, s, autopad(k, p), groups=g, bias=False, dilation=dilation)
self.bn = nn.BatchNorm2d(c2)
self.act = nn.Hardswish() if act else nn.Identity()
def forward(self, x):
return self.act(self.bn(self.conv(x)))
def autopad(k, p=None):
# Compute padding
if p is None:
p = k // 2
return p
class DWConv(nn.Module):
# Depthwise Separable Convolution with dilation and pointwise convolution
def __init__(self, c1, c2, k=1, s=1, act=True, dilation=1):
super(DWConv, self).__init__()
# Depthwise Convolution
self.depthwise = Conv(c1, c1, k, s, act=False, g=c1, dilation=dilation)
# Pointwise Convolution (1x1 Convolution)
self.pointwise = Conv(c1, c2, 1)
# Activation function for the final output
self.act = nn.Hardswish() if act else nn.Identity()
def forward(self, x):
# Apply depthwise convolution
x = self.depthwise(x)
# Apply pointwise convolution
x = self.pointwise(x)
# Apply activation function
return self.act(x)
# Example usage:
# Create a depthwise separable convolution layer with dilation and pointwise convolution
dw_separable_conv = DWConv(c1=64, c2=128, k=3, s=1, act=True, dilation=2)
normal_conv = Conv(c1=64, c2=128, k=3, s=1, act=True, dilation=2)
# Create an input tensor
input_tensor = torch.randn(1, 64, 32, 32)
print(input_tensor.shape)
# Forward pass through the layer
output_tensor = dw_separable_conv(input_tensor)
print(output_tensor.shape)
print("Normal Convolution")
output_tensor = normal_conv(input_tensor)
print(output_tensor.shape)
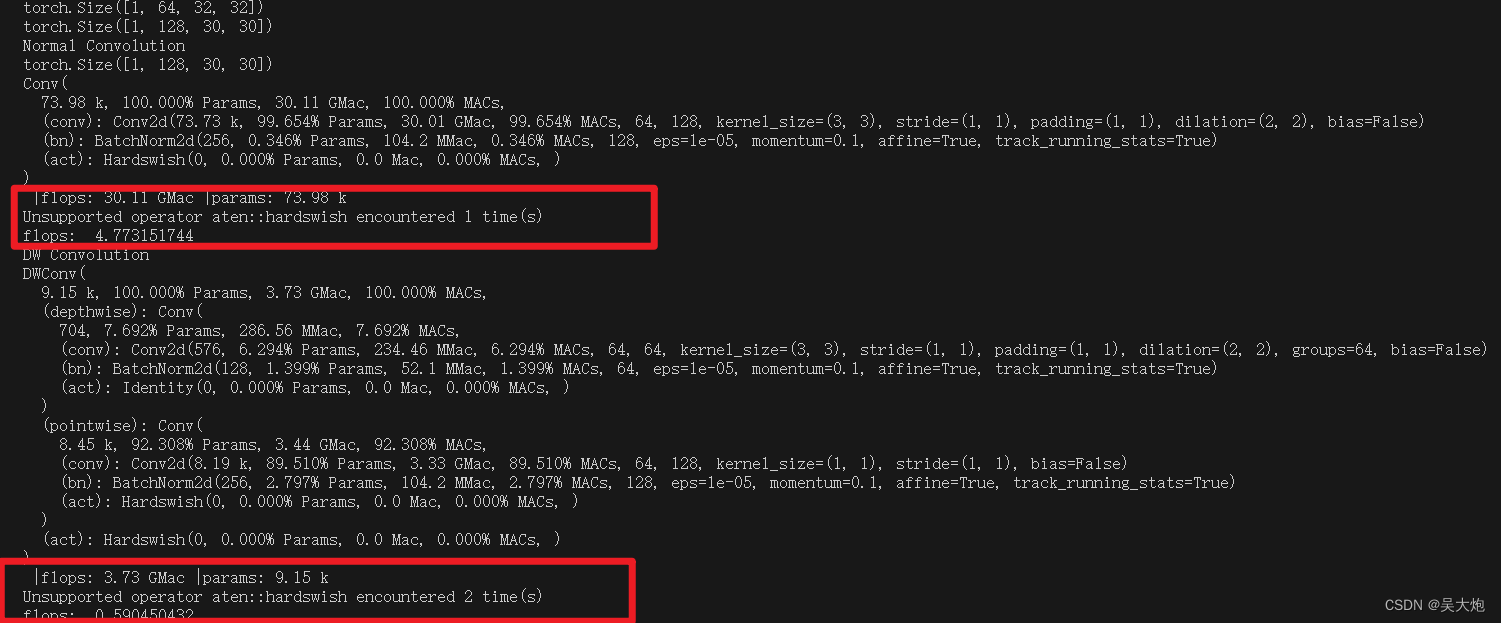
# 计算参数量和计算量
from ptflops import get_model_complexity_info
flops,params = get_model_complexity_info(normal_conv,(64,640,640),as_strings=True,print_per_layer_stat=True)
print(" |flops: %s |params: %s" % (flops, params))
from fvcore.nn import FlopCountAnalysis
input_ = torch.randn((1, 64, 256, 256))
flops = FlopCountAnalysis(normal_conv, input_)
print("flops: ", flops.total() / 1e9)
print("DW Convolution")
# 计算参数量和计算量
from ptflops import get_model_complexity_info
flops,params = get_model_complexity_info(dw_separable_conv,(64,640,640),as_strings=True,print_per_layer_stat=True)
print(" |flops: %s |params: %s" % (flops, params))
from fvcore.nn import FlopCountAnalysis
input_ = torch.randn((1, 64, 256, 256))
flops = FlopCountAnalysis(dw_separable_conv, input_)
print("flops: ", flops.total() / 1e9)


 7481
7481


 被折叠的 条评论
为什么被折叠?
被折叠的 条评论
为什么被折叠?
 到【灌水乐园】发言


