


图像处理的现实应用
人脸检测和识别
基于内容的图像检索content-based image retrieval
RGB图像的画质改善
医疗影像X-ray
文书处理Optical Character Recognition
工厂自动化Factory Automation
安保,监视系统
自动影像处理
增强现实augmented reality
- 虚拟现实
- 头戴式显示器 Head Mounted Display(HMD)
目录
环境Win10,VS2022
1.BMP图像
新建一个头文件,再新建一个c++空文件
新建一个位图文件

BMP是英文Bitmap(位图)的简写,它是Windows操作系统中的标准图像文件格式,能够被多种Windows应用程序所支持。BMP图像文件是Windows采用的图形文件格式,在Windows环境下运行的所有图象处理软件都支持BMP图象文件格式。Windows系统内部各图像绘制操作都是以BMP为基础的。
BMP文件是小端格式的二进制文件,可以将 BMP 映像划分为四个区域:
- 文件头 - 所有 BMP 图像都以五行文件头开头。其中包含有关像素数据的文件类型、文件大小和位置的信息。
- 位图标头 - 也称为信息标头。这包含有关图像的宽度/高度,位深度等信息。
- 颜色标题 - 包含有关色彩空间和位蒙版的信息
- 像素数据。
PNG或JPEG图像是位的映射,但它们不被称为位图,因为它们是压缩的。有损压缩是一种压缩算法,可更改像素信息以减小文件大小,而不会对图像细节造成太大损害。由于BMP未压缩,因此它是无损的。因此,BMP图像的尺寸要大得多。
BMP 图像中最后一行的第一个像素由像素数据中的第一个字节表示。然后,扫描通过映射下一个像素与像素数据中的下一个字节,直到该行中的最后一个像素,从而向前移动。
扫描线类似于像素行。由于 BMP 遵循自下而上的扫描,因此第一行扫描行是 BMP 图像的最后一行。一旦扫描线为该行构造了像素,它就会向上移动一行,并开始从该行的像素数据中解析像素。
在上面的例子中,我们正在创建一个像素BMP图像,为了方便起见,我们可以说1px可以仅通过1字节成功打印。为了便于理解,我们已将 Pixel Data 分解为一个网格,但实际上,它只是一个连续的字节流4 x 4 4 x 4 .
示例
bmp.h
#include <vector>
struct BMPFileHeader {
    uint16_t file_type{ 0x4D42 };          // File type always BM which is 0x4D42
    uint32_t file_size{ 0 };               // Size of the file (in bytes)
    uint16_t reserved1{ 0 };               // Reserved, always 0
    uint16_t reserved2{ 0 };               // Reserved, always 0
    uint32_t offset_data{ 0 };             // Start position of pixel data (bytes from the beginning of the file)

};
struct BMPInfoHeader {
    uint32_t size{ 0 };                      // Size of this header (in bytes)
    int32_t width{ 0 };                      // width of bitmap in pixels
    int32_t height{ 0 };                     // width of bitmap in pixels
                                                  //       (if positive, bottom-up, with origin in lower left corner)
                                                      //       (if negative, top-down, with origin in upper left corner)
    uint16_t planes{ 1 };                    // No. of planes for the target device, this is always 1
    uint16_t bit_count{ 0 };                 // No. of bits per pixel
    uint32_t compression{ 0 };               // 0 or 3 - uncompressed. THIS PROGRAM CONSIDERS ONLY UNCOMPRESSED BMP images
    uint32_t size_image{ 0 };                // 0 - for uncompressed images
    int32_t x_pixels_per_meter{ 0 };
    int32_t y_pixels_per_meter{ 0 };
    uint32_t colors_used{ 0 };               // No. color indexes in the color table. Use 0 for the max number of colors allowed by bit_count
    uint32_t colors_important{ 0 };          // No. of colors used for displaying the bitmap. If 0 all colors are required

};
struct BMPColorHeader {
    uint32_t red_mask{ 0x00ff0000 };         // Bit mask for the red channel
    uint32_t green_mask{ 0x0000ff00 };       // Bit mask for the green channel
    uint32_t blue_mask{ 0x000000ff };        // Bit mask for the blue channel
    uint32_t alpha_mask{ 0xff000000 };       // Bit mask for the alpha channel
    uint32_t color_space_type{ 0x73524742 }; // Default "sRGB" (0x73524742)
    uint32_t unused[16]{ 0 };                // Unused data for sRGB color space

};
struct BMP {
    BMPFileHeader file_header;
    BMPInfoHeader bmp_info_header;
    BMPColorHeader bmp_color_header;
    std::vector<uint8_t> data;

           BMP(const char* fname) {
               read(fname);

    }

            void read(const char* fname) {
            	// ...

    }

            BMP(int32_t width, int32_t height, bool has_alpha = true) {
            	// ...

    }

            void write(const char* fname) {
           	// ...

    }

 private:
        // ...

};
bmp.cpp
#include "bmp.h"

 int main() {
	     // Read an image from disk, modify it and write it back:
		   BMP bmp("Shapes.bmp");
	     bmp.write("Shapes_copy.bmp");

		    // Create a BMP image in memory:
		    BMP bmp2(800, 600);

		   // Modify the pixel data:
		   // ....

		   // Save the image:
		    bmp2.write("Bitmap.bmp");

		   // Create a 24 bit per pixel image (BGR colors) and save it
		    BMP bmp3(209, 203, false);
	    // ...
		   bmp3.write("test_24bits.bmp");

}
2.Opencv在C++中的图像处理
首先配置opencv在VS2022的环境,详情可参考环境配置 | 图文VS2022配置OpenCV_夏天|여름이다的博客-CSDN博客
2.1.opencv读取图片、摄像头
读取照片
#include <opencv2/imgcodecs.hpp>
#include <opencv2/highgui.hpp>
#include <opencv2/imgproc.hpp>
#include <iostream>

using namespace cv;
using namespace std;

int main()
{
	string path = "D:\\VSProjectFile\\cv\\lina.jpg";
	Mat img = imread(path);
	imshow("Image", img);
	waitKey(0); //显示图片不会一闪而过

	return 0;
}

从文件读取视频
#include <opencv2/imgcodecs.hpp>
#include <opencv2/highgui.hpp>
#include <opencv2/imgproc.hpp>
#include <iostream>

using namespace cv;
using namespace std;

int main()
{
	string path = "Resources/test_video.mp4";
	VideoCapture cap(path); //视频捕捉对象
	Mat img;
	while (true) {

		cap.read(img);

		imshow("Image", img);
		waitKey(1);
	}
	return 0;
}
读取电脑摄像头
#include <opencv2/imgcodecs.hpp>
#include <opencv2/highgui.hpp>
#include <opencv2/imgproc.hpp>
#include <iostream>

using namespace cv;
using namespace std;

int main()
{
	VideoCapture cap(0);
	Mat img;

	while (true) {

		cap.read(img);

		imshow("Image", img);
		waitKey(1);
	}

	return 0;
}
没有摄像头,找不到摄像头时也会程序中断模式。
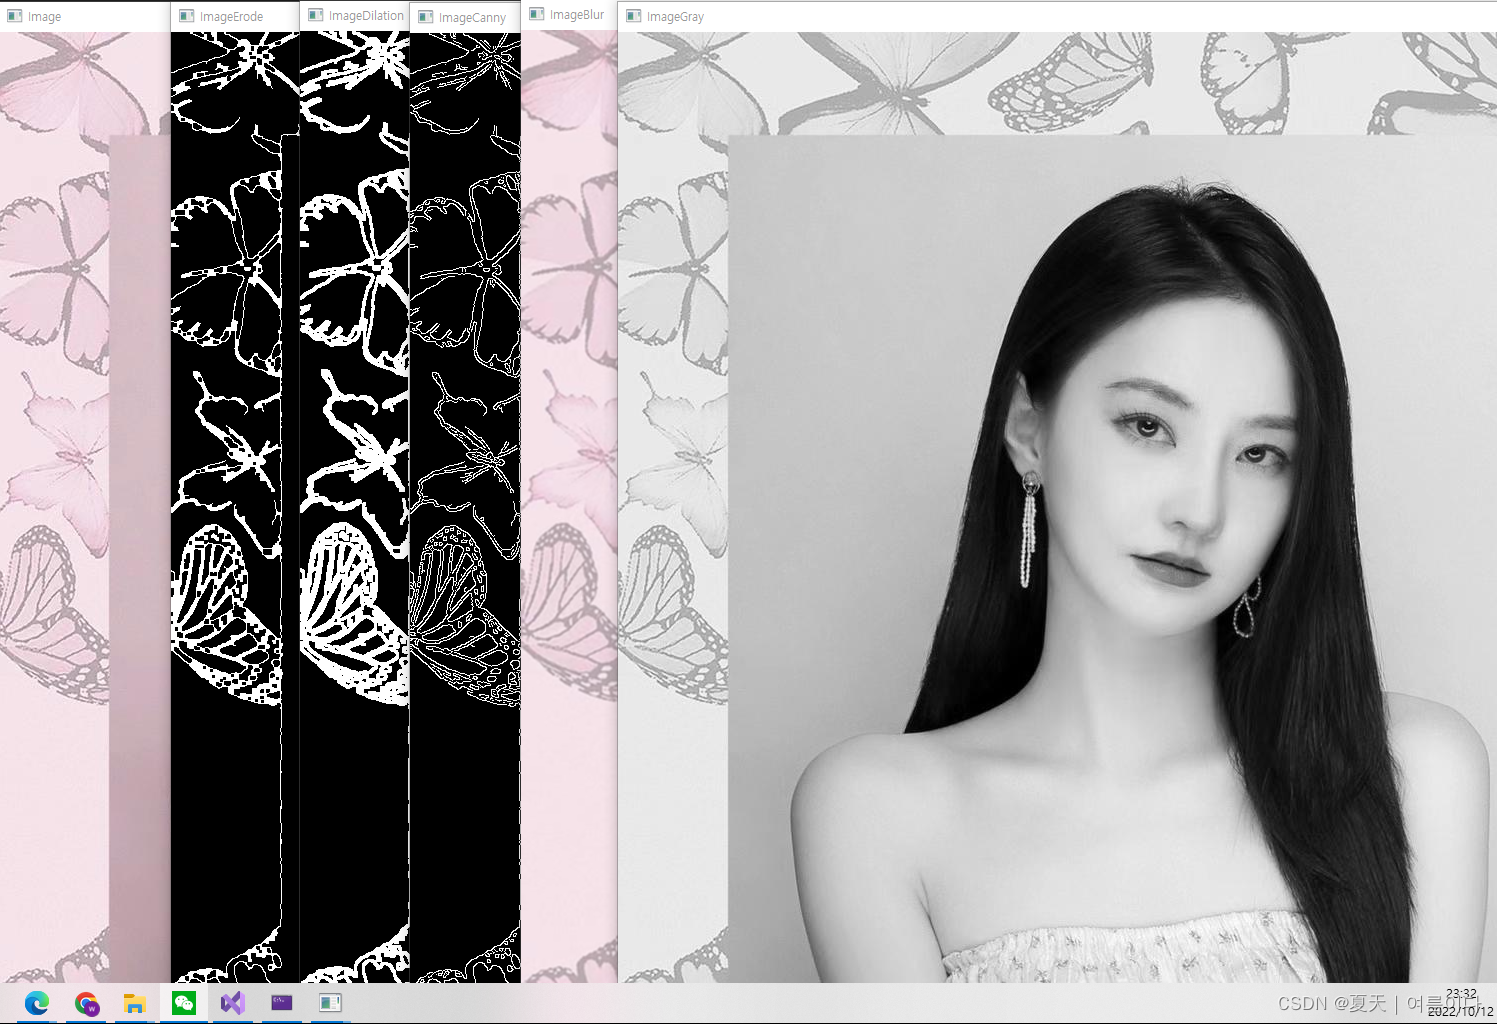
2.2.opencv对图片进行灰度化,高斯模糊,边缘检测
#include <opencv2/imgcodecs.hpp>
#include <opencv2/highgui.hpp>
#include <opencv2/imgproc.hpp>
#include <iostream>

using namespace cv;
using namespace std;

int main()
{
	string path = "D:\\VSProjectFile\\cv\\lina.jpg";
	Mat img = imread(path);
	Mat imgGray, imgBlur, imgCanny, imgDil, imgErode;

	cvtColor(img, imgGray, COLOR_BGR2GRAY); //灰度化
	GaussianBlur(img, imgBlur, Size(3, 3), 3, 0); //高斯模糊
	Canny(imgBlur, imgCanny, 25, 75); //边缘检测

	Mat kernel = getStructuringElement(MORPH_RECT, Size(3, 3));
	dilate(imgCanny, imgDil, kernel);
	erode(imgDil, imgErode, kernel);

	imshow("Image", img);
	imshow("ImageGray", imgGray);
	imshow("ImageBlur", imgBlur);
	imshow("ImageCanny", imgCanny);
	imshow("ImageDilation", imgDil);
	imshow("ImageErode", imgErode);
	waitKey(0);

	return 0;
}
2.3.opencv对图片的大小位置调整

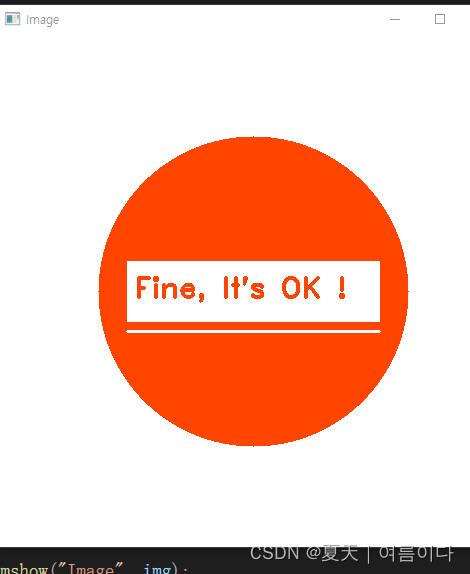
2.4.opencv绘制形状和文字
#include <opencv2/imgcodecs.hpp>
#include <opencv2/highgui.hpp>
#include <opencv2/imgproc.hpp>
#include <iostream>

using namespace cv;
using namespace std;

int main()
{
	//Blank Image
	Mat img(512, 512, CV_8UC3, Scalar(255, 255, 255));

	circle(img, Point(256, 256), 155, Scalar(0, 69, 255), FILLED);
	rectangle(img, Point(130, 226), Point(382, 286), Scalar(255, 255, 255), -1);
	line(img, Point(130, 296), Point(382, 296), Scalar(255, 255, 255), 2);

	putText(img, "Fine, It's OK !", Point(137, 262), FONT_HERSHEY_DUPLEX, 0.95, Scalar(0, 69, 255), 2);

	imshow("Image", img);
	waitKey(0);

	return 0;
}
2.5.opencv的透视变换
#include <opencv2/imgcodecs.hpp>
#include <opencv2/highgui.hpp>
#include <opencv2/imgproc.hpp>
#include <iostream>

using namespace cv;
using namespace std;

float w = 250, h = 350;
Mat matrix, imgWarp;

int main()
{
	string path = "D:\\VSProjectFile\\cv\\ai.png";
	Mat img = imread(path);

	Point2f src[4] = { {350, 250}, {360, 260}, {250, 250}, {125, 160} };
	Point2f dst[4] = { {0.0f, 0.0f}, {w, 0.0f}, {0.0f, h}, {w, h} };

	matrix = getPerspectiveTransform(src, dst);
	warpPerspective(img, imgWarp, matrix, Point(w, h));

	for (int i = 0; i < 4; i++) {
		circle(img, src[i], 10, Scalar(0, 0, 255), FILLED);
	}

	imshow("Image", img);
	imshow("ImageWarp", imgWarp);
	waitKey(0);

	return 0;
}
2.6.opencv的颜色检测
#include <opencv2/imgcodecs.hpp>
#include <opencv2/highgui.hpp>
#include <opencv2/imgproc.hpp>
#include <iostream>

using namespace cv;
using namespace std;

Mat imgHSV, mask;
int hmin = 0, smin = 110, vmin = 153;
int hmax = 19, smax = 240, vmax = 255;


int main()
{
	string path = "D:\\VSProjectFile\\cv\\hg1.jpg";
	Mat img = imread(path);
	cvtColor(img, imgHSV, COLOR_BGR2HSV);

	namedWindow("Trackbars", (640, 200));
	createTrackbar("Hue Min", "Trackbars", &hmin, 179);
	createTrackbar("Hue Max", "Trackbars", &hmax, 179);
	createTrackbar("Sat Min", "Trackbars", &smin, 255);
	createTrackbar("Sat Max", "Trackbars", &smax, 255);
	createTrackbar("Val Min", "Trackbars", &vmin, 255);
	createTrackbar("Val Max", "Trackbars", &vmax, 2555);


	while (true) {

		Scalar lower(hmin, smin, vmin);
		Scalar upper(hmax, smax, vmax);
		inRange(imgHSV, lower, upper, mask);

		imshow("Image", img);
		imshow("Image HSV", imgHSV);
		imshow("Image Mask", mask);
		waitKey(1);

	}

	return 0;
}
2.7.opencv的形状轮廓检测
#include <opencv2/imgcodecs.hpp>
#include <opencv2/highgui.hpp>
#include <opencv2/imgproc.hpp>
#include <iostream>

using namespace cv;
using namespace std;

void getContours(Mat imgDil, Mat img) {

	vector<vector<Point>> contours; //轮廓数据
	vector<Vec4i> hierarchy;

	findContours(imgDil, contours, hierarchy, RETR_EXTERNAL, CHAIN_APPROX_SIMPLE); //通过预处理的二值图像找到所有轮廓contours
	//drawContours(img, contours, -1, Scalar(255, 0, 255), 2); //绘制所有轮廓

	for (int i = 0; i < contours.size(); i++)
	{
		double area = contourArea(contours[i]); //计算每个轮廓区域
		cout << area << endl;

		vector<vector<Point>> conPoly(contours.size());
		vector<Rect> boundRect(contours.size());
		string objectType;

		if (area > 1000) //过滤噪声
		{
			//找轮廓的近似多边形或曲线
			double peri = arcLength(contours[i], true);
			approxPolyDP(contours[i], conPoly[i], 0.02 * peri, true);

			cout << conPoly[i].size() << endl;
			boundRect[i] = boundingRect(conPoly[i]); //找每个近似曲线的最小上边界矩形

			int objCor = (int)conPoly[i].size();

			if (objCor == 3) { objectType = "Tri"; }
			if (objCor == 4) {

				float aspRatio = (float)boundRect[i].width / boundRect[i].height; //宽高比
				cout << aspRatio << endl;
				if (aspRatio > 0.95 && aspRatio < 1.05) {
					objectType = "Square";
				}
				else {
					objectType = "Rect";
				}
			}
			if (objCor > 4) { objectType = "CirCle"; }

			drawContours(img, conPoly, i, Scalar(255, 0, 255), 2); //绘制滤除噪声后的所有轮廓
			rectangle(img, boundRect[i].tl(), boundRect[i].br(), Scalar(0, 255, 0), 5); //绘制边界框
			putText(img, objectType, { boundRect[i].x, boundRect[i].y - 5 }, FONT_HERSHEY_PLAIN, 1, Scalar(0, 69, 255), 1);
		}
	}
}

int main()
{
	string path = "D:\\VSProjectFile\\cv\\tx.png";
	Mat img = imread(path);
	Mat imgGray, imgBlur, imgCanny, imgDil;

	// Preprocessing
	cvtColor(img, imgGray, COLOR_BGR2GRAY);
	GaussianBlur(imgGray, imgBlur, Size(3, 3), 3, 0);
	Canny(imgBlur, imgCanny, 25, 75);
	Mat kernel = getStructuringElement(MORPH_RECT, Size(3, 3));
	dilate(imgCanny, imgDil, kernel);

	getContours(imgDil, img);

	imshow("Image", img);
	/*imshow("Image Gray", imgGray);
	imshow("Image Blur", imgBlur);
	imshow("Image Canny", imgCanny);
	imshow("Image Dil", imgDil);*/

	waitKey(0);

	return 0;
}
疑问与解答?
1.照片的像素是怎么存储在计算机中的?
日常生活中我们的照片都是彩色的,也就是RGB三原色,
也可以表示为
这些指标中的每一个都将具有介于 0 到 255 之间的值,其中每个数字都表示像素的强度,或者您可以说红色、绿色和蓝色的阴影。最后,所有这些通道或所有这些矩阵都叠加在一起,因此当加载到计算机中时,图像的形状将是 :N*M*3
2.计算机怎么实现2次元处理?
创建一个图像对象,根据RGB的像素值,可以从存储数字图像的文件创建 Image 对象。图像对象具有与图像中的宽度、高度和像素集合相对应的属性。要求图像对象使用 and 方法返回其大小。我们还可以使用 从图像中的特定位置获取像素,并使用 更改特定位置的像素。为了处理所有像素,系统地访问图像中的所有行和列。执行此操作的最佳方法是使用嵌套迭代。
总结
1.照片上的一个像素是p,那么p[x]指的就是p的动态数组(dynamic array),p[a][b]指的就是动作位置空间。
参考文献
【1】OpenCV入门【C++版】_Star_ID的博客-CSDN博客_c++ opencv教程


 211
211


 被折叠的 条评论
为什么被折叠?
被折叠的 条评论
为什么被折叠?
 到【灌水乐园】发言


