


1. 旋转变换
对于二维平面中一个点 ( x , y ) (x, y) (x,y),绕原点逆时针旋转角度 θ \theta θ 后的新坐标 ( x ′ , y ′ ) (x', y') (x′,y′) 可以用以下公式表示:
[ x ′ y ′ ] = [ cos θ − sin θ sin θ cos θ ] [ x y ] \begin{bmatrix} x' \\ y' \end{bmatrix} = \begin{bmatrix} \cos\theta & -\sin\theta \\ \sin\theta & \cos\theta \end{bmatrix} \begin{bmatrix} x \\ y \end{bmatrix} [x′y′]=[cosθsinθ−sinθcosθ][xy]
展开后得到:
x
′
=
x
cos
θ
−
y
sin
θ
x' = x\cos\theta - y\sin\theta
x′=xcosθ−ysinθ
y
′
=
x
sin
θ
+
y
cos
θ
y' = x\sin\theta + y\cos\theta
y′=xsinθ+ycosθ
特殊角度的旋转矩阵:
-
旋转90度 ( θ = π 2 \theta = \frac{\pi}{2} θ=2π):
[ 0 − 1 1 0 ] \begin{bmatrix} 0 & -1 \\ 1 & 0 \end{bmatrix} [01−10] -
旋转180度 ( θ = π \theta = \pi θ=π):
[ − 1 0 0 − 1 ] \begin{bmatrix} -1 & 0 \\ 0 & -1 \end{bmatrix} [−100−1] -
旋转270度 ( θ = 3 π 2 \theta = \frac{3\pi}{2} θ=23π):
[ 0 1 − 1 0 ] \begin{bmatrix} 0 & 1 \\ -1 & 0 \end{bmatrix} [0−110]
重要性质:
- 保持向量长度不变(等距变换)
- 保持向量之间的角度不变
- 行列式值为1(保持面积不变)
- 旋转矩阵是正交矩阵,即其转置矩阵等于其逆矩阵
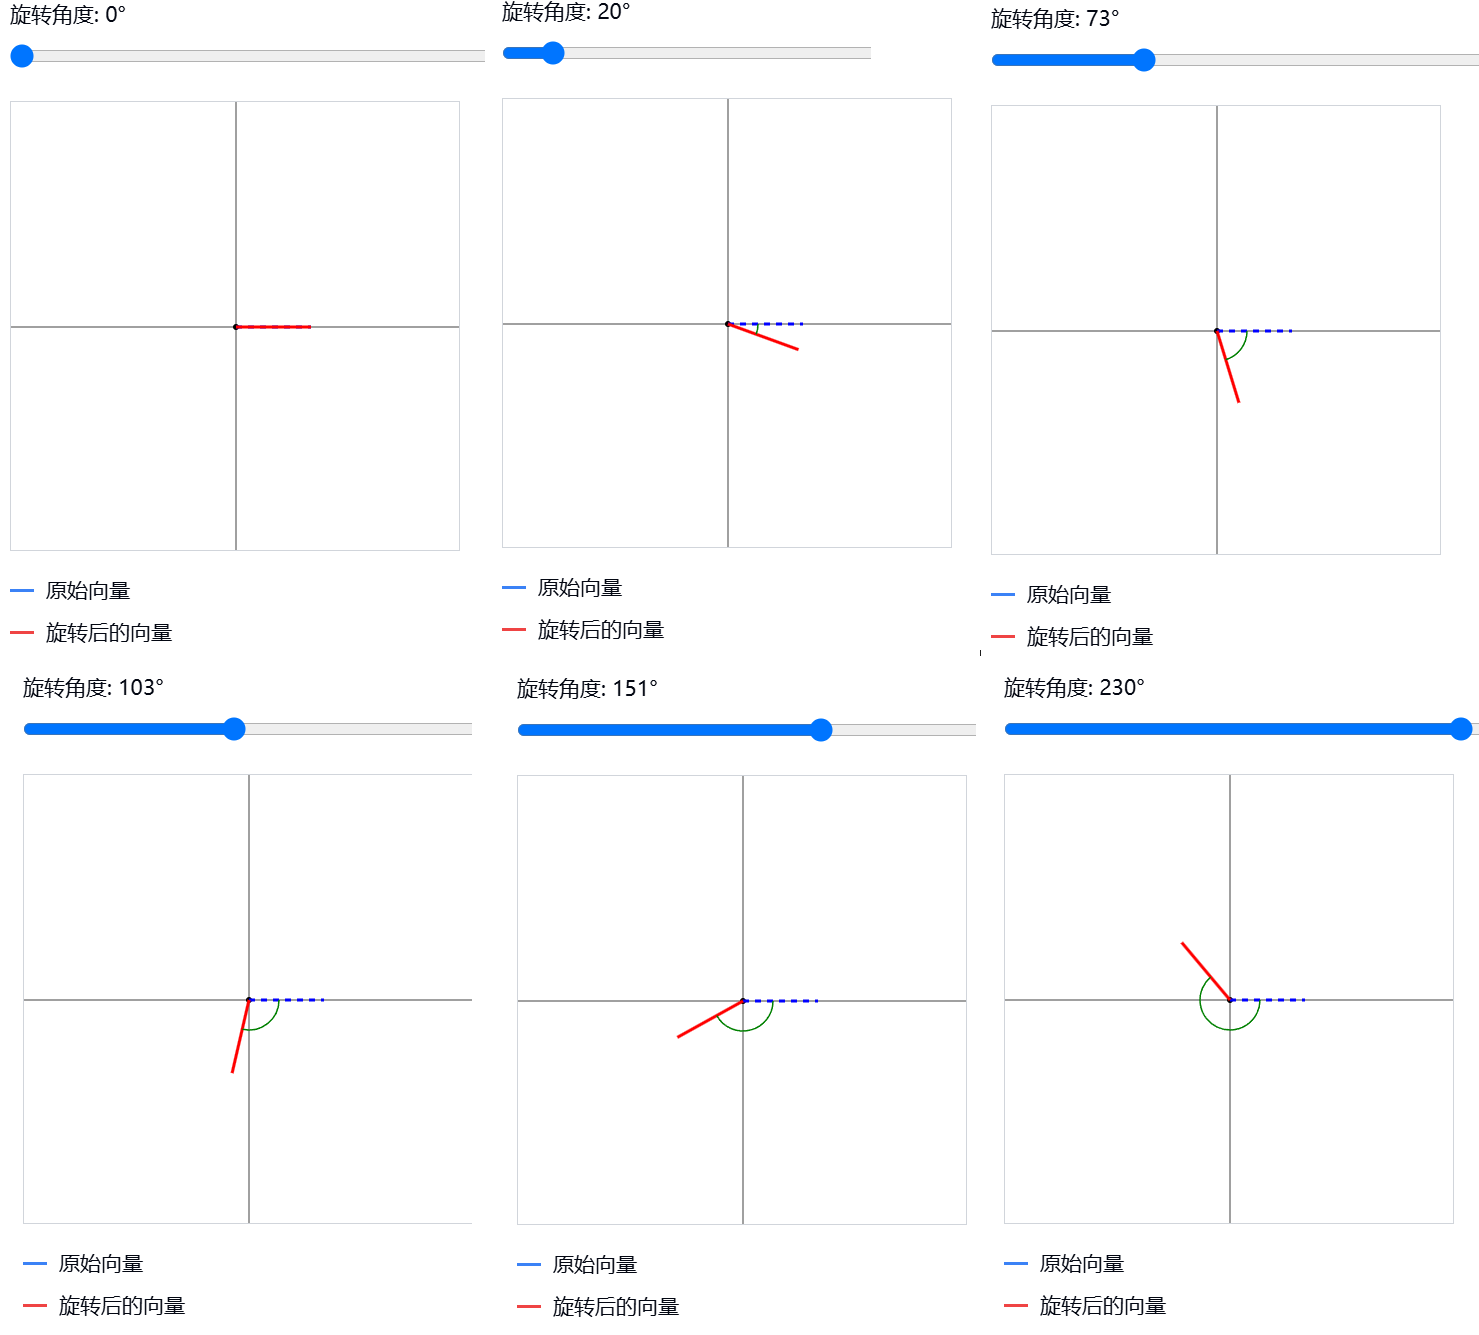
上面的交互式演示让你可以通过滑动条来调整旋转角度,直观地观察向量的旋转效果。蓝色虚线表示原始向量,红色实线表示旋转后的向量,绿色弧表示旋转角度。
补充说明:
- 对于三维空间的旋转,情况会更复杂,需要指定旋转轴
- 实际应用中,旋转变换常用于:
- 计算机图形学中的图像旋转
- 机器人运动控制
- 3D建模和动画
- 物理模拟中的刚体运动
你可以尝试调整上面演示中的角度滑块,观察向量是如何旋转的。这样可以帮助你更好地理解旋转变换的效果。有任何问题或需要进一步讨论的地方,我都很乐意为你解答。
2. . 旋转矩阵公式适用情况
( cos θ − sin θ sin θ cos θ ) \begin{pmatrix} \cos\theta & -\sin\theta \\ \sin\theta & \cos\theta \end{pmatrix} (cosθsinθ−sinθcosθ)
这个矩阵用于将二维平面上的点 ( x , y ) (x,y) (x,y) 绕原点逆时针旋转 θ \theta θ 角度。使用过程如下:
- 基本用法
要旋转一个点 ( x , y ) (x,y) (x,y),我们需要将其写成列向量形式,然后进行矩阵乘法:
( cos θ − sin θ sin θ cos θ ) ( x y ) = ( x ′ y ′ ) \begin{pmatrix} \cos\theta & -\sin\theta \\ \sin\theta & \cos\theta \end{pmatrix} \begin{pmatrix} x \\ y \end{pmatrix} = \begin{pmatrix} x' \\ y' \end{pmatrix} (cosθsinθ−sinθcosθ)(xy)=(x′y′)
- 具体例子
让我们以旋转点 ( 1 , 0 ) (1,0) (1,0) 旋转 45 ° 45° 45° 为例:
首先,我们知道:
- cos ( 45 ° ) = 2 2 \cos(45°) = \frac{\sqrt{2}}{2} cos(45°)=22
- sin ( 45 ° ) = 2 2 \sin(45°) = \frac{\sqrt{2}}{2} sin(45°)=22
代入公式:
(
2
2
−
2
2
2
2
2
2
)
(
1
0
)
\begin{pmatrix} \frac{\sqrt{2}}{2} & -\frac{\sqrt{2}}{2} \\ \frac{\sqrt{2}}{2} & \frac{\sqrt{2}}{2} \end{pmatrix} \begin{pmatrix} 1 \\ 0 \end{pmatrix}
(2222−2222)(10)
计算过程:
x
′
=
(
1
⋅
2
2
)
+
(
0
⋅
−
2
2
)
=
2
2
x' = (1 \cdot \frac{\sqrt{2}}{2}) + (0 \cdot -\frac{\sqrt{2}}{2}) = \frac{\sqrt{2}}{2}
x′=(1⋅22)+(0⋅−22)=22
y
′
=
(
1
⋅
2
2
)
+
(
0
⋅
2
2
)
=
2
2
y' = (1 \cdot \frac{\sqrt{2}}{2}) + (0 \cdot \frac{\sqrt{2}}{2}) = \frac{\sqrt{2}}{2}
y′=(1⋅22)+(0⋅22)=22
所以点 ( 1 , 0 ) (1,0) (1,0) 旋转45°后变成了 ( 2 2 , 2 2 ) (\frac{\sqrt{2}}{2}, \frac{\sqrt{2}}{2}) (22,22)
- 常用角度值
一些常用角度的三角函数值:
- 0°: cos ( 0 ° ) = 1 \cos(0°)=1 cos(0°)=1, sin ( 0 ° ) = 0 \sin(0°)=0 sin(0°)=0
- 30°: cos ( 30 ° ) = 3 2 \cos(30°)=\frac{\sqrt{3}}{2} cos(30°)=23, sin ( 30 ° ) = 1 2 \sin(30°)=\frac{1}{2} sin(30°)=21
- 45°: cos ( 45 ° ) = 2 2 \cos(45°)=\frac{\sqrt{2}}{2} cos(45°)=22, sin ( 45 ° ) = 2 2 \sin(45°)=\frac{\sqrt{2}}{2} sin(45°)=22
- 60°: cos ( 60 ° ) = 1 2 \cos(60°)=\frac{1}{2} cos(60°)=21, sin ( 60 ° ) = 3 2 \sin(60°)=\frac{\sqrt{3}}{2} sin(60°)=23
- 90°: cos ( 90 ° ) = 0 \cos(90°)=0 cos(90°)=0, sin ( 90 ° ) = 1 \sin(90°)=1 sin(90°)=1
- 实际应用
- 计算机图形学中旋转图像
- 机器人运动控制
- 游戏开发中的物体旋转
让我再用一个可视化的例子来展示不同角度的旋转效果:
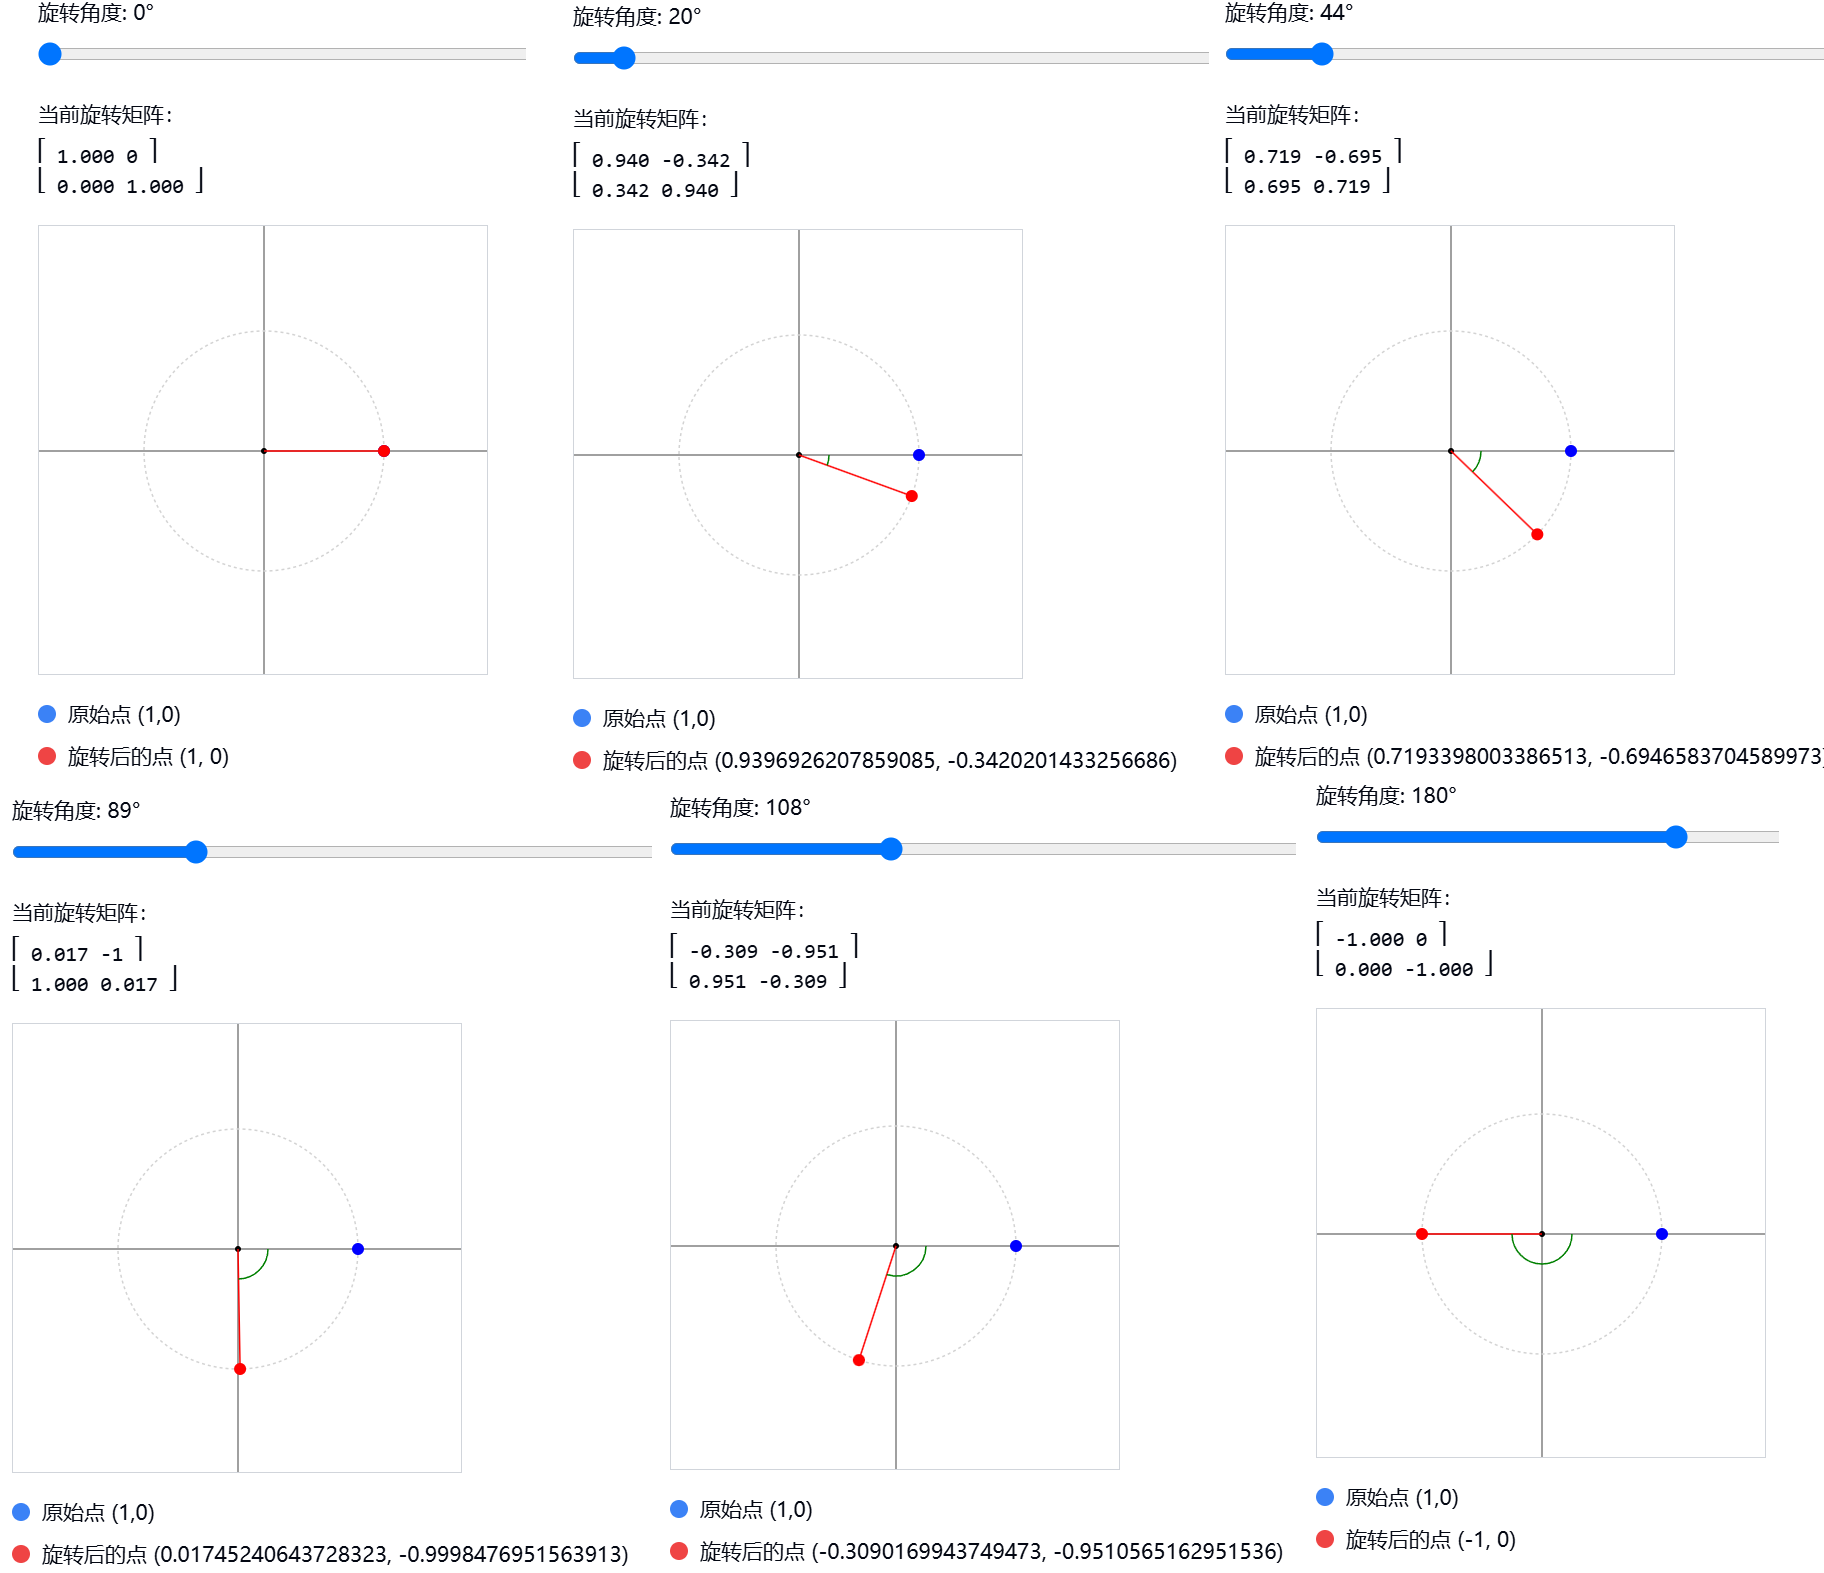
这个交互式演示让你可以:
- 通过滑动条调整旋转角度
- 实时查看旋转矩阵的值
- 观察点从原始位置 ( 1 , 0 ) (1,0) (1,0) 旋转到新位置的过程
- 看到对应角度的正弦和余弦值
通过这个演示,你可以直观地理解旋转矩阵是如何工作的。当你调整角度时,可以看到:
- 点是如何在圆上移动的
- 旋转矩阵中的值是如何变化的
- 点的新坐标是如何计算出来的
这就是旋转矩阵的完整使用过程。通过了解这个基本原理,你就可以将它应用到更复杂的旋转变换中。
3. 项目中,使用旋转矩阵的思路和技巧
在实际项目中使用旋转矩阵时,我来分享一些实用的思路和技巧:
- 预计算常用角度
// 预计算常用角度的sin和cos值
const ROTATION_CACHE = {
  0: { sin: 0, cos: 1 },
  90: { sin: 1, cos: 0 },
  180: { sin: 0, cos: -1 },
  270: { sin: -1, cos: 0 }
};

// 使用示例
function getRotationMatrix(angle) {
  if (angle in ROTATION_CACHE) {
    const { sin, cos } = ROTATION_CACHE[angle];
    return [
      [cos, -sin],
      [sin, cos]
    ];
  }
  // 非常用角度再计算
  const rad = angle * Math.PI / 180;
  return [
    [Math.cos(rad), -Math.sin(rad)],
    [Math.sin(rad), Math.cos(rad)]
  ];
}
- 矩阵链式变换
// 组合多个变换(如先平移后旋转)
function composeTransformations(point, transforms) {
  return transforms.reduce((p, transform) => transform(p), point);
}

// 使用示例
const point = { x: 10, y: 20 };
const result = composeTransformations(point, [
  p => translate(p, tx, ty),
  p => rotate(p, angle),
  p => scale(p, sx, sy)
]);
- 性能优化处理
// 批量处理多个点的旋转
function batchRotatePoints(points, angle) {
  const cos = Math.cos(angle * Math.PI / 180);
  const sin = Math.sin(angle * Math.PI / 180);

  return points.map(({x, y}) => ({
    x: x * cos - y * sin,
    y: x * sin + y * cos
  }));
}
- 旋转中心点处理
// 围绕指定点旋转
function rotateAroundPoint(point, center, angle) {
  // 1. 将点平移到原点
  const translatedX = point.x - center.x;
  const translatedY = point.y - center.y;

  // 2. 旋转
  const rad = angle * Math.PI / 180;
  const cos = Math.cos(rad);
  const sin = Math.sin(rad);

  const rotatedX = translatedX * cos - translatedY * sin;
  const rotatedY = translatedX * sin + translatedY * cos;

  // 3. 平移回原位置
  return {
    x: rotatedX + center.x,
    y: rotatedY + center.y
  };
}
- 错误处理与边界检查
function safeRotate(point, angle) {
  // 角度规范化到 0-360
  angle = ((angle % 360) + 360) % 360;

  // 检查输入值
  if (!isFinite(point.x) || !isFinite(point.y)) {
    throw new Error('Invalid point coordinates');
  }

  // 处理特殊角度
  if (angle === 0) return {...point};
  if (angle === 90) return {x: -point.y, y: point.x};
  if (angle === 180) return {x: -point.x, y: -point.y};
  if (angle === 270) return {x: point.y, y: -point.x};

  // 一般角度旋转
  const rad = angle * Math.PI / 180;
  return {
    x: point.x * Math.cos(rad) - point.y * Math.sin(rad),
    y: point.x * Math.sin(rad) + point.y * Math.cos(rad)
  };
}
- 实用辅助函数
const RotationUtils = {
  // 角度转弧度
  toRadians: (degrees) => degrees * Math.PI / 180,

  // 弧度转角度
  toDegrees: (radians) => radians * 180 / Math.PI,

  // 规范化角度到 0-360
  normalizeAngle: (angle) => ((angle % 360) + 360) % 360,

  // 计算两点之间的角度
  getAngleBetweenPoints: (p1, p2) => {
    return Math.atan2(p2.y - p1.y, p2.x - p1.x) * 180 / Math.PI;
  }
};
- 适配移动设备的触摸旋转
function handleTouchRotation(element) {
  let startAngle = 0;
  let currentAngle = 0;

  element.addEventListener('touchstart', (e) => {
    const touch = e.touches[0];
    const center = getElementCenter(element);
    startAngle = Math.atan2(
      touch.clientY - center.y,
      touch.clientX - center.x
    );
  });

  element.addEventListener('touchmove', (e) => {
    const touch = e.touches[0];
    const center = getElementCenter(element);
    const angle = Math.atan2(
      touch.clientY - center.y,
      touch.clientX - center.x
    );

    currentAngle += (angle - startAngle);
    startAngle = angle;

    // 应用旋转
    element.style.transform = `rotate(${currentAngle}rad)`;
  });
}
- Canvas中的优化使用
class RotationCanvas {
  constructor(canvas) {
    this.ctx = canvas.getContext('2d');
    this.center = {
      x: canvas.width / 2,
      y: canvas.height / 2
    };
  }

  rotateContext(angle) {
    // 保存当前状态
    this.ctx.save();
    // 移动到旋转中心
    this.ctx.translate(this.center.x, this.center.y);
    // 旋转
    this.ctx.rotate(angle * Math.PI / 180);
    // 移回原位置
    this.ctx.translate(-this.center.x, -this.center.y);
  }

  restoreContext() {
    this.ctx.restore();
  }

  drawRotatedImage(image, angle) {
    this.rotateContext(angle);
    this.ctx.drawImage(image, 0, 0);
    this.restoreContext();
  }
}
- 状态管理集成
// Redux action
const rotateElement = (elementId, angle) => ({
  type: 'ROTATE_ELEMENT',
  payload: {
    id: elementId,
    angle
  }
});

// Reducer
const elementReducer = (state = initialState, action) => {
  switch (action.type) {
    case 'ROTATE_ELEMENT':
      return {
        ...state,
        elements: state.elements.map(element =>
          element.id === action.payload.id
            ? { ...element, rotation: action.payload.angle }
            : element
        )
      };
    default:
      return state;
  }
};
这些技巧和思路可以帮助你在项目中更好地使用旋转矩阵。关键是要根据具体需求选择合适的实现方式,并注意性能优化和边界情况的处理。
需要注意的要点:
- 预计算常用角度值以提高性能
- 处理好旋转中心点的问题
- 考虑移动设备的触摸操作
- 注意数值精度和舍入误差
- 合理使用状态管理
- 优化Canvas绘制性能
- 做好错误处理和边界检查
4. 旋转矩阵综合案例
1. 案例背景
我们在开发一个智能机器人手臂控制系统,需要实现以下功能:
- 机器人手臂需要在3D空间中抓取物体
- 手臂需要根据物体位置自动调整角度
- 要求实时计算抓取路径和姿态
- 需要考虑多个关节的协同旋转
2. 为什么选用旋转矩阵
-
精确性要求:
- 机器人手臂需要高精度的角度控制
- 旋转矩阵提供了准确的数学模型
- 可以精确描述3D空间中的旋转变换
-
计算效率:
- 矩阵运算可以高效处理多个点的变换
- 适合实时计算和控制系统
- 便于硬件加速(GPU计算)
-
组合变换:
- 多个旋转可以通过矩阵乘法简单组合
- 便于处理多关节协同运动
- 易于与其他变换(平移、缩放)结合
3. 实现思路和技巧
// 1. 定义基础旋转矩阵类
class RotationMatrix {
  constructor() {
    this.matrix = [
      [1, 0, 0],
      [0, 1, 0],
      [0, 0, 1]
    ];
  }

  // 绕X轴旋转
  rotateX(angle) {
    const rad = angle * Math.PI / 180;
    const cos = Math.cos(rad);
    const sin = Math.sin(rad);
    return [
      [1, 0, 0],
      [0, cos, -sin],
      [0, sin, cos]
    ];
  }

  // 绕Y轴旋转
  rotateY(angle) {
    const rad = angle * Math.PI / 180;
    const cos = Math.cos(rad);
    const sin = Math.sin(rad);
    return [
      [cos, 0, sin],
      [0, 1, 0],
      [-sin, 0, cos]
    ];
  }

  // 绕Z轴旋转
  rotateZ(angle) {
    const rad = angle * Math.PI / 180;
    const cos = Math.cos(rad);
    const sin = Math.sin(rad);
    return [
      [cos, -sin, 0],
      [sin, cos, 0],
      [0, 0, 1]
    ];
  }
}

// 2. 机器人手臂类
class RoboticArm {
  constructor() {
    this.joints = [];
    this.rotationMatrix = new RotationMatrix();
  }

  // 计算抓取姿态
  calculateGraspPose(targetPosition) {
    // 计算需要的旋转角度
    const angles = this.calculateRequiredAngles(targetPosition);

    // 组合多个关节的旋转
    let finalMatrix = this.rotationMatrix.matrix;
    for (const angle of angles) {
      finalMatrix = this.multiplyMatrices(finalMatrix,
        this.rotationMatrix.rotateZ(angle.z));
    }

    return finalMatrix;
  }

  // 优化运动路径
  optimizePath(currentPose, targetPose) {
    // 实现路径优化逻辑
  }
}
4. 完整使用过程
- 初始化系统:
const robotArm = new RoboticArm();
const target = { x: 100, y: 150, z: 50 };
- 计算抓取姿态:
const graspPose = robotArm.calculateGraspPose(target);
- 生成运动路径:
const path = robotArm.optimizePath(robotArm.currentPose, graspPose);
- 执行抓取动作:
async function executeGrasp() {
  for (const pose of path) {
    await robotArm.moveTo(pose);
    await robotArm.checkCollision();
  }
  await robotArm.closeGripper();
}
5. 注意事项
- 数值精度:
// 处理数值精度问题
function roundMatrix(matrix, precision = 6) {
  return matrix.map(row =>
    row.map(val => Number(val.toFixed(precision)))
  );
}
- 奇异点处理:
function checkSingularity(matrix) {
  const determinant = calculateDeterminant(matrix);
  if (Math.abs(determinant) < 1e-6) {
    throw new Error('Singularity detected');
  }
}
- 性能优化:
// 使用缓存优化性能
const angleCache = new Map();

function getCachedRotation(angle) {
  const key = Math.round(angle * 100) / 100;
  if (!angleCache.has(key)) {
    angleCache.set(key, calculateRotation(angle));
  }
  return angleCache.get(key);
}
- 错误处理:
try {
  const pose = robotArm.calculateGraspPose(target);
  await robotArm.execute(pose);
} catch (error) {
  if (error instanceof SingularityError) {
    // 处理奇异点
    robotArm.findAlternativePath();
  } else if (error instanceof CollisionError) {
    // 处理碰撞
    robotArm.avoidCollision();
  }
}
- 安全限制:
// 实施角度限制
function enforceJointLimits(angle, joint) {
  const limits = joint.getLimits();
  return Math.max(limits.min,
         Math.min(limits.max, angle));
}
- 实时监控:
class MotionMonitor {
  constructor(robotArm) {
    this.arm = robotArm;
    this.startMonitoring();
  }

  startMonitoring() {
    setInterval(() => {
      const pose = this.arm.getCurrentPose();
      this.checkLimits(pose);
      this.checkVelocity();
      this.checkTorque();
    }, 100);
  }
}
通过这个综合案例,我们可以看到旋转矩阵在实际工程中的应用。关键是要注意:
- 合理设计数据结构和算法
- 做好错误处理和异常情况
- 注意性能优化和实时性要求
- 确保系统安全和稳定性
- 实现必要的监控和调试功能
5. 旋转矩阵综合案例 - 游戏中的相机控制系统
1. 案例背景
开发一个3D游戏的相机控制系统,需要实现:
- 玩家可以自由旋转视角观察游戏世界
- 支持第一人称和第三人称视角切换
- 相机要平滑跟随角色移动
- 处理相机碰撞和穿墙问题
2. 为什么选用旋转矩阵
- 视角计算需求:
// 相机视角变换的核心就是旋转变换
// 1. 欧拉角容易产生万向节死锁
// 2. 四元数虽然也可以,但不够直观
// 3. 旋转矩阵直观且易于理解和实现
- 性能考虑:
// 旋转矩阵的优势
const advantages = {
  cacheEfficient: '矩阵运算可以利用CPU缓存',
  vectorization: '适合SIMD指令优化',
  parallelComputing: '易于GPU并行计算'
};
- 与图形API兼容:
// 大多数图形API使用矩阵
// WebGL、OpenGL等都直接支持矩阵运算
// 不需要额外的转换步骤
3. 实现思路和技巧
class CameraController {
  constructor() {
    this.position = new Vector3(0, 0, 0);
    this.rotation = new Matrix3();
    this.viewMatrix = new Matrix4();
  }

  // 1. 相机旋转控制
  rotateCamera(deltaX, deltaY) {
    // 水平旋转(绕Y轴)
    const yawMatrix = new Matrix3().rotateY(deltaX);

    // 垂直旋转(绕X轴)
    const pitchMatrix = new Matrix3().rotateX(deltaY);

    // 组合旋转
    this.rotation = this.rotation
      .multiply(yawMatrix)
      .multiply(pitchMatrix);
  }

  // 2. 视图矩阵更新
  updateViewMatrix() {
    // 构建视图矩阵
    this.viewMatrix = Matrix4.createLookAt(
      this.position,
      this.position.add(this.rotation.forward),
      this.rotation.up
    );
  }
}
4. 完整使用过程
- 初始化相机系统:
class GameCamera {
  constructor() {
    this.controller = new CameraController();
    this.setupInputHandlers();
    this.setupCollisionDetection();
  }

  setupInputHandlers() {
    // 鼠标移动处理
    document.addEventListener('mousemove', (e) => {
      if (this.isMouseLocked) {
        const sensitivity = 0.002;
        this.controller.rotateCamera(
          e.movementX * sensitivity,
          e.movementY * sensitivity
        );
      }
    });
  }

  setupCollisionDetection() {
    // 设置碰撞检测
    this.collider = new CameraCollider(this.controller);
  }
}
- 实现平滑跟随:
class CameraFollower {
  followTarget(target, deltaTime) {
    // 计算目标位置
    const targetPos = target.position.add(
      this.getFollowOffset()
    );

    // 平滑插值
    this.position = Vector3.lerp(
      this.position,
      targetPos,
      deltaTime * this.followSpeed
    );
  }

  getFollowOffset() {
    return this.rotation.backward.multiply(
      this.followDistance
    );
  }
}
- 视角切换实现:
class ViewModeController {
  switchToFirstPerson() {
    this.currentOffset = Vector3.zero;
    this.followDistance = 0;
    this.updateCameraPosition();
  }

  switchToThirdPerson() {
    this.currentOffset = new Vector3(0, 2, -5);
    this.followDistance = 5;
    this.updateCameraPosition();
  }
}
5. 注意事项
- 性能优化:
class CameraOptimizer {
  // 1. 缓存常用矩阵
  cacheFrequentMatrices() {
    this.cachedViewMatrix = this.controller.viewMatrix.clone();
  }

  // 2. 使用定点数学
  fastRotation(angle) {
    const fixed = Math.round(angle * 1024);
    return this.fixedPointRotationTable[fixed];
  }
}
- 平滑处理:
class SmoothCamera {
  smoothRotation(targetRotation) {
    // 使用球面线性插值
    this.currentRotation = Matrix3.slerp(
      this.currentRotation,
      targetRotation,
      this.smoothFactor
    );
  }
}
- 边界检查:
class CameraConstraints {
  enforceBounds(position) {
    // 检查相机边界
    position.x = Math.clamp(position.x, this.minX, this.maxX);
    position.y = Math.clamp(position.y, this.minY, this.maxY);
    position.z = Math.clamp(position.z, this.minZ, this.maxZ);
  }

  // 限制视角
  clampRotation(rotation) {
    const pitch = Math.clamp(
      rotation.getPitch(),
      -Math.PI / 2,
      Math.PI / 2
    );
    rotation.setPitch(pitch);
  }
}
- 防止穿墙:
class WallCollision {
  preventClipping() {
    const ray = new Ray(
      this.targetPosition,
      this.currentPosition
    );

    const hit = this.world.raycast(ray);
    if (hit) {
      this.adjustCameraPosition(hit.point);
    }
  }
}
- 相机抖动处理:
class CameraStabilizer {
  stabilizeCamera() {
    // 应用阻尼
    this.velocity = this.velocity.multiply(this.damping);

    // 移动平均滤波
    this.smoothedPosition = Vector3.average([
      this.position,
      this.previousPosition,
      this.smoothedPosition
    ]);
  }
}
6. 使用场景
-
游戏场景:
- 第一人称射击游戏(FPS)
- 第三人称动作游戏
- 策略游戏的自由视角
-
虚拟现实:
- VR头显视角控制
- 虚拟场景漫游
-
建筑漫游:
- 建筑设计预览
- 室内装修展示
-
教育应用:
- 3D教学演示
- 虚拟实验室
这个案例展示了旋转矩阵在游戏相机控制中的应用,关键点是:
- 实现平滑的相机控制
- 处理好各种边界情况
- 注意性能优化
- 提供良好的用户体验
- 保证稳定性和可靠性
6. 旋转矩阵综合案例 - 卫星姿态控制系统
1. 案例背景
设计一个卫星姿态控制系统,需要实现:
- 调整卫星在轨道上的姿态
- 保持太阳能板对准太阳
- 确保通信天线对准地球
- 处理多轴稳定控制
2. 为什么选用旋转矩阵
- 精确的姿态表示:
// 优势:
// 1. 可以精确表示卫星的空间姿态
// 2. 避免奇异点问题
// 3. 便于进行误差分析和修正
- 计算效率:
// 关键特点:
const matrixAdvantages = {
  directComputation: '直接进行姿态计算',
  memoryEfficient: '内存占用小',
  hardwareOptimized: '硬件加速支持好'
};
- 实时性要求:
// 卫星姿态控制需要实时响应
// 矩阵运算适合实时控制系统
// 便于实现反馈控制
3. 实现思路和技巧
class SatelliteAttitudeController {
  constructor() {
    this.currentAttitude = new Matrix3();
    this.targetAttitude = new Matrix3();
    this.sensorData = new SensorArray();
  }

  // 1. 姿态估计
  estimateAttitude() {
    // 使用传感器数据估计当前姿态
    const gyroData = this.sensorData.getGyroData();
    const starTrackerData = this.sensorData.getStarTracker();

    return this.kalmanFilter.estimate(
      gyroData,
      starTrackerData
    );
  }

  // 2. 姿态控制
  controlAttitude(targetAttitude) {
    // 计算姿态误差
    const errorMatrix = this.currentAttitude
      .transpose()
      .multiply(targetAttitude);

    // 生成控制指令
    return this.generateControlCommands(errorMatrix);
  }
}
4. 完整使用过程
- 初始化系统:
class SatelliteSystem {
  constructor() {
    this.attitudeController = new SatelliteAttitudeController();
    this.solarPanelController = new SolarPanelController();
    this.communicationSystem = new CommunicationSystem();
  }

  async initialize() {
    await this.calibrateSensors();
    await this.initializeControllers();
    this.startAttitudeControl();
  }
}
- 姿态控制循环:
class AttitudeControlLoop {
  async run() {
    while (true) {
      // 1. 获取传感器数据
      const sensorData = await this.getSensorData();

      // 2. 估计当前姿态
      const currentAttitude =
        this.estimateAttitude(sensorData);

      // 3. 计算目标姿态
      const targetAttitude =
        this.calculateTargetAttitude();

      // 4. 执行姿态调整
      await this.adjustAttitude(
        currentAttitude,
        targetAttitude
      );

      await this.sleep(CONTROL_INTERVAL);
    }
  }
}
- 太阳能板对准控制:
class SolarPanelController {
  alignWithSun() {
    // 获取太阳方向
    const sunVector = this.getSunVector();

    // 计算所需旋转
    const rotationMatrix =
      this.calculateAlignmentRotation(sunVector);

    // 执行旋转
    this.rotatePanels(rotationMatrix);
  }
}
5. 注意事项
- 数值稳定性:
class NumericalStabilizer {
  // 1. 正交化处理
  orthogonalize(matrix) {
    // Gram-Schmidt正交化
    return this.gramSchmidt(matrix);
  }

  // 2. 误差累积处理
  compensateErrors(matrix) {
    const error = matrix.multiply(
      matrix.transpose()
    ).subtract(Matrix3.identity());

    return this.correctMatrix(matrix, error);
  }
}
- 故障处理:
class FaultHandler {
  handleSensorFailure() {
    // 切换到备用传感器
    this.switchToBackupSensor();

    // 调整控制策略
    this.adaptControlStrategy();
  }

  handleActuatorFailure() {
    // 重新分配控制任务
    this.redistributeControl();
  }
}
- 能源优化:
class EnergyOptimizer {
  optimizeRotation(targetAttitude) {
    // 选择能耗最小的旋转路径
    const paths = this.generateRotationPaths();
    return this.selectEfficientPath(paths);
  }
}
- 温度补偿:
class TemperatureCompensator {
  compensate(matrix) {
    const temperature = this.getTemperature();
    const correction =
      this.calculateThermalDistortion(temperature);
    return matrix.multiply(correction);
  }
}
6. 应用场景
- 空间任务:
- 地球观测卫星
- 通信卫星
- 空间站姿态控制
- 航天器控制:
- 探测器姿态调整
- 货运飞船对接
- 空间望远镜指向控制
- 导航系统:
- 惯性导航系统
- 姿态参考系统
- 自动驾驶系统
关键点总结:
- 保证控制精度和稳定性
- 优化能源消耗
- 处理各种故障情况
- 考虑空间环境影响
- 实现实时控制要求
这个案例展示了旋转矩阵在航天领域的高精度应用,关注点完全不同于游戏相机或机器人控制系统,更强调:
- 极高的精确度要求
- 故障容错能力
- 能源效率
- 环境适应性
- 实时性保证
番外
为啥选择90度,是这个矩阵?
- 旋转90度 (
θ
=
π
2
\theta = \frac{\pi}{2}
θ=2π):
[ 0 − 1 1 0 ] \begin{bmatrix} 0 & -1 \\ 1 & 0 \end{bmatrix} [01−10]
这其实是把旋转矩阵的通用公式:
[
cos
θ
−
sin
θ
sin
θ
cos
θ
]
\begin{bmatrix} \cos\theta & -\sin\theta \\ \sin\theta & \cos\theta \end{bmatrix}
[cosθsinθ−sinθcosθ]
代入 θ = 90 ° = π 2 \theta = 90° = \frac{\pi}{2} θ=90°=2π 得到的结果。因为:
- 当 θ = 90 ° \theta = 90° θ=90° 时:
- cos ( 90 ° ) = cos ( π 2 ) = 0 \cos(90°) = \cos(\frac{\pi}{2}) = 0 cos(90°)=cos(2π)=0
- sin ( 90 ° ) = sin ( π 2 ) = 1 \sin(90°) = \sin(\frac{\pi}{2}) = 1 sin(90°)=sin(2π)=1
- 把这些值代入通用旋转矩阵:
[ cos ( 90 ° ) − sin ( 90 ° ) sin ( 90 ° ) cos ( 90 ° ) ] = [ 0 − 1 1 0 ] \begin{bmatrix} \cos(90°) & -\sin(90°) \\ \sin(90°) & \cos(90°) \end{bmatrix} = \begin{bmatrix} 0 & -1 \\ 1 & 0 \end{bmatrix} [cos(90°)sin(90°)−sin(90°)cos(90°)]=[01−10]
为了验证这确实能实现90度旋转,让我们用一个具体的例子:
假设我们要旋转向量
(
1
,
0
)
(1,0)
(1,0):
[
0
−
1
1
0
]
[
1
0
]
=
[
0
⋅
1
+
(
−
1
)
⋅
0
1
⋅
1
+
0
⋅
0
]
=
[
0
1
]
\begin{bmatrix} 0 & -1 \\ 1 & 0 \end{bmatrix} \begin{bmatrix} 1 \\ 0 \end{bmatrix} = \begin{bmatrix} 0 \cdot 1 + (-1) \cdot 0 \\ 1 \cdot 1 + 0 \cdot 0 \end{bmatrix} = \begin{bmatrix} 0 \\ 1 \end{bmatrix}
[01−10][10]=[0⋅1+(−1)⋅01⋅1+0⋅0]=[01]
可以看到,向量 ( 1 , 0 ) (1,0) (1,0) 经过这个变换后变成了 ( 0 , 1 ) (0,1) (0,1),这正是逆时针旋转90度的结果!
类似地,如果我们旋转向量
(
0
,
1
)
(0,1)
(0,1):
[
0
−
1
1
0
]
[
0
1
]
=
[
0
⋅
0
+
(
−
1
)
⋅
1
1
⋅
0
+
0
⋅
1
]
=
[
−
1
0
]
\begin{bmatrix} 0 & -1 \\ 1 & 0 \end{bmatrix} \begin{bmatrix} 0 \\ 1 \end{bmatrix} = \begin{bmatrix} 0 \cdot 0 + (-1) \cdot 1 \\ 1 \cdot 0 + 0 \cdot 1 \end{bmatrix} = \begin{bmatrix} -1 \\ 0 \end{bmatrix}
[01−10][01]=[0⋅0+(−1)⋅11⋅0+0⋅1]=[−10]
( 0 , 1 ) (0,1) (0,1) 变成了 ( − 1 , 0 ) (-1,0) (−1,0),也是逆时针旋转90度的结果。
这就是为什么这个特殊的矩阵可以实现90度旋转 - 它是通用旋转矩阵在 θ = 90 ° \theta = 90° θ=90° 时的特殊情况。你可以想象,任何一个二维向量经过这个变换,都会逆时针旋转90度。


 1458
1458

 被折叠的 条评论
为什么被折叠?
被折叠的 条评论
为什么被折叠?
 到【灌水乐园】发言


