


前言
在阅读该篇文章之前建议先学习一下以下内容,学习完再看这篇文章会有一种水到渠成的感觉,这篇文章更多像是那些知识点运用
- OpenGL的顶点着色器、片段着色器、着色器程序
- OpenGL的VAO、VBO、EBO、FBO
- OpenGL的纹理概念
- NDK
大家也可以移步看一看我之前写的一篇帖子,保姆级运用OpenGL绘制一个三角形的帖子。
安卓NDK保姆级OnpenGL绘制三角形(详细到爆炸)![]() https://blog.csdn.net/weixin_44752167/article/details/133933705
https://blog.csdn.net/weixin_44752167/article/details/133933705
你可以说这个帖子写的不好,但是一定不能说他写的不够详细!
基础概念介绍
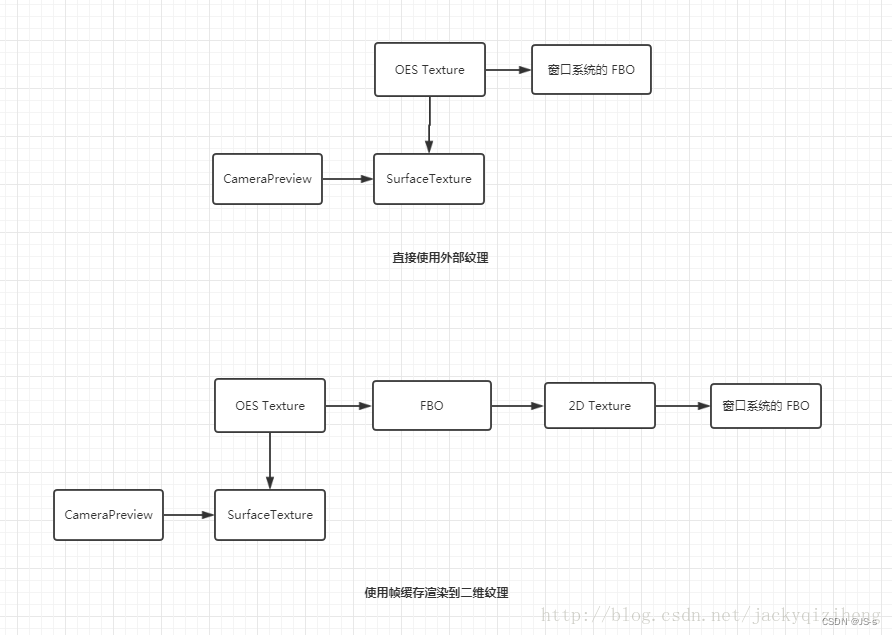
我原本其实有写过一个版本的运用NDK实现直接窗口渲染的相机预览滤镜的demo,后面通过学习FBO(离屏渲染),发觉使用FBO实现滤镜预览才是最优选择。
FBO
首先来段官方解释:
FBO(Frame Buffer Object)即帧缓冲区对象,实际上是一个可添加缓冲区的容器,可以为其添加纹理或渲染缓冲区对象(RBO)。
FBO 本身不能用于渲染,只有添加了纹理或者渲染缓冲区之后才能作为渲染目标,它仅且提供了 3 个附着(Attachment),分别是颜色附着、深度附着和模板附着。
我第一次看的时候其实不知所云,所以我现在尽量通过图解的方式进行讲解一下,到底FBO有啥用,为啥我说FBO实现滤镜预览才是最优的选择。
首先我们要知道一个概念就是,其实我们平时使用OpenGL完成某些功能的时候虽然可能不显性使用的FBO,但是我们其实都在使用FBO,因为窗口其实有自带一个FBO,只是这个FBO不需要我们进行任何的声明或者绑定。
我们首先来看看平时不显性使用FBO的预览是怎样的。

可以看到不显性使用FBO的预览方式,无论是顶点还是片段都是可以理解成在GLSurface上直接渲染,但是其实平时很多时候在处理业务的时候没有必要全部都直接渲染出来。
例如加上水印、滤镜等效果,我们是否可以有个思路就是现在类似后台的地方处理完再一起渲染到屏幕的显示部分,这样效率以及性能都能有个比较好的改善。
接下来我们来看看显性使用FBO大概是个什么样子。
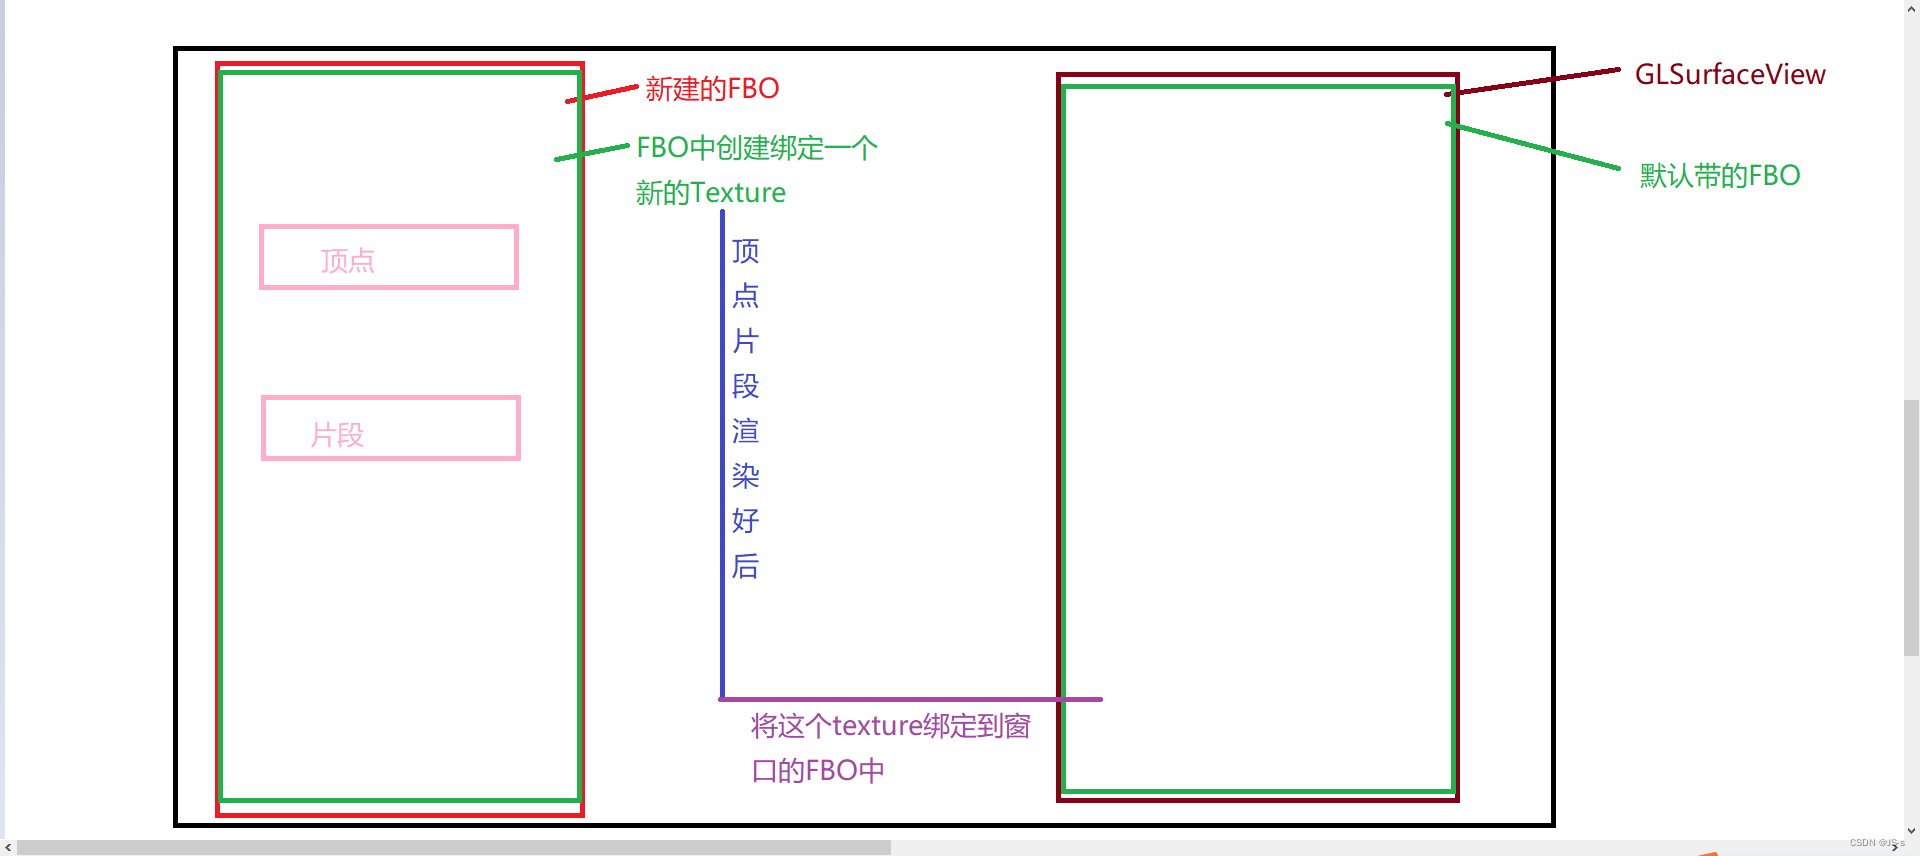
看见没有,我们这里是另起炉灶新建了一个FBO,然后FBO中再创建绑定一个纹理,后续在绘制的时候,我们的顶点啊片段啊都会先绘制到这个纹理上面,然后绘制成功后,注意了噢,这时候屏幕上面是啥都没有的,因为这个是离屏渲染的。我们接下来要将这个texture纹理给绑定到默认的FBO中,就可以基本完成整个流程啦。
大家可以结合之前的图解跟上面的这个流程图进行 交叉理解。
其实别看着好像特别复杂,其实特别好理解。我们可以把现在这个情况理解成,我们参加了一个画画比赛,在评委那有个画板,我们在最后需要把自己画的画放到评委的画板那,评委看的是最后的效果,咱们不能直接在评委的画板直接画你的作品;所以我们需要一个自己的画架,然后放上自己的画纸在上面去进行绘画,等我们绘画完之后,再将这个画纸放到评委的画板上去进行呈现。在这里的话,评委的画板其实就相当于GLSurfaceView自带的FBO,我们自己的画板就相当于新建绑定的FBO,然后我们的画纸就相当于FBO中绑定的texture,带我们绘制完之后,我们就将画纸给放到评委的画板上面,这个过程就是把新建的FBO的texture重新绑定到GLSurfaceView的FBO上。
代码编写
我们整个demo是通过NDK的方式去使用OpenGL,使用的是CMake去管理项目,为了更加高效的进行开发工作,我之前有详细讲述过一套脚手架,只要涉及到NDK使用OpenGL的demo都可以按照那套脚手架进行快速开始,在那个脚手架的基础上去实现你的功能需求。我在这边就不重复进行讲解,大家可以先看一下我这篇文章,这样看后面的章节不会太生硬。
布局文件
<?xml version="1.0" encoding="utf-8"?>
<androidx.constraintlayout.widget.ConstraintLayout xmlns:android="http://schemas.android.com/apk/res/android"
    xmlns:app="http://schemas.android.com/apk/res-auto"
    xmlns:tools="http://schemas.android.com/tools"
    android:layout_width="match_parent"
    android:layout_height="match_parent"
    tools:context=".MainActivity">

    <!--<TextView
        android:id="@+id/sample_text"
        android:layout_width="wrap_content"
        android:layout_height="wrap_content"
        android:text="Hello World!"
        app:layout_constraintBottom_toBottomOf="parent"
        app:layout_constraintEnd_toEndOf="parent"
        app:layout_constraintStart_toStartOf="parent"
        app:layout_constraintTop_toTopOf="parent" />
-->
    <com.example.openglcameraapplication.MyGLSurfaceView
        android:id="@+id/myglsurfaceview"
        android:layout_width="match_parent"
        android:layout_height="match_parent"/>
</androidx.constraintlayout.widget.ConstraintLayout>
首先我们这个demo不会有其他按钮,主要专注于GLSurfaceView的预览渲染上,可以看到这个布局文件中,我们自定义了一个View——MyGLSurfaceView。
MyGLSurfaceView
大家可以先过一下下面的代码,我在代码的末尾会对一些需要注意的地方进行讲解一下
package com.example.openglcameraapplication;

import android.app.Activity;
import android.content.Context;
import android.content.res.AssetManager;
import android.graphics.SurfaceTexture;
import android.opengl.GLSurfaceView;
import android.util.AttributeSet;
import android.util.Log;

import javax.microedition.khronos.egl.EGLConfig;
import javax.microedition.khronos.opengles.GL10;

public class MyGLSurfaceView extends GLSurfaceView implements SurfaceTexture.OnFrameAvailableListener, GLSurfaceView.Renderer  {
    private AssetManager assetManager;
    private Camera2Proxy mCameraProxy;
    private int mPreviewTextureId;
    private SurfaceTexture mSurfaceTexture;

    public MyGLSurfaceView(Context context) {
        super(context);
    }

    public MyGLSurfaceView(Context context, AttributeSet attrs) {
        super(context, attrs);
        setEGLContextClientVersion(3);
        assetManager = context.getAssets();
        mCameraProxy = new Camera2Proxy((Activity) context);
        setRenderer(this);
        setRenderMode(RENDERMODE_WHEN_DIRTY);
    }

    @Override
    public void onFrameAvailable(SurfaceTexture surfaceTexture) {
        //Log.d("yjs","onFrameAvailable");
        requestRender();

    }


    @Override
    public void onSurfaceCreated(GL10 gl, EGLConfig config) {
        Log.d("yjs","java,onSurfaceCreated");
        /*
        * 尝试使用FBO分屏渲染
        * */
        //先创建一个texture
        mPreviewTextureId = onNdkGetTextureId();
        //初始化着色器和着色器程序
        onNdkSurfaceCreated(assetManager);
        mSurfaceTexture = new SurfaceTexture(mPreviewTextureId);
        mSurfaceTexture.setOnFrameAvailableListener(this);
        mCameraProxy.setupCamera(getWidth(),getHeight());
        mCameraProxy.setPreviewSurface(mSurfaceTexture);
        mCameraProxy.openCamera();
        Log.d("yjs","openCamera");
    }

    @Override
    public void onSurfaceChanged(GL10 gl, int width, int height) {
        onNdkSurfaceChanged(width,height);
    }

    @Override
    public void onDrawFrame(GL10 gl) {

        onNdkSurfaceDrawFrame(mPreviewTextureId);
        mSurfaceTexture.updateTexImage();
    }

    private native void onNdkSurfaceCreated(AssetManager assetManager);
    private native void onNdkSurfaceChanged(int width,int height);
    private native void onNdkSurfaceDrawFrame(int mPreviewTextureId);
    private native int onNdkGetTextureId();
}
可以看到这个自定义View,集成自GLSurfaceView,我这边还同时在这个类中实现了Render接口跟一个SurfaceTexture.OnFrameAvailableListener回调接口。
Render接口在我之前的教程就有说过,GLSurfaceView的渲染基本都是在Render中去完成的,其中这里onSurfaceCreated、onSurfaceChanged、onDrawFrame都是Render的方法。
而对于SurfaceTexture.OnFrameAvailableListener回调接口,它将会在SurfaceTexture有新的图像数据的时候进行回调。
接下来我会给你们讲讲这段逻辑最重要的几个语句
setRenderer(this);
setRenderMode(RENDERMODE_WHEN_DIRTY);
可以看到设置Render之后,我将Render的模式设置成了RENDERMODE_WHEN_DIRTY,简单理解就是,Render默认的模式是自动刷新的,设置了这个模式之后,Render就不会再自动刷新了,讲人话就是onDrawFrame这个方法不会主动去回调了。
于是在这个前提下,我们就得做一些操作,主动去调用这个回调函数。
@Override
public void onFrameAvailable(SurfaceTexture surfaceTexture) {
//Log.d("yjs","onFrameAvailable");
requestRender();}
调用requestRender后,渲染线程会尽快执行一次渲染操作,在onDrawFrame方法中进行实际的渲染工作。
需要注意的是,requestRender方法只是向渲染线程发送了一个请求,实际的渲染操作可能会在稍后的时间点执行。通常情况下,建议在需要更新画面时及时调用requestRender,而避免过于频繁地调用以减少不必要的渲染开销。
总之,requestRender方法是用于请求重新渲染的方法,在使用OpenGL ES进行渲染的应用程序中,通过调用该方法来触发渲染线程的渲染操作。
但是需要注意的是onFrameAvailable这个回调方法是什么时候进行回调的?onFrameAvailable()方法是在SurfaceTexture中有新的图像数据时被调用的。
但是这时候问题又来了,怎么保证SurfaceTexture中会有新的图像数据被调用呢?
@Override
public void onDrawFrame(GL10 gl) {
    //Log.d("yjs","onDrawFrame");
    onNdkSurfaceDrawFrame(mPreviewTextureId);
    mSurfaceTexture.updateTexImage();
}
SurfaceTexture中是否有新的图像数据是由updateTexImage()方法控制的。updateTexImage()方法将当前最新的图像数据更新到SurfaceTexture中,然后SurfaceTexture会通知所有注册的监听器,包括注册的OnFrameAvailableListener监听器。
可以说updateTexImage()和requestRender()是组合使用的,缺一不可。你们要是不信邪完全可以试试。
如果没有调用updateTexImage()方法,SurfaceTexture中就不会有新的图像数据,因此就不会触发onFrameAvailable()方法。
所以,在使用SurfaceTexture获取摄像头数据时,必须调用updateTexImage()方法来更新SurfaceTexture中的图像数据,才能触发onFrameAvailable()方法并获取到最新的摄像头数据。
接下来我给你们说说,几个比较重要的逻辑
public MyGLSurfaceView(Context context, AttributeSet attrs) {
    super(context, attrs);
    setEGLContextClientVersion(3);
    assetManager = context.getAssets();
    //相当于Camera2的一个工具类,里面包括了启动浏览的所有流程,封装成了单独方法
    mCameraProxy = new Camera2Proxy((Activity) context);
    //设置Render
    setRenderer(this);
    //设置Render模式
    setRenderMode(RENDERMODE_WHEN_DIRTY);
}
上面提到的Camera2Proxy类,我相信读者来查阅这个帖子都是有所了解的,我就不进行解释里面具体的代码,直接将源码附这里,可以直接拷贝使用。
package com.example.openglcameraapplication;

import android.annotation.SuppressLint;
import android.annotation.TargetApi;
import android.app.Activity;
import android.content.Context;
import android.graphics.ImageFormat;
import android.graphics.Rect;
import android.graphics.SurfaceTexture;
import android.hardware.camera2.CameraAccessException;
import android.hardware.camera2.CameraCaptureSession;
import android.hardware.camera2.CameraCharacteristics;
import android.hardware.camera2.CameraDevice;
import android.hardware.camera2.CameraManager;
import android.hardware.camera2.CameraMetadata;
import android.hardware.camera2.CaptureRequest;
import android.hardware.camera2.CaptureResult;
import android.hardware.camera2.TotalCaptureResult;
import android.hardware.camera2.params.MeteringRectangle;
import android.hardware.camera2.params.StreamConfigurationMap;
import android.media.ImageReader;
import android.os.Build;
import android.os.Handler;
import android.os.HandlerThread;
import android.util.Log;
import android.util.Size;
import android.view.OrientationEventListener;
import android.view.Surface;
import android.view.SurfaceHolder;

import androidx.annotation.NonNull;

import java.util.Arrays;
import java.util.Collections;
import java.util.Comparator;

public class Camera2Proxy {

    private static final String TAG = "Camera2Proxy";

    private Activity mActivity;

    private int mCameraId = CameraCharacteristics.LENS_FACING_BACK; // 要打开的摄像头ID
    private Size mPreviewSize; // 预览大小
    private CameraManager mCameraManager; // 相机管理者
    private CameraCharacteristics mCameraCharacteristics; // 相机属性
    private CameraDevice mCameraDevice; // 相机对象
    private CameraCaptureSession mCaptureSession;
    private CaptureRequest.Builder mPreviewRequestBuilder; // 相机预览请求的构造器
    private CaptureRequest mPreviewRequest;
    private Handler mBackgroundHandler;
    private HandlerThread mBackgroundThread;
    private ImageReader mImageReader;
    private Surface mPreviewSurface;
    private OrientationEventListener mOrientationEventListener;

    private int mDisplayRotate = 0;
    private int mDeviceOrientation = 0; // 设备方向,由相机传感器获取
    private int mZoom = 0; // 缩放

    /**
     * 打开摄像头的回调
     */
    private CameraDevice.StateCallback mStateCallback = new CameraDevice.StateCallback() {
        @Override
        public void onOpened(@NonNull CameraDevice camera) {
            Log.d(TAG, "onOpened");
            mCameraDevice = camera;
            initPreviewRequest();
        }

        @Override
        public void onDisconnected(@NonNull CameraDevice camera) {
            Log.d(TAG, "onDisconnected");
            releaseCamera();
        }

        @Override
        public void onError(@NonNull CameraDevice camera, int error) {
            Log.e(TAG, "Camera Open failed, error: " + error);
            releaseCamera();
        }
    };

    @TargetApi(Build.VERSION_CODES.M)
    public Camera2Proxy(Activity activity) {
        mActivity = activity;
        mCameraManager = (CameraManager) mActivity.getSystemService(Context.CAMERA_SERVICE);
        mOrientationEventListener = new OrientationEventListener(mActivity) {
            @Override
            public void onOrientationChanged(int orientation) {
                mDeviceOrientation = orientation;
            }
        };
    }

    @SuppressLint("MissingPermission")
    public void openCamera() {
        Log.v(TAG, "openCamera");
        startBackgroundThread(); // 对应 releaseCamera() 方法中的 stopBackgroundThread()
        mOrientationEventListener.enable();
        try {

            // 打开摄像头
            mCameraManager.openCamera(Integer.toString(mCameraId), mStateCallback, mBackgroundHandler);
        } catch (CameraAccessException e) {
            e.printStackTrace();
        }
    }

    public void setupCamera(int width, int height){
        try {
            mCameraCharacteristics = mCameraManager.getCameraCharacteristics(Integer.toString(mCameraId));
            StreamConfigurationMap map = mCameraCharacteristics.get(CameraCharacteristics
                    .SCALER_STREAM_CONFIGURATION_MAP);
            // 拍照大小,选择能支持的一个最大的图片大小
            Size largest = Collections.max(Arrays.asList(map.getOutputSizes(ImageFormat.JPEG)), new CompareSizesByArea());
            Log.d(TAG, "picture size: " + largest.getWidth() + "*" + largest.getHeight());
            mImageReader = ImageReader.newInstance(largest.getWidth(), largest.getHeight(), ImageFormat.JPEG, 2);
            // 预览大小,根据上面选择的拍照图片的长宽比,选择一个和控件长宽差不多的大小
            mPreviewSize = chooseOptimalSize(map.getOutputSizes(SurfaceTexture.class), width, height, largest);
            Log.d(TAG, "preview size: " + mPreviewSize.getWidth() + "*" + mPreviewSize.getHeight());
        } catch (CameraAccessException e) {
            throw new RuntimeException(e);
        }

    }

    public void releaseCamera() {
        Log.v(TAG, "releaseCamera");
        if (null != mCaptureSession) {
            mCaptureSession.close();
            mCaptureSession = null;
        }
        if (mCameraDevice != null) {
            mCameraDevice.close();
            mCameraDevice = null;
        }
        if (mImageReader != null) {
            mImageReader.close();
            mImageReader = null;
        }
        mOrientationEventListener.disable();
        stopBackgroundThread(); // 对应 openCamera() 方法中的 startBackgroundThread()
    }

    public void setImageAvailableListener(ImageReader.OnImageAvailableListener onImageAvailableListener) {
        if (mImageReader == null) {
            Log.w(TAG, "setImageAvailableListener: mImageReader is null");
            return;
        }
        mImageReader.setOnImageAvailableListener(onImageAvailableListener, null);
    }

    public void setPreviewSurface(SurfaceHolder holder) {
        mPreviewSurface = holder.getSurface();
    }

    public void setPreviewSurface(SurfaceTexture surfaceTexture) {
        Log.d("yjs","setPreviewSurface");
        surfaceTexture.setDefaultBufferSize(mPreviewSize.getWidth(), mPreviewSize.getHeight());
        mPreviewSurface = new Surface(surfaceTexture);
    }

    private void initPreviewRequest() {
        try {
            mPreviewRequestBuilder = mCameraDevice.createCaptureRequest(CameraDevice.TEMPLATE_PREVIEW);
            mPreviewRequestBuilder.addTarget(mPreviewSurface); // 设置预览输出的 Surface
            mCameraDevice.createCaptureSession(Arrays.asList(mPreviewSurface, mImageReader.getSurface()),
                    new CameraCaptureSession.StateCallback() {

                        @Override
                        public void onConfigured(@NonNull CameraCaptureSession session) {
                            mCaptureSession = session;
                            // 设置连续自动对焦
                            mPreviewRequestBuilder.set(CaptureRequest.CONTROL_AF_MODE, CaptureRequest
                                    .CONTROL_AF_MODE_CONTINUOUS_PICTURE);
                            // 设置自动曝光
                            mPreviewRequestBuilder.set(CaptureRequest.CONTROL_AE_MODE, CaptureRequest
                                    .CONTROL_AE_MODE_ON_AUTO_FLASH);
                            // 设置完后自动开始预览
                            mPreviewRequest = mPreviewRequestBuilder.build();
                            startPreview();
                        }

                        @Override
                        public void onConfigureFailed(@NonNull CameraCaptureSession session) {
                            Log.e(TAG, "ConfigureFailed. session: mCaptureSession");
                        }
                    }, mBackgroundHandler); // handle 传入 null 表示使用当前线程的 Looper
        } catch (CameraAccessException e) {
            e.printStackTrace();
        }
    }

    public void startPreview() {
        Log.v(TAG, "startPreview");
        if (mCaptureSession == null || mPreviewRequestBuilder == null) {
            Log.w(TAG, "startPreview: mCaptureSession or mPreviewRequestBuilder is null");
            return;
        }
        try {
            // 开始预览,即一直发送预览的请求
            mCaptureSession.setRepeatingRequest(mPreviewRequest, new CameraCaptureSession.CaptureCallback() {
                @Override
                public void onCaptureCompleted(@NonNull CameraCaptureSession session, @NonNull CaptureRequest request, @NonNull TotalCaptureResult result) {
                    super.onCaptureCompleted(session, request, result);
                    /*Log.d("yjs","preview completed");*/
                }
            }, mBackgroundHandler);
        } catch (CameraAccessException e) {
            e.printStackTrace();
        }
    }

    public void stopPreview() {
        Log.v(TAG, "stopPreview");
        if (mCaptureSession == null || mPreviewRequestBuilder == null) {
            Log.w(TAG, "stopPreview: mCaptureSession or mPreviewRequestBuilder is null");
            return;
        }
        try {
            mCaptureSession.stopRepeating();
        } catch (CameraAccessException e) {
            e.printStackTrace();
        }
    }

    public void captureStillPicture() {
        try {
            CaptureRequest.Builder captureBuilder = mCameraDevice.createCaptureRequest(CameraDevice
                    .TEMPLATE_STILL_CAPTURE);
            captureBuilder.addTarget(mImageReader.getSurface());
            captureBuilder.set(CaptureRequest.CONTROL_AF_MODE, CaptureRequest.CONTROL_AF_MODE_CONTINUOUS_PICTURE);
            captureBuilder.set(CaptureRequest.JPEG_ORIENTATION, getJpegOrientation(mDeviceOrientation));
            // 预览如果有放大,拍照的时候也应该保存相同的缩放
            Rect zoomRect = mPreviewRequestBuilder.get(CaptureRequest.SCALER_CROP_REGION);
            if (zoomRect != null) {
                captureBuilder.set(CaptureRequest.SCALER_CROP_REGION, zoomRect);
            }
            mCaptureSession.stopRepeating();
            mCaptureSession.abortCaptures();
            final long time = System.currentTimeMillis();
            mCaptureSession.capture(captureBuilder.build(), new CameraCaptureSession.CaptureCallback() {
                @Override
                public void onCaptureCompleted(@NonNull CameraCaptureSession session,
                                               @NonNull CaptureRequest request,
                                               @NonNull TotalCaptureResult result) {
                    Log.w(TAG, "onCaptureCompleted, time: " + (System.currentTimeMillis() - time));
                    try {
                        mPreviewRequestBuilder.set(CaptureRequest.CONTROL_AF_TRIGGER, CameraMetadata
                                .CONTROL_AF_TRIGGER_CANCEL);
                        mCaptureSession.capture(mPreviewRequestBuilder.build(), null, mBackgroundHandler);
                    } catch (CameraAccessException e) {
                        e.printStackTrace();
                    }
                    startPreview();
                }
            }, mBackgroundHandler);
        } catch (CameraAccessException e) {
            e.printStackTrace();
        }
    }

    private int getJpegOrientation(int deviceOrientation) {
        if (deviceOrientation == android.view.OrientationEventListener.ORIENTATION_UNKNOWN) return 0;
        int sensorOrientation = mCameraCharacteristics.get(CameraCharacteristics.SENSOR_ORIENTATION);
        // Round device orientation to a multiple of 90
        deviceOrientation = (deviceOrientation + 45) / 90 * 90;
        // Reverse device orientation for front-facing cameras
        boolean facingFront = mCameraCharacteristics.get(CameraCharacteristics.LENS_FACING) == CameraCharacteristics
                .LENS_FACING_FRONT;
        if (facingFront) deviceOrientation = -deviceOrientation;
        // Calculate desired JPEG orientation relative to camera orientation to make
        // the image upright relative to the device orientation
        int jpegOrientation = (sensorOrientation + deviceOrientation + 360) % 360;
        Log.d(TAG, "jpegOrientation: " + jpegOrientation);
        return jpegOrientation;
    }

    public boolean isFrontCamera() {
        return mCameraId == CameraCharacteristics.LENS_FACING_FRONT;
    }

    public Size getPreviewSize() {
        return mPreviewSize;
    }

    public void switchCamera(int width, int height) {
        mCameraId ^= 1;
        Log.d(TAG, "switchCamera: mCameraId: " + mCameraId);
        releaseCamera();
        setupCamera(width, height);
        openCamera();
    }

    private Size chooseOptimalSize(Size[] sizes, int viewWidth, int viewHeight, Size pictureSize) {
        int totalRotation = getRotation();
        boolean swapRotation = totalRotation == 90 || totalRotation == 270;
        int width = swapRotation ? viewHeight : viewWidth;
        int height = swapRotation ? viewWidth : viewHeight;
        return getSuitableSize(sizes, width, height, pictureSize);
    }

    private int getRotation() {
        int displayRotation = mActivity.getWindowManager().getDefaultDisplay().getRotation();
        switch (displayRotation) {
            case Surface.ROTATION_0:
                displayRotation = 90;
                break;
            case Surface.ROTATION_90:
                displayRotation = 0;
                break;
            case Surface.ROTATION_180:
                displayRotation = 270;
                break;
            case Surface.ROTATION_270:
                displayRotation = 180;
                break;
        }
        int sensorOrientation = mCameraCharacteristics.get(CameraCharacteristics.SENSOR_ORIENTATION);
        mDisplayRotate = (displayRotation + sensorOrientation + 270) % 360;
        return mDisplayRotate;
    }

    private Size getSuitableSize(Size[] sizes, int width, int height, Size pictureSize) {
        int minDelta = Integer.MAX_VALUE; // 最小的差值,初始值应该设置大点保证之后的计算中会被重置
        int index = 0; // 最小的差值对应的索引坐标
        float aspectRatio = pictureSize.getHeight() * 1.0f / pictureSize.getWidth();
        Log.d(TAG, "getSuitableSize. aspectRatio: " + aspectRatio);
        for (int i = 0; i < sizes.length; i++) {
            Size size = sizes[i];
            // 先判断比例是否相等
            if (size.getWidth() * aspectRatio == size.getHeight()) {
                int delta = Math.abs(width - size.getWidth());
                if (delta == 0) {
                    return size;
                }
                if (minDelta > delta) {
                    minDelta = delta;
                    index = i;
                }
            }
        }
        return sizes[index];
    }

    public void handleZoom(boolean isZoomIn) {
        if (mCameraDevice == null || mCameraCharacteristics == null || mPreviewRequestBuilder == null) {
            return;
        }
        // maxZoom 表示 active_rect 宽度除以 crop_rect 宽度的最大值
        float maxZoom = mCameraCharacteristics.get(CameraCharacteristics.SCALER_AVAILABLE_MAX_DIGITAL_ZOOM);
        Log.d(TAG, "handleZoom: maxZoom: " + maxZoom);
        int factor = 100; // 放大/缩小的一个因素,设置越大越平滑,相应放大的速度也越慢
        if (isZoomIn && mZoom < factor) {
            mZoom++;
        } else if (mZoom > 0) {
            mZoom--;
        }
        Log.d(TAG, "handleZoom: mZoom: " + mZoom);
        Rect rect = mCameraCharacteristics.get(CameraCharacteristics.SENSOR_INFO_ACTIVE_ARRAY_SIZE);
        int minW = (int) ((rect.width() - rect.width() / maxZoom) / (2 * factor));
        int minH = (int) ((rect.height() - rect.height() / maxZoom) / (2 * factor));
        int cropW = minW * mZoom;
        int cropH = minH * mZoom;
        Log.d(TAG, "handleZoom: cropW: " + cropW + ", cropH: " + cropH);
        Rect zoomRect = new Rect(cropW, cropH, rect.width() - cropW, rect.height() - cropH);
        mPreviewRequestBuilder.set(CaptureRequest.SCALER_CROP_REGION, zoomRect);
        mPreviewRequest = mPreviewRequestBuilder.build();
        startPreview(); // 需要重新 start preview 才能生效
    }

    public void focusOnPoint(double x, double y, int width, int height) {
        if (mCameraDevice == null || mPreviewRequestBuilder == null) {
            return;
        }
        // 1. 先取相对于view上面的坐标
        int previewWidth = mPreviewSize.getWidth();
        int previewHeight = mPreviewSize.getHeight();
        if (mDisplayRotate == 90 || mDisplayRotate == 270) {
            previewWidth = mPreviewSize.getHeight();
            previewHeight = mPreviewSize.getWidth();
        }
        // 2. 计算摄像头取出的图像相对于view放大了多少,以及有多少偏移
        double tmp;
        double imgScale;
        double verticalOffset = 0;
        double horizontalOffset = 0;
        if (previewHeight * width > previewWidth * height) {
            imgScale = width * 1.0 / previewWidth;
            verticalOffset = (previewHeight - height / imgScale) / 2;
        } else {
            imgScale = height * 1.0 / previewHeight;
            horizontalOffset = (previewWidth - width / imgScale) / 2;
        }
        // 3. 将点击的坐标转换为图像上的坐标
        x = x / imgScale + horizontalOffset;
        y = y / imgScale + verticalOffset;
        if (90 == mDisplayRotate) {
            tmp = x;
            x = y;
            y = mPreviewSize.getHeight() - tmp;
        } else if (270 == mDisplayRotate) {
            tmp = x;
            x = mPreviewSize.getWidth() - y;
            y = tmp;
        }
        // 4. 计算取到的图像相对于裁剪区域的缩放系数,以及位移
        Rect cropRegion = mPreviewRequestBuilder.get(CaptureRequest.SCALER_CROP_REGION);
        if (cropRegion == null) {
            Log.w(TAG, "can't get crop region");
            cropRegion = mCameraCharacteristics.get(CameraCharacteristics.SENSOR_INFO_ACTIVE_ARRAY_SIZE);
        }
        int cropWidth = cropRegion.width();
        int cropHeight = cropRegion.height();
        if (mPreviewSize.getHeight() * cropWidth > mPreviewSize.getWidth() * cropHeight) {
            imgScale = cropHeight * 1.0 / mPreviewSize.getHeight();
            verticalOffset = 0;
            horizontalOffset = (cropWidth - imgScale * mPreviewSize.getWidth()) / 2;
        } else {
            imgScale = cropWidth * 1.0 / mPreviewSize.getWidth();
            horizontalOffset = 0;
            verticalOffset = (cropHeight - imgScale * mPreviewSize.getHeight()) / 2;
        }
        // 5. 将点击区域相对于图像的坐标,转化为相对于成像区域的坐标
        x = x * imgScale + horizontalOffset + cropRegion.left;
        y = y * imgScale + verticalOffset + cropRegion.top;
        double tapAreaRatio = 0.1;
        Rect rect = new Rect();
        rect.left = clamp((int) (x - tapAreaRatio / 2 * cropRegion.width()), 0, cropRegion.width());
        rect.right = clamp((int) (x + tapAreaRatio / 2 * cropRegion.width()), 0, cropRegion.width());
        rect.top = clamp((int) (y - tapAreaRatio / 2 * cropRegion.height()), 0, cropRegion.height());
        rect.bottom = clamp((int) (y + tapAreaRatio / 2 * cropRegion.height()), 0, cropRegion.height());
        // 6. 设置 AF、AE 的测光区域,即上述得到的 rect
        mPreviewRequestBuilder.set(CaptureRequest.CONTROL_AF_REGIONS, new MeteringRectangle[]{new MeteringRectangle
                (rect, 1000)});
        mPreviewRequestBuilder.set(CaptureRequest.CONTROL_AE_REGIONS, new MeteringRectangle[]{new MeteringRectangle
                (rect, 1000)});
        mPreviewRequestBuilder.set(CaptureRequest.CONTROL_AF_MODE, CaptureRequest.CONTROL_AF_MODE_AUTO);
        mPreviewRequestBuilder.set(CaptureRequest.CONTROL_AF_TRIGGER, CameraMetadata.CONTROL_AF_TRIGGER_START);
        mPreviewRequestBuilder.set(CaptureRequest.CONTROL_AE_PRECAPTURE_TRIGGER, CameraMetadata
                .CONTROL_AE_PRECAPTURE_TRIGGER_START);
        try {
            // 7. 发送上述设置的对焦请求,并监听回调
            mCaptureSession.capture(mPreviewRequestBuilder.build(), mAfCaptureCallback, mBackgroundHandler);
        } catch (CameraAccessException e) {
            e.printStackTrace();
        }
    }

    private final CameraCaptureSession.CaptureCallback mAfCaptureCallback = new CameraCaptureSession.CaptureCallback() {

        private void process(CaptureResult result) {
            Integer state = result.get(CaptureResult.CONTROL_AF_STATE);
            if (null == state) {
                return;
            }
            Log.d(TAG, "process: CONTROL_AF_STATE: " + state);
            if (state == CaptureResult.CONTROL_AF_STATE_FOCUSED_LOCKED || state == CaptureResult
                    .CONTROL_AF_STATE_NOT_FOCUSED_LOCKED) {
                Log.d(TAG, "process: start normal preview");
                mPreviewRequestBuilder.set(CaptureRequest.CONTROL_AF_TRIGGER, CameraMetadata.CONTROL_AF_TRIGGER_CANCEL);
                mPreviewRequestBuilder.set(CaptureRequest.CONTROL_AF_MODE, CaptureRequest
                        .CONTROL_AF_MODE_CONTINUOUS_PICTURE);
                mPreviewRequestBuilder.set(CaptureRequest.CONTROL_AE_MODE, CaptureRequest.FLASH_MODE_OFF);
                startPreview();
            }
        }

        @Override
        public void onCaptureProgressed(@NonNull CameraCaptureSession session,
                                        @NonNull CaptureRequest request,
                                        @NonNull CaptureResult partialResult) {
            process(partialResult);
        }

        @Override
        public void onCaptureCompleted(@NonNull CameraCaptureSession session,
                                       @NonNull CaptureRequest request,
                                       @NonNull TotalCaptureResult result) {
            process(result);
        }
    };


    private void startBackgroundThread() {
        if (mBackgroundThread == null || mBackgroundHandler == null) {
            Log.v(TAG, "startBackgroundThread");
            mBackgroundThread = new HandlerThread("CameraBackground");
            mBackgroundThread.start();
            mBackgroundHandler = new Handler(mBackgroundThread.getLooper());
        }
    }

    private void stopBackgroundThread() {
        Log.v(TAG, "stopBackgroundThread");
        if (mBackgroundThread != null) {
            mBackgroundThread.quitSafely();
            try {
                mBackgroundThread.join();
                mBackgroundThread = null;
                mBackgroundHandler = null;
            } catch (InterruptedException e) {
                e.printStackTrace();
            }
        }
    }

    private int clamp(int x, int min, int max) {
        if (x > max) return max;
        if (x < min) return min;
        return x;
    }

    /**
     * Compares two {@code Size}s based on their areas.
     */
    static class CompareSizesByArea implements Comparator<Size> {

        @Override
        public int compare(Size lhs, Size rhs) {
            // We cast here to ensure the multiplications won't overflow
            return Long.signum((long) lhs.getWidth() * lhs.getHeight() -
                    (long) rhs.getWidth() * rhs.getHeight());
        }
    }

}
紧接着我们来看看surface创建的时候我们应该干什么
1.需要创建一个纹理(这个为摄像头数据的预览纹理)
这个纹理会获取他的id,绑定到surfacetexture上,然后通过Camera2的下发流去作为摄像头数据的载体。
2.初始化着色器和着色器程序
3.通过刚刚获得的纹理绑定到surfacetexture上
4.我们还可以在surfacetexture创建好之后,创建OnFrameAvailableListener的监听
5.启动相机预览,下预览流(Camera2)
需要注意的是这个启动相机预览流的时候,会需要用到surface,而这个surface就应该是我们上面创建的surfacetexture对象(该对象又绑定了我们的纹理id),简直就是环环相扣。
@Override
public void onSurfaceCreated(GL10 gl, EGLConfig config) {
    Log.d("yjs","java,onSurfaceCreated");
    /*
    * 尝试使用FBO分屏渲染
    * */
    //先创建一个texture,这里使用的是NDK的native方法
    mPreviewTextureId = onNdkGetTextureId();
    //初始化着色器和着色器程序
    onNdkSurfaceCreated(assetManager);
    mSurfaceTexture = new SurfaceTexture(mPreviewTextureId);
    mSurfaceTexture.setOnFrameAvailableListener(this);
    //相机启动预览流
    mCameraProxy.setupCamera(getWidth(),getHeight());
    mCameraProxy.setPreviewSurface(mSurfaceTexture);
    mCameraProxy.openCamera();
    Log.d("yjs","openCamera");
}
surface变化跟绘制frame的代码比较简单,我就放到一起来说说
@Override
public void onSurfaceChanged(GL10 gl, int width, int height) {
    //NDK调用Native方法
    onNdkSurfaceChanged(width,height);
}

@Override
public void onDrawFrame(GL10 gl) {
    //Log.d("yjs","onDrawFrame");
    mSurfaceTexture.updateTexImage();
    //NDK调用Native方法
    onNdkSurfaceDrawFrame(mPreviewTextureId);
}
可以看到自定义的MyGLSurfaceView只要涉及到OpenGL的操作,都是通过NDK的方式调用Native C++。
private native void onNdkSurfaceCreated(AssetManager assetManager);
private native void onNdkSurfaceChanged(int width,int height);
private native void onNdkSurfaceDrawFrame(int mPreviewTextureId);
private native int onNdkGetTextureId();
native-lib
我们使用脚手架创建项目的话,会发现所有的native方法都会对应生成在一个native-lib.cpp中
#include <jni.h>
#include <string>

#include <GLES3/gl3.h>
#include "GLCanvas.h"
#include "LogUtils.h"

GLCanvas glCanvas;
LogUtils logUtil;

extern "C" JNIEXPORT jstring JNICALL
Java_com_example_openglcameraapplication_MainActivity_stringFromJNI(
        JNIEnv *env,
        jobject /* this */) {
    std::string hello = "Hello from C++";
    return env->NewStringUTF(hello.c_str());
}
extern "C"
JNIEXPORT void JNICALL
Java_com_example_openglcameraapplication_MyGLSurfaceView_onNdkSurfaceCreated(JNIEnv *env,
                                                                             jobject thiz,
                                                                             jobject asset_manager) {
    // TODO: implement onNdkSurfaceCreated()
    logUtil.debug("yjs", "MyGLSurfaceView_onNdkSurfaceCreated");
    glEnable(GL_DEPTH_TEST);
    glClearColor(1.0, 1.0, 0, 1.0);
    AAssetManager *pManager = AAssetManager_fromJava(env, asset_manager);
    //创建一般的着色器程序,以及FBO
    glCanvas.init(pManager, "VFinalShader.vert",
                  "FFinalShader.frag","VShader.vert", "FShader.frag");
    glCanvas.initVAOAndVBO();

    logUtil.debug("yjs", "glCanvas.init");
}
extern "C"
JNIEXPORT void JNICALL
Java_com_example_openglcameraapplication_MyGLSurfaceView_onNdkSurfaceChanged(JNIEnv *env,
                                                                             jobject thiz,
                                                                             jint width,
                                                                             jint height) {
    // TODO: implement onNdkSurfaceChanged()
    logUtil.debug("yjs", "MyGLSurfaceView_onNdkSurfaceChanged");
    glViewport(0, 0, width, height);
    //原本的代码VAO VBO都是draw的时候进行绑定,其实没有必要,因为坐标没有改变,可以直接在surfacecreate的时候就绑定住,这边再顺便将FBO绑定一下
    glCanvas.initFBO(width, height);

}
extern "C"
JNIEXPORT void JNICALL
Java_com_example_openglcameraapplication_MyGLSurfaceView_onNdkSurfaceDrawFrame(JNIEnv *env,
                                                                               jobject thiz,
                                                                               jint m_preview_texture_id) {
    // TODO: implement onNdkSurfaceDrawFrame()
    //清空颜色缓存区以及深度缓冲区
    glClear(GL_COLOR_BUFFER_BIT | GL_DEPTH_BUFFER_BIT);
    glCanvas.Draw(m_preview_texture_id);
}
extern "C"
JNIEXPORT jint JNICALL
Java_com_example_openglcameraapplication_MyGLSurfaceView_onNdkGetTextureId(JNIEnv *env,
                                                                           jobject thiz) {
    // TODO: implement onNdkGetTextureId()
    int textureId = glCanvas.initTexture();
    return textureId;
}
可以注意到其实正在的逻辑处理并不是在native-lib里面进行,这个文件更多是去调用我们声明的一个对象方法,通过这个对象去进行初始化VAO、VBO、FBO,去进行绘制。这样能做到代码更加明确。这也是我们接下来需要着重讲的部分
GLCanvas
GLCanvas是自定义的预览管理类,有.h文件和.cpp文件组成。首先我将所有的代码附上来,再挑其中比较重要的逻辑进行讲解。大家可以先过一遍。
.h文件
//
// Created by yangjunsheng on 2023/12/4.
//

#ifndef OPENGLCAMERAAPPLICATION_GLCANVAS_H
#define OPENGLCAMERAAPPLICATION_GLCANVAS_H

#include "GLES3/gl3.h"
#include "GLUtil.h"
#include <android/asset_manager_jni.h>
#include <android/asset_manager.h>

class GLCanvas {
private:
    GLUtil gLuint;//自己写的工具类,主要是创建对着色器程序的一些操作,封装起来了
    GLuint mProgram;//着色器程序
    GLuint mFBOProgram;//FBO着色器程序
    GLuint mVertexShader;//顶点着色器
    GLuint mFragmentShader;//片段着色器
    GLuint mFBOVertexShader;//FBO顶点着色器
    GLuint mFBOFragmentShader;//FBO片段着色器
    unsigned int mPreviewTextureId;
    unsigned int mFboTextureId;
    unsigned int *VAOs;
    unsigned int *VBOs;
    //创建FBO
    unsigned int mPreviewFBOId;


public:
    GLCanvas();

    ~GLCanvas();

    void init(AAssetManager *pManger, const char *vShaderFileName, const char *fShaderFileName,
              const char *vFBOShaderFileName, const char *fFBOShaderFileName);

    void Draw(int TextureId);

    int initTexture();

    bool initFBO(int width, int height);

    void initVAOAndVBO();

    bool CreateFrameBufferObj();
};


#endif //OPENGLCAMERAAPPLICATION_GLCANVAS_H
.cpp文件
//
// Created by yangjunsheng on 2023/12/4.
//

#include <cstdlib>
#include "GLCanvas.h"

#include <GLES3/gl3ext.h>
#include <GLES2/gl2ext.h>
#include "LogUtils.h"

LogUtils LogUtils;

GLCanvas::GLCanvas() {

}

GLCanvas::~GLCanvas() {
    if (mProgram) {
        // 清理资源
        glDeleteBuffers(1, VBOs);
        glDeleteVertexArrays(1, VAOs);
        glDeleteTextures(1, &mPreviewTextureId);
        delete[] VAOs;
        delete[] VBOs;
        gLuint.DeleteProgram(mProgram);
    }
}

//主要创建顶点着色器以及片段着色器以及将二者附在着色器程序上
void
GLCanvas::init(AAssetManager *pManger, const char *vShaderFileName, const char *fShaderFileName,
               const char *vFBOShaderFileName, const char *fFBOShaderFileName) {
    //通过获取着色器代码文件获取到里面的代码,将其转换成字符串的形式
    AAsset *vFile = AAssetManager_open(pManger, vShaderFileName, AASSET_MODE_BUFFER);
    off_t vFileLength = AAsset_getLength(vFile);
    char *vContentBuff = (char *) malloc(vFileLength);
    AAsset_read(vFile, vContentBuff, vFileLength);
    //千万要记住关闭文件流
    AAsset_close(vFile);

    //接下来获取片段着色器代码转换成字符串
    AAsset *fFile = AAssetManager_open(pManger, fShaderFileName, AASSET_MODE_BUFFER);
    off_t fFileLength = AAsset_getLength(fFile);
    char *fContentBuff = (char *) malloc(fFileLength);
    AAsset_read(fFile, fContentBuff, fFileLength);
    AAsset_close(fFile);

    AAsset *vFBOFile = AAssetManager_open(pManger, vFBOShaderFileName, AASSET_MODE_BUFFER);
    off_t vFBOFileLength = AAsset_getLength(vFBOFile);
    char *vFBOContentBuff = (char *) malloc(vFBOFileLength);
    AAsset_read(vFBOFile, vFBOContentBuff, vFBOFileLength);
    AAsset_close(vFBOFile);

    AAsset *fFBOFile = AAssetManager_open(pManger, fFBOShaderFileName, AASSET_MODE_BUFFER);
    off_t fFBOFileLength = AAsset_getLength(fFBOFile);
    char *fFBOContentBuff = (char *) malloc(fFBOFileLength);
    AAsset_read(fFBOFile, fFBOContentBuff, fFBOFileLength);
    AAsset_close(vFBOFile);

    LogUtils.debug("yjs", vContentBuff);
    mProgram = gLuint.CreateProgram(vContentBuff, fContentBuff, mVertexShader, mFragmentShader);
    mFBOProgram = gLuint.CreateProgram(vFBOContentBuff, fFBOContentBuff, mFBOVertexShader,
                                       mFBOFragmentShader);
    LogUtils.debug("yjs", "mProgram:" + mProgram);
    free(vContentBuff);
    free(fContentBuff);
    free(vFBOContentBuff);
    free(fFBOContentBuff);
}

void GLCanvas::initVAOAndVBO() {
    LogUtils.debug("yjs","GLCanvas.cpp,initVAOAndVBO");
    //顶点坐标
    float vVertices[] = {
            -1.0f, 1.0f,
            -1.0f, -1.0f,
            1.0f, -1.0f,
            1.0f, 1.0f
    };

    //fbo 纹理坐标与正常纹理方向不同,原点位于左下角
    GLfloat vFboTexCoors[] = {
            1.0f, 1.0f,
            0.0f, 1.0f,
            0.0f, 0.0f,
            1.0f, 0.0f
    };

    //正常纹理坐标
    GLfloat vTexCoors[] = {
            0.0f, 1.0f,
            0.0f, 0.0f,
            1.0f, 0.0f,
            1.0f, 1.0f,
    };

    VAOs = new GLuint[2];
    VBOs = new GLuint [3];
    glGenVertexArrays(2, VAOs);
    glGenBuffers(3, VBOs);

    //首先先存储VBO
    glBindBuffer(GL_ARRAY_BUFFER, VBOs[0]);
    glBufferData(GL_ARRAY_BUFFER, sizeof(vVertices), vVertices, GL_STATIC_DRAW);

    glBindBuffer(GL_ARRAY_BUFFER, VBOs[1]);
    glBufferData(GL_ARRAY_BUFFER, sizeof(vFboTexCoors), vFboTexCoors, GL_STATIC_DRAW);

    glBindBuffer(GL_ARRAY_BUFFER, VBOs[2]);
    glBufferData(GL_ARRAY_BUFFER, sizeof(vTexCoors), vTexCoors, GL_STATIC_DRAW);

    glBindBuffer(GL_ARRAY_BUFFER, 0);

    //先绑定普通渲染的VAO
    glBindVertexArray(VAOs[0]);
    glBindBuffer(GL_ARRAY_BUFFER, VBOs[0]);
    glEnableVertexAttribArray(0);
    glVertexAttribPointer(0, 2, GL_FLOAT, GL_FALSE, 2 * sizeof(float), (void *) 0);
    glBindBuffer(GL_ARRAY_BUFFER, VBOs[2]);
    glEnableVertexAttribArray(1);
    glVertexAttribPointer(1, 2, GL_FLOAT, GL_FALSE, 2 * sizeof(float),
                          (void *) 0);
    glBindBuffer(GL_ARRAY_BUFFER, 0);
    glBindVertexArray(0);

    //绑定FBO渲染的VAO
    glBindVertexArray(VAOs[1]);
    glBindBuffer(GL_ARRAY_BUFFER, VBOs[0]);
    glEnableVertexAttribArray(0);
    glVertexAttribPointer(0, 2, GL_FLOAT, GL_FALSE, 2 * sizeof(float), (void *) 0);
    glBindBuffer(GL_ARRAY_BUFFER, VBOs[1]);
    glEnableVertexAttribArray(1);
    glVertexAttribPointer(1, 2, GL_FLOAT, GL_FALSE, 2 * sizeof(float),
                          (void *) 0);
    glBindBuffer(GL_ARRAY_BUFFER, 0);
    glBindVertexArray(0);
    LogUtils.debug("yjs","GLCanvas.cpp,end initVAOAndVBO");
}


void GLCanvas::Draw(int textureId) {
    if (mProgram == 0) {
        LogUtils.debug("yjs", "mProgram is null");
        return;
    }
    //LogUtils.debug("yjs","GLCanvas.cpp,draw");
    glBindFramebuffer(GL_FRAMEBUFFER, mPreviewFBOId);
    glUseProgram(mFBOProgram);
    glEnable(GL_CULL_FACE);
    glBindVertexArray(VAOs[1]);
    glActiveTexture(GL_TEXTURE0);
    glBindTexture(GL_TEXTURE_EXTERNAL_OES, mPreviewTextureId);
    glUniform1i(glGetUniformLocation(mProgram, "texture1"), 0);
    glDrawArrays(GL_TRIANGLE_FAN, 0, 4);

    glBindTexture(GL_TEXTURE_2D, 0);
    glBindVertexArray(0);
    glBindFramebuffer(GL_FRAMEBUFFER, 0);

    glUseProgram(mProgram);
    glEnable(GL_CULL_FACE);
    glBindVertexArray(VAOs[0]);
    glActiveTexture(GL_TEXTURE0);
    glBindTexture(GL_TEXTURE_2D, mFboTextureId);
    glUniform1i(glGetUniformLocation(mProgram, "s_TextureMap"), 0);
    glDrawArrays(GL_TRIANGLE_FAN, 0, 4);

    glBindTexture(GL_TEXTURE_2D, 0);
    glBindVertexArray(0);


    //texture也要记得删

}

int GLCanvas::initTexture() {
    unsigned int texture;
    glActiveTexture(GL_TEXTURE0);
    glGenTextures(1, &texture);
    glBindTexture(GL_TEXTURE_EXTERNAL_OES, texture);
    glTexParameterf(GL_TEXTURE_EXTERNAL_OES, GL_TEXTURE_MIN_FILTER, GL_LINEAR);
    glTexParameterf(GL_TEXTURE_EXTERNAL_OES, GL_TEXTURE_MAG_FILTER, GL_LINEAR);
    glTexParameteri(GL_TEXTURE_EXTERNAL_OES, GL_TEXTURE_WRAP_S, GL_CLAMP_TO_EDGE);
    glTexParameteri(GL_TEXTURE_EXTERNAL_OES, GL_TEXTURE_WRAP_T, GL_CLAMP_TO_EDGE);
    glBindTexture(GL_TEXTURE_EXTERNAL_OES, 0);
    if (texture != -1) {
        mPreviewTextureId = texture;
        return texture;
    } else {
        return -1;
    }
}

bool GLCanvas::initFBO(int width, int height) {
    // 创建一个 2D 纹理用于连接 FBO 的颜色附着
    glGenTextures(1, &mFboTextureId);
    glBindTexture(GL_TEXTURE_2D, mFboTextureId);
    glTexParameterf(GL_TEXTURE_2D, GL_TEXTURE_WRAP_S, GL_CLAMP_TO_EDGE);
    glTexParameterf(GL_TEXTURE_2D, GL_TEXTURE_WRAP_T, GL_CLAMP_TO_EDGE);
    glTexParameteri(GL_TEXTURE_2D, GL_TEXTURE_MIN_FILTER, GL_LINEAR);
    glTexParameteri(GL_TEXTURE_2D, GL_TEXTURE_MAG_FILTER, GL_LINEAR);
    glBindTexture(GL_TEXTURE_2D, GL_NONE);

    // 创建 FBO
    glGenFramebuffers(1, &mPreviewFBOId);
    // 绑定 FBO
    glBindFramebuffer(GL_FRAMEBUFFER, mPreviewFBOId);
    // 绑定 FBO 纹理
    glBindTexture(GL_TEXTURE_2D, mFboTextureId);
    // 将纹理连接到 FBO 附着
    glFramebufferTexture2D(GL_FRAMEBUFFER, GL_COLOR_ATTACHMENT0, GL_TEXTURE_2D, mFboTextureId, 0);
    // 分配内存大小
    glTexImage2D(GL_TEXTURE_2D, 0, GL_RGBA, width, height, 0, GL_RGBA,
                 GL_UNSIGNED_BYTE, nullptr);
    // 检查 FBO 的完整性状态
    if (glCheckFramebufferStatus(GL_FRAMEBUFFER) != GL_FRAMEBUFFER_COMPLETE) {
        LogUtils.debug("yjs",
                       "FBOSample::CreateFrameBufferObj glCheckFramebufferStatus status != GL_FRAMEBUFFER_COMPLETE");
        return false;
    }
    // 解绑纹理
    glBindTexture(GL_TEXTURE_2D, GL_NONE);
    // 解绑 FBO
    glBindFramebuffer(GL_FRAMEBUFFER, GL_NONE);
    return true;
}
void init(AAssetManager *pManger, const char *vShaderFileName, const char *fShaderFileName,
          const char *vFBOShaderFileName, const char *fFBOShaderFileName);

void Draw(int TextureId);

int initTexture();

bool initFBO(int width, int height);

void initVAOAndVBO();
上面几个方法是完成预览的一些核心方法 :
- init(...):这个方法主要是通过assetManger获取到我们写的glsl文件内容去创建顶点着色器、片段着色器,并将二者附着到着色器程序中。执行完这个方法我们就可以在绘制的时候使用着色器程序了。需要注意的是,这个方法创建了两个着色器程序,一个是FBO渲染的程序,一个是FBO渲染后,屏幕上的渲染着色器程序。下面我这边顺便将glsl文件附上来
FBO渲染:
#顶点着色器

#version 300 es

layout(location = 0) in vec4 vPositon;
layout(location = 1) in vec2 aTextCoord;

out vec2 TexCoord;

void main() {
    gl_Position = vPositon;
    TexCoord=vec2(aTextCoord.x,aTextCoord.y);
}


#片段着色器

#version 300 es

#extension GL_OES_EGL_image_external_essl3 : require
precision mediump float;
out vec4 fragColor;
in vec2 TexCoord;
uniform samplerExternalOES  texture1;
void main() {
    vec4 tempColor=texture(texture1,TexCoord);
    #黑白滤镜 rgb都是一样的,所以我们只需要取平均值就行!
    float c=(tempColor.r+tempColor.g+tempColor.b)/3.0;
    fragColor=vec4(c,c,c,tempColor.a);

    /*普通原本的样子*/
    /*
        fragColor=texture(texture1,TexCoord);
    */
}
普通渲染
#顶点着色器

#version 300 es

layout(location = 0) in vec4 vPositon;
layout(location = 1) in vec2 aTextCoord;

out vec2 TexCoord;

void main() {
    gl_Position = vPositon;
    TexCoord=vec2(aTextCoord.x,aTextCoord.y);
}


#片段着色器

#version 300 es

precision mediump float;
in vec2 TexCoord;
out vec4 fragColor;
uniform sampler2D s_TextureMap;

void main() {
    fragColor = texture(s_TextureMap, TexCoord);
}
我这里补充一下,普通渲染的片段着色器为什么用的纹理是sampler2D的格式,而不是samplerExternalOES。
正如之前的图解,普通渲染用到纹理是另外创建的FBO中的纹理,而在创建FBO的时候我们就直接绑定了一个纹理,而这个纹理就是sampler2D格式的。具体可以看看后面的initFBO的方法解释。
- initTexture:这个方法是为了创建一个纹理作为surface传递给Camera2,以及后续拿到这个纹理进行滤镜处理。预览的原始数据都在这个纹理里面,就是创建一个格式为samplerExternalOES的纹理。
- initFBO:这个方法就是初始化一个FBO,其实这个代码可以是固定的,没啥变化。
bool GLCanvas::initFBO(int width, int height) {
    // 创建一个 2D 纹理用于连接 FBO 的颜色附着
    glGenTextures(1, &mFboTextureId);
    glBindTexture(GL_TEXTURE_2D, mFboTextureId);
    glTexParameterf(GL_TEXTURE_2D, GL_TEXTURE_WRAP_S, GL_CLAMP_TO_EDGE);
    glTexParameterf(GL_TEXTURE_2D, GL_TEXTURE_WRAP_T, GL_CLAMP_TO_EDGE);
    glTexParameteri(GL_TEXTURE_2D, GL_TEXTURE_MIN_FILTER, GL_LINEAR);
    glTexParameteri(GL_TEXTURE_2D, GL_TEXTURE_MAG_FILTER, GL_LINEAR);
    glBindTexture(GL_TEXTURE_2D, GL_NONE);

    // 创建 FBO
    glGenFramebuffers(1, &mPreviewFBOId);
    // 绑定 FBO
    glBindFramebuffer(GL_FRAMEBUFFER, mPreviewFBOId);
    // 绑定 FBO 纹理
    glBindTexture(GL_TEXTURE_2D, mFboTextureId);
    // 将纹理连接到 FBO 附着
    glFramebufferTexture2D(GL_FRAMEBUFFER, GL_COLOR_ATTACHMENT0, GL_TEXTURE_2D, mFboTextureId, 0);
    // 分配内存大小
    glTexImage2D(GL_TEXTURE_2D, 0, GL_RGBA, width, height, 0, GL_RGBA,
                 GL_UNSIGNED_BYTE, nullptr);
    // 检查 FBO 的完整性状态
    if (glCheckFramebufferStatus(GL_FRAMEBUFFER) != GL_FRAMEBUFFER_COMPLETE) {
        LogUtils.debug("yjs",
                       "FBOSample::CreateFrameBufferObj glCheckFramebufferStatus status != GL_FRAMEBUFFER_COMPLETE");
        return false;
    }
    // 解绑纹理
    glBindTexture(GL_TEXTURE_2D, GL_NONE);
    // 解绑 FBO
    glBindFramebuffer(GL_FRAMEBUFFER, GL_NONE);
    return true;
}
上面这段代码有一个比较重要的理解点 !
glFramebufferTexture2D(GL_FRAMEBUFFER, GL_COLOR_ATTACHMENT0, GL_TEXTURE_2D, mFboTextureId, 0);
这行代码主要就是让后续绘制都绘制到这个纹理上,可以回过头看一下FBO的片段着色器,他out了一个fragColor,这个就是输出到这个纹理上的。这也是为什么后续可以直接将这个texture传递到普通屏幕渲染去进行使用。
- initVAOAndVBO:初始化好FBO之后,我们就可以开始初始化FBO跟普通渲染的VAO\VBO。
void GLCanvas::initVAOAndVBO() {
    LogUtils.debug("yjs","GLCanvas.cpp,initVAOAndVBO");
    //顶点坐标
    float vVertices[] = {
            -1.0f, 1.0f,
            -1.0f, -1.0f,
            1.0f, -1.0f,
            1.0f, 1.0f
    };

    //fbo 纹理坐标与正常纹理方向不同,原点位于左下角
    GLfloat vFboTexCoors[] = {
            1.0f, 1.0f,
            0.0f, 1.0f,
            0.0f, 0.0f,
            1.0f, 0.0f
    };

    //正常纹理坐标
    GLfloat vTexCoors[] = {
            0.0f, 1.0f,
            0.0f, 0.0f,
            1.0f, 0.0f,
            1.0f, 1.0f,
    };

    VAOs = new GLuint[2];
    VBOs = new GLuint [3];
    glGenVertexArrays(2, VAOs);
    glGenBuffers(3, VBOs);

    //首先先存储VBO
    glBindBuffer(GL_ARRAY_BUFFER, VBOs[0]);
    glBufferData(GL_ARRAY_BUFFER, sizeof(vVertices), vVertices, GL_STATIC_DRAW);

    glBindBuffer(GL_ARRAY_BUFFER, VBOs[1]);
    glBufferData(GL_ARRAY_BUFFER, sizeof(vFboTexCoors), vFboTexCoors, GL_STATIC_DRAW);

    glBindBuffer(GL_ARRAY_BUFFER, VBOs[2]);
    glBufferData(GL_ARRAY_BUFFER, sizeof(vTexCoors), vTexCoors, GL_STATIC_DRAW);

    glBindBuffer(GL_ARRAY_BUFFER, 0);

    //先绑定普通渲染的VAO
    glBindVertexArray(VAOs[0]);
    glBindBuffer(GL_ARRAY_BUFFER, VBOs[0]);
    glEnableVertexAttribArray(0);
    glVertexAttribPointer(0, 2, GL_FLOAT, GL_FALSE, 2 * sizeof(float), (void *) 0);
    glBindBuffer(GL_ARRAY_BUFFER, VBOs[2]);
    glEnableVertexAttribArray(1);
    glVertexAttribPointer(1, 2, GL_FLOAT, GL_FALSE, 2 * sizeof(float),
                          (void *) 0);
    glBindBuffer(GL_ARRAY_BUFFER, 0);
    glBindVertexArray(0);

    //绑定FBO渲染的VAO
    glBindVertexArray(VAOs[1]);
    glBindBuffer(GL_ARRAY_BUFFER, VBOs[0]);
    glEnableVertexAttribArray(0);
    glVertexAttribPointer(0, 2, GL_FLOAT, GL_FALSE, 2 * sizeof(float), (void *) 0);
    glBindBuffer(GL_ARRAY_BUFFER, VBOs[1]);
    glEnableVertexAttribArray(1);
    glVertexAttribPointer(1, 2, GL_FLOAT, GL_FALSE, 2 * sizeof(float),
                          (void *) 0);
    glBindBuffer(GL_ARRAY_BUFFER, 0);
    glBindVertexArray(0);
    LogUtils.debug("yjs","GLCanvas.cpp,end initVAOAndVBO");
}
其实通过这段代码,也能让对VAO\VBO理解不是很深的同学加深一下理解。VBO是存储顶点的地方,VAO可以通过绑定VBO控制这些顶点怎么绘制。代码应该也不算难,我这边就不解释啦,大家可以仔细看看。
还有一个地方需要注意的是,因为是相机预览demo,便会有cameraid这个东西,前摄的FBO纹理坐标,需要做一个镜像,后摄则不需要!
- Draw:该方法顾名思义就是绘制的方法,也算是核心中的核心了。
void GLCanvas::Draw(int textureId) {
    if (mProgram == 0) {
        LogUtils.debug("yjs", "mProgram is null");
        return;
    }
    //LogUtils.debug("yjs","GLCanvas.cpp,draw");
    glBindFramebuffer(GL_FRAMEBUFFER, mPreviewFBOId);
    glUseProgram(mFBOProgram);
    glEnable(GL_CULL_FACE);
    glBindVertexArray(VAOs[1]);
    glActiveTexture(GL_TEXTURE0);
    glBindTexture(GL_TEXTURE_EXTERNAL_OES, mPreviewTextureId);
    glUniform1i(glGetUniformLocation(mProgram, "texture1"), 0);
    glDrawArrays(GL_TRIANGLE_FAN, 0, 4);

    glBindTexture(GL_TEXTURE_2D, 0);
    glBindVertexArray(0);
    glBindFramebuffer(GL_FRAMEBUFFER, 0);

    glUseProgram(mProgram);
    glEnable(GL_CULL_FACE);
    glBindVertexArray(VAOs[0]);
    glActiveTexture(GL_TEXTURE0);
    glBindTexture(GL_TEXTURE_2D, mFboTextureId);
    glUniform1i(glGetUniformLocation(mProgram, "s_TextureMap"), 0);
    glDrawArrays(GL_TRIANGLE_FAN, 0, 4);

    glBindTexture(GL_TEXTURE_2D, 0);
    glBindVertexArray(0);


    //texture也要记得删

}
我们来看看这个逻辑,我们如果不调用这个方法
glBindFramebuffer(GL_FRAMEBUFFER, mPreviewFBOId);
draw还是会默认使用的屏幕的FBO进行绘制,调用了这个方法之后,我们使用FBO的着色器程序,再绑定之前初始化过的FBO的VAO,绑定预览的纹理到FBO中。当然最后一定要记得,FBO使用完之后,要记得解绑,否则后面会一直在用这个FBO。
glBindFramebuffer(GL_FRAMEBUFFER, 0);
FBO渲染完之后,按正常来说,我们原本初始化的那个FBO的纹理便有了处理之后的(滤镜)内容,这时候我们再将这个纹理绑定到普通渲染的纹理中。
glActiveTexture(GL_TEXTURE0);
glBindTexture(GL_TEXTURE_2D, mFboTextureId);
glUniform1i(glGetUniformLocation(mProgram, "s_TextureMap"), 0);
自此,主要的离屏流程就基本导通!但是在这个过程中,你们看代码肯定会发现有些类好像没有看到有些附上,例如LogUtils、GLUtils。这些都属于工具类,我就不具体进行讲解,在文章最后附上,大家可以结合之前说的进行理解查看。
LogUtils
.h文件
//
// Created by yangjunsheng on 2023/11/6.
//

#ifndef STICKERSQUAREAPPLICATION_LOGUTILS_H
#define STICKERSQUAREAPPLICATION_LOGUTILS_H
#include <android/log.h>


class LogUtils {
public:
    static void debug(const char* tag, const char* message);

    static void info(const char* tag, const char* message);

    static void warn(const char* tag, const char* message);

    static void error(const char* tag, const char* message);
};


#endif //STICKERSQUAREAPPLICATION_LOGUTILS_H
.cpp文件
//
// Created by yangjunsheng on 2023/11/6.
//

#include "LogUtils.h"

void LogUtils::debug(const char *tag, const char *message) {
    __android_log_print(ANDROID_LOG_DEBUG, tag, "%s", message);
}

void LogUtils::info(const char *tag, const char *message) {
    __android_log_print(ANDROID_LOG_INFO, tag, "%s", message);
}

void LogUtils::warn(const char *tag, const char *message) {
    __android_log_print(ANDROID_LOG_WARN, tag, "%s", message);
}

void LogUtils::error(const char *tag, const char *message) {
    __android_log_print(ANDROID_LOG_ERROR, tag, "%s", message);
}
GLUtils
.h文件
//
// Created by yangjunsheng on 2023/12/4.
//

#ifndef OPENGLCAMERAAPPLICATION_GLUTIL_H
#define OPENGLCAMERAAPPLICATION_GLUTIL_H

#include "GLES3/gl3.h"


class GLUtil {
public:
    //加载着色器
    GLuint LoadShader(GLenum shaderType, const char *pSource);

    //创建着色器程序
    GLuint CreateProgram(const char *pVertexShaderSource, const char *pFragShaderSource,
                         GLuint &vertexShaderHandle, GLuint &fragShaderHandle);

    //删除着色器程序
    void DeleteProgram(GLuint &program);
};


#endif //OPENGLCAMERAAPPLICATION_GLUTIL_H
.cpp文件
//
// Created by yangjunsheng on 2023/12/4.
//

#include "GLUtil.h"
#include "LogUtils.h"

GLuint GLUtil::LoadShader(GLenum shaderType, const char *pSource) {
    GLuint shader =0;
    //创建着色器,通过传进来的shaderType创建顶点着色器和片段着色器
    shader=glCreateShader(shaderType);
    if(shader){
        glShaderSource(shader,1,&pSource,NULL);
        //编译shader
        glCompileShader(shader);

        GLint compileStatus;
        glGetShaderiv(shader, GL_COMPILE_STATUS, &compileStatus);
        if (compileStatus != GL_TRUE) {
            GLint infoLogLength;
            glGetShaderiv(shader, GL_INFO_LOG_LENGTH, &infoLogLength);
            if (infoLogLength > 0) {
                char* infoLog = new char[infoLogLength];
                glGetShaderInfoLog(shader, infoLogLength, NULL, infoLog);
                LogUtils::error("yjs", infoLog);
                delete[] infoLog;
            }
            glDeleteShader(shader);
            shader = 0;
        }
    }
    return shader;
}

GLuint GLUtil::CreateProgram(const char *pVertexShaderSource, const char *pFragShaderSource,
                             GLuint &vertexShaderHandle, GLuint &fragShaderHandle) {
    GLuint program =0;
    vertexShaderHandle=LoadShader(GL_VERTEX_SHADER,pVertexShaderSource);
    if (!vertexShaderHandle){
        return program;
    }
    fragShaderHandle=LoadShader(GL_FRAGMENT_SHADER,pFragShaderSource);
    if (!fragShaderHandle){
        return program;
    }
    program=glCreateProgram();
    if (program){
        LogUtils::debug("yjs","create program success");
        //将着色器附加到着色器程序中
        glAttachShader(program,vertexShaderHandle);
        glAttachShader(program,fragShaderHandle);
        glLinkProgram(program);

        GLint linkStatus;
        glGetProgramiv(program, GL_LINK_STATUS, &linkStatus);
        if (linkStatus != GL_TRUE) {
            GLint infoLogLength;
            glGetProgramiv(program, GL_INFO_LOG_LENGTH, &infoLogLength);
            if (infoLogLength > 0) {
                char* infoLog = new char[infoLogLength];
                glGetProgramInfoLog(program, infoLogLength, NULL, infoLog);
                LogUtils::error("yjs", infoLog);
                delete[] infoLog;
            }
            glDeleteProgram(program);
            program = 0;
        }

        //链接好之后就可以把之前的shader给删掉了
        glDetachShader(program,vertexShaderHandle);
        glDeleteShader(vertexShaderHandle);
        vertexShaderHandle=0;
        glDetachShader(program,fragShaderHandle);
        glDeleteShader(fragShaderHandle);
        fragShaderHandle=0;

    }
    LogUtils::debug("yjs","get here");
    return program;
}

void GLUtil::DeleteProgram(GLuint &program) {
    if (program){
        glUseProgram(0);
        glDeleteProgram(program);
        program=0;
    }
}
CMake
# For more information about using CMake with Android Studio, read the
# documentation: https://d.android.com/studio/projects/add-native-code.html.
# For more examples on how to use CMake, see https://github.com/android/ndk-samples.

# Sets the minimum CMake version required for this project.
cmake_minimum_required(VERSION 3.22.1)

# Declares the project name. The project name can be accessed via ${ PROJECT_NAME},
# Since this is the top level CMakeLists.txt, the project name is also accessible
# with ${CMAKE_PROJECT_NAME} (both CMake variables are in-sync within the top level
# build script scope).
project("openglcameraapplication")

# Creates and names a library, sets it as either STATIC
# or SHARED, and provides the relative paths to its source code.
# You can define multiple libraries, and CMake builds them for you.
# Gradle automatically packages shared libraries with your APK.
#
# In this top level CMakeLists.txt, ${CMAKE_PROJECT_NAME} is used to define
# the target library name; in the sub-module's CMakeLists.txt, ${PROJECT_NAME}
# is preferred for the same purpose.
#
# In order to load a library into your app from Java/Kotlin, you must call
# System.loadLibrary() and pass the name of the library defined here;
# for GameActivity/NativeActivity derived applications, the same library name must be
# used in the AndroidManifest.xml file.
add_library(${CMAKE_PROJECT_NAME} SHARED
        # List C/C++ source files with relative paths to this CMakeLists.txt.
        native-lib.cpp
        GLUtil.cpp
        GLCanvas.cpp
        LogUtils.cpp)

# Specifies libraries CMake should link to your target library. You
# can link libraries from various origins, such as libraries defined in this
# build script, prebuilt third-party libraries, or Android system libraries.
target_link_libraries(${CMAKE_PROJECT_NAME}
        # List libraries link to the target library
        android
        log
        GLESv3
        GLESv2
        )
总结
写这篇文章的主要原因还是想做个学习笔记进行备份,尽可能的按照自己的思路进行编写,文笔有限可能有些地方比较难懂,我这边也将我的项目进行打包上传,大家可以进行下载查看。要是CSDN要钱的话,可以私信我,我给你们发一份,直接就可以运行的!
最后在啰嗦一下,其实FBO很简单的,我们只要做好FBO的初始化,在我们绘制的时候 ,把我们想要绘制处理的东西先绘制到FBO中,然后它里面的纹理,我们就可以直接放到普通窗口渲染中,思路还算清晰的噢,大家多消化消化,理解理解!
谢谢大家散会!


 1万+
1万+


 被折叠的 条评论
为什么被折叠?
被折叠的 条评论
为什么被折叠?
 到【灌水乐园】发言


