


前言
文本实现使用 nodejs 搭建一个 http 服务和 ws 服务,然后使用 nodeMcu 读取遥杆传感器信号并整理发送到 http 服务,再由 ws 服务推送到网页端,实现摇杆控制网页中的内容。
交流群
QQ 交流群: 854445223
效果展示
–
一、材料准备
1、nodeMcu 板子一块

2、摇杆模块一个

3、vsCode 编辑器
4、ESPlorer 上传代码到 nodeMcu 板子中的工具(需要 java 环境)
下载地址:https://github.com/4refr0nt/ESPlorer/releases
5、固件下载
下载地址:https://nodemcu-build.com/
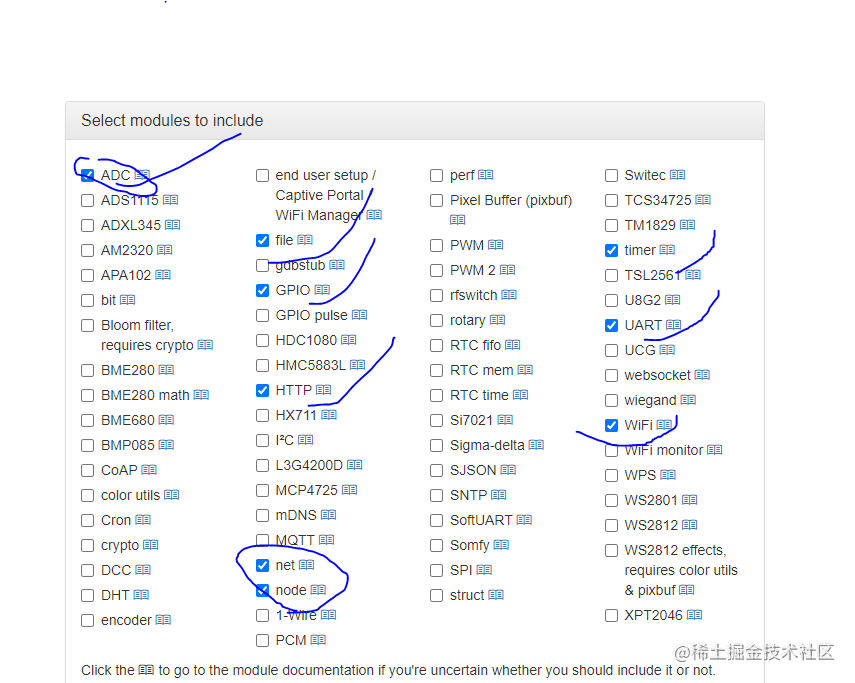
上面选项中除了 http 和 ADC 都是默认选择的,所以只需要注意是否选择了上述两个模块即可。
上面的邮箱不能写 qq 邮箱,建议用 163 邮箱。
6、固件烧录工具 ESP8266Flasher
下载地址:https://github.com/nodemcu/nodemcu-flasher/tree/master/Win64/Release
7、一台备案的服务器
http 模块请求的地址必须是域名,如果为 ip 的话无法请求。所以需要一台备案的服务器,或者使用国外的服务器也可以,只要能使用域名即可。
二、http 服务、ws服务 搭建
使用 express.js、scoket.io 实现,具体代码如下
const express = require('express');
const bodyParser = require('body-parser');//解析,用req.body获取post参数
const app = express();
app.use(bodyParser.json());
app.use(bodyParser.urlencoded({extended: false}));
const http = require('http');
const server = http.createServer(app);
const { Server } = require("socket.io");
const io = new Server(server, {
  // 设置允许跨域的域名,*代表允许任意域名跨域
  cors: {
    origin: "*",
  }
});

app.all("*",function (req,res,next) {
    // 设置允许跨域的域名,*代表允许任意域名跨域
    res.header("Access-Control-Allow-Origin","*");
    next();
});

app.get('/',(req,res) => {
    res.send('<h1>Hello world scoket</h1>');
});

// 接收传感器人物动态
app.post('/personControl',(req,res) => {
    console.log('收到请求-json:',req.body)
    res.json({ success: true, data: req.body })
    // 直接广播
    io.emit("personControl", req.body)
})

io.on('connection',(socket) => {
    console.log('==============');
    console.log('一个用户连接:',socket.id);

    socket.on('disconnect',() => {
        console.log('一个用户断开连接:',socket.id);
    });

    socket.emit("hey", "hello")
});


server.listen(3000,() => {
    console.log('listening on *:3000');
});
http 服务提供了:
一个 get 接口 / ,方便用于浏览器直接查看服务是否运行了
一个 post 接口 personControl 提供给 ndoeMcu 给网页提供数据
ws 服务提供了:
用户首次连接时发送 hello 问候语,
当 personControl 接口收到数据后也广播数据出去。
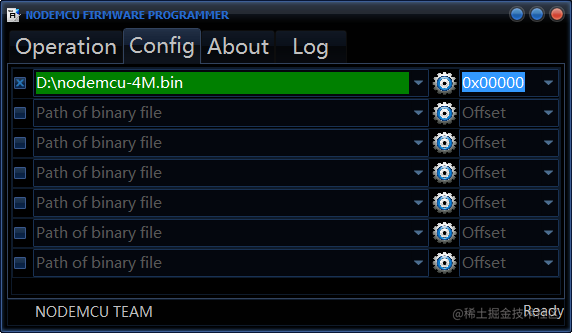
三、nodeMcu 固件烧录
1、选择好串口
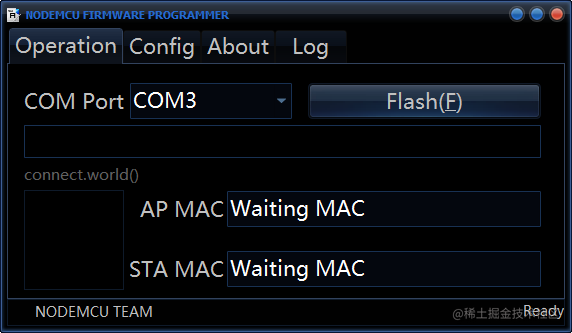
2、选择好下载的固件 .bin 结尾的文件
3、回到第一个页面,然后点击 Flash 按钮
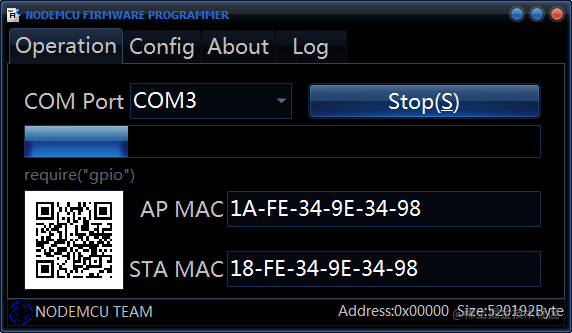
下图这样就成功了

四、nodeMcu 代码编写
主要是用于读取遥感传感器的代码,一共需要两个文件,打开 ESPlorer,点击新增按钮即可新增文件

init.lua
--  nodeMcu 上电后默认会调用这个 init.lua
dofile("script2.lua")
script2.lua
-- 连接 wifi
function connectWifi(ssid, pwd, successCb, errorCb, disconnectCb)
    wifi.setmode(wifi.STATION)
    station_cfg={}
    station_cfg.ssid = ssid
    station_cfg.pwd = pwd
    --station_cfg.save = false
    print("连接wifi:"..ssid.." - "..pwd)
    wifi.sta.config(station_cfg)
end
connectWifi("test", "12345678")

-- 连接成功
connectWifiSuccess = function()

    yPin = 2

--  前后方向状态 front | back
    yState = "front"
--  左右转向  "left" | "right" | "none"
    rotate = "none"

    domain = "http://不给你们看.com:3000/personControl"

--  定时读取 IO 口
    mytimer = tmr.create()
    mytimer:register(100, tmr.ALARM_AUTO, function()
        yVal = gpio.read(yPin)
--        print(yVal.."  "..adc.read(0))
        -- [前后] --
        if(yVal == 1) then
        -- [默认状态是向前]
            if(yState ~= "front") then
                yState = "front"
                print("front")
                local body = '{"type":"yState", "value":"'..yState..'"}'
                postData(domain, body, function(data) print(data) end)
            end
        elseif(yVal == 0) then
        -- [说明用户控制了back]
            if(yState ~= "back") then
                yState = "back"
                print("back")
                local body = '{"type":"back", "value":"'..yState..'"}'
                postData(domain, body, function(data) print(data) end)
            end
        end

        -- [let and right] --
         if(adc.read(0) > 1000 ) then
            -- [向左]
            if(rotate ~= "left") then
                rotate = "left"
                print("left")
                local body = '{"type":"rotate", "value":"'..rotate..'"}'
                postData(domain, body, function(data) print(data) end)
            end
         elseif(adc.read(0) < 100 ) then
            -- [向右]
            if(rotate ~= "right") then
                rotate = "right"
                print("right")
                local body = '{"type":"rotate", "value":"'..rotate..'"}'
                postData(domain, body, function(data) print(data) end)
            end
         else
            -- [不转向]
            if(rotate ~= "none") then
                rotate = "none"
                print("none")
                local body = '{"type":"rotate", "value":"'..rotate..'"}'
                postData(domain, body, function(data) print(data) end)
            end
         end
    end)
    mytimer:start()
end


-- 连接失败
connectWifiError = function()
end

-- 断开 wifi
connectWifiDisconnect = function()
--    mytimer:unregister()
end


----  wifi 成功回调
wifi.eventmon.register(wifi.eventmon.STA_CONNECTED, function(T)
    print("连接 wifi 成功")
    if(type(connectWifiSuccess) == "function") then connectWifiSuccess() end
end)

--  wifi 失败回调
wifi.eventmon.register(wifi.eventmon.STA_DHCP_TIMEOUT, function()
    print("连接 wifi 超时")
    if(type(connectWifiError) == "function") then connectWifiError() end
end)

--  wifi 断开回调
wifi.eventmon.register(wifi.eventmon.STA_DISCONNECTED, function()
    print("断开 wifi")
    if(type(connectWifiDisconnect) == "function") then connectWifiDisconnect() end
end)


-- 经测试,用 ip 无法请求
-- post 请求
function postData(url, body, cb)
    print("\n发出POST请求:\n"..body)
    http.post(url, 'Content-Type: application/json\r\n', body, function(code, data)
        if (code < 0) then
          print("HTTP request failed, code:"..code)
        else
          cb(data)
        end
    end)
end
复制进去后 ctrl + s 保存即可。
上面代码比较简单就不仔细赘述了,对应好以下引脚即可:
| 遥感 | nodeMcu |
|---|---|
| VCC | 3.3v |
| GND | GND |
| X | A0 |
| Y | A2 |
主要是 nodeMcu 只有 A0 可以使用 adc 模块,所以只有 A0 可以把 3.3v 转为 0~1024 的模拟量。
所以 Y 轴只能读取高电平或者低电平,默认高电平,所以默认我们的模型要么停下来,要么向前走一下。
给网页中的数据有以下两种情况
// 1、转向数据
{"type":"rotate", "value":"right" | "left"}

// 2、前进还是停止状态 front | back, 这里 back 做停止状态,懒得写后退
{"type":"rotate", "value":"front" | "back"}
其他注意事项:
ESPlorer 中很多汉字也无法通过编译,如果上传代码到板子在某个汉字地方报错,删除对应汉字就好了(注释无用!!!)
注意 wifi 如果是 5GHZ 的情况下可能链接不上,看板子是否只是支持 2.45GH
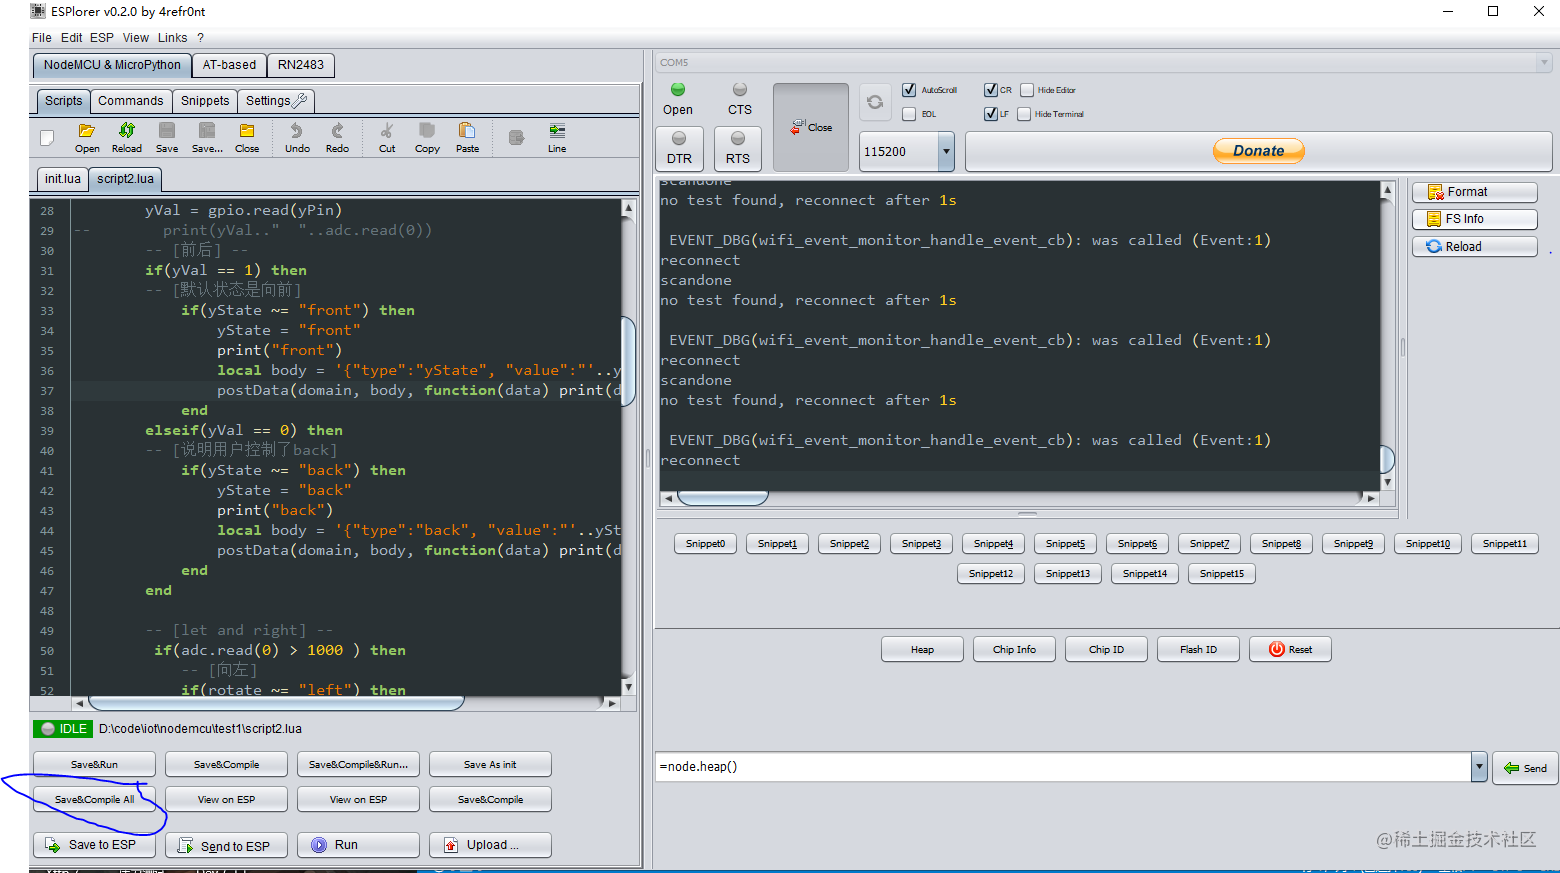
五、上传 lua 代码 nodeMcu 板子
选择好串口后点击链接按钮即可,连接好按钮名字会变为 close。因为我烧录的固件是 dev 版本的,所以输出的信息比较多。

然后上传代码,点击 save & compile All
上传完毕后点击 Reload,可以看到已经上传的文件
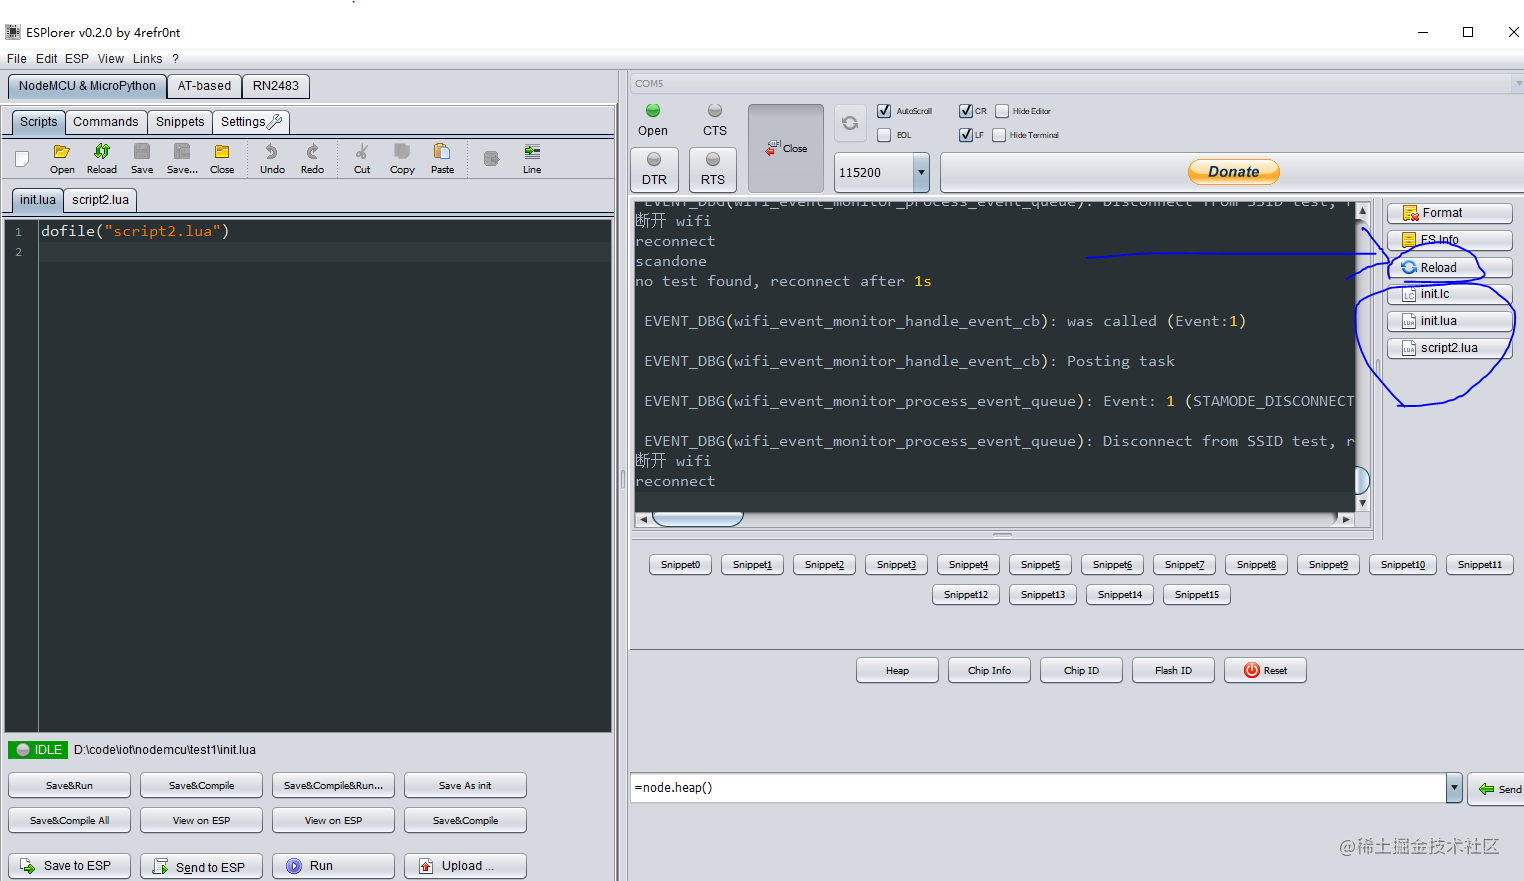
这时候板子已经可以和服务器通信了,我们再来编写一段 react 代码来弄一个页面!
六、页面和 ws 服务对接
3d 引擎使用 babylonjs
详细代码实现如下:
import { useEffect, useRef } from "react";

import * as BABYLON from "@babylonjs/core";

import "@babylonjs/core/Meshes/meshBuilder";
// Required side effects to populate the Create methods on the mesh class. Without this, the bundle would be smaller but the createXXX methods from mesh would not be accessible.
import "@babylonjs/loaders/glTF";

import io from "socket.io-client";

// 让模型按照点位移动
const Demo = (props) => {
	const canvasDom = useRef();

	// 引擎
	const engine = useRef();
	// 场景
	const scene = useRef();
	// 相机
	const camera = useRef();

	// 人物 meth
	const person = useRef();
	const personStartRotation = useRef();

	// 人物动画 {[name]:aniObj}
	const anis = useRef({});
	// 正在播放的动画名称
	// const aning = useRef();
	// 人物动态
	// --  前后方向状态 front | back
	const yState = useRef("front")
	// --  左右转向  "left" | "right" | "none"
	const rotate = useRef("none")


	/** 人物移动空值 **/
	// 当前要走的距离
	const distance = useRef(0);
	// 行走速度
	const step = useRef(0.04);
	// 当前行走的路线索引
	const p = useRef(0);
	// 走完了所有的路线
	const isOver = useRef(false);
	// 路线
	const track = useRef([
		// { type: "translate", value: 3 },
		// { type: "turn", value: -90 },
		// { type: "translate", value: 5 },
		// { type: "turn", value: -90 },
		// { type: "translate", value: 3 },
	]);

	const startWalk = () => {
		// 模型位置还原
		person.current.position = new BABYLON.Vector3(5, 0, -5);
		// 模型角度还原
		person.current.rotationQuaternion = personStartRotation.current.clone();

		// 行走数据
		isOver.current = false;
		p.current = 0;
		distance.current = 0;
		// 人物动画
		anis.current["zou"].start(true);
	};

	const nextWalk = (
		data = [
			{ type: "turn", value: 90 },
			{ type: "translate", value: 5 },
		]
	) => {
		// 从最后一次开始走
		p.current = track.current.length;
		track.current.push(...data);
		// 基于当前的位置继续走
		distance.current = 0;
		isOver.current = false;
		anis.current["zou"].start(true);
	};


	// 设置大小
	const resize = () => {
		// 画布 dom 宽高改变
		canvasDom.current.width = window.innerWidth;
		canvasDom.current.height = window.innerHeight;

		// 引擎重置
		engine.current && engine.current.resize();
	};

	const init = async () => {
		const canvas = canvasDom.current;

		// This is really important to tell Babylon.js to use decomposeLerp and matrix interpolation
		BABYLON.Animation.AllowMatricesInterpolation = true;

		// 实例化一个引擎
		engine.current = new BABYLON.Engine(canvas, true, {
			// stencil: true
		});

		// 创建场景
		scene.current = new BABYLON.Scene(engine.current);

		// 创建相机
		camera.current = new BABYLON.ArcRotateCamera("camera1", -90, Math.PI / 2.6, 14, new BABYLON.Vector3(0, 0.8, 0), scene.current);

		const resetCamera = () => (camera.current.target = new BABYLON.Vector3(0, 0.8, 0));
		resetCamera();

		// 加载 scene.gltf 的相机
		camera.current.attachControl(canvas, true);

		// 创建光源
		const light = new BABYLON.HemisphericLight("light1", new BABYLON.Vector3(0, 1, 0), scene.current);
		light.intensity = 0.8;
		light.specular = BABYLON.Color3.Black();

		// 添加地面
		const ground = BABYLON.MeshBuilder.CreateGround("ground", { width: 10, height: 10, subdivisions: 1 }, scene.current);
		const groundMaterial = new BABYLON.StandardMaterial("groundMaterial", scene.current);
		groundMaterial.diffuseTexture = new BABYLON.Texture("/moduls2/halo_2xbox_1killtacularturf/textures/turf_brick1_diffuse.png", scene.current);

		// groundMaterial.diffuseTexture.uScale = 10;
		// groundMaterial.diffuseTexture.vScale = 10;
		groundMaterial.specularColor = new BABYLON.Color3(0.5, 0.1, 0.1);
		ground.material = groundMaterial;

		// 加载一个人物
		BABYLON.SceneLoader.ImportMesh("", "/moduls2/", "model.glb", scene.current, function (newMeshes, particleSystems, skeletons) {
			const mesh = newMeshes[0];
			person.current = mesh;
			person.current.position = new BABYLON.Vector3(5, 0, -5);
			personStartRotation.current = person.current.rotationQuaternion.clone();

			scene.current.animationGroups.forEach((aniObj) => {
				// 记录动画
				anis.current[aniObj.name] = aniObj;
				aniObj.pause();
			});

			// console.log(track.current)
			!!track.current.length && anis.current["zou"].start(true);

			scene.current.onBeforeRenderObservable.add(() => {

				if (!isOver.current) {
					const curTrack = track.current[p.current];
					if (curTrack) {
						const { type, value } = curTrack;
						if (type === "translate") {
							// 位移
							distance.current += step.current;
							person.current.movePOV(0, 0, step.current);
							if (distance.current >= value) {
								p.current += 1;
								distance.current = 0;
							}
						}
						if (type === "turn") {
							// 转向
							person.current.rotate(BABYLON.Axis.Y, BABYLON.Tools.ToRadians(value), BABYLON.Space.LOCAL);
							p.current += 1;
							distance.current = 0;
						}

						if (!track.current[p.current]) {
							// 说明走完了
							isOver.current = true;
							console.log("走完所有路径");
							anis.current["zou"].stop();
						}
					}
				}
			});
		});

		// 渲染引擎
		engine.current.runRenderLoop(() => {
			scene.current.render();
		});
	};

	useEffect(() => {
		init();
		resize();

		const socket = io("ws://不给你们看.com:3000/", {});
		socket.on("hey", (...args) => {
			console.log("网页收到信息-hey:", args);
		});
		socket.on("personControl", (args) => {
			console.log("网页收到信息-personControl:", args);
			const type = args.type;
			const value = args.value;
			if (type === "rotate") {
				// 转向
				if (value === "left") {
					nextWalk([ { type: "turn", value: -90 } ])
				} else if (value === "right") {
					nextWalk([ { type: "turn", value: 90 } ])
				}
			}
			if (type === "yState") {
				// 前进还是后退
				if (value === "front") {
					nextWalk([{ type: "translate", value: 5 }])
				} else if (value === "back") {
					// 停止
					// p.current = track.current.length;
					// isOver.current = true;
				}
			}

                        // 这里板子里面的代码写错了,就这么判断吧...
			if (type === "back") {
				// 停止
				p.current = track.current.length;
				isOver.current = true;
				anis.current["zou"].stop();
			}
		});

		window.addEventListener("resize", resize);
		return () => {
			// window.removeEventListener("resize", resize);
			engine.current && engine.current.dispose();
			track.current = [];
		};
	}, []);

	return (
		<div style={{ width: "100%", height: "100%", overflow: "hidden" }}>
			<canvas ref={canvasDom} style={{ width: "100%", height: "100%" }}></canvas>

			{/* <div onClick={()=>startWalk()} style={{ padding: 12, border: "1px solid #fff", position: "absolute", bottom: 0, right: 0, zIndex: 1, color: "#fff", cursor: "pointer" }}>
				重新开始走
			</div> */}
			<div onClick={() => nextWalk()} style={{ padding: 12, border: "1px solid #fff", position: "absolute", bottom: 52, right: 0, zIndex: 1, color: "#fff", cursor: "pointer" }}>
				随机到一个点
			</div>
		</div>
	);
};

export default Demo;
模型放到了 github 上面,各位自行下载即可。
https://github.com/wangzongming/iot
模型我合成了好几个动画进去,这里就用到了一个 zou 其他动画各位可自行研究。
–


 3052
3052


 被折叠的 条评论
为什么被折叠?
被折叠的 条评论
为什么被折叠?
 到【灌水乐园】发言


