目录如下:
1、简介
- Spring Boot 是由Pivotal团队提供的全新框架,其设计目的是用来简化新Spring应用的初始搭建以及开发过程。
- 该框架使用了特定的方式来进行配置,从而使开发人员不再需要定义样板化的配置。
- 通过这种方式,Spring Boot致力于在蓬勃发展的快速应用开发领域(rapid application development)成为领导者。
2、第一个SpringBoot
2.1、方式一【不推荐,了解】
- 通过官方网站 https://start.spring.io/
- 创建项目
- 下载到本地
- 最后import 导入

2.2、方式二【推荐】
在 IDEA 中创建:

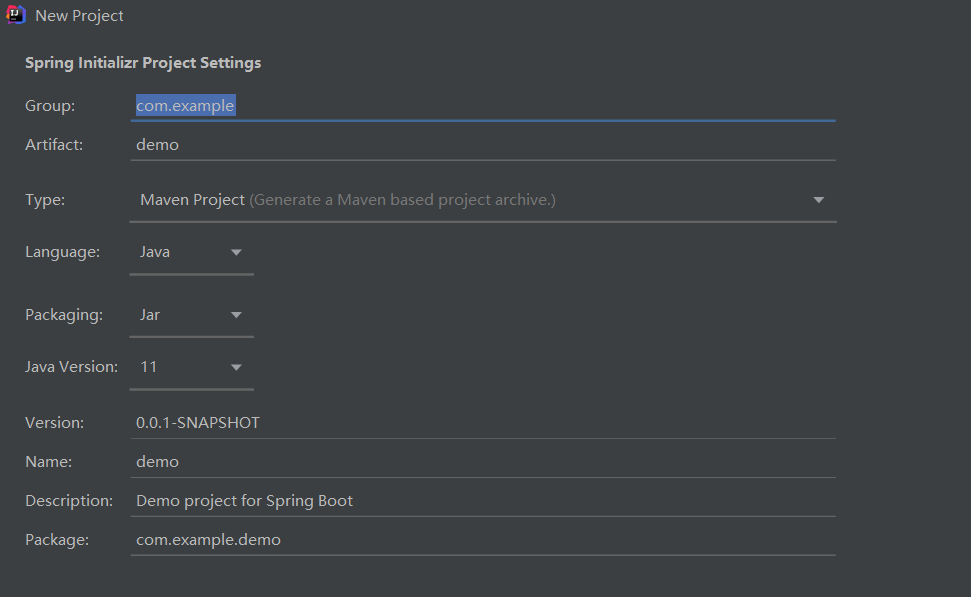

创建成功:
可以立刻使用,无须配置:
注意包结构:
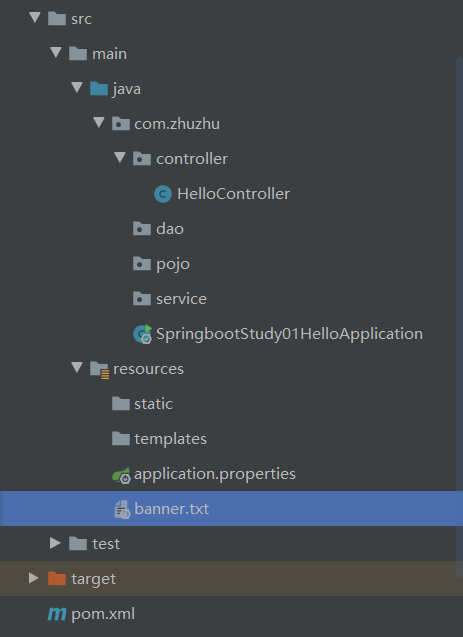
新建一个Controller:
@Controller
@RequestMapping("/hello")
public class HelloController {

    @RequestMapping("/h1")
    @ResponseBody
    public String hello01() {
        return "hello!springboot!";
    }
}
直接运行:

2.3、一些玩法
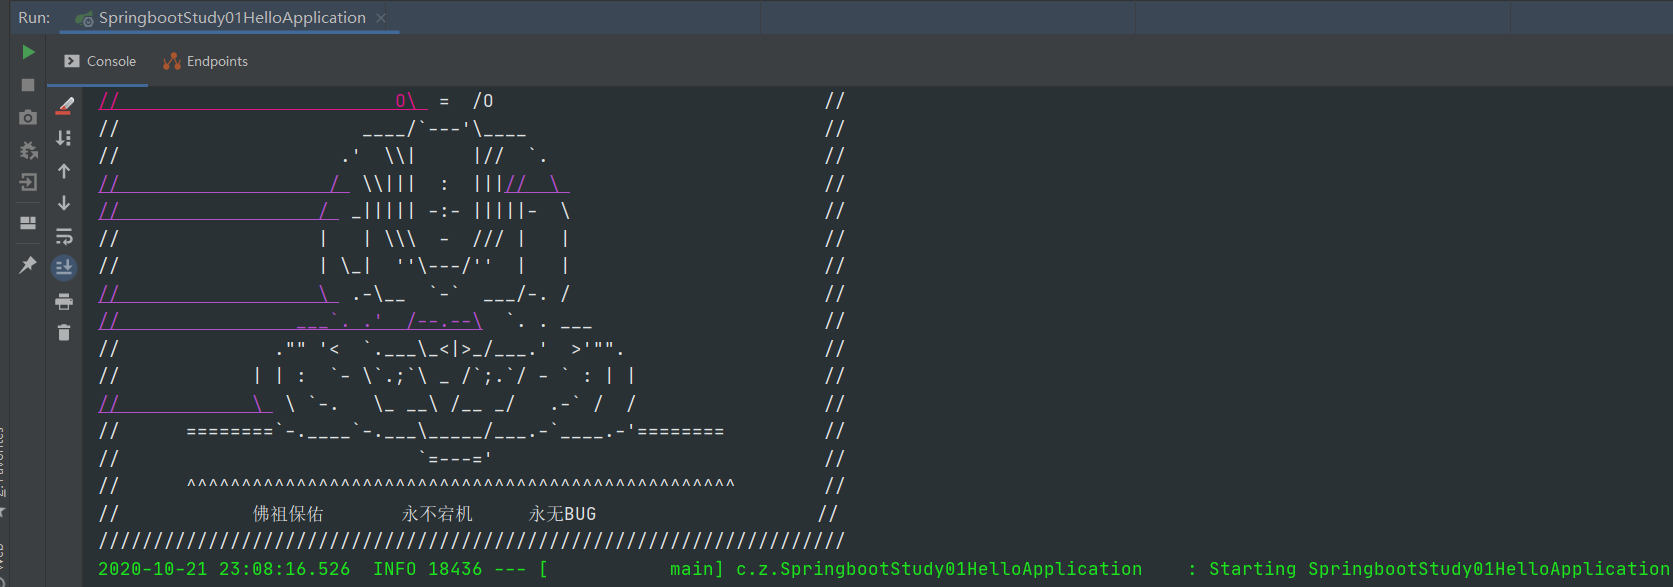
更换自定义banner:
在resources目录下新建 banner.txt
//                          _ooOoo_                               //
//                         o8888888o                              //
//                         88" . "88                              //
//                         (| ^_^ |)                              //
//                         O\  =  /O                              //
//                      ____/`---'\____                           //
//                    .'  \\|     |//  `.                         //
//                   /  \\|||  :  |||//  \                        //
//                  /  _||||| -:- |||||-  \                       //
//                  |   | \\\  -  /// |   |                       //
//                  | \_|  ''\---/''  |   |                       //
//                  \  .-\__  `-`  ___/-. /                       //
//                ___`. .'  /--.--\  `. . ___                     //
//              ."" '<  `.___\_<|>_/___.'  >'"".                  //
//            | | :  `- \`.;`\ _ /`;.`/ - ` : | |                 //
//            \  \ `-.   \_ __\ /__ _/   .-` /  /                 //
//      ========`-.____`-.___\_____/___.-`____.-'========         //
//                           `=---='                              //
//      ^^^^^^^^^^^^^^^^^^^^^^^^^^^^^^^^^^^^^^^^^^^^^^^^^^        //
//            佛祖保佑       永不宕机     永无BUG                    //
运行输出:
更改端口号:
在核心配置文件 application.properties 中:
server.port=8081
3、SpringBoot 自动装配原理初探
3.1、@SpringBootApplication
结论: springboot所有自动配置都是在启动的时候扫描并加载:spring.factories所有的自动配置类都在这里面,但是不一定生效,要判断条件是否成立。只要导入了对应的start,就有对应的启动器了,有了启动器,我们自动装配就会生效,然后就配置成功!
- springboot在启动的时候,从类路径下/META-INF/spring.factories获取指定的值;
- 将这些自动配置的类导入容器,自动配置就会生效,帮我进行自动配置!
- 以前我们需要自动配置的东西,现在springboot帮我们做了!
- 整合javaEE,解决方案和自动配置的东西都在spring-boot-autoconfigure-2.2.0.RELEASE.jar这个包下
- 它会把所有需要导入的组件,以类名的方式返回,这些组件就会被添加到容器;
- 容器中也会存在非常多的xxAutoConfiguration的文件(@Bean),就是这些类给容器中导入了这个场景需要的所有组件;并自动配置,@Configuration ,JavaConfig!
- 有了自动配置类,免去了我们手动编写配置文件的工作!
3.2、SpringApplication.run( );

4、yaml 语法配置
4.1、简介
yaml 是用于配置文件的一种语法格式,
SpringBoot 使用一个全局的配置文件 , 配置文件名称是固定的
-
application.properties
语法结构 :key=value
-
application.yml
语法结构 :key:空格value
4.2、基本语法
说明:语法要求严格!
1、空格不能省略
2、以缩进来控制层级关系,只要是左边对齐的一列数据都是同一个层级的。
3、属性和值的大小写都是十分敏感的。
字面量:普通的值 [ 数字,布尔值,字符串 ]
字面量直接写在后面就可以 , 字符串默认不用加上双引号或者单引号;
注意:
-
“ ” 双引号,不会转义字符串里面的特殊字符 , 特殊字符会作为本身想表示的意思;
比如 :name: “kuang \n shen” 输出 :kuang 换行 shen
-
‘’ 单引号,会转义特殊字符 , 特殊字符最终会变成和普通字符一样输出
比如 :name: ‘kuang \n shen’ 输出 :kuang \n shen
#对象、Map格式
k:
    v1:
    v2:

student:
    name: qinjiang
    age: 3

student: {name: qinjiang,age: 3}
#数组
pets:
 - cat
 - dog
 - pig

pets: [cat,dog,pig]
4.3、yaml 注入配置文件
pojo:
@Component  //注册bean到容器中
public class Dog {
    private String name;
    private Integer age;
}
@Component //注册bean到容器中
@ConfigurationProperties(prefix = "person")//与application.yml的person对应
public class Person {
    private String name;
    private Integer age;
    private Boolean happy;
    private Date birth;
    private Map<String,Object> maps;
    private List<Object> lists;
    private Dog dog;
}
在springboot项目中的 resources 目录下新建一个文件 application.yml :
person:
  name: azhu
  age: 3
  happy: false
  birth: 2000/01/01
  maps: {k1: v1,k2: v2}
  lists:
   - code
   - girl
   - music
  dog:
    name: 旺财
    age: 1
@ConfigurationProperties(prefix = “person”) 之后会报红色提示:【需要导入一个依赖】
<!-- 导入配置文件处理器,配置文件进行绑定就会有提示,需要重启idea才能生效 -->
<dependency>
  <groupId>org.springframework.boot</groupId>
  <artifactId>spring-boot-configuration-processor</artifactId>
  <optional>true</optional>
</dependency>
测试:
@SpringBootTest
class DemoApplicationTests {

    @Autowired
    Person person; //将person自动注入进来

    @Test
    public void contextLoads() {
        System.out.println(person); //打印person信息
    }
}
4.4、加载指定的配置文件
**@PropertySource :**加载指定的配置文件;
@configurationProperties:默认从全局配置文件中获取值;
1、在resources目录下新建一个person.properties文件
name=azhu
2、然后在代码中指定加载person.properties文件
@PropertySource(value = "classpath:person.properties")
@Component //注册bean
public class Person {
    @Value("${name}")
    private String name;
}
4.5、配置文件占位符
配置文件还可以编写占位符生成随机数
person:
    name: azhu${random.uuid} # 随机uuid
    age: ${random.int}  # 随机int
    happy: false
    birth: 2000/01/01
    maps: {k1: v1,k2: v2}
    lists:
      - code
      - girl
      - music
    dog:
      name: ${person.hello:other}_旺财
      age: 1
4.6、小结
| @ConfigurationProperties | @Value | |
|---|---|---|
| 功能 | 批量注入配置文件中的属性 | 一个个指定 |
| 松散绑定(松散语法) | 支持 | 不支持 |
| SpEL | 不支持 | 支持 |
| JSR303数据校验 | 支持 | 不支持 |
| 复杂类型封装 | 支持 | 不支持 |
- @ConfigurationProperties只需要写一次即可 , @Value则需要每个字段都添加
- 松散绑定:比如:yml中写的last-name,这个和lastName是一样的, - 后面跟着的字母默认是大写的。这就是松散绑定。
- JSR303数据校验 : 这个就是可以在字段是增加一层过滤器验证,可以保证数据的合法性。
- 复杂类型封装,yml中可以封装对象 , 使用value就不支持
结论:
-
配置yml和配置properties都可以获取到值 , 强烈推荐 yml;
-
如果在某个业务中,只需要获取配置文件中的某个值,可以使用一下 @value;
-
如果专门编写了一个JavaBean来和配置文件进行一一映射,
就直接@configurationProperties,不要犹豫!
5、多环境配置切换
profile是Spring对不同环境提供不同配置功能的支持,可以通过激活不同的环境版本,实现快速切换环境;
5.1、多个配置文件
在主配置文件编写的时候,文件名可以是 application-{profile}.properties/yml , 用来指定多个环境版本
例如:
application-test.properties 代表测试环境配置
application-dev.properties 代表开发环境配置
但是Springboot并不会直接启动这些配置文件,它默认使用application.properties主配置文件;
我们需要通过一个配置来选择需要激活的环境:
#比如在配置文件中指定使用dev环境,我们可以通过设置不同的端口号进行测试;
#我们启动SpringBoot,就可以看到已经切换到dev下的配置了;
spring.profiles.active=dev
5.2、yaml 的多文档块
和properties配置文件中一样,但是使用yml去实现不需要创建多个配置文件,更加方便了 !
server:
  port: 8081
#选择要激活那个环境块
spring:
  profiles:
    active: dev

---
server:
  port: 8083
spring:
  profiles: dev #配置环境的名称

---
server:
  port: 8084
spring:
  profiles: prod  #配置环境的名称
注意:如果yml和properties同时都配置了端口,并且没有激活其他环境 , 默认会使用properties配置文件的!
5.3、配置文件加载位置
外部加载配置文件的方式十分多,我们选择最常用的即可,在开发的资源文件中进行配置!
springboot 启动会扫描以下位置的application.properties或者application.yml文件作为Spring boot的默认配置文件:
优先级1:项目路径下的config文件夹配置文件
优先级2:项目路径下配置文件
优先级3:资源路径下的config文件夹配置文件
优先级4:资源路径下配置文件
优先级由高到底,高优先级的配置会覆盖低优先级的配置;
SpringBoot会从这四个位置全部加载主配置文件;互补配置;
我们在最低级的配置文件中设置一个项目访问路径的配置来测试互补问题;
#配置项目的访问路径
server.servlet.context-path=/zhuzhu
5.4、拓展,运维小技巧
指定位置加载配置文件
我们还可以通过spring.config.location来改变默认的配置文件位置
项目打包好以后,我们可以使用命令行参数的形式,启动项目的时候来指定配置文件的新位置;
这种情况,一般是后期运维做的多,相同配置,外部指定的配置文件优先级最高
java -jar spring-boot-config.jar --spring.config.location=F:/application.properties
6、Web开发
6.1、静态资源处理
- 在SpringBoot中,可以使用以下方式处理静态资源
- webjars,访问路径
localhost:8080/webjars - public,static,/**,resouces,访问路径
localhost:8080/【重点】
- webjars,访问路径
- 优先级:resouces > static > public
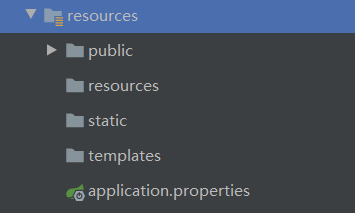
另外,也可以自定义静态资源路径:
-
在application.properties中配置:哪些文件夹是需要放静态资源文件的
spring.resources.static-locations=classpath:/coding/,classpath:/zhuzhu/ -
一旦自己定义了静态文件夹的路径,原来的自动配置就都会失效了!
6.2、首页自定义
- 在resources目录或其子目录新建自己的 index.html
- 通过
localhost:8080/即可访问到 - 也可以通过index的 controller 进行跳转【建议】
6.3、模板引擎 thymeleaf
-
引入依赖
<dependency>
    <groupId>org.springframework.boot</groupId>
    <artifactId>spring-boot-starter-thymeleaf</artifactId>
</dependency>
或者:在新建项目的时候选择 thymeleaf 的依赖

-
使用
在 templates 目录下新建自己的 test.html文件
注意:templates 目录下的文件是受到保护的,不能直接通过url访问。
<!DOCTYPE html>
<html lang="en">
    <head>
        <meta charset="UTF-8">
        <title>Title</title>
    </head>
    <body>
        <h3>test!</h3>
    </body>
</html>
通过 Controller 即可进行跳转
@RequestMapping("/test")
public String hello02() {
    return "test";
}
thymeleaf 语法学习:
要学习语法,还是参考官网文档最为准确 :https://www.thymeleaf.org/
要使用thymeleaf,需要在html文件中导入命名空间的约束,方便提示。
xmlns:th="http://www.thymeleaf.org"
可以使用任意的 th:attr 来替换Html中原生属性的值!

6.4、装配扩展SpringMVC
6.5、增删改查
6.6、拦截器
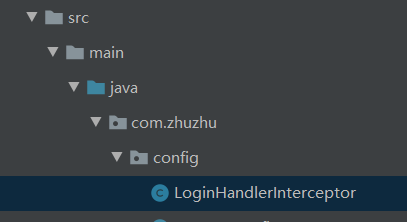
public class LoginHandlerInterceptor implements HandlerInterceptor {

    @Override
    public boolean preHandle(HttpServletRequest request, HttpServletResponse response, Object handler) throws Exception {
        // 登录成功,就会有用户的session
        Object loginUser = request.getSession().getAttribute("loginUser");
        if (loginUser == null) {//没有登录
            request.setAttribute("msg", "没有权限,请先登录!");
            request.getRequestDispatcher("/index.html").forward(request, response);
            return false;
        } else {
            return true;
        }
    }
}
7、整合Mybatis
7.1、直接整合
导依赖:
<!-- mybatis-spring-boot-starter -->
<dependency>
    <groupId>org.mybatis.spring.boot</groupId>
    <artifactId>mybatis-spring-boot-starter</artifactId>
    <version>2.1.1</version>
</dependency>
配置数据源:
application.properties
spring.datasource.username=root
spring.datasource.password=123456
spring.datasource.url=jdbc:mysql://localhost:3306/zhuzhumall?useSSL=false&serverTimezone=GMT&characterEncoding=UTF-8
spring.datasource.driver-class-name=com.mysql.cj.jdbc.Driver
简单连接数据库测试一下:
@SpringBootTest
class SpringbootStudy05MybatisApplicationTests {

    @Autowired
    DataSource dataSource;

    @Test
    void contextLoads() throws SQLException {
        System.out.println(dataSource.getClass());
        System.out.println(dataSource.getConnection());
    }
}
7.2、dao层开发(增删查改)
-
com.zhuzhu.pojo
-
com.zhuzhu.dao
接口 UserMapper
@Mapper //表示这是一个 mybatis 的 mapper 类 @Repository public interface UserMapper{ List<User> getUserList(); } -
接口的实现 UserMapper.xml
可以放在这里:
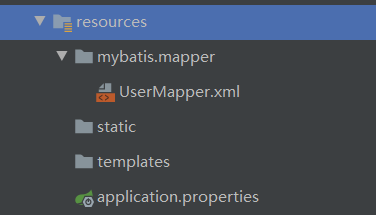
<select id="getUserList" resultMap="UserMap"> select `id`,`username`,`password`,`email` from t_user; </select> -
配置整合 mybatis
application.properties
# 整合mybatis
mybatis.type-aliases-package=com.zhuzhu.pojo
mybatis.mapper-locations=classpath:mybatis/mapper/*.xml
8、SpringSecurity
8.1、简介
Spring Security是针对Spring项目的安全框架,也是Spring Boot底层安全模块默认的技术选型,他可以实现强大的Web安全控制,对于安全控制,我们仅需要引入spring-boot-starter-security模块,进行少量的配置,即可实现强大的安全管理!
记住几个类:
- WebSecurityConfigurerAdapter:自定义Security策略
- AuthenticationManagerBuilder:自定义认证策略
- @EnableWebSecurity:开启WebSecurity模式
Spring Security的两个主要目标是“认证"和“授权”(访问控制)。
这个概念是通用的,而不是只在Spring Security 中存在。
8.2、快速上手
1、需要导入依赖
<dependency>
    <groupId>org.springframework.boot</groupId>
    <artifactId>spring-boot-starter-security</artifactId>
</dependency>
2、需要新建一个 spring security 的配置类
@EnableWebSecurity
public class SecurityConfig extends WebSecurityConfigurerAdapter {
}
3、实现授权的方法
@EnableWebSecurity
public class SecurityConfig extends WebSecurityConfigurerAdapter {

    // 链式编程

    // 授权
    @Override
    protected void configure(HttpSecurity http) throws Exception {
        // 首页所有人可以访问,其他页需要对应权限
        http.authorizeRequests()
                .antMatchers("/").permitAll()
                .antMatchers("/level1/**").hasRole("vip1")
                .antMatchers("/level2/**").hasRole("vip2")
                .antMatchers("/level3/**").hasRole("vip3");

        // 没有权限自动跳转到登录页面
        http.formLogin();
    }
}
4、实现认证的方法
注意:需要对密码进行加密编码
@EnableWebSecurity
public class SecurityConfig extends WebSecurityConfigurerAdapter {

    // 链式编程

    // 授权
    @Override
    protected void configure(HttpSecurity http) throws Exception {
        // 首页所有人可以访问,其他页需要对应权限
        http.authorizeRequests()
                .antMatchers("/").permitAll()
                .antMatchers("/level1/**").hasRole("vip1")
                .antMatchers("/level2/**").hasRole("vip2")
                .antMatchers("/level3/**").hasRole("vip3");

        // 没有权限自动跳转到登录页面
        http.formLogin();
    }

    // 认证
    @Override
    protected void configure(AuthenticationManagerBuilder auth) throws Exception {
        // 一般从数据库中读取
        // 现在从内存中读取
        auth.inMemoryAuthentication().passwordEncoder(new BCryptPasswordEncoder())
                .withUser("azhu").password(new BCryptPasswordEncoder().encode("123")).roles("vip1")
                .and()
                .withUser("root").password(new BCryptPasswordEncoder().encode("123456")).roles("vip1", "vip2", "vip3")
                .and()
                .withUser("guest").password(new BCryptPasswordEncoder().encode("456")).roles("vip2");

    }
}
5、注销的功能
// 授权
@Override
protected void configure(HttpSecurity http) throws Exception {
    // 首页所有人可以访问,其他页需要对应权限
    http.authorizeRequests()
        .antMatchers("/").permitAll()
        .antMatchers("/level1/**").hasRole("vip1")
        .antMatchers("/level2/**").hasRole("vip2")
        .antMatchers("/level3/**").hasRole("vip3");
    // 没有权限自动跳转到登录页面
    http.formLogin();
    // 开启注销的功能
    http.logout().logoutSuccessUrl("/");
}
6、记住我的功能
// 授权
@Override
protected void configure(HttpSecurity http) throws Exception {
    // 首页所有人可以访问,其他页需要对应权限
    http.authorizeRequests()
        .antMatchers("/").permitAll()
        .antMatchers("/level1/**").hasRole("vip1")
        .antMatchers("/level2/**").hasRole("vip2")
        .antMatchers("/level3/**").hasRole("vip3");

    // 没有权限自动跳转到登录页面
    http.formLogin();
    // 开启注销的功能
    http.logout().logoutSuccessUrl("/");
    // 开启记住我的功能
    http.rememberMe();
}
7、使用自定义的登录页面
// 没有权限自动跳转到登录页面(自定义的登录页)
http.formLogin().loginPage("/tologin");
9、Shiro
9.1、简介
- Apache Shiro 是一个Java的安全(权限)框架
- Shiro可以非常容易的开发出足够好的应用,其不仅可以用在JavaSE环境,也可以用在JavaEE环境。
- Shiro可以完成,认证,授权,加密,会话管理,Web集成,缓存等。
- 下载地址: http://shiro.apache.org
9.2、有什么功能

- Authentication:身份认证、登录,验证用户是不是拥有相应的身份;
- Authorization:授权,即权限验证,验证某个已认证的用户是否拥有某个权限,即判断用户能否进行什么操作,如:验证某个用户是否拥有某个角色,或者细粒度的验证某个用户对某个资源是否具有某个权限!
- Session Manager:会话管理,即用户登录后就是第一次会话,在没有退出之前,它的所有信息都在会话中;会话可以是普通的JavaSE环境,也可以是Web环境;
- Cryptography:加密,保护数据的安全性,如密码加密存储到数据库中,而不是明文存储;
- Web Support:Web支持,可以非常容易的集成到Web环境;
- Caching:缓存,比如用户登录后,其用户信息,拥有的角色、权限不必每次去查,这样可以提高效率
- Concurrency:Shiro支持多线程应用的并发验证,即,如在一个线程中开启另一个线程,能把权限自动的传播过去
- Testing:提供测试支持;
- Run As:允许一个用户假装为另一个用户(如果他们允许)的身份进行访问;
- Remember Me:记住我,这个是非常常见的功能,即一次登录后,下次再来的话不用登录了
9.3、Shiro架构(外部)
从外部来看Shiro,即从应用程序角度来观察如何使用shiro完成工作:
[外链图片转存失败,源站可能有防盗链机制,建议将图片保存下来直接上传(img-5CwynMeO-1612690964534)(C:\Users\nobod\AppData\Roaming\Typora\typora-user-images\1610526688717.png)]
- subject:应用代码直接交互的对象是Subject,也就是说Shiro的对外API核心就是Subject,Subject代表了当前的用户,这个用户不一定是一个具体的人,与当前应用交互的任何东西都是Subject,如网络爬虫,机器人等,与Subject的所有交互都会委托给SecurityManager; Subject其实是一个门面,SecurityManageer才是实际的执行者
- SecurityManager:安全管理器,即所有与安全有关的操作都会与SercurityManager交互,并且它管理着所Subject,可以看出它是Shiro的核心,它负责与$hiro的某他组件进行交互,它相当于SpringMVC的DispatcherServlet的角色
- Realm:Shiro从Realm获取安全数据(如用户,角色,权限),就是说SecurityManager要验证用户身份,那么它需要从Realm获取相应的用户进行比较,来确定用户的身份是否合法;也需要从Realm得到用户相应的角色、权限,进行验证用户的操作是否能够进行,可以把Realm看成DataSource;
9.4、Shiro架构(内部)
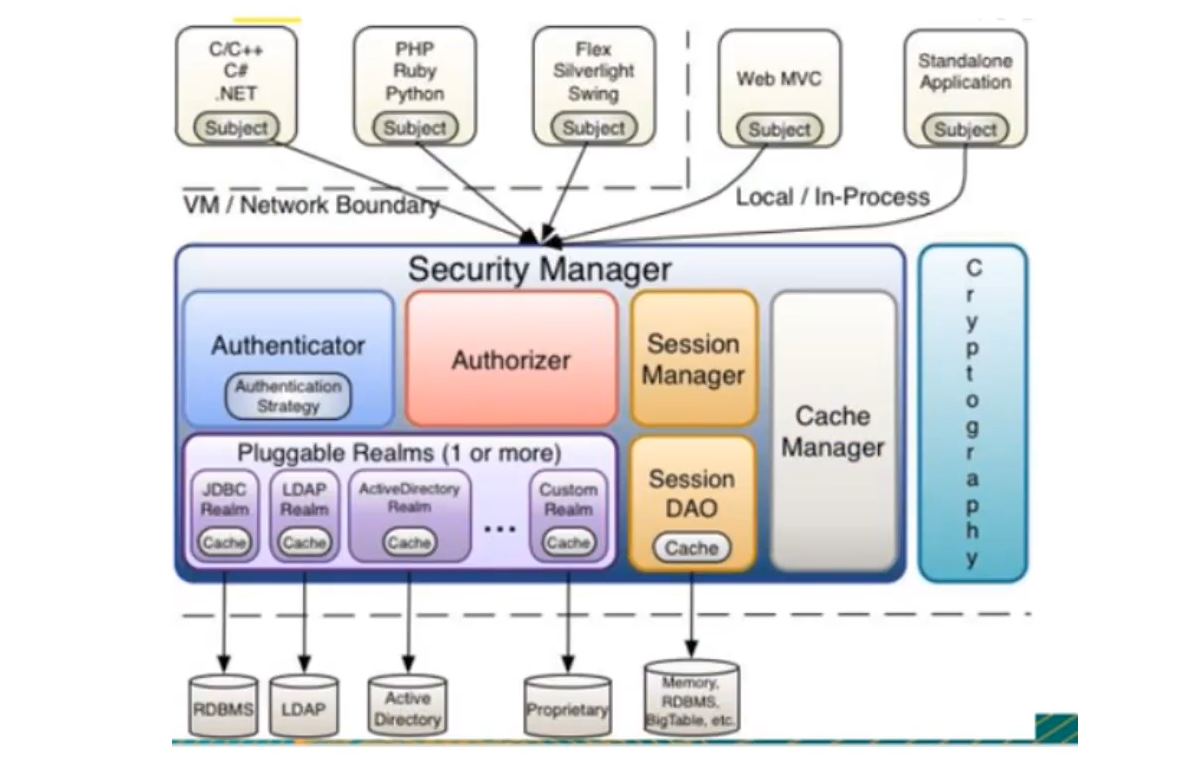
- Subject:任何可以与应用交互的‘‘用户’;
- Security Manager:相当于SpringMVC中的DispatcherServlet;是Shiro的心脏,所有具体的交互都通过Security Manager进行控制,它管理者所有的Subject,且负责进行认证,授权,会话,及缓存的管理。
- Authenticator:负责Subject认证,是一个扩展点,可以自定义实现;可以使用认证策略(Authenticationstrategy),即什么情况下算用户认证通过了;
- Authorizer:授权器,即访问控制器,用来决定主体是否有权限进行相应的操作;即控制着用户能访问应用中的那些功能;
- Realm:可以有一个或者多个的realm,可以认为是安全实体数据源,即用于获取安全实体的,可以用DBC实现,也可以是内存实现等等,由用户提供;所以一般在应用中都需要实现自己的realm
- SessionManager:管理Session生命周期的组件,而Shiro并不仅仅可以用在Web环境,也可以用在普通的JavaSE环境中
- CacheManager:缓存控制器,来管理如用户,角色,权限等缓存的;因为这些数据基本上很少改变,放到缓存中后可以提高访问的性能;
- Cryptography:密码模块,Shiro提高了一些常见的加密组件用于密码加密,解密等
9.5、使用Shiro
9.5.1、快速上手
-
导包
<dependency> <groupId>org.apache.shiro</groupId> <artifactId>shiro-spring</artifactId> <version>1.5.3</version> </dependency> -
配置 授权和认证
/** * 自定义的UserRealm * @Author: AZhu * @Date: 2021/2/7 15:31 */ public class UserRealm extends AuthorizingRealm { //授权 @Override protected AuthorizationInfo doGetAuthorizationInfo(PrincipalCollection principalCollection) { System.out.println("执行了 授权 doGetAuthorizationInfo"); return null; } //认证 @Override protected AuthenticationInfo doGetAuthenticationInfo(AuthenticationToken authenticationToken) throws AuthenticationException { System.out.println("执行了 认证 doGetAuthenticationInfo"); return null; } } -
配置shiro
/** * @Author: AZhu * @Date: 2021/2/7 15:34 */ @Configuration public class ShiroConfig { //3 ShiroFilterFactoryBean @Bean public ShiroFilterFactoryBean getShiroFilterFactoryBean(@Qualifier("securityManager") DefaultWebSecurityManager defaultWebSecurityManager) { ShiroFilterFactoryBean shiroFilterFactoryBean = new ShiroFilterFactoryBean(); //设置安全管理器 shiroFilterFactoryBean.setSecurityManager(defaultWebSecurityManager); return shiroFilterFactoryBean; } //2 DefaultWebSecurityManager @Bean(name = "securityManager") public DefaultWebSecurityManager getDefaultWebSecurityManager(UserRealm userRealm) { DefaultWebSecurityManager defaultWebSecurityManager = new DefaultWebSecurityManager(); //关联userRealm defaultWebSecurityManager.setRealm(userRealm); return defaultWebSecurityManager; } //1 创建realm对象,需要自定义 @Bean public UserRealm userRealm() { return new UserRealm(); } } -
做登录拦截
//3 ShiroFilterFactoryBean @Bean public ShiroFilterFactoryBean getShiroFilterFactoryBean(@Qualifier("securityManager") DefaultWebSecurityManager defaultWebSecurityManager) { ShiroFilterFactoryBean shiroFilterFactoryBean = new ShiroFilterFactoryBean(); //设置安全管理器 shiroFilterFactoryBean.setSecurityManager(defaultWebSecurityManager); //添加shiro内置的过滤器 //拦截 Map<String, String> filterMap = new LinkedHashMap<>(); filterMap.put("/*", "authc"); shiroFilterFactoryBean.setFilterChainDefinitionMap(filterMap); //设置登录的请求 shiroFilterFactoryBean.setLoginUrl("/tologin"); return shiroFilterFactoryBean; } -
做登录认证
@RequestMapping("/login")
public String tologin(String username, String password, Model model) {
    //获取当前用户
    Subject subject = SecurityUtils.getSubject();
    //封装用户的登录信息
    UsernamePasswordToken token = new UsernamePasswordToken(username, password);
    try {
        //执行登录方法,如果没有异常就说明ok
        subject.login(token);
        return "index";
    } catch (UnknownAccountException e) {
        //用户名不存在
        model.addAttribute("msg", "用户名错误");
        return "login";
    } catch (IncorrectCredentialsException e) {
        //密码不存在
        model.addAttribute("msg", "密码错误");
        return "login";
    }
}
//认证 @Override protected AuthenticationInfo doGetAuthenticationInfo(AuthenticationToken authenticationToken) throws AuthenticationException { System.out.println("执行了 认证 doGetAuthenticationInfo"); //用户名和密码 String name = "admin"; String password = "123456"; UsernamePasswordToken usernamePasswordToken = (UsernamePasswordToken) authenticationToken; //用户名认证 if (!name.equals(usernamePasswordToken.getUsername())) { return null; } //密码认证,shiro做 return new SimpleAuthenticationInfo("", password, ""); }
9.5.2、连接数据库
-
导包
<dependency> <groupId>mysql</groupId> <artifactId>mysql-connector-java</artifactId> <version>5.1.47</version> </dependency> <dependency> <groupId>log4j</groupId> <artifactId>log4j</artifactId> <version>1.2.17</version> </dependency> <dependency> <groupId>com.alibaba</groupId> <artifactId>druid</artifactId> <version>1.2.3</version> </dependency> <dependency> <groupId>org.mybatis.spring.boot</groupId> <artifactId>mybatis-spring-boot-starter</artifactId> <version>2.1.3</version> </dependency> -
配置数据库
spring: datasource: username: root data-password: 123456 #解决市区报错的问题 url: jdbc:mysql://localhost:3306/mybatis?serverTimezone=UTF&useUnicode=true&characteEncoding=utf-8 driver-class-name: com.mysql.jdbc.Driver type: com.alibaba.druid.pool.DruidDataSource #druid专有配置: 、、、、、、 -
dao,pojo
正常实现,略。
-
新的认证
//认证
@Override
protected AuthenticationInfo doGetAuthenticationInfo(AuthenticationToken authenticationToken) throws AuthenticationException {
    System.out.println("执行了 认证 doGetAuthenticationInfo");
    UsernamePasswordToken usernamePasswordToken = (UsernamePasswordToken) authenticationToken;
    //连接真正的数据库
    User user = userService.queryUserByName(usernamePasswordToken.getUsername);
    //用户名认证
    if (user==null) {
        return null;
    }
    //密码认证,shiro做
    return new SimpleAuthenticationInfo("", user.getPassword, "");
}
9.5.3、授权管理
-
对不同权限的拦截
//3 ShiroFilterFactoryBean @Bean public ShiroFilterFactoryBean getShiroFilterFactoryBean(@Qualifier("securityManager") DefaultWebSecurityManager defaultWebSecurityManager) { ShiroFilterFactoryBean shiroFilterFactoryBean = new ShiroFilterFactoryBean(); //设置安全管理器 shiroFilterFactoryBean.setSecurityManager(defaultWebSecurityManager); //添加shiro内置的过滤器 //拦截 Map<String, String> filterMap = new LinkedHashMap<>(); //授权 filterMap.put("/user/add", "perms[user:add]"); filterMap.put("/*", "authc"); shiroFilterFactoryBean.setFilterChainDefinitionMap(filterMap); //设置登录的请求 shiroFilterFactoryBean.setLoginUrl("/tologin"); //设置未授权页面 shiroFilterFactoryBean.setUnauthorizedUrl("/noauth"); return shiroFilterFactoryBean; } -
数据库表要有存放权限信息的字段
user_id username password perms 1 admin 123456 user:add 2 azhu 456789 user:update -
授权
//授权
@Override
protected AuthorizationInfo doGetAuthorizationInfo(PrincipalCollection principalCollection) {
    System.out.println("执行了 授权 doGetAuthorizationInfo");
    //SimpleAuthorizationInfo
    SimpleAuthorizationInfo info = new SimpleAuthorizationInfo();
    info.addStringPermission("user:add");
    //拿到当前登录的对象
    Subject subject = SecurityUtils.getSubject();
    User currentUser = (User) subject.getPrincipal();
    //设置当前用户权限
    info.addStringPermission(currentUser.getPerms());
    //返回info
    return info;
}
9.5.4、页面进行权限访问
整合thmeleaf
-
导包
<dependency> <groupId>com.github.theborakompanioni</groupId> <artifactId>thymeleaf-extras-shiro</artifactId> <version>2.0.0</version> </dependency> -
配置
/** * @Author: AZhu * @Date: 2021/2/7 15:34 */ @Configuration public class ShiroConfig { //整合shiroDialet @Bean public ShiroDialect getShiroDialect() { return new ShiroDialect(); } } -
编写页面
<div th:if="${shiro:notAuthenticated=""}">
    <a th:href="@{/tologin}">登录</a>
</div>
<p th:text="${msg}"></p>
<div shiro:hasPermission="user:add">
    <a th:href="@{/user/add}">add</a>
</div>
<div shiro:hasPermission="user:update">
    <a th:href="@{/user/update}">update</a>
</div>
10、Swagger
10.1、概念
Swagger:
- 号称世界上最流行的Api工具
- RestFul Api 文档在线自动生成工具=》》Api文档与Api定义同步更新
- 在线运行,可以在线测试Api接口
- 支持多种语言(java,php、、、)
官网:https://swagger.io/
10.2、快速使用
-
导包
<dependency> <groupId>io.springfox</groupId> <artifactId>springfox-swagger2</artifactId> <version>2.9.1</version> </dependency> <dependency> <groupId>io.springfox</groupId> <artifactId>springfox-swagger-ui</artifactId> <version>2.9.1</version> </dependency> -
编写一个helloword工程
-
配置SwaggerConfig
@Configuration @EnableSwagger2 //开启Swagger2 public class SwaggerConfig(){ } -
测试运行
http://localhost:8080/swaggerr-ui.html
11、任务
11.1、异步任务
@Service
public class AsynService{
    //告诉Spring这是一个异步的方法
    @Async
    public void hello(){
        try{
            Thread.sleep(3000);
        }catch(){
        }
        sout("数据正在处理---")
    }
}
@EnableAsync //开启异步注解功能
@SpringBootApplication
public class SpringBoot09TestApplication{
    public static void main(String[] args){
        SpringApplication.run(SpringBoot09TestApplication.class, args);
    }
}
11.2、邮件任务
-
导包
<dependency> <groupId>org.springframework.boot</groupId> <artifactId>spring-boot-starter-mail</artifactId> </dependency> -
开启邮箱服务
在你自己的qq邮箱开启po3/smtp服务,以此作为程序的发送方
-
spring配置
spring.mail.username=12345678@qq.com spring.mail.password=goshuagudalxaljd spring.mail.host=smtp.qq.com #开启加密验证 spring.mail.properties.mail.smtp.ssl.enable=true -
发送简单邮件
@Autowird JavaMailSenderImpl mailSender; @Test void contextLoads(){ SimpleMailMessage mailMessage = new SimpleMailMessage(); mailMessage.setSubject("这是标题"); mailMessage.setText("这是正文"); mailMessage.setTo("623789456@qq.com"); mailMessage.setFrom("12345678@qq.com"); mailSender.send(mailMessage); } -
发送复杂邮件
@Test
void contextLoads2(){
    MimeMessage mimeMessage = mailSender.createMimeMessage();
    //组装
    MimeMessageHelper helper = new MimeMessageHelper(mimeMessage,true);
    //正文
    helper.setSubject("这是标题");
    helper.setText("这是正文");
    //附件
    helper.addAttchment("1.jpg",new File("c:\\user\\admin\\mag\\1.jpg"));

    helper.setTo("623789456@qq.com");
    helper.setFrom("12345678@qq.com");
    mailSender.send(mailMessage);
}
11.3、定时任务
-
Service
@Service public class ScheduledService{ //在特定时间执行这个方法 //cron表达式:秒 分 时 日 月 星期 @Scheduled(cron = "0 * * * * 0-7") public void hello(){ sout("hello执行了!"); } } -
main
@EnableAsync //开启异步功能的注解
@EnableScheduling //开启定时功能的注解
@SpringBootApplication
public class SpringBoot09TestApplication{
    public static void main(String[] args){
        SpringApplication.run(SpringBoot09TestApplication.class, args);
    }
}


 412
412


 被折叠的 条评论
为什么被折叠?


