


 文章讲述了为局域网使用代理服务器的概念,包括其隐私保护、内容控制、缓存加速等功能。同时强调了在JavaWeb项目测试中,是否开启跳过本地地址的代理服务器取决于测试环境的需求,可能是为了优化本地访问速度或测试代理特性。
示意图
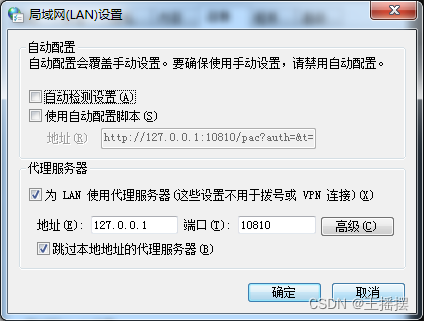
为LAN使用代理服务器是什么意思?
为LAN使用代理服务器这个选项允许您为局域网连接配置一个代理服务器。代理服务器充当了您的计算机和互联网之间的中介,所有的网络请求都会先通过这个代理服务器,然后再发送到目的地。这样做的目的有几个:
隐私和安全:代理服务器可以隐藏您的真实IP地址,增加匿名性,减少直接暴露在互联网上的风险。
内容过滤:在某些情况下,代理服务器可以用来屏蔽或过滤掉特定的网站或内容。
缓存:代理服务器可以缓存常访问的网页,提高访问速度。
访问受限内容:通过代理服务器,您可以绕过一些地理位置或网络提供商的限制,访问被屏蔽或受限的网站。
跳过本地地址的代理服务器是什么意思?
跳过本地地址的代理服务器意味着当您访问本地网络内的地址时,不会通过代理服务器。本地地址通常指的是局域网内的地址或特定的域名,如以"localhost"、"127.0.0.1"或局域网内的IP地址开头的地址。
启用这个选项的原因是,对于局域网内的资源或特定的本地服务,通常不需要通过代理服务器访问,直接访问更快更方便。而且,如果代理服务器配置有误或者代理服务器本身无法访问本地资源,那么通过代理服务器访问本地地址可能会导致连接失败或延迟增加。
总的来说,跳过本地地址的代理服务器是为了优化网络性能和提高访问本地资源的可靠性。
其他
在进行Java Web项目测试时,是否需要勾选"跳过本地地址的代理服务器"这个选项主要取决于您的测试环境和需求:
如果您的测试环境位于本地网络中,并且您主要访问的是本地部署的Web应用(如运行在localhost或局域网IP上的应用),那么勾选这个选项通常是比较合适的。这样可以确保访问本地Web应用时不经过代理服务器,从而提高访问速度和减少不必要的代理配置问题。
如果您的测试环境需要通过代理服务器访问外部网络,或者需要测试代理服务器的相关功能,那么您可能需要根据实际情况调整这个选项。例如,如果需要测试应用如何通过代理服务器访问外部API或服务,那么可能不适合勾选这个选项。
总之,是否勾选这个选项应根据您的具体测试需求和网络环境来决定。如果您不确定,可以尝试两种配置,并观察哪种配置更符合您的测试场景


 2263
2263

 被折叠的 条评论
为什么被折叠?
被折叠的 条评论
为什么被折叠?
 到【灌水乐园】发言


