


文章目录
- 第1章 Linux系统编程入门
- 1.1 Linux开发环境搭建
- 1.2 GCC(1)
- 1.3 GCC(2)
- 1.4 静态库的制作
- 1.5 静态库的使用
- 1.6 动态库的制作与使用
- 1.7 动态库加载失败的原因
- 1.8 解决动态库加载失败问题
- 1.9 动态库与静态库的对比
- 1.10 Makefile(1)
- 1.11 Makefile(2)
- 1.12 Makefile(3)
- 1.13 GDB调试(1)
- 1.14 GDB调试(2)
- 1.15 GDB调试(3)
- 1.16 GDB调试(4)
- 1.17 标准C库IO函数和Linux系统IO函数对比
- 1.18 虚拟地址空间
- 1.19 文件描述符
- 1.20 open打开文件
- 1.21 open创建新文件
- 1.22 read、write函数
- 1.23 lseek函数
- 1.24 stat、lstat函数
- 1.25 模拟实现ls -l命令
- 1.26 文件属性操作函数
- 1.27 目录操作函数
- 1.28 目录遍历函数
- 1.29 dup、dup2函数
- 1.30 fcntl函数
第1章 Linux系统编程入门
1.1 Linux开发环境搭建
01/搭建步骤:
-
安装Linux系统(虚拟机安装、云服务器)
https://releases.ubuntu.com/bionic/
-
安装XSHELL、XFTP
https://www.netsarang.com/zh/free-for-home-school/
-
安装Visual Studio Code
https://code.visualstudio.com/
1.2 GCC(1)
1.2.1 什么是GCC
- GCC 原名为 GNU C语言编译器 (GNU C Compiler)
- GCC (GNU Compiler Collection,GNU编译器套件)是由 GNU 开发的编程语言译器。GNU 编译器套件包括 C、C++、Objective-C、Java、Ada 和 Go 语言前端,也包括了这些语言的库 (如 libstdc++,libgcj等)
- GCC 不仅支持 C 的许多“方言”,也可以区别不同的 C 语言标准,可以使用命令行选项来控制编译器在翻译源代码时应该遵循哪个 C 标准。例如,当使用命令行参数’'-std=c9’启动 GCC 时,编译器支持 C99 标准
- 安装命令
sudo apt install gcc g++(版本 > 4.8.5) - 查看版本 gcc/g++ -v/–version
gcc:是用来编译C语言的
g++:是用来编译c++语言的
# 在Unix系统上,从源文件到目标文件的转化是由编译器驱动程序完成的。
linux> gcc -o hello hello.c

# GCC编译器驱动程序读取源程序文件hello.c,并把它翻译成一个可执行目标文件hello。这个翻译过程分为四个阶段:预处理(Preprocessing)、编译(Compilation)、汇编(Assembly)、链接(Linking)。执行这四个阶段的程序(预处理器、编译器、汇编器、和链接器)一起构成了编译系统。

# 自己在vscode里面写的代码,用gcc编译,然后生成可执行文件app
ernest-laptop@ubuntu:~/Linux/lession02$ ls
test.c
ernest-laptop@ubuntu:~/Linux/lession02$ gcc test.c -o app   % 这一步就是翻译,-o:指定要翻译的名字
ernest-laptop@ubuntu:~/Linux/lession02$ ls
app  test.c
ernest-laptop@ubuntu:~/Linux/lession02$ ./app  % 执行程序
Hello World

# 如果不添加-o,直接运行的话,就会生成a.out 也能直接执行
ernest-laptop@ubuntu:~/Linux/lession02$ gcc test.c
ernest-laptop@ubuntu:~/Linux/lession02$ ls
a.out  app  test.c
ernest-laptop@ubuntu:~/Linux/lession02$ ./a.out
Hello World
1.2.2 GCC工作流程

目标代码就是计算机能识别的二进制数字0,1
ernest-laptop@ubuntu:~/Linux/lession02$ gcc test.c -E -o test.i
ernest-laptop@ubuntu:~/Linux/lession02$ ls
a.out  app  test.c  test.i
ernest-laptop@ubuntu:~/Linux/lession02$ gcc test.i -S -o test.s
ernest-laptop@ubuntu:~/Linux/lession02$ ls
a.out  app  test.c  test.i  test.s
ernest-laptop@ubuntu:~/Linux/lession02$ gcc test.s -s -o test.o
ernest-laptop@ubuntu:~/Linux/lession02$ ls
a.out  app  test.c  test.i  test.o  test.s
ernest-laptop@ubuntu:~/Linux/lession02$ ./test.o
Hello World


代码从创建到执行步骤:
在编译型语言如C或C++中的程序编译过程中,不同阶段生成的文件扩展名通常如下:
1. 预处理(Preprocessing)
- 生成的文件:这一阶段通常不会生成一个单独的物理文件,而是生成一个经过预处理的源代码,直接进入下一阶段。在一些情况下,如果特别指定,可以生成预处理后的文件。
- 扩展名:没有通用的标准扩展名,但有时使用
.i(特别是在某些编译器如GCC中)。
2. 编译(Compilation)
- 生成的文件:编译器将预处理过的源代码编译为汇编代码。
- 扩展名:通常是
.s或.asm。
3. 汇编(Assembly)
- 生成的文件:汇编器将汇编代码转换为机器代码,生成目标代码文件。
- 扩展名:
- 在Unix/Linux系统中,扩展名通常是
.o。 - 在Windows系统中,扩展名通常是
.obj。
- 在Unix/Linux系统中,扩展名通常是
4. 链接(Linking)
- 生成的文件:链接器将一个或多个目标文件以及所需的库文件链接成一个单独的可执行文件或库文件。
- 扩展名:
- 对于可执行文件,在Unix/Linux系统中通常没有特定扩展名(但有执行权限),而在Windows系统中是
.exe。 - 对于库文件,静态库在Unix/Linux中通常是
.a,在Windows中是.lib;动态库在Unix/Linux中通常是.so,在Windows中是.dll。
- 对于可执行文件,在Unix/Linux系统中通常没有特定扩展名(但有执行权限),而在Windows系统中是
这些扩展名可能会根据所用的操作系统和编译器的不同而有所变化,但上述提供的是最常见的情况。

1.3 GCC(2)
1.3.1 gcc与g++的区别
-
gcc 和 g++都是GNU(组织)的一个编译器
-
误区一:gcc 只能编译 c 代码,g++ 只能编译 c++ 代码。两者都可以,请注意
- 后缀为 .c 的,gcc 把它当作是 C 程序,而 g++ 当作是 c++ 程序
- 后缀为 .cpp 的,两者都会认为是 C++ 程序,C++ 的语法规则更加严谨一些
- 编译阶段,g++ 会调用 gcc,对于 C++ 代码,两者是等价的,但是因为 gcc命令不能自动和 C++ 程序使用的库联接,所以通常用 g++ 来完成链接,为了统一起见,干脆编译/链接统统用 g++ 了,这就给人一种错觉,好像 cpp 程序只能用g++似的
-
误区二:gcc 不会定义cplusplus 宏,而 g++ 会
- 实际上,这个宏只是标志着编译器将会把代码按 C 还是 C++ 语法来解释
- 如上所述,如果后缀为 .c,并且采用 gcc 编译器,则该宏就是未定义的,否则就是已定义
-
误区三:编译只能用 gcc,链接只能用 g++
- 严格来说,这句话不算错误,但是它混淆了概念,应该这样说: 编译可以用gcc/g++,而链接可以用 g++ 或者 gcc -lstdc++。
- 命令不能自动和C++程序使用的库联接,所以通常使用 g++ 来完成联接gcc,但在编译阶段,g++会自动调用 gcc,二者等价
# 这里测试-D的作用
rnest-laptop@ubuntu:~/Linux/lession03$ ls
test.c
ernest-laptop@ubuntu:~/Linux/lession03$ gcc test.c -o test
ernest-laptop@ubuntu:~/Linux/lession03$ ls
test  test.c
ernest-laptop@ubuntu:~/Linux/lession03$ ./test
Hello GCC!!!
Hello GCC!!!
Hello GCC!!!
ernest-laptop@ubuntu:~/Linux/lession03$ gcc test.c -o test -DDebug
ernest-laptop@ubuntu:~/Linux/lession03$ ls
test  test.c
ernest-laptop@ubuntu:~/Linux/lession03$ ./test
Hello GCC!!!
Hello GCC!!!
Hello GCC!!!
ernest-laptop@ubuntu:~/Linux/lession03$ gcc test.c -o test -DDEBUG
ernest-laptop@ubuntu:~/Linux/lession03$ ls
test  test.c
ernest-laptop@ubuntu:~/Linux/lession03$ ./test
我是一个程序猿,我不会爬树...
Hello GCC!!!
Hello GCC!!!
Hello GCC!!!

# 这里测试-Wall的作用
ernest-laptop@ubuntu:~/Linux/lession03$ ls
test.c
ernest-laptop@ubuntu:~/Linux/lession03$ gcc test.c -o test -Wall
test.c: In function ‘main’:
test.c:5:9: warning: unused variable ‘a’ [-Wunused-variable]
    5 |     int a = 10;
      |         ^
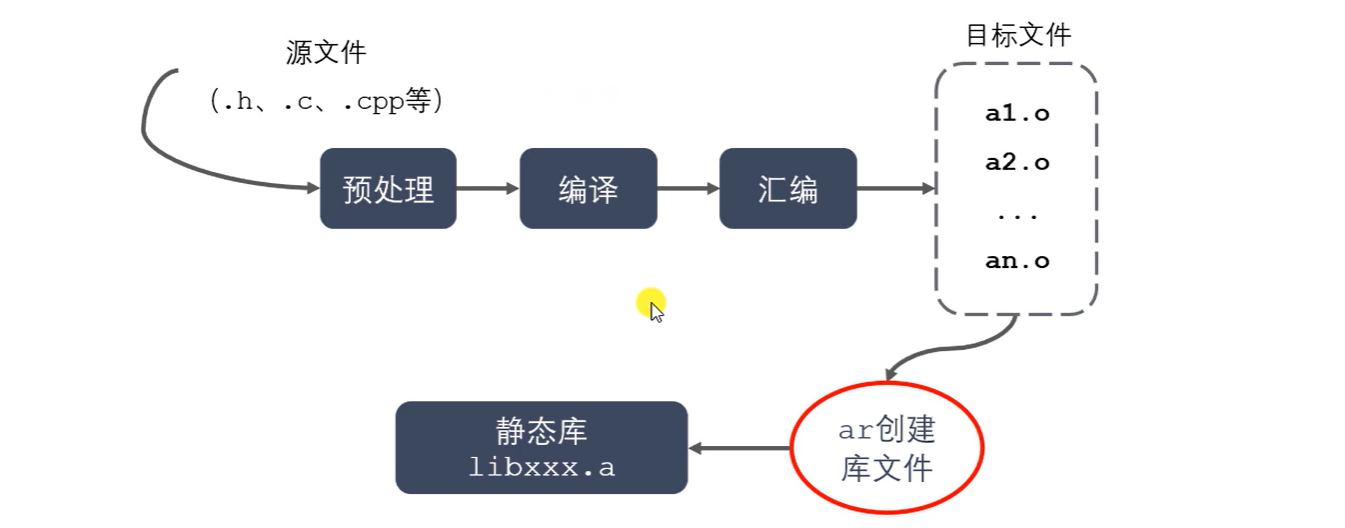
1.4 静态库的制作
1.4.1 什么是库?
- 库文件是计算机上的一类文件,可以简单的把库文件看成一种代码仓库,"它提供给使用者一些可以直接拿来用的变量、函数或类。
- 库是特殊的一种程序,编写库的程序和编写一般的程序区别不大,只是库不能单独运行
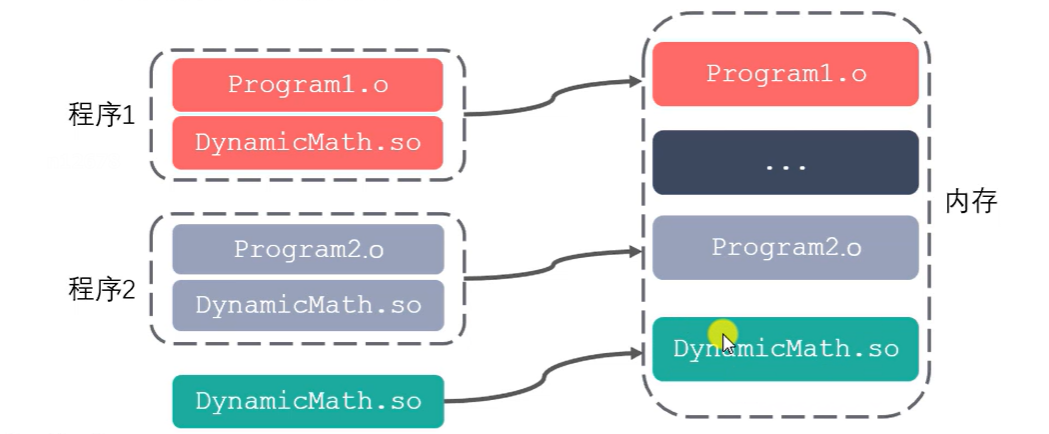
- 库文件有两种,静态库和动态库 (共享库),区别是:静态库在程序的链接阶段被复制到了程序中;动态库在链接阶段没有被复制到程序中,而是程序在运行时由系统动态加载到内存中供程序调用。
- 库的好处:
- 1.代码保密:比如自己写的代码,可以压缩成库,发给别人以后,别人智能调用库,虽然说有反编译,但是c/c++的反编译还原度很低,java反编译的还原度还是挺高的95%左右。
- 2.方便部署和分发:比如自己写的代码有100个.cpp文件,压缩成库以后容量就减少了,别人就可以直接调用了。
1.4.2 静态库的制作
命名规则
- Linux:libxxx.a
- lib:前缀(固定)
- xxx:库的名字,自己起
- .a:后缀 (固定)
- Windows : libxxx.lib
静态库的制作
-
gcc 获得.o文件(比如有10个.o文件,要把这10个文件打包成库)
-
将.o文件打包,使用 ar 工具 (archive) ar rcs libxxx.a xxx.o xxx.o
-
r - 将文件插入备存文件中
-
c - 建立备存文件
-
s - 索引
-
ernest-laptop@ubuntu:~/Linux$ ls
lesson02  lesson03  lesson04
ernest-laptop@ubuntu:~/Linux$ cd lesson04
ernest-laptop@ubuntu:~/Linux/lesson04$ ls
calc  library
ernest-laptop@ubuntu:~/Linux/lesson04$ cd calc
ernest-laptop@ubuntu:~/Linux/lesson04/calc$ ls
add.c  div.c  head.h  main.c  mult.c  sub.c
ernest-laptop@ubuntu:~/Linux/lesson04/calc$ gcc -c add.c div.c mult.c sub.c
ernest-laptop@ubuntu:~/Linux/lesson04/calc$ ls
add.c  add.o  div.c  div.o  head.h  main.c  mult.c  mult.o  sub.c  sub.o
ernest-laptop@ubuntu:~/Linux/lesson04/calc$ tree
.
├── add.c
├── add.o
├── div.c
├── div.o
├── head.h
├── main.c
├── mult.c
├── mult.o
├── sub.c
└── sub.o

0 directories, 10 files
ernest-laptop@ubuntu:~/Linux/lesson04/calc$ ar rcs libcalc.a add.o div.o sub.o mult.o
ernest-laptop@ubuntu:~/Linux/lesson04/calc$ ls
add.c  add.o  div.c  div.o  head.h  libcalc.a  main.c  mult.c  mult.o  sub.c  sub.o
ernest-laptop@ubuntu:~/Linux/lesson04/calc$ tree
.
├── add.c
├── add.o
├── div.c
├── div.o
├── head.h
├── libcalc.a
├── main.c
├── mult.c
├── mult.o
├── sub.c
└── sub.o

0 directories, 11 files
1.5 静态库的使用
# 创建lesson05 在lesson05里面使用创建的静态库
ernest-laptop@ubuntu:~/Linux/lesson05/library$ tree
.
├── include
│   └── head.h
├── lib
├── main.c
└── src
    ├── add.c
    ├── div.c
    ├── mult.c
    └── sub.c

3 directories, 6 files
ernest-laptop@ubuntu:~/Linux/lesson05/library$ cp ../calc/libcalc.a ./lib
ernest-laptop@ubuntu:~/Linux/lesson05/library$ tree
.
├── include
│   └── head.h
├── lib
│   └── libcalc.a   // 在把库给别人之后,其实还需要把库所依赖的头文件发送别人,要不然库文件运行不起来
├── main.c
└── src
    ├── add.c
    ├── div.c
    ├── mult.c
    └── sub.c

3 directories, 7 files


# 接下来试着编译main.c文件,下面报错了,因为找不动head.h文件,有两种解决方案:
	1.把head.h文件放在与main.c文件同一级的目录中
	2.在编译的时候指定路径 通过 -I 指定路径,比如 gcc main.c -o app -I ./include/

ernest-laptop@ubuntu:~/Linux/lesson05/library$ vim main.c
ernest-laptop@ubuntu:~/Linux/lesson05/library$ gcc main.c -o app
main.c:2:10: fatal error: head.h: No such file or directory
    2 | #include "head.h"
      |          ^~~~~~~~
compilation terminated.

# 在执行第二种解决方案的时候,还会出现问题,原因是定义未引用,意思是找不到库文件,所以不仅要指定库文件,还得需要把库文件的路径加进去
	gcc main.c -o app -I ./include/ -l calc -L./lib

ernest-laptop@ubuntu:~/Linux/lesson05/library$ gcc main.c -o app -I ./include/
/usr/bin/ld: /tmp/ccTknEW3.o: in function `main':
main.c:(.text+0x3e): undefined reference to `add'
/usr/bin/ld: main.c:(.text+0x60): undefined reference to `subtract'
/usr/bin/ld: main.c:(.text+0x82): undefined reference to `multiply'
/usr/bin/ld: main.c:(.text+0xa4): undefined reference to `divide'
collect2: error: ld returned 1 exit status

# 下面才是成功的示例
ernest-laptop@ubuntu:~/Linux/lesson05/library$ gcc main.c -o app -I ./include/ -l calc -L./lib
ernest-laptop@ubuntu:~/Linux/lesson05/library$ tree
.
├── app
├── include
│   └── head.h
├── lib
│   └── libcalc.a
├── main.c
└── src
    ├── add.c
    ├── div.c
    ├── mult.c
    └── sub.c

3 directories, 8 files
ernest-laptop@ubuntu:~/Linux/lesson05/library$ ./app
a = 20, b = 12
a + b = 32
a - b = 8
a * b = 240
a / b = 1.666667
1.6 动态库的制作与使用
1.6.1 动态库的制作
命名规则
-
Linux:libxxx.so
lib:前缀 (固定)
xxx:库的名字,自己起
.so:后缀 (固定)
在Linux下是一个可执行文件
-
Windows:libxxx.dll
动态库的制作
-
gcc 得到.o文件,得到和位置无关的代码
gcc -c -fpic/-fPIC a.c b.c
-
gcc 得到动态库
gcc -shared a.o b.o -o libcalc.so
# 创建了lesson06文件夹,把lesson05文件夹里面的两个文件calc library复制过来,然后开始制作动态库
ernest-laptop@ubuntu:~/Linux/lesson06$ ls
calc  library
ernest-laptop@ubuntu:~/Linux/lesson06$ cd calc/
ernest-laptop@ubuntu:~/Linux/lesson06/calc$ ls
add.c  div.c  head.h  main.c  mult.c  sub.c
ernest-laptop@ubuntu:~/Linux/lesson06/calc$ gcc -c -fpic add.c div.c mult.c sub.c
ernest-laptop@ubuntu:~/Linux/lesson06/calc$ tree
.
├── add.c
├── add.o
├── div.c
├── div.o
├── head.h
├── main.c
├── mult.c
├── mult.o
├── sub.c
└── sub.o

0 directories, 10 files
ernest-laptop@ubuntu:~/Linux/lesson06/calc$ gcc -shared add.o div.o mult.o sub.o -o libcalc.so
ernest-laptop@ubuntu:~/Linux/lesson06/calc$ tree
.
├── add.c
├── add.o
├── div.c
├── div.o
├── head.h
├── libcalc.so
├── main.c
├── mult.c
├── mult.o
├── sub.c
└── sub.o

0 directories, 11 files
接下来开始使用动态库
ernest-laptop@ubuntu:~/Linux/lesson06/library$ tree
.
├── app
├── include
│   └── head.h
├── lib
├── main.c
└── src
    ├── add.c
    ├── div.c
    ├── mult.c
    └── sub.c

3 directories, 7 files
ernest-laptop@ubuntu:~/Linux/lesson06/library$ cp ../calc/libcalc.so ./lib
ernest-laptop@ubuntu:~/Linux/lesson06/library$ rm app
ernest-laptop@ubuntu:~/Linux/lesson06/library$ tree
.
├── include
│   └── head.h
├── lib
│   └── libcalc.so
├── main.c
└── src
    ├── add.c
    ├── div.c
    ├── mult.c
    └── sub.c
ernest-laptop@ubuntu:~/Linux/lesson06/library$ gcc main.c -o main -I include/ -L lib/ - calc
ernest-laptop@ubuntu:~/Linux/lesson06/library$ tree
.
├── include
│   └── head.h
├── lib
│   └── libcalc.so
├── main
├── main.c
└── src
    ├── add.c
    ├── div.c
    ├── mult.c
    └── sub.c

3 directories, 8 files
ernest-laptop@ubuntu:~/Linux/lesson06/library$ ./main
./main: error while loading shared libraries: libcalc.so: cannot open shared object file: No such file or directory
这里报了一个新的错误:动态库加载失败,找不到动态库文件
1.7 动态库加载失败的原因
工作原理
-
**静态库:**GCC 进行链接时,会把静态库中代码打包到可执行程序中
-
动态库:GCC 进行链接时,动态库的代码不会被打包到可执行程序中
-
程序启动之后,动态库会被动态加载到内存中,通过 ldd (list dynamicdependencies) 命令检查动态库依赖关系
-
如何定位共享库文件呢?
当系统加载可执行代码时候,能够知道其所依赖的库的名字,但是还需要知道绝对路径。此时就需要系统的动态载入器来获取该绝对路径。对于elf格式的可执行程序,是由ld-linux.so来完成的,它先后搜索elf文件的 DT_RPATH段一>环境变量LD_LIBRARY_PATH -> /etc/ld.so.cache文件列表 -> /lib/,/usr/lib目录找到库文件后将其载入内存。
# 下面是main程序执行所需要的库
ernest-laptop@ubuntu:~/Linux/lesson06/library$ ldd main
        linux-vdso.so.1 (0x00007ffe84187000)
        libcalc.so => not found
        libc.so.6 => /lib/x86_64-linux-gnu/libc.so.6 (0x00007fb56b92a000)
        /lib64/ld-linux-x86-64.so.2 (0x00007fb56bb36000)
1.8 解决动态库加载失败问题
1.8.1 第一种方式:用环境变量LD_LIBRARY_PATH
# 把动态库加入到 LD_LIBRARY_PATH 里面
ernest-laptop@ubuntu:~/Linux/lesson06/library$ export LD_LIBRARY_PATH=$LD_LIBRARY_PATH:/home/ernest-laptop/Linux/lesson06/library/lib
ernest-laptop@ubuntu:~/Linux/lesson06/library$ ldd main
        linux-vdso.so.1 (0x00007ffdc7176000)
        libcalc.so => /home/ernest-laptop/Linux/lesson06/library/lib/libcalc.so (0x00007f8bb9fcf000)
        libc.so.6 => /lib/x86_64-linux-gnu/libc.so.6 (0x00007f8bb9dca000)
        /lib64/ld-linux-x86-64.so.2 (0x00007f8bb9fdb000)
但是上面这种方式只是临时的,关闭终端就消失了,因此我们需要设置永久的。
设置永久的有两种方式:
-
用户级别的:
ernest-laptop@ubuntu:~$ ll total 21244 drwxr-xr-x 27 ernest-laptop ernest-laptop 4096 Jul 3 05:26 ./ drwxr-xr-x 9 root root 4096 Apr 25 19:25 ../ -rw------- 1 ernest-laptop ernest-laptop 4206 Jul 3 00:15 .bash_history -rw-r--r-- 1 ernest-laptop ernest-laptop 220 Apr 7 05:36 .bash_logout -rw-r--r-- 1 ernest-laptop ernest-laptop 3771 Apr 7 05:36 .bashrc drwxrwxr-x 2 ernest-laptop ernest-laptop 4096 May 16 06:56 bochs/ drwxr-xr-x 16 ernest-laptop ernest-laptop 4096 May 16 07:48 bochs-2.6.2/ drwxr-xr-x 3 root root 4096 Apr 14 20:52 build/ drwxrwxr-x 2 ernest-laptop ernest-laptop 4096 Apr 25 20:14 c/ drwx------ 15 ernest-laptop ernest-laptop 4096 Jul 2 00:04 .cache/ drwx------ 10 ernest-laptop ernest-laptop 4096 Apr 7 06:50 .config/ drwxr-xr-x 2 ernest-laptop ernest-laptop 4096 Apr 7 06:49 Desktop/ drwxr-xr-x 2 ernest-laptop ernest-laptop 4096 Apr 7 06:49 Documents/ drwxrwxr-x 3 ernest-laptop ernest-laptop 4096 Apr 25 19:32 .dotnet/ drwxr-xr-x 2 ernest-laptop ernest-laptop 4096 Apr 7 06:49 Downloads/ drwx------ 3 ernest-laptop ernest-laptop 4096 Apr 7 06:49 .gnupg/ drwxrwxr-x 12 ernest-laptop ernest-laptop 4096 May 30 03:49 HIT-Linux-0.11/ -rw-rw-r-- 1 ernest-laptop ernest-laptop 21586449 May 30 03:24 hit-oslab-linux-20110823.tar.gz -rw-rw-r-- 1 ernest-laptop ernest-laptop 2381 Apr 10 06:37 index.html drwxrwxr-x 7 ernest-laptop ernest-laptop 4096 Jul 3 06:07 Linux/ drwxr-xr-x 3 ernest-laptop ernest-laptop 4096 Apr 7 06:49 .local/ drwx------ 4 ernest-laptop ernest-laptop 4096 May 16 06:28 .mozilla/ drwxr-xr-x 2 ernest-laptop ernest-laptop 4096 Apr 7 06:49 Music/ drwxr-xr-x 5 ernest-laptop ernest-laptop 4096 Mar 3 2017 oslab/ drwxr-xr-x 2 ernest-laptop ernest-laptop 4096 Apr 7 06:49 Pictures/ -rw-r--r-- 1 ernest-laptop ernest-laptop 807 Apr 7 05:36 .profile drwxr-xr-x 2 ernest-laptop ernest-laptop 4096 Apr 7 06:49 Public/ drwxr-xr-x 2 ernest-laptop ernest-laptop 4096 Apr 7 08:25 .rpmdb/ drwx------ 2 ernest-laptop ernest-laptop 4096 Jul 2 01:23 .ssh/ -rw-r--r-- 1 ernest-laptop ernest-laptop 0 Apr 7 06:50 .sudo_as_admin_successful drwxr-xr-x 2 ernest-laptop ernest-laptop 4096 Apr 7 06:49 Templates/ drwxr-xr-x 2 ernest-laptop ernest-laptop 4096 Apr 7 06:49 Videos/ drwxr-xr-x 2 ernest-laptop ernest-laptop 4096 Apr 11 17:53 .vim/ -rw------- 1 ernest-laptop ernest-laptop 10693 Jul 3 05:26 .viminfo drwxrwxr-x 5 ernest-laptop ernest-laptop 4096 Jul 3 18:24 .vscode-server/ -rw-rw-r-- 1 ernest-laptop ernest-laptop 183 Jul 2 00:20 .wget-hsts -rw------- 1 ernest-laptop ernest-laptop 52 Jul 2 01:04 .Xauthority -rw------- 1 ernest-laptop ernest-laptop 2610 Jul 2 01:15 y -rw-r--r-- 1 ernest-laptop ernest-laptop 574 Jul 2 01:15 y.pub ernest-laptop@ubuntu:~$ pwd /home/ernest-laptop ernest-laptop@ubuntu:~$ vim .bashrc # 在.bashrc文件最底下里面添加一行 export LD_LIBRARY_PATH=$LD_LIBRARY_PATH:/home/ernest-laptop/Linux/lesson06/library/lib ernest-laptop@ubuntu:~$ source .bashrc # 让配置生效 . bashrc 也是可以的 -
系统级别的:
# 在/etc/profile 文件里面更改
ernest-laptop@ubuntu:~$ sudo vim /etc/profile
[sudo] password for ernest-laptop:
ernest-laptop@ubuntu:~$ . profile
bash: profile: No such file or directory
ernest-laptop@ubuntu:~$ . /etc/profile
ernest-laptop@ubuntu:~$ echo $LD_LIBRARY_PATH
:/home/ernest-laptop/Linux/lesson06/library/lib
ernest-laptop@ubuntu:~$ cd /home/ernest-laptop/Linux/lesson06/library
ernest-laptop@ubuntu:~/Linux/lesson06/library$ ldd main
        linux-vdso.so.1 (0x00007ffd2eefb000)
        libcalc.so => /home/ernest-laptop/Linux/lesson06/library/lib/libcalc.so (0x00007f604fbf7000)
        libc.so.6 => /lib/x86_64-linux-gnu/libc.so.6 (0x00007f604f9f2000)
        /lib64/ld-linux-x86-64.so.2 (0x00007f604fc03000)
ernest-laptop@ubuntu:~/Linux/lesson06/library$ ./main
a = 20, b = 12
a + b = 32
a - b = 8
a * b = 240
a / b = 1.666667
1.8.2 第二种方式:用/etc/ld.so.cache文件列表
# 因为/etc/ld.so.cache里面是二进制文件,不允许更改,因此我们在/etc/ld.so.conf文件里面更改,在文件最底下加一条/home/ernest-laptop/Linux/lesson06/library/lib
ernest-laptop@ubuntu:~/Linux/lesson06/library$ sudo vim /etc/ld.so.conf
[sudo] password for ernest-laptop:
ernest-laptop@ubuntu:~/Linux/lesson06/library$ sudo ldconfig
ernest-laptop@ubuntu:~/Linux/lesson06/library$ cd /home/ernest-laptop/Linux/lesson06/library
ernest-laptop@ubuntu:~/Linux/lesson06/library$ ldd main
        linux-vdso.so.1 (0x00007fff88deb000)
        libcalc.so => /home/ernest-laptop/Linux/lesson06/library/lib/libcalc.so (0x00007fc0fbb86000)
        libc.so.6 => /lib/x86_64-linux-gnu/libc.so.6 (0x00007fc0fb994000)
        /lib64/ld-linux-x86-64.so.2 (0x00007fc0fbba5000)
1.8.3 第三种方式:/lib/,/usr/lib目录找到库文件后将其载入内存
不建议在这两个目录下添加库文件,因为这两个目录里面有很多系统的库文件,如果自己定义的库文件与系统提供的库文件重名了就会出现错误。
1.9 动态库与静态库的对比
1.9.1 程序编译成可执行程序的过程

1.9.2 静态库制作过程
1.9.3 动态库制作过程

1.9.4 静态库的优缺点
优点:
- 静态库被打包到应用程序中加载速度快
- 发布程序无需提供静态库,移植方便
缺点:
- 消耗系统资源,浪费内存
- 更新、部署、发布麻烦

1.9.5 动态库的优缺点
优点:
- 可以实现进程间资源共享 (共享库)
- 更新、部署、发布简单可以控制何时加载动态库
缺点:
- 加载速度比静态库慢
- 发布程序时需要提供依赖的动态库
1.10 Makefile(1)
1.10.1 什么是Makefile
- 一个工程中的源文件不计其数,其按类型、功能、模块分别放在若干个目录中Makefile 文件定义了一系列的规则来指定哪些文件需要先编译,哪些文件需要后编译,哪些文件需要重新编译,甚至于进行更复杂的功能操作,因为 Makefile 文件就像一个 shell 脚本一样,也可以执行操作系统的命令。
- Makefile 带来的好处就是“自动化编译”,一旦写好,只需要一个 make 命令,整个工程完全自动编译,极大的提高了软件开发的效率。make 是一个命令工具,是一个解释 Makefile 文件中指令的命令工具,一般来说,大多数的 IDE 都有这个命令比如 Delphi的 make,Visual C++的 nmake,Linux 下GNU的 make。
其实我们所说的源代码文件不仅包含 .c .cpp 文件,而且还包含 .h 文件
Makefile要学到什么程度呢?
- 作为程序员,现在只需要学到能勘定Makefile文件即可
- 作为架构师,要会写Makefile文件
1.10.3 Makefile文件命名和规则
-
文件命名
makefile 或者 Makefile -
Makefile 规则
-
一个 Makefile 文件中可以有一个或者多个规则
目标…:依赖…
命令 (shell 命令) …
- 目标: 最终要生成的文件 (伪目标除外)
- 依赖:生成目标所需要的文件或是目标
- 命令:通过执行命令对依赖操作生成目标 (命令前必须 Tab 缩进)
-
# 自己写了一个Makefile文件,然后执行make,生成可执行程序app
ernest-laptop@ubuntu:~/Linux/lesson07/redis-5.0.10$ ls
00-RELEASENOTES  COPYING  Makefile   redis.conf       runtest-moduleapi  src
BUGS             deps     MANIFESTO  runtest          runtest-sentinel   tests
CONTRIBUTING     INSTALL  README.md  runtest-cluster  sentinel.conf      utils
ernest-laptop@ubuntu:~/Linux/lesson07/redis-5.0.10$ vim Makefile
ernest-laptop@ubuntu:~/Linux/lesson07$ cat Makefile
app:sub.c add.c mult.c div.c main.c
        gcc sub.c add.c mult.c div.c main.c -o app
ernest-laptop@ubuntu:~/Linux/lesson07$ make
gcc sub.c add.c mult.c div.c main.c -o app
ernest-laptop@ubuntu:~/Linux/lesson07$ ./app
a = 20, b = 12
a + b = 32
a - b = 8
a * b = 240
a / b = 1.666667
1.11 Makefile(2)
1.11.1 Makefile工作原理
-
命令在执行之前,需要先检查规则中的依赖是否存在
-
如果存在,执行命令
-
如果不存在,向下检查其它的规则,检查有没有一个规则是用来生成这个依赖的,如果找到了,则执行该规则中的命令
# Makefile第一个版本
ernest-laptop@ubuntu:~/Linux/lesson07$ cat Makefile1
app:sub.c add.c mult.c div.c main.c
        gcc sub.c add.c mult.c div.c main.c -o app

# Makefile第二个版本,第二个版本执行效率会比第一个高一些
ernest-laptop@ubuntu:~/Linux/lesson07$ cat Makefile
app:sub.o add.o mult.o div.o main.o
        gcc sub.o add.o mult.o div.o main.o -o app    # 如果找不到*.o,那么就会执行下面的程序

sub.o:sub.c
        gcc -c sub.c -o sub.o

add.o:add.c
        gcc -c add.c -o add.o

mult.o:mult.c
        gcc -c mult.c -o mult.o

div.o:div.c
        gcc -c div.c -o div.o

main.o:main.c
        gcc -c main.c -o main.o
-
-
检测更新,在执行规则中的命令时,会比较目标和依赖文件的时间
-
如果依赖的时间比目标的时间晚,需要重新生成目标
-
如果依赖的时间比目标的时间早,目标不需要更新,对应规则中的命令不需要被执行
意思就是说,如果修改了代码,执行make的时候会根据以上工作原理去检查。 main.c 是依赖,main.o 是目标文件
-
1.12 Makefile(3)
1.12.1 变量
-
自定义变量
变量名=变量值 var=hello
-
预定义变量
**AR:**归档维护程序的名称,默认值为 ar**CC:**C 编译器的名称,默认值为 cc
**CXX:**C++ 编译器的名称,默认值为 g++
**$@:**目标的完整名称
**$<:**第一个依赖文件的名称,这是自动变量,代表规则中的第一个依赖项,即源文件的名称。
**$^:**所有的依赖文件
-
获取变量的值
$(变量名)
# 下面是一个示例
app:main.c a.c b.c
	gcc -c main.c a.c b.c

#自动变量只能在规则的命令中使用
app:main.c a.c b.c
	$(CC) -c $^ -o $@
# Makefile第三个版本
ernest-laptop@ubuntu:~/Linux/lesson07$ cat Makefile
#定义变量
src=sub.o add.o mult.o div.o main.o
target=app
$(target):$(src)
        $(CC) $(src) -o $(target)

sub.o:sub.c
        gcc -c sub.c -o sub.o

add.o:add.c
        gcc -c add.c -o add.o

mult.o:mult.c
        gcc -c mult.c -o mult.o

div.o:div.c
        gcc -c div.c -o div.o

main.o:main.c
        gcc -c main.c -o main.o
1.12.2 模式匹配
add.o:add.c
	gcc -c add.c
div.o:div.c
	gcc -c div.c
sub.o:sub.c
	gcc -c sub.c
mult.o:mult.c
	gcc -c mult.c
main.o:main.c
	gcc -c main.c

%.o:%.c
-%:通配符,匹配一个字符串
-两个%匹配的是同一个字符串

# 示例
%.o:%.c
	gcc -c $< -o $@
# Makefile第四个版本
ernest-laptop@ubuntu:~/Linux/lesson07$ cat Makefile
#定义变量
src=sub.o add.o mult.o div.o main.o
target=app
$(target):$(src)
        $(CC) $(src) -o $(target)

%.o:%.c
        $(CC) -c $< -o $@
这是一个典型的Makefile规则示例,通常用于编译C源代码文件为目标文件。这个规则定义了如何生成目标文件(以.o为扩展名)从对应的C源文件(以.c为扩展名)。
让我解释一下这个规则的每一部分:
-
%.o:%.c:这是规则的目标部分。%.o表示任何以.o为扩展名的目标文件,%.c表示与之匹配的同名.c源文件。这个规则告诉Make工具如何生成目标文件。 -
gcc -c $< -o $@:这是规则的命令部分。它告诉Make工具如何将源文件编译成目标文件。具体解释如下:gcc:这是C语言编译器,用于编译C源文件。-c:这个选项告诉gcc只进行编译而不进行链接,生成目标文件。$<:这是自动变量,代表规则中的第一个依赖项,即源文件的名称。-o $@:这个选项告诉gcc将生成的目标文件命名为规则的目标文件名($@是自动变量,代表目标文件的名称)。
使用这个规则,Make工具可以根据需要自动编译所有的C源文件并生成相应的目标文件。你可以将这个规则添加到Makefile中,然后运行make命令来编译你的项目。当Make工具检测到源文件有变化时,它将自动重新编译相应的目标文件。这是一种自动化构建项目的常见方式。
在Makefile规则 %.o:%.c 中,$< 和 $@ 分别表示以下内容:
-
$<代表规则中的第一个依赖项,也就是与目标文件.o相关联的源文件.c的名称。 -
$@代表规则的目标文件,也就是要生成的目标文件的名称,这里是.o文件的名称。
所以,对于规则 %.o:%.c,$< 代表源文件(.c 文件),而 $@ 代表目标文件(.o 文件)。这通常用于构建规则中的命令,以指定输入和输出文件的名称。
1.12.3 函数
-
$(wildcard PATTERN…)
-
**功能:**获取指定目录下指定类型的文件列表
-
**参数:**PATTERN 指的是某个或多个目录下的对应的某种类型的文件,如果有多
个目录,一般使用空格间隔 -
**返回:**得到的若干个文件的文件列表,文件名之间使用空格间隔
-
示例:
$(wildcard *.c ./sub/*.c)
返回值格式:a.c b.c c.c d.c e.c f.c
-
-
$(patsubst ,,
) -
功能:查找
中的单词(单词以“空格”、“Tab”或“回车”“换行”分隔)是否符合模式,如果匹配的话,则以替换 -
可以包括通配符’%‘,表示任意长度的字串。如果中也包含‘%’,那么,中的这个号将是中的那个所代表的字串。(可以用‘\’来转义,以’%‘来表示真实含义的’%'字符)
-
返回:函数返回被替换过后的字符串
-
示例:
$(patsubst %.c, %.o, x.c bar.c)
返回值格式: x.o bar.o
-
# Makefile第五个版本
ernest-laptop@ubuntu:~/Linux/lesson07$ cat Makefile
#定义变量
#sub.c add.c mult.c div.c main.c
src=$(wildcard ./*.c)
objs=$(patsubst %.c, %.o, $(src))
target=app
$(target):$(objs)
        $(CC) $(objs) -o $(target)

%.o:%.c
        $(CC) -c $< -o $@
# Makefile第六个版本
ernest-laptop@ubuntu:~/Linux/lesson07$ cat Makefile
#定义变量
#sub.c add.c mult.c div.c main.c
src=$(wildcard ./*.c)
objs=$(patsubst %.c, %.o, $(src))
target=app
$(target):$(objs)
        $(CC) $(objs) -o $(target)

%.o:%.c
        $(CC) -c $< -o $@

clean:
        rm $(objs) -f

# 但是在这个版本中,clean命令不能执行,因为生成的clean目标文件没有依赖,一直是最新的,因此执行不了clean,所以要在改进一下,把clean文件写成临时伪文件的

# Makefile第七个版本
ernest-laptop@ubuntu:~/Linux/lesson07$ cat Makefile
ernest-laptop@ubuntu:~/Linux/lesson07$ cat Makefile
#定义变量
#sub.c add.c mult.c div.c main.c
src=$(wildcard ./*.c)
objs=$(patsubst %.c, %.o, $(src))
target=app
$(target):$(objs)
        $(CC) $(objs) -o $(target)

%.o:%.c
        $(CC) -c $< -o $@

.PHONY:clean				# 把clean变成伪目标,没必要生成一个文件,这样的话就不会与外面的clean文件进行对比,因此执行								make clean的时候就不会出现问题了
clean:
        rm $(objs) -f
clean的作用:
“clean” 是一个常见的目标名称,通常在 Makefile 中用于清理项目中生成的临时文件、中间文件和生成的可执行文件,以便将项目还原到干净的状态。这个目标的作用是删除那些可以被重新生成的文件,以释放磁盘空间或确保重新编译时不受旧文件的影响。
在你提供的 Makefile 片段中,“clean” 目标的作用是删除一个变量 $(objs) 中指定的文件,通常这些文件是项目编译生成的目标文件(例如,.o 文件),它们是由源文件编译而来的中间文件。
通常情况下,“clean” 目标用于执行类似于下面的操作:
clean:
    rm $(objs)
其中 $(objs) 包含了需要删除的文件列表。这些文件是由编译过程生成的,执行 “clean” 目标后,这些文件会被删除,项目会被还原到一个干净的状态,可以重新编译生成。
“clean” 目标的存在有助于确保项目在不同构建之间保持一致性,避免旧的目标文件干扰新的构建。当你需要重新编译项目或者清理中间文件时,可以运行 make clean 命令来触发 “clean” 目标的执行。
1.13 GDB调试(1)
1.13.1 什么是GDB
- GDB 是由 GNU 软件系统社区提供的调试工具,同 GCC 配套组成了一套完整的开发环境,GDB是 Linux 和许多类 Unix 系统中的标准开发环境。
- 一般来说,GDB主要帮助你完成下面四个方面的功能:
- 启动程序,可以按照自定义的要求随心所欲的运行程序
- 可让被调试的程序在所指定的调置的断点处停住(断点可以是条件表达式)
- 当程序被停住时,可以检查时程序中所发生的事
- 可以改变程序,将一个 BUG 产生的影响修正从而测试其他 BUG
1.13.2 准备工作
- 通常,在为调试而编译时,我们会 () 关掉编译器的优化选项(‘-o’),并打开调试选项 (‘-g’)。另外,-'wall’在尽量不影响程序行为的情况下选项打开所有warning,也可以发现许多问题,避免一些不必要的 BUG。
- gcc -g -Wall program.c -o program
- ‘-g’ 选项的作用是在可执行文件中加入源代码的信息,比如可执行文件中第几条机器指令对应源代码的第几行,但并不是把整个源文件嵌入到可执行文件中,所以在调试时必须保证 gdb 能找到源文件。
1.13.3 GDB命令一启动、退出、查看代码
# 启动和退出
  	gdb 可执行程序
  	quit

# 给程序设置参数/获取设置参数
    set args 10 20
  	show args

# GDB使用帮助
 	help

# 查看当前文件代码
	list/l (从默认位置显示)
	list/l 行号(从指定的行显示)
	list/l 函数名(从指定的函数显示)

# 查看非当前文件代码
	list/l 文件名:行号
	list/l 文件名:函数名

# 设置显示的行数
	show list/listsize
	set list/listsize 行数
ernest-laptop@ubuntu:~/Linux/lesson08$ ls
bubble.cpp  main.cpp  select.cpp  sort.h  test.c
ernest-laptop@ubuntu:~/Linux/lesson08$ gcc test.c -o test -g
ernest-laptop@ubuntu:~/Linux/lesson08$ ./test
argc = 1
a = 10, b = 30
a + b = 40
i = 0
res value: 0
i = 1
res value: 0
i = 2
res value: 1
i = 3
res value: 3
i = 4
res value: 6
i = 5
res value: 10
i = 6
res value: 15
i = 7
res value: 21
i = 8
res value: 28
i = 9
res value: 36
THE END !!!
ernest-laptop@ubuntu:~/Linux/lesson08$ ./test 10 20		# 在执行程序test程序的时候加上参数
argc = 3
ernest-laptop@ubuntu:~/Linux/lesson08$ gdb test			# 调试程序
GNU gdb (Ubuntu 9.2-0ubuntu1~20.04.1) 9.2
Copyright (C) 2020 Free Software Foundation, Inc.
License GPLv3+: GNU GPL version 3 or later <http://gnu.org/licenses/gpl.html>
This is free software: you are free to change and redistribute it.
There is NO WARRANTY, to the extent permitted by law.
Type "show copying" and "show warranty" for details.
This GDB was configured as "x86_64-linux-gnu".
Type "show configuration" for configuration details.
For bug reporting instructions, please see:
<http://www.gnu.org/software/gdb/bugs/>.
Find the GDB manual and other documentation resources online at:
    <http://www.gnu.org/software/gdb/documentation/>.

For help, type "help".
Type "apropos word" to search for commands related to "word"...
Reading symbols from test...
(gdb) set args 10 20		# 也可以在调试的时候加上参数
(gdb) show args
Argument list to give program being debugged when it is started is "10 20".
(gdb) q		# 退出调试

(gdb) help	# 帮助
List of classes of commands:

aliases -- Aliases of other commands.
breakpoints -- Making program stop at certain points.
data -- Examining data.
files -- Specifying and examining files.
internals -- Maintenance commands.
obscure -- Obscure features.
running -- Running the program.
stack -- Examining the stack.
status -- Status inquiries.
support -- Support facilities.
tracepoints -- Tracing of program execution without stopping the program.
user-defined -- User-defined commands.

Type "help" followed by a class name for a list of commands in that class.
Type "help all" for the list of all commands.
Type "help" followed by command name for full documentation.
Type "apropos word" to search for commands related to "word".
Type "apropos -v word" for full documentation of commands related to "word".
Command name abbreviations are allowed if unambiguous.		# 按enter键可以翻页
如果哪里不明白的话,可以通过 help xxx 来查看帮助文档
1.14 GDB调试(2)
# 如果想看代码的行号,可以vim test.c 然后通过 :set nu 来设置行号

# 查看当前文件代码
	list/l (从默认位置显示)
	list/l 行号(从指定的行显示)
	list/l 函数名(从指定的函数显示)

# 如果想在调试的时候能看到代码的话,那么在生成可执行程序的时候就得执行如下的命令
ernest-laptop@ubuntu:~/Linux/lesson08$ gcc test.c -o test -g	# 加上 -g 选项
ernest-laptop@ubuntu:~/Linux/lesson08$ ls
bubble.cpp  main.cpp  select.cpp  sort.h  test  test.c
ernest-laptop@ubuntu:~/Linux/lesson08$ gdb test
GNU gdb (Ubuntu 9.2-0ubuntu1~20.04.1) 9.2
Copyright (C) 2020 Free Software Foundation, Inc.
License GPLv3+: GNU GPL version 3 or later <http://gnu.org/licenses/gpl.html>
This is free software: you are free to change and redistribute it.
There is NO WARRANTY, to the extent permitted by law.
Type "show copying" and "show warranty" for details.
This GDB was configured as "x86_64-linux-gnu".
Type "show configuration" for configuration details.
For bug reporting instructions, please see:
<http://www.gnu.org/software/gdb/bugs/>.
Find the GDB manual and other documentation resources online at:
    <http://www.gnu.org/software/gdb/documentation/>.

For help, type "help".
Type "apropos word" to search for commands related to "word"...
Reading symbols from test...
(gdb) list	# list显示行号,默认只显示10行,如果想显示其他的行的话,需要按住enter键,之后10行,10行的显示

(gdb) l 20	# list后面跟上20 表示显示中间的行号是20行
15              b = atoi(argv[2]);
16          }
17          printf("a = %d, b = %d\n", a, b);
18          printf("a + b = %d\n", a + b);
19
20          for(int i = 0; i < a; ++i) {
21              printf("i = %d\n", i);
22              // 函数调用
23              int res = test(i);
24              printf("res value: %d\n", res);
# 把 main.cpp bubble.cpp select.cpp 三个文件合成一个可执行程序 main,在进行gdb调试的时候,显示的是main.cpp文件的内容
ernest-laptop@ubuntu:~/Linux/lesson08$ g++ main.cpp bubble.cpp select.cpp -o main -g
ernest-laptop@ubuntu:~/Linux/lesson08$ ls
bubble.cpp  main  main.cpp  select.cpp  sort.h  test  test.c
ernest-laptop@ubuntu:~/Linux/lesson08$ gdb main
GNU gdb (Ubuntu 9.2-0ubuntu1~20.04.1) 9.2
Copyright (C) 2020 Free Software Foundation, Inc.
License GPLv3+: GNU GPL version 3 or later <http://gnu.org/licenses/gpl.html>
This is free software: you are free to change and redistribute it.
There is NO WARRANTY, to the extent permitted by law.
Type "show copying" and "show warranty" for details.
This GDB was configured as "x86_64-linux-gnu".
Type "show configuration" for configuration details.
For bug reporting instructions, please see:
<http://www.gnu.org/software/gdb/bugs/>.
Find the GDB manual and other documentation resources online at:
    <http://www.gnu.org/software/gdb/documentation/>.

For help, type "help".
Type "apropos word" to search for commands related to "word"...
Reading symbols from main...
(gdb) l
1       #include <iostream>
2       #include "sort.h"
3
4       using namespace std;
5
6       int main() {
7
8           int array[] = {12, 27, 55, 22, 67};
9           int len = sizeof(array) / sizeof(int);
10
(gdb)
# 查看非当前文件代码
	list/l 文件名:行号
	list/l 文件名:函数名

(gdb) l bubble.cpp:1
1       #include "sort.h"
2       #include <iostream>
3
4       using namespace std;
5
6       void bubbleSort(int *array, int len) {
7
8           for (int i = 0; i < len - 1; i++) {
9                       for (int j = 0; j < len - 1 - i; j++) {
10                              if (array[j] > array[j + 1]) {
(gdb) l select.cpp:selectSort
1       #include "sort.h"
2       #include <iostream>
3
4       using namespace std;
5
6       void selectSort(int *array, int len) {
7
8           for (int j = 0; j < len - 1; j++) {
9                       for (int i = j + 1; i < len; i++) {
10                              if (array[j] > array[i]) {
# 设置显示的行数
	show list/listsize
	set list/listsize 行数

(gdb) show list
Number of source lines gdb will list by default is 10.
(gdb) set list 20
(gdb) l
11              a = 10;
12              b = 30;
13          } else {
14              a = atoi(argv[1]);
15              b = atoi(argv[2]);
16          }
17          printf("a = %d, b = %d\n", a, b);
18          printf("a + b = %d\n", a + b);
19
20          for(int i = 0; i < a; ++i) {
21              printf("i = %d\n", i);
22              // 函数调用
23              int res = test(i);
24              printf("res value: %d\n", res);
25          }
26
27          printf("THE END !!!\n");
28          return 0;
29      }
30
(gdb)
1.15 GDB调试(3)
1.15.1 GDB命令-断点操作
# 设置断点
	b/break 行号
	b/break 函数名
	b/break 文件名:行号
	b/break 文件名:函数

# 查看断点
	i/info b/break

# 删除断点
	d/del/delete 断点编号

# 设置断点无效
	dis/disable 断点编号

# 设置断点生效
	ena/enable 断点编号

# 设置条件断点(一般用在循环的位置)
	b/break 10if i==5
# 设置断点
	b/break 行号
	b/break 函数名
	b/break 文件名:行号
	b/break 文件名:函数

(gdb) l
1       #include <iostream>
2       #include "sort.h"
3
4       using namespace std;
5
6       int main() {
7
8           int array[] = {12, 27, 55, 22, 67};
9           int len = sizeof(array) / sizeof(int);
10
(gdb) b 9
Breakpoint 1 at 0x1227: file main.cpp, line 9.
(gdb) info break
Num     Type           Disp Enb Address            What
1       breakpoint     keep y   0x0000000000001227 in main() at main.cpp:9

# Enb:enable的缩写

# 打断点
(gdb) break 6
(gdb) break bubble.cpp:11
(gdb) break bubble.cpp:bubbleSort
Breakpoint 4 at 0x13eb: file bubble.cpp, line 6.
(gdb) info break
Num     Type           Disp Enb Address            What
1       breakpoint     keep y   0x0000000000001227 in main() at main.cpp:9
2       breakpoint     keep y   0x00000000000011e9 in main() at main.cpp:6
3       breakpoint     keep y   0x000000000000145d in bubbleSort(int*, int) at bubble.cpp:11
4       breakpoint     keep y   0x00000000000013eb in bubbleSort(int*, int) at bubble.cpp:6
# 删除断点
	d/del/delete 断点编号

(gdb) d 2		# 把编号为 2 的断点删除
(gdb) info break
Num     Type           Disp Enb Address            What
1       breakpoint     keep y   0x0000000000001227 in main() at main.cpp:9
3       breakpoint     keep y   0x000000000000145d in bubbleSort(int*, int) at bubble.cpp:11
4       breakpoint     keep y   0x00000000000013eb in bubbleSort(int*, int) at bubble.cpp:6
# 设置断点无效
	dis/disable 断点编号

(gdb) disable 1		# 设置编号为 1 的断点无效 n
(gdb) i b
Num     Type           Disp Enb Address            What
1       breakpoint     keep n   0x0000000000001227 in main() at main.cpp:9
3       breakpoint     keep y   0x000000000000145d in bubbleSort(int*, int) at bubble.cpp:11
4       breakpoint     keep y   0x00000000000013eb in bubbleSort(int*, int) at bubble.cpp:6
# 设置断点生效
	ena/enable 断点编号

(gdb) enable 1		# 设置编号为 1 的断点生效 y
(gdb) i b
Num     Type           Disp Enb Address            What
1       breakpoint     keep y   0x0000000000001227 in main() at main.cpp:9
3       breakpoint     keep y   0x000000000000145d in bubbleSort(int*, int) at bubble.cpp:11
4       breakpoint     keep y   0x00000000000013eb in bubbleSort(int*, int) at bubble.cpp:6
# 设置条件断点(一般用在循环的位置)
	b/break 10if i==5

11          bubbleSort(array, len);
12
13          // 遍历
14          cout << "冒泡排序之后的数组: ";
15          for(int i = 0; i < len; i++) {
16              cout << array[i] << " ";
17          }
18          cout << endl;
19          cout << "===================================" << endl;
20
(gdb) break 16 if i==3		# 当 i=3 的时候打断点
Breakpoint 5 at 0x1261: file main.cpp, line 16.
(gdb) i b
Num     Type           Disp Enb Address            What
1       breakpoint     keep y   0x0000000000001227 in main() at main.cpp:9
3       breakpoint     keep y   0x000000000000145d in bubbleSort(int*, int) at bubble.cpp:11
4       breakpoint     keep y   0x00000000000013eb in bubbleSort(int*, int) at bubble.cpp:6
5       breakpoint     keep y   0x0000000000001261 in main() at main.cpp:16
        stop only if i==3
1.16 GDB调试(4)
1.16.1 GDB命令-调试命令
# 运行GDB程序
start	(程序停在第一行)
run		(遇到断点才停)

# 继续运行,到下一个断点停
c/continue

# 向下执行一行代码(不会进入函数体)
n/next

# 变量操作
p/print 变量名(打印变量值)
ptype 变量名(打印变量类型)

# 向下单步调试(遇到函数进入函数体),想要跳出函数体,函数体里面不能有断点
s/step
finish (跳出函数体)

# 自动变量操作
display num(自动打印指定变量的值)
i/info display
undisplay 编号

# 其它操作
set var 变量名=变量值
until(跳)
# 运行GDB程序
start	(程序停在第一行)
run		(遇到断点才停)

# 继续运行,到下一个断点停
c/continue

(gdb) start
Temporary breakpoint 1 at 0x11e9: file main.cpp, line 6.
Starting program: /home/ernest-laptop/Linux/lesson08/main

Temporary breakpoint 1, main () at main.cpp:6
6       int main() {
(gdb) c		# 继续运行,但是因为没有断点,因此会一直执行到程序结束
Continuing.
冒泡排序之后的数组: 12 22 27 55 67
===================================
选择排序之后的数组: 11 25 36 47 80
[Inferior 1 (process 24387) exited normally]
(gdb) run		# 因为没有断点,因此会一直执行到程序结束
Starting program: /home/ernest-laptop/Linux/lesson08/main
冒泡排序之后的数组: 12 22 27 55 67
===================================
选择排序之后的数组: 11 25 36 47 80
[Inferior 1 (process 24439) exited normally]
1.17 标准C库IO函数和Linux系统IO函数对比
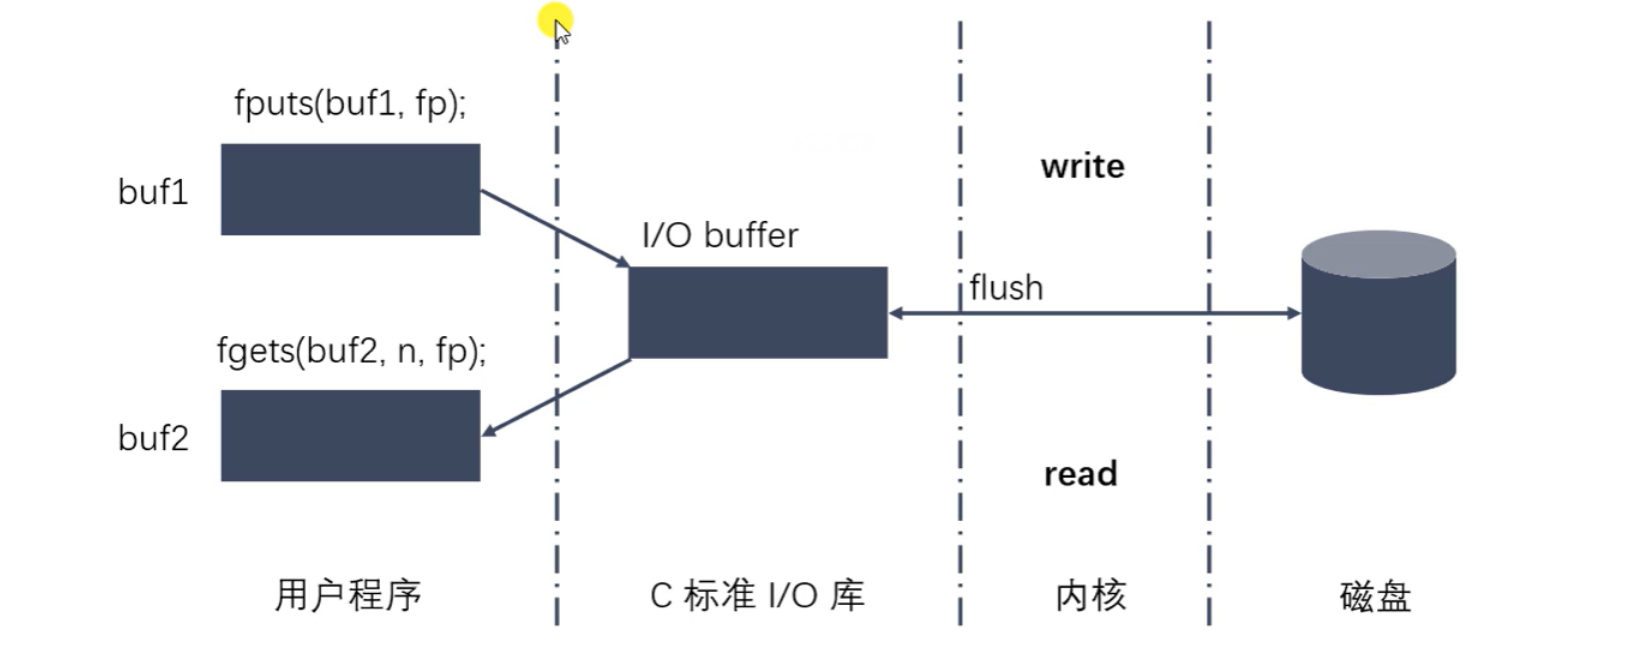
1.17.1 文件IO
文件IO:是站在内存的角度看的,输入就是输入到内存中,输出就是从内存里面输出。
1.17.2 标准C库IO函数

标准C库IO函数是第三方库,有缓冲区的,能提高效率。而Liunx系统IO函数是没有缓冲区的。
在网络通信的时候要选择Linux系统的IO函数,而在操作文件的时候要选择标准C库IO函数
1.17.3 标准C库IO和Linux系统IO的关系
1.18 虚拟地址空间

**程序:**程序就是加载到磁盘上的代码
**进程:**进程就是加载到内存上的程序
32位的机器虚拟地址是2^32 = 4G,这里是以32位机器来说的。
64位的机器虚拟地址是248,而不是264
虚拟地址空间里面的数据是要通过MMU加载到实际物理内存中去执行的。
虚拟地址空间实际是不存在的,只是为了解决问题而设立的。
用户区:
- **受保护的的地址:**0~4k,比如说null,nullptr都在这个地址里面
- ELF:.bss .data .text
- **堆空间:**堆空间比栈空间要大,而且数据是从下往上,从低地址到高地址存储的
- **共享库:**一些共享的库
- **栈空间:**数据是从上往下,从高地址到低地址存储的
- **命令行参数:*int main(int argc, char argv[])
- **环境变量:**在Linux命令行里面可以输入env查看环境变量
**内核区:**内核空间是受保护的,用户不能对该空间进行读写操作,否则会出现段错误,但是可以通过系统调用去使用内核区里面的东西
1.19 文件描述符
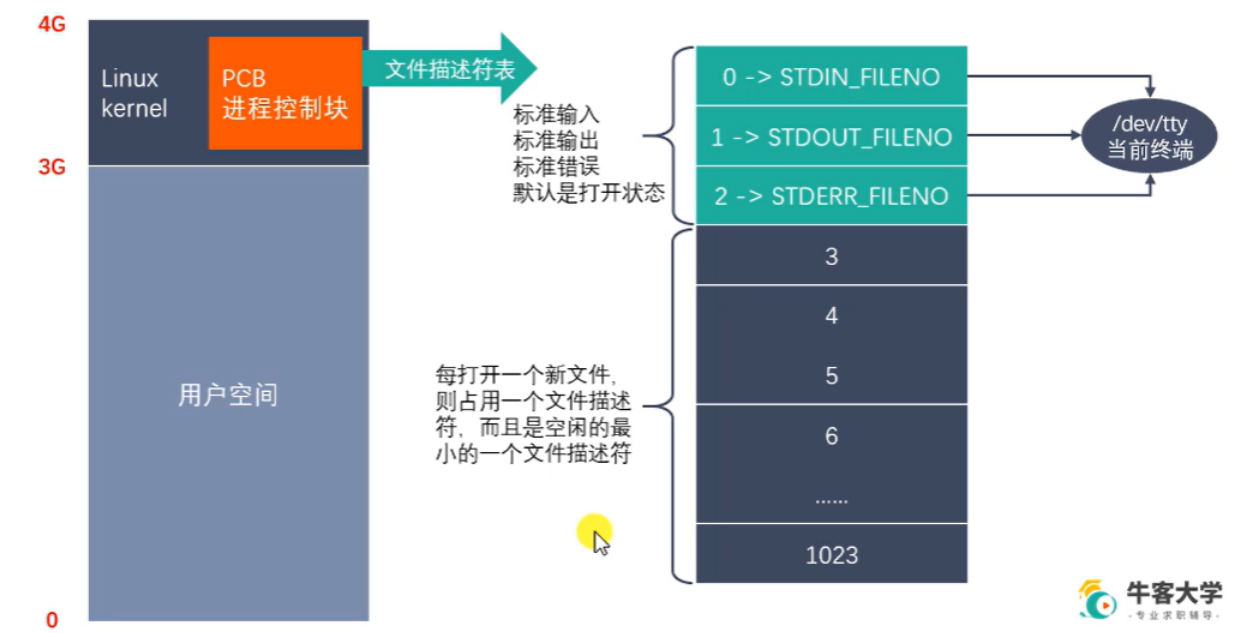
文件描述符默认大小为1024,就是说一个进程同时能打开的文件个数最大为1024个
同一个文件可以被打开多次,但是每次的文件描述符都不一样
用open()函数可以打开文件描述符
1.20 open打开文件
1.20.1 LInux系统IO函数
- int open(const char *pathname, int flags);
- int open(const char *pathname, int flags,mode_t mode);
- int close(int fd);
- ssize_t read(int fd, void *buf, size_t count);
- ssize_t write(int fd, const void *buf,size_t count);
- off_t lseek(int fd, off_t offset, int whence);
标准C库的IO函数 fopen() 会调用底层Liunx的open()函数。
# man 2 Linux系统IO函数在第二章的手册里面,而标准C库IO函数在第三章里面
ernest-laptop@ubuntu:~/Linux$ man 2 open
OPEN(2)                                                             Linux Programmer's Manual                                                            OPEN(2)

NAME
       open, openat, creat - open and possibly create a file

SYNOPSIS
       #include <sys/types.h>
       #include <sys/stat.h>
       #include <fcntl.h>

       int open(const char *pathname, int flags);
       int open(const char *pathname, int flags, mode_t mode);
       ......
/* 创建一个open.c文件 */

/*
    #include <sys/types.h>
    #include <sys/stat.h>
    #include <fcntl.h>

    // 打开一个已经存在的文件
    int open(const char *pathname, int flags);
        参数:
            - pathname:要打开的文件路径
            - flags:对文件的操作权限设置还有其他的设置
            O_RDONLY,  O_WRONLY,  O_RDWR
        返回值:返回一个新的文件描述符,如果调用失败,返回-1

    errno: 属于Linux系统函数库,库里面的一个全局变量,记录的是最近的错误号。

    #include <stdio.h>
    void perror(const char *s); 作用:打印errno对应的错误描述,这个函数在标准C库里面
        s参数: 用户描述,比如hello,最终输出的内容是 hello:xxx(实际的错误描述)。


    // 创建一个新文件
    int open(const char *pathname, int flags, mode_t mode);

*/
#include <sys/types.h>
#include <sys/stat.h>
#include <fcntl.h>
#include <stdio.h>
#include <unistd.h>

int main()
{
    int fd = open("text.txt", O_RDONLY);

    if (fd == -1)
    {
        perror("open:");
    }

    // 关闭
    close(fd);

    return 0;
}
# 编译open.c文件,如果text.txt存在的话,执行open程序,不会报错误,反之会报错误
ernest-laptop@ubuntu:~/Linux/lesson09$ gcc open.c -o open
ernest-laptop@ubuntu:~/Linux/lesson09$ ./open
1.21 open创建新文件
# umask默认的值为0002,可以更改umask的值为0022,但是只针对当前的终端窗口有效,换一个终端窗口就没效了
ernest-laptop@ubuntu:~/Linux/lesson09$ umask
0002
ernest-laptop@ubuntu:~/Linux/lesson09$ umask 0022
ernest-laptop@ubuntu:~/Linux/lesson09$ umask
0022
/*
    #include <sys/types.h>
    #include <sys/stat.h>
    #include <fcntl.h>

    int open(const char *pathname, int flags, mode_t mode);
        参数:
            - pathname:要创建的文件的路径
            - flags: 对文件的操作权限和其他的设置
                - 必选项: O_RDONLY, O_WRONLY,O_RDWR 这三个之间是互斥
                - 可选项:O CREAT 文件不存在,创建新文件
            - mode: 八进制的数,表示创建出的新的文件的操作权限,比如: 0775
            最终的权限是: mode & ~umask
            0777    ->      111111111
            0775    ->      111111101
            -------------------------------------
                            111111101
            按位与:0和任何数都为0
            umask的作用就是抹去某些权限。

            flags参数是一个int类型的数据,占4个字节,32位。
            flags 32个位,每一位就是一个标志位
            下面的程序为什么要用或呢,因为每个标志在他所在的位上面是1,而其他的位为0,这样的话,或可以让有1的位上面还是有1
            0000 0010
            0000 0100
            ----------------
            0000 0110
*/

#include <sys/types.h>
#include <sys/stat.h>
#include <fcntl.h>
#include <unistd.h>
#include <stdio.h>

int main()
{
    int fd = open("create.txt", O_RDWR | O_CREAT, 0777);

    if (fd == -1)
    {
        perror("open");
    }

    close(fd);

    return 0;
}
ernest-laptop@ubuntu:~/Linux/lesson09$ gcc create.c -o create
ernest-laptop@ubuntu:~/Linux/lesson09$ ./create
ernest-laptop@ubuntu:~/Linux/lesson09$ ll create.txt
-rwxr-xr-x 1 ernest-laptop ernest-laptop 0 Jul  6 04:06 create.txt*
# 文件的权限为0775
1.22 read、write函数
int open(const char *pathname, intflags);

int open(const char *pathname, int flags, mode_t mode);

int close(int fd);

ssize_t read(int fd, void *buf, size_t count);	// 从文件中读数据存放到内存里面

ssize_t write(int fd, const void *buf, size_t count);	// 把内存里面的数据写到文件里面

off_t lseek(int fd, off_t offset, int whence);

int stat(const char *pathname, struct stat *statbuf);

int lstat(const char *pathname, struct stat *statbuf);
下面是一个复制文件的一个示例:
/*
    #include <unistd.h>
    ssize_t read(int fd, void *buf, size_t count);
        参数:
            - fd:文件描述符,open得到的,通过这个文件描述符操作某个文件
            - buf:需要读取数据到内存中,然后再放到buf里面,数组的地址
            - count:指定的buf数组大小
        返回值:
            - 成功:
                >0:返回实际的读取到的字节数
                =0:文件已经读取完了,没有数据可以读了
            - 失败:-1 ,并且设置errno

    #include <unistd.h>
    ssize_t write(int fd, const void *buf, size_t count);
        参数:
            - fd:文件描述符,open得到的,通过这个文件描述符操作某个文件
            - buf:由内存往磁盘写入的数据
            - count:要写的数据的实际的大小
        返回值:
            成功:实际写入的字节数
            失败: 返回-1,并设置errno
*/

#include <sys/types.h>
#include <sys/stat.h>
#include <fcntl.h>
#include <stdio.h>
#include <unistd.h>

int main()
{

    // 1.通过open打开english.txt文件
    int srcfd = open("english.txt", O_RDWR);

    if (srcfd == -1)
    {
        perror("open");
        return -1;
    }

    // 2.创建一个新的文件
    int destfd = open("cpy.txt", O_WRONLY | O_CREAT, 0664);

    if (destfd == -1)
    {
        perror("open");
        return -1;
    }

    // 我的理解是这样的:read函数读取数据,是每个字节每个字节读的,
    // 读第一个的时候把第一个字节放到write函数对要写入的文件里面,
    // 当read函数读取文件到最后一个字节的下一个字节的时候,判断已经
    // 没有数据可以读了,此时就直接返回一个0

    // 3.频繁的读写文件
    char buf[1024] = {0};
    int len = 0;
    while ((len = read(srcfd, buf, sizeof(buf))) > 0)
    {
        write(destfd, buf, len);
    }

    // 4.关闭文件
    close(srcfd);
    close(destfd);

    return 0;
}
1.23 lseek函数
/*
    标准C库的函数
    #include <stdio.h>
    int fseek(FILE *stream, long offset, int whence);

    Linux系统函数
    #include <sys/types.h>
    #include <unistd.h>
    off_t lseek(int fd, off_t offset, int whence);
        参数:
            - fd:文件描述符,通过open得到的,通过这个fd操作某个函数
            - offset:偏移量
            - whence:
                SEEK_SET
                    设置文件指针的偏移量
                SEEK_CUR
                    设置偏移量:当前位置 + 第二个参数offset的值
                SEEK_END
                    设置偏移量:文件大小 + 第二个参数offset的值
        返回值:返回文件指针的位置

    作用:
        1.移动文件指针到文件的头部
        lseek(fd, 0, SEEK_SET);

        2.获取当前文件指针的作用
        lseek(fd, 0, SEEK_CUR);

        3.获取文件的长度
        lseek(fd, 0, SEEK_END);

        4.拓展文件的长度,比如当前文件为10b,想扩展100b,为110b
        lseek(fd, 100, SEEK_END);

*/

#include <sys/types.h>
#include <sys/stat.h>
#include <fcntl.h>
#include <unistd.h>

int main()
{

    int fd = open("hello.txt", O_RDWR);

    if (fd == -1)
    {
        return -1;
    }

    // 扩展文件的长度
    int ret = lseek(fd, 100, SEEK_END);
    if (ret == -1)
    {
        return -1;
    }

    // 写入一个空数据
    write(fd, " ", 1);

    // 关闭文件
    close(fd);

    return 0;
}
# 编译,执行以后看到 hello.txt 文件从11b变成了112b(11 + 100 + 1)
ernest-laptop@ubuntu:~/Linux/lesson11$ gcc lseek.c -o lseek
ernest-laptop@ubuntu:~/Linux/lesson11$ ll
total 36
drwxrwxr-x  2 ernest-laptop ernest-laptop  4096 Jul  6 19:55 ./
drwxrwxr-x 12 ernest-laptop ernest-laptop  4096 Jul  6 07:49 ../
-rw-rw-r--  1 ernest-laptop ernest-laptop    11 Jul  6 18:54 hello.txt
-rwxr-xr-x  1 ernest-laptop ernest-laptop 16824 Jul  6 19:55 lseek*
-rw-rw-r--  1 ernest-laptop ernest-laptop  1507 Jul  6 19:55 lseek.c
ernest-laptop@ubuntu:~/Linux/lesson11$ ./lseek
ernest-laptop@ubuntu:~/Linux/lesson11$ ll
total 36
drwxrwxr-x  2 ernest-laptop ernest-laptop  4096 Jul  6 19:55 ./
drwxrwxr-x 12 ernest-laptop ernest-laptop  4096 Jul  6 07:49 ../
-rw-rw-r--  1 ernest-laptop ernest-laptop   112 Jul  6 19:55 hello.txt
-rwxr-xr-x  1 ernest-laptop ernest-laptop 16824 Jul  6 19:55 lseek*
-rw-rw-r--  1 ernest-laptop ernest-laptop  1507 Jul  6 19:55 lseek.c
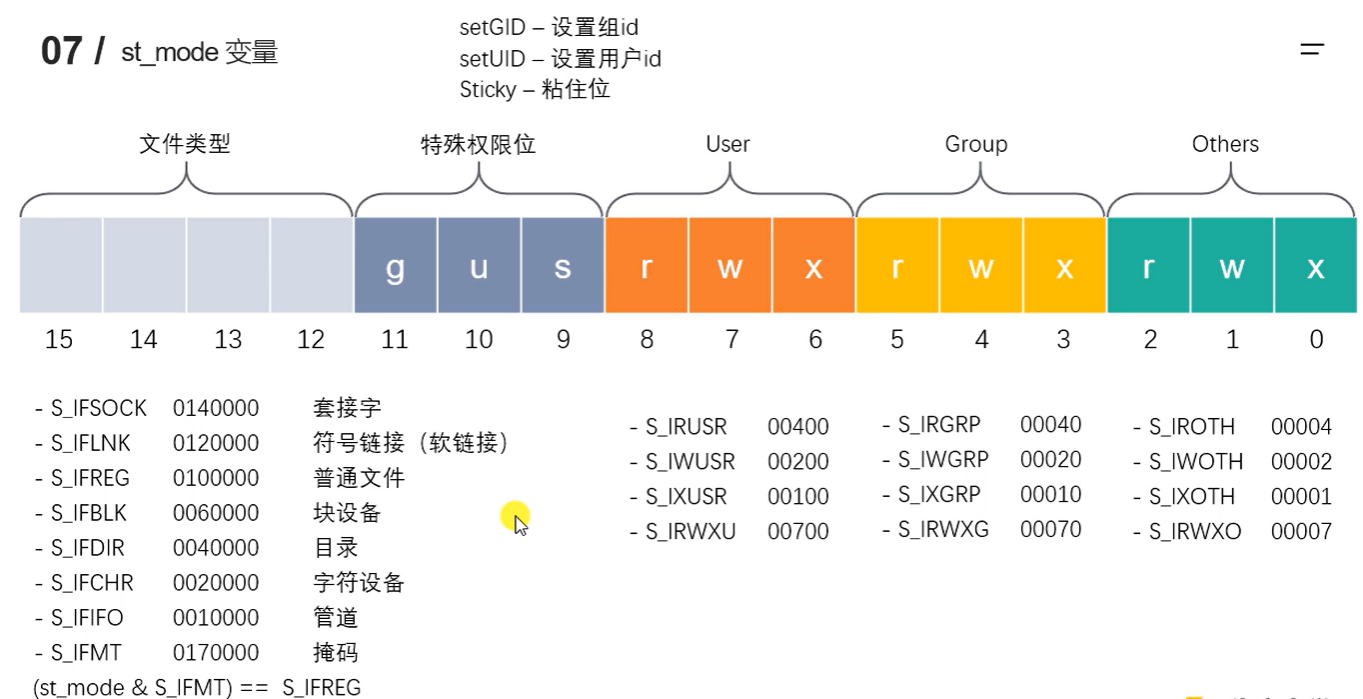
1.24 stat、lstat函数
struct stat {
               dev_t     st_dev;         /* 文件的设备编号 */
               ino_t     st_ino;         /* 节点 */
               mode_t    st_mode;        /* 文件的类型和存取的权限 */
               nlink_t   st_nlink;       /* 连到该文件的硬连接数目 */
               uid_t     st_uid;         /* 用户ID */
               gid_t     st_gid;         /* 组ID */
               dev_t     st_rdev;        /* 设备文件的设备编号 */
               off_t     st_size;        /* 文件字节数(文件大小) */
               blksize_t st_blksize;     /* 块大小 */
               blkcnt_t  st_blocks;      /* 块数 */
    		  time_t	st_atime;	    /* 最后一次访问时间 */
    		  time_t	st_mtime;		/* 最后一次修改时间 */
    		  time_t	st_ctime;		/* 最后一次改变时间(指属性) */
};
ernest-laptop@ubuntu:~/Linux/lesson12$ ln -s a.txt b.txt	# 创建一个软链接,b.txt 指向 a.txt
ernest-laptop@ubuntu:~/Linux/lesson12$ ls
a.txt  b.txt  stat  stat.c
ernest-laptop@ubuntu:~/Linux/lesson12$ ll
total 36
drwxr-xr-x  2 ernest-laptop ernest-laptop  4096 Jul  6 23:59 ./
drwxrwxr-x 13 ernest-laptop ernest-laptop  4096 Jul  6 20:08 ../
-rw-r--r--  1 ernest-laptop ernest-laptop    12 Jul  6 20:12 a.txt
lrwxrwxrwx  1 ernest-laptop ernest-laptop     5 Jul  6 23:59 b.txt -> a.txt
-rwxr-xr-x  1 ernest-laptop ernest-laptop 16896 Jul  6 20:46 stat*
-rw-rw-r--  1 ernest-laptop ernest-laptop  1147 Jul  6 20:46 stat.c
ernest-laptop@ubuntu:~/Linux/lesson12$ stat b.txt
  File: b.txt -> a.txt
  Size: 5               Blocks: 0          IO Block: 4096   symbolic link
Device: 805h/2053d      Inode: 1092769     Links: 1
Access: (0777/lrwxrwxrwx)  Uid: ( 1000/ernest-laptop)   Gid: ( 1000/ernest-laptop)
Access: 2023-07-06 23:59:14.329571909 -0700
Modify: 2023-07-06 23:59:14.245565255 -0700
Change: 2023-07-06 23:59:14.245565255 -0700
 Birth: -
ernest-laptop@ubuntu:~/Linux/lesson12$ stat a.txt
  File: a.txt
  Size: 12              Blocks: 8          IO Block: 4096   regular file
Device: 805h/2053d      Inode: 1092763     Links: 1
Access: (0644/-rw-r--r--)  Uid: ( 1000/ernest-laptop)   Gid: ( 1000/ernest-laptop)
Access: 2023-07-06 20:14:33.010011564 -0700
Modify: 2023-07-06 20:12:54.530742363 -0700
Change: 2023-07-06 20:12:54.534742843 -0700
 Birth: -
stat、lstat的用法:
/*
    #include <sys/types.h>
    #include <sys/stat.h>
    #include <unistd.h>

    int stat(const char *pathname, struct stat *statbuf);
        作用:获取一个文件相关的一些信息
        参数:
            - pathname:操作的文件路径
            - statbuf:结构体变量,传出参数,用于保存获取的文件信息
        返回值:
            成功:返回0
            失败:返回-1,设置errno(错误参数)

    int lstat(const char *pathname, struct stat *statbuf);
    作用:获取一个文件相关的一些信息
        参数:
            - pathname:操作的文件路径
            - statbuf:结构体变量,传出参数,用于保存获取的文件信息
        返回值:
            成功:返回0
            失败:返回-1,设置errno(错误参数)
*/

#include <sys/types.h>
#include <sys/stat.h>
#include <unistd.h>
#include <stdio.h>

int main()
{
    struct stat statbuf;

    int ret = stat("a.txt", &statbuf);
    if (ret == -1)
    {
        perror("stat");
        return -1;
    }

    printf("size: %ld\n", statbuf.st_size);

    return 0;
}
软链接用lstat函数
1.25 模拟实现ls -l命令
下面程序实现了ls -l命令:
#include <stdio.h>
#include <sys/types.h>
#include <sys/stat.h>
#include <unistd.h>
#include <pwd.h>
#include <grp.h>
#include <time.h>
#include <string.h>

// 模拟实现ls -l命令
// -rw-r--r-- 1 ernest-laptop ernest-laptop 12 Jul  6 20:12 a.txt

int main(int argc, char *argv[])
{

    // 判断输入的参数是否正确
    if (argc < 2)
    {
        printf("%s filename\n", argv[0]);
        return -1;
    }

    // 通过stat函数获取用户传入的文件的信息
    struct stat st;
    int ret = stat(argv[1], &st);
    if (ret == -1)
    {
        perror("stat");
        return -1;
    }

    // 获取文件类型和文件权限
    char perms[11] = {0}; // 用于保存文件类型和文件权限的字符串

    switch (st.st_mode & __S_IFMT)
    {
    case S_IFLNK:
        perms[0] = 'l';
        break;
    case S_IFDIR:
        perms[0] = 'd';
        break;
    case S_IFREG:
        perms[0] = '-';
        break;
    case S_IFBLK:
        perms[0] = 'b';
        break;
    case S_IFCHR:
        perms[0] = 'c';
        break;
    case S_IFSOCK:
        perms[0] = 's';
        break;
    case S_IFIFO:
        perms[0] = 'p';
        break;
    default:
        perms[0] = '?';
        break;
    }

    // 判断文件的访问权限

    // 文件所有者
    perms[1] = (st.st_mode & S_IRUSR) ? 'r' : '-';
    perms[2] = (st.st_mode & S_IWUSR) ? 'w' : '-';
    perms[3] = (st.st_mode & S_IXUSR) ? 'x' : '-';

    // 文件所在组
    perms[4] = (st.st_mode & S_IRGRP) ? 'r' : '-';
    perms[5] = (st.st_mode & S_IWGRP) ? 'w' : '-';
    perms[6] = (st.st_mode & S_IXGRP) ? 'x' : '-';

    // 其他人
    perms[7] = (st.st_mode & S_IROTH) ? 'r' : '-';
    perms[8] = (st.st_mode & S_IWOTH) ? 'w' : '-';
    perms[9] = (st.st_mode & S_IXOTH) ? 'x' : '-';

    // 硬连接数
    int linkNum = st.st_nlink;

    // 文件所有者
    char *fileUser = getpwuid(st.st_uid)->pw_name;

    // 文件所在组
    char *fileGrp = getgrgid(st.st_gid)->gr_name;

    // 文件大小
    long int fileSize = st.st_size;

    // 获取修改的时间
    char *time = ctime(&st.st_mtime);

    char mtime[512] = {0};
    strncpy(mtime, time, strlen(time) - 1);

    char buf[1024];
    sprintf(buf, "%s %d %s %s %ld %s %s", perms, linkNum, fileUser, fileGrp, fileSize, mtime, argv[1]);

    printf("%s\n", buf);

    return 0;
}
ernest-laptop@ubuntu:~/Linux/lesson12$ ls -l a.txt
-rw-r--r-- 1 ernest-laptop ernest-laptop 12 Jul  6 20:12 a.txt
ernest-laptop@ubuntu:~/Linux/lesson12$ gcc ls-l.c -o ls
ernest-laptop@ubuntu:~/Linux/lesson12$ ls a.txt
a.txt
ernest-laptop@ubuntu:~/Linux/lesson12$ ./ls
./ls filename
ernest-laptop@ubuntu:~/Linux/lesson12$ ./ls a.txt
-rw-r--r-- 1 ernest-laptop ernest-laptop 12 Thu Jul  6 20:12:54 2023 a.txt
1.26 文件属性操作函数
int access(const char *pathname, int mode);

int chmod(const char *filename, int mode);

int chown(const char *path, uid_t owner, gid_t group);

int truncate(const char *path, off_t length);
1.26.1 access函数
/*
    #include <unistd.h>

    int access(const char *pathname, int mode);
        作用:判断文件是否有某个权限,或者文件是否存在
            参数:
                - pathname:判断的文件路径
                - mode:
                    R_OK:判断是否有读权限
                    W_OK: 判断是否有写权限
                    X_OK: 判断是否有执行权限
                    F_OK: 判断文件是否存在
            返回值:成功返回0,失败返回-1
*/

#include <unistd.h>
#include <stdio.h>

int main()
{

    int ret = access("a.txt", F_OK);

    if (ret == -1)
    {
        perror("access");
        return -1;
    }

    printf("文件存在!!!\n");

    return 0;
}
执行结果:
ernest-laptop@ubuntu:~/Linux/lesson13$ touch a.txt
ernest-laptop@ubuntu:~/Linux/lesson13$ ls
access  access.c  a.txt
ernest-laptop@ubuntu:~/Linux/lesson13$ ./access
文件存在!!!
1.26.2 chmod函数
/*
    #include <sys/stat.h>

    int chmod(const char *pathname, mode_t mode);
        作用:修改文件的权限
            参数:
                - pathname:需要修改的文件的路径
                - mode:需要修改的权限值,八进制的数
            返回值:成功返回0,失败返回-1
*/
#include <sys/stat.h>
#include <stdio.h>

int main()
{

    int ret = chmod("a.txt", 0777);
    if (ret == -1)
    {
        perror("chmod");
        return -1;
    }

    return 0;
}
ernest-laptop@ubuntu:~/Linux/lesson13$ gcc chmod.c -o chmod
ernest-laptop@ubuntu:~/Linux/lesson13$ ./chmod
ernest-laptop@ubuntu:~/Linux/lesson13$ ll
total 56
drwxrwxr-x  2 ernest-laptop ernest-laptop  4096 Jul  7 02:45 ./
drwxrwxr-x 15 ernest-laptop ernest-laptop  4096 Jul  7 02:23 ../
-rwxr-xr-x  1 ernest-laptop ernest-laptop 16784 Jul  7 02:31 access*
-rw-rw-r--  1 ernest-laptop ernest-laptop   746 Jul  7 02:31 access.c
-rwxrwxrwx  1 ernest-laptop ernest-laptop     0 Jul  7 02:32 a.txt*
-rwxr-xr-x  1 ernest-laptop ernest-laptop 16744 Jul  7 02:45 chmod*
-rw-rw-r--  1 ernest-laptop ernest-laptop   506 Jul  7 02:45 chmod.c
Ctrl  +  [     文本向左移动

Ctrl  +  ]     文本向右移动;

Shift  +  Alt  + F     实现代码的对齐;
—— 如果右下角弹出安装插件,安装好即可。如果弹出需要配置,点击后选中beautify即可。
1.26.3 chown函数
操作文件权限的函数
1.26.4 truncate函数
/*
    #include <unistd.h>
    #include <sys/types.h>
    int truncate(const char *path, off_t length);
        作用:缩减或者扩展文件的尺寸至指定的大小
            参数:
                - pathname:需要修改的文件路径
                - length:需要文件最终变成的大小,比如原先5k,指定了10k,那么就会增加5k
*/
#include <unistd.h>
#include <sys/types.h>
#include <stdio.h>

int main()
{

    int ret = truncate("b.txt", 20);
    if (ret == -1)
    {
        perror("truncate");
        return -1;
    }

    return 0;
}
执行结果:
ernest-laptop@ubuntu:~/Linux/lesson13$ gcc truncate.c -o truncate
ernest-laptop@ubuntu:~/Linux/lesson13$ ll
total 84
drwxrwxr-x  2 ernest-laptop ernest-laptop  4096 Jul  7 05:27 ./
drwxrwxr-x 15 ernest-laptop ernest-laptop  4096 Jul  7 02:23 ../
-rwxr-xr-x  1 ernest-laptop ernest-laptop 16784 Jul  7 02:31 access*
-rw-rw-r--  1 ernest-laptop ernest-laptop   746 Jul  7 02:31 access.c
-rw-r--r--  1 ernest-laptop ernest-laptop    12 Jul  7 05:27 b.txt
-rwxr-xr-x  1 ernest-laptop ernest-laptop 16744 Jul  7 02:45 chmod*
-rw-rw-r--  1 ernest-laptop ernest-laptop   506 Jul  7 02:45 chmod.c
-rwxr-xr-x  1 ernest-laptop ernest-laptop 16744 Jul  7 05:27 truncate*
-rw-rw-r--  1 ernest-laptop ernest-laptop   579 Jul  7 05:26 truncate.c
ernest-laptop@ubuntu:~/Linux/lesson13$ ./truncate
ernest-laptop@ubuntu:~/Linux/lesson13$ ll
total 84
drwxrwxr-x  2 ernest-laptop ernest-laptop  4096 Jul  7 05:27 ./
drwxrwxr-x 15 ernest-laptop ernest-laptop  4096 Jul  7 02:23 ../
-rwxr-xr-x  1 ernest-laptop ernest-laptop 16784 Jul  7 02:31 access*
-rw-rw-r--  1 ernest-laptop ernest-laptop   746 Jul  7 02:31 access.c
-rw-r--r--  1 ernest-laptop ernest-laptop    20 Jul  7 05:27 b.txt	# 原来是12b,现在变成20b了
-rwxr-xr-x  1 ernest-laptop ernest-laptop 16744 Jul  7 02:45 chmod*
-rw-rw-r--  1 ernest-laptop ernest-laptop   506 Jul  7 02:45 chmod.c
-rwxr-xr-x  1 ernest-laptop ernest-laptop 16744 Jul  7 05:27 truncate*
-rw-rw-r--  1 ernest-laptop ernest-laptop   579 Jul  7 05:26 truncate.c
1.27 目录操作函数
int mkdir(const char*pathname,mode_t mode);

int rmdir(const char *pathname);

int rename(const char *oldpath, const char *newpath);

int chdir(const char *path);

char *getcwd(char *buf, size_t size);
1.27.1 mkdir函数
# 如果直接输入 man mkdir 出来的是命令的说明文档
# 如果直接输入 man 2 mkdir 出来的是函数的说明文档
/*
    #include <sys/stat.h>
    #include <sys/types.h>

    int mkdir(const char *pathname, mode_t mode);
        作用:创建一个目录
        参数:
            - pathname:创建的文件路径
            - mode:权限,八进制的数
        返回值:
            成功返回0,失败返回-1
*/
#include <sys/stat.h>
#include <sys/types.h>
#include <stdio.h>

int main()
{

    int ret = mkdir("aaa", 0777);
    if (ret == -1)
    {
        perror("mkdir");
        return -1;
    }

    return 0;
}
ernest-laptop@ubuntu:~/Linux/lesson14$ gcc mkdir.c -o mkdir
ernest-laptop@ubuntu:~/Linux/lesson14$ ./mkdir
ernest-laptop@ubuntu:~/Linux/lesson14$ ll
total 36
drwxrwxr-x  3 ernest-laptop ernest-laptop  4096 Jul  7 05:57 ./
drwxrwxr-x 16 ernest-laptop ernest-laptop  4096 Jul  7 05:50 ../
drwxr-xr-x  2 ernest-laptop ernest-laptop  4096 Jul  7 05:57 aaa/
-rwxr-xr-x  1 ernest-laptop ernest-laptop 16744 Jul  7 05:57 mkdir*
-rw-rw-r--  1 ernest-laptop ernest-laptop   525 Jul  7 05:57 mkdir.c
1.27.2 rename函数
/*
    #include <stdio.h>

    int rename(const char *oldpath, const char *newpath);
*/

#include <stdio.h>

int main()
{

    int ret = rename("aaa", "bbb");
    if (ret == -1)
    {
        perror("rename");
        return -1;
    }

    return 0;
}
ernest-laptop@ubuntu:~/Linux/lesson14$ ll
total 40
drwxrwxr-x  3 ernest-laptop ernest-laptop  4096 Jul  7 05:59 ./
drwxrwxr-x 16 ernest-laptop ernest-laptop  4096 Jul  7 05:50 ../
drwxr-xr-x  2 ernest-laptop ernest-laptop  4096 Jul  7 05:57 aaa/
-rwxr-xr-x  1 ernest-laptop ernest-laptop 16744 Jul  7 05:57 mkdir*
-rw-rw-r--  1 ernest-laptop ernest-laptop   525 Jul  7 05:57 mkdir.c
-rw-rw-r--  1 ernest-laptop ernest-laptop   251 Jul  7 06:01 rename.c
ernest-laptop@ubuntu:~/Linux/lesson14$ gcc rename.c -o rename
ernest-laptop@ubuntu:~/Linux/lesson14$ ./rename
ernest-laptop@ubuntu:~/Linux/lesson14$ ll
total 60
drwxrwxr-x  3 ernest-laptop ernest-laptop  4096 Jul  7 06:01 ./
drwxrwxr-x 16 ernest-laptop ernest-laptop  4096 Jul  7 05:50 ../
drwxr-xr-x  2 ernest-laptop ernest-laptop  4096 Jul  7 05:57 bbb/
-rwxr-xr-x  1 ernest-laptop ernest-laptop 16744 Jul  7 05:57 mkdir*
-rw-rw-r--  1 ernest-laptop ernest-laptop   525 Jul  7 05:57 mkdir.c
-rwxr-xr-x  1 ernest-laptop ernest-laptop 16744 Jul  7 06:01 rename*
-rw-rw-r--  1 ernest-laptop ernest-laptop   251 Jul  7 06:01 rename.c
1.27.3 chdir、getcwd函数
/*
    #include <unistd.h>
    int chdir(const char *path);
        作用:修改进程的工作路径
            比如在/home/nowcoder 启动了一个可执行程序a.out,进程的工作目录就在/home/nowcoder
            参数:
                - path:需要修改的工作目录

    #include <unistd.h>
    char *getcwd(char *buf, size_t size);
        作用: 获取当前工作目录
        参数:
            - buf : 存储的路径,指向的是一个数组 (传出参数)
            - size: 数组的大小
        返回值:
            返回的指向的一块内存,这个数据就是第一个参数

*/
#include <unistd.h>
#include <stdio.h>
#include <sys/types.h>
#include <sys/stat.h>
#include <fcntl.h>

int main()
{

    // 获取当前的工作目录
    char buf[128];
    getcwd(buf, sizeof(buf));
    printf("当前的工作目录是:%s\n", buf);

    // 修改工作目录
    int ret = chdir("/home/ernest-laptop/Linux/lesson13");
    if (ret == -1)
    {
        perror("chdir");
        return -1;
    }

    // 创建一个新的文件
    int fd = open("chdir.txt", O_RDWR | O_CREAT, 0665);
    if (fd == -1)
    {
        perror("open");
        return -1;
    }

    close(fd);

    // 获取当前的工作目录
    char buf1[128];
    getcwd(buf1, sizeof(buf1));
    printf("当前的工作目录是:%s\n", buf1);

    return 0;
}
ernest-laptop@ubuntu:~/Linux/lesson14$ gcc chdir.c -o chdir
ernest-laptop@ubuntu:~/Linux/lesson14$ ./chdir
当前的工作目录是:/home/ernest-laptop/Linux/lesson14
当前的工作目录是:/home/ernest-laptop/Linux/lesson13
ernest-laptop@ubuntu:~/Linux/lesson14$ cd ..
ernest-laptop@ubuntu:~/Linux$ cd lesson13
\ernest-laptop@ubuntu:~/Linux/lesson13$ \ls
access  access.c  b.txt  chdir.txt  chmod  chmod.c  truncate  truncate.c
ernest-laptop@ubuntu:~/Linux/lesson13$ ll
total 84
drwxrwxr-x  2 ernest-laptop ernest-laptop  4096 Jul  7 06:34 ./
drwxrwxr-x 16 ernest-laptop ernest-laptop  4096 Jul  7 05:50 ../
-rwxr-xr-x  1 ernest-laptop ernest-laptop 16784 Jul  7 02:31 access*
-rw-rw-r--  1 ernest-laptop ernest-laptop   746 Jul  7 02:31 access.c
-rw-r--r--  1 ernest-laptop ernest-laptop    20 Jul  7 05:27 b.txt
-rw-r--r-x  1 ernest-laptop ernest-laptop     0 Jul  7 06:34 chdir.txt*
-rwxr-xr-x  1 ernest-laptop ernest-laptop 16744 Jul  7 02:45 chmod*
-rw-rw-r--  1 ernest-laptop ernest-laptop   506 Jul  7 02:45 chmod.c
-rwxr-xr-x  1 ernest-laptop ernest-laptop 16744 Jul  7 05:27 truncate*
-rw-rw-r--  1 ernest-laptop ernest-laptop   579 Jul  7 05:26 truncate.c
1.28 目录遍历函数
DIR *opendir(const char *name);

struct dirent *readdir(DIR *dirp);

int closedir(DIR *dirp);
struct dirent {
               ino_t          d_ino;       /* Inode number 				次目录进入点的inode 			*/
               off_t          d_off;       /* Not an offset; see below 	 目录文件开头至此目录进入点的位移  */
               unsigned short d_reclen;    /* Length of this record 	 name的长度,不包含NULL字符 		*/
               unsigned char  d_type;      /* Type of file; not supported by all filesystem types 														d_name所指的数据类型									    */
               char           d_name[256]; /* Null-terminated filename 	  文件名						*/
           };

/*
d_type
	DT_BLK 			- 块设备
    DT_CHR  		- 字符设备
    DT_DIR			- 目录
    DT_LNK			- 软连接
    DT_EIEO 		- 管道
    DT_REG			- 普通文件
    DT_SOCK  		- 套接字
    DT_UNKNOWN 		- 未知

*/
/*
    #include <sys/types.h>
    #include <dirent.h>
    DIR *opendir(const char *name);
        作用:打开一个目录
        参数:
            - name :需要打开的目录的名称
        返回值:
            DIR * 类型,理解为目录流
            错误返回NULL

    #include <dirent.h>
    struct dirent *readdir(DIR *dirp);
        作用:读取目录中的数据
        参数: dirp是opendir返回的结果
        返回值:
            struct dirent,代表读取到的文件的信息
            读取到了末尾或者失败了,返回NULL


    #include <sys/types.h>
    #include <dirent.h>
    int closedir(DIR *dirp);
        作用:关闭目录

*/

#include <sys/types.h>
#include <dirent.h>
#include <stdio.h>
#include <string.h>
#include <stdlib.h>

int getFileNum(const char *path);

int main(int argc, char *argv[])
{

    if (argc < 2)
    {
        printf("%s path", argv[0]);
        return -1;
    }

    int num = getFileNum(argv[1]);

    printf("普通文件的个数为:%d\n", num);

    return 0;
}

// 用于获取目录下普通文件的个数
int getFileNum(const char *path)
{
    // 1.打开目录
    DIR *dir = opendir(path);

    if (dir == NULL)
    {
        perror("opendir");
        exit(0);
    }

    struct dirent *ptr;

    // 记录普通文件的个数
    int total = 0;

    while ((ptr = readdir(dir)) != NULL)
    {
        // 获取名称
        char *dname = ptr->d_name;

        // 忽略掉. 和 ..
        if (strcmp(dname, ".") == 0 || strcmp(dname, "..") == 0)
        {
            continue;
        }

        // 判断是目录还是普通文件
        if (ptr->d_type == DT_DIR)
        {
            char newpath[256];
            sprintf(newpath, "%s/%s", path, dname);
            total += getFileNum(newpath);
        }

        if (ptr->d_type == DT_REG)
        {
            total++;
        }
    }

    // 关闭目录
    closedir(dir);

    return total;
}
ernest-laptop@ubuntu:~/Linux/lesson15$ gcc readFileNum.c -o app
ernest-laptop@ubuntu:~/Linux/lesson15$ ./app /home/ernest-laptop/Linux
普通文件的个数为:865
ernest-laptop@ubuntu:~/Linux/lesson15$ ./app /home/ernest-laptop/Linux/lesson02
普通文件的个数为:1
ernest-laptop@ubuntu:~/Linux/lesson15$ ./app /home/ernest-laptop/Linux/lesson14
普通文件的个数为:6
1.29 dup、dup2函数
这两个函数是跟文件描述符相关的
int dup(int oldfd);					/*复制文件描述符*/

int dup2(int oldfd, int newfd);		/*重定向文件描述符*/
1.29.1 dup函数
/*
    #include <unistd.h>

    int dup(int oldfd);
        作用:复制一个文件描述符,复制的文件描述符跟之前的是一样的,指向同一个文件
        fd=3,int fd1 = dup(fd),
        fd指向的是a.txt,fd1也是指向a.txt
        从空闲的文件描述符表中找一个最小的,为新的拷贝的文件描述符

*/

#include <unistd.h>
#include <stdio.h>
#include <sys/types.h>
#include <sys/stat.h>
#include <fcntl.h>
#include <string.h>

int main()
{
    int fd = open("a.txt", O_RDWR | O_CREAT, 0665);

    int fd1 = dup(fd);
    if (fd == -1)
    {
        perror("dup");
        return -1;
    }

    printf("fd :  %d, fd1 :  %d\n", fd, fd1);

    close(fd);

    char *str = "hello world!";
    int ret = write(fd1, str, strlen(str));

    if (ret == -1)
    {
        perror("write");
        return -1;
    }

    close(fd1);

    return 0;
}
执行结果:
ernest-laptop@ubuntu:~/Linux/lesson16$ ./dup
fd :  3, fd1 :  4
1.29.2 dup2函数
/*
    #include <unistd.h>
    int dup2(int oldfd, int newfd);
    作用:重定向文件描述符
    oldfd 指向 a.txt,newfd 指向 b.txt
    调用函数成功后: newfd 和 b.txt 做close,newfd 指向了 a.txt
    oldfd 必须是一个有效的文件描述符
    oldfd和newfd值相同,相当于什么都没有做
*/

#include <unistd.h>
#include <stdio.h>
#include <sys/stat.h>
#include <sys/types.h>
#include <fcntl.h>
#include <string.h>

int main()
{
    int fd = open("1.txt", O_RDWR | O_CREAT, 0665);
    if (fd == -1)
    {
        perror("open");
        return -1;
    }

    int fd1 = open("2.txt", O_RDWR | O_CREAT, 0665);
    if (fd1 == -1)
    {
        perror("open");
        return -1;
    }

    printf("fd :  %d, fd1 :  %d\n", fd, fd1);

    int fd2 = dup2(fd, fd1);
    if (fd2 == -1)
    {
        perror("open");
        return -1;
    }

    // 通过fd1去写数据,实际操作的是1.txt,而不是2.txt
    char *str = "hello world!";
    int ret = write(fd1, str, strlen(str));

    if (ret == -1)
    {
        perror("write");
        return -1;
    }

    printf("fd :  %d, fd1 :  %d, fd2 :  %d\n", fd, fd1, fd2); // fd2与fd1指的是同一个文件,值是一样的

    close(fd);
    close(fd1);

    return 0;
}
执行结果:
ernest-laptop@ubuntu:~/Linux/lesson16$ gcc dup2.c -o dup2
ernest-laptop@ubuntu:~/Linux/lesson16$ ./dup2
fd :  3, fd1 :  4
fd :  3, fd1 :  4, fd2 :  4
1.30 fcntl函数
int fcntl(int fd, int cmd,... /* arg */ );
// 复制文件描述符
// 设置/获取文件的状态标志
/*
    #include <unistd.h>
    #include <fcntl.h>

    int fcntl(int fd, int cmd, ...);
        参数:
            fd :表示需要操作的文件描述符
            cmd: 表示对文件描述符进行如何操作
                - F_DUPFD : 复制文件描述符,复制是第一个参数fd,得到一个新的文件描述符(返回值)
                int ret = fcntl(fd, F_DUPFD);

                - F_GETFL : 取指定的文件描述符文件状态flag
                获取的flag和我们通过open函数传递的flag是一个东西。

                - F_SETFL : 设置文件描述符文件状态flag
                必选项:O_RDONLY,O_WRONLY,O_RDWR 不可以被修改
                可选性:  APPEND,O_NONBLOCK
                O_APPEND 表示追加数据
                NONBLOK 设置成非阻塞

            阻塞和非阻塞:描述的是函数调用的行为。

*/

#include <unistd.h>
#include <fcntl.h>
#include <stdio.h>
#include <string.h>

int main()
{
    // 1.复制文件描述符
    // int fd = open("1.txt", O_RDONLY);
    // int ret = fcntl(fd, F_DUPFD);

    // 2.修改或获取文件状态flag
    int fd = open("1.txt", O_RDWR);
    if (fd == -1)
    {
        perror("open");
        return -1;
    }

    // 获取文件描述符状态flag
    int flag = fcntl(fd, F_GETFL);
    if (flag == -1)
    {
        perror("fcntl");
        return -1;
    }

    flag |= O_APPEND;

    // 修改文件描述符状态的flag,给flag加入O_APPEND这个标记
    int ret = fcntl(fd, F_SETFL, flag);
    if (ret == -1)
    {
        perror("fcntl");
        return -1;
    }

    char *str = " world";
    write(fd, str, strlen(str));

    close(fd);

    return -1;
}
执行结果:
# 往 1.txt 文件里面追加了 " world"


 302
302


 被折叠的 条评论
为什么被折叠?
被折叠的 条评论
为什么被折叠?
 到【灌水乐园】发言


