


 本文深入解析图像拼接过程,从读取和矫正图像开始,通过定义图像对、寻找角点、匹配算法以及使用ransac算法确定对应关系。最终,利用gen_projective_mosaic生成全景图像。详细步骤包括图像畸变矫正、harris角点检测、sad匹配策略及项目实战中的参数调整。
参考例程mosaicking.hdev
原理简要说明:要进行图像拼接,就要求所拍摄图像中有重叠区域,即交集,在这个基础上,才能通过算法找到两张图像的共性特征,此处利用的特征正是图像的角点,在两张不同内容但有重叠区域的图像角点被找到后(例程用的是harris算法),使用算法(例程用的是ransac算法)来进行匹配得到关系,即图像A的角点与图像B的同一角点之间的关系,有了这个关系后,将这个关系映射到所有图像中就可以进行拼接
举个简单例子(例子没有考虑畸变,刚体变换等因素),映射关系α就好比知道了两张图像A,B在将要拼接的大图像C上的占比,有了这个占比,就可以你出一部分A*α,我出一部分B*α,共同组成一个大图C=A*α+B*α
1读取所有拍摄图像
读取过程中,如果需要消除径向畸变,需要知道相机内参(通过标定板,蜂窝标定等)
下面的畸变的影响效果,消除畸变后的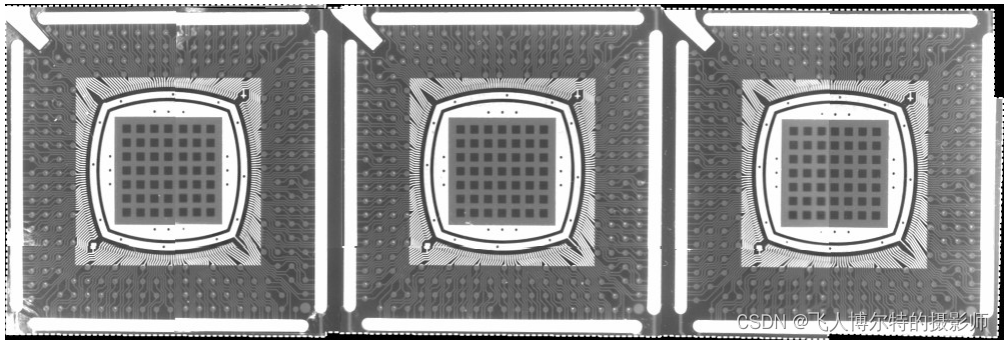
没消除畸变的

消除畸变的代码,在读取图像时进行畸变矫正即可
*构建相机内参
gen_cam_par_area_scan_division (0.0121693, -2675.63, 7.40046e-006, 7.4e-006, 290.491, 258.887, 640, 480, CamParam)
*使用halcon算法根据相机内参进行畸变矫正,矫正后会返回新的内参
change_radial_distortion_cam_par ('adaptive', CamParam, 0, CamParOut)
gen_empty_obj (Images)
for J := 1 to 10 by 1
    read_image (Image, ImgPath + ImgName + J$'02')
    *矫正
    change_radial_distortion_image (Image, Image, Image, CamParam, CamParOut)
    concat_obj (Images, Image, Images)
endfor
正确读取10张图像

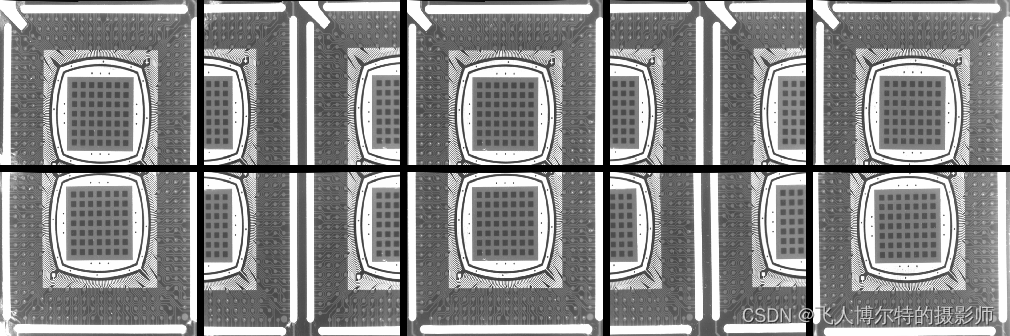
2定义图像对image pairs
即各个图像之间的联系(构成重叠部分的两个图像),具体定义见如安装位置halcon文档中solution_guide的solution_guide_iii_c_3d_vision.pdf,其中的第196页,安装了halcon就会有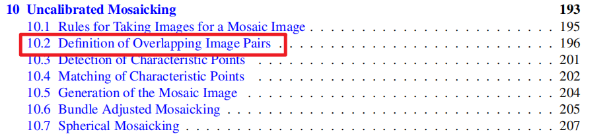
例程中定义图像对的代码
if (PairConfiguration == 1)
    From := [1,2,3,4,6,7,8,9,1]
    To := [2,3,4,5,7,8,9,10,6]
elseif (PairConfiguration == 2)
    From := [1,2,3,4,6,7,8,9,3]
    To := [2,3,4,5,7,8,9,10,8]
elseif (PairConfiguration == 3)
    From := [1,2,3,4,1,2,3,4,5]
    To := [2,3,4,5,6,7,8,9,10]
else
    * Set default pair configuration.
    From := [1,2,3,4,6,7,8,9,3]
    To := [2,3,4,5,7,8,9,10,8]
endif
简要概括一下(copy from doc)
- each image is connected to all the other images. 每个图像彼此之间要有关系(直接或间接都行),From和To各自的长度不少于图像数量减1
- the path along which neighboring images are connected is not too long.两个相邻的图像不要设置太远,比如下图,并且如果出现两行的情况,建议取中间的图像作为两行之间的连接,如下

- the overlapping areas of image pairs are large enough and contain enough texture to ensure a proper matching.图像之间的重叠部分尽量大,包含尽量多的共同角点信息(后面代码会体现)
3找角点
例程中利用了harris算法来寻找图像的角点
SigmaGrad := 1
SigmaSmooth := 3
Alpha := 0.04
Threshold := 0
*对重叠的两张图像(通过上面的定义的图像对得到)分别进行角点提取
points_harris (ImageFrom, SigmaGrad, SigmaSmooth, Alpha, Threshold, RowFromAll, ColumnFromAll)
points_harris (ImageTo, SigmaGrad, SigmaSmooth, Alpha, Threshold, RowToAll, ColumnToAll)
4根据左右图像(ImagePairs中对应的每两张图像)的角点集和左右图像进行匹配,得到拼接矩阵和对应点下标
匹配算法有(copy from halcon help doc)
1. sad(以角点为中心 左右窗口内对应像素灰度值之差 的绝对值 ,再求和 结果最小时,即为匹配点,先确定左窗口,再遍历右窗口。 单位:灰度值之差的和)
2. ssd(以角点为中心 左右窗口内对应像素灰度值之差 的平方)
3. ncc( 计算两幅图像匹配区域的互相关性 最大时 即为匹配点。单位:相似程度 0-1)
具体算法原理参见binocular_disparity算子说明文档
* Determine the position of the from and to images in the set of overlapping images.
* 确定“To”和“From”图像在重叠图像集(大图像)中的位置。
FromImagePosRow := ImagePosRow[F - 1] // 左图像序号
FromImagePosColumn := ImagePosColumn[F - 1]
ToImagePosRow := ImagePosRow[T - 1] // 右图像序号
ToImagePosColumn := ImagePosColumn[T - 1]
* Define initial values for the position of the search window by defining the approximate position
* of the corresponding ImageFrom and ImageTo.
* 通过定义相应ImageFrom和ImageTo的大致位置,定义搜索窗口位置的初始值。
FromShiftRow := FromImagePosRow * Height // 左图像行坐标,只是用来计算左右搜索中心的距离,并不是真实存在
FromShiftColumn := FromImagePosColumn * Width
ToShiftRow := ToImagePosRow * Height // 右图像行坐标
ToShiftColumn := ToImagePosColumn * Width
* Perform the matching.
* 进行匹配
MaskSize := 21
OverlapRow := 0.65
OverlapColumn := 0.5
*左搜索窗口搜索中心与右搜索窗口搜索中心的距离,即左角点位置与右角点的距离,跟图像重叠部分占比有关,
*比如上下两张图片重叠部分0.35,那么row方向的距离就等于图像height*0.35,也可以手动测距离,即两个相同点在不同照片上,
*两个点离对应的边的距离相减,就得到了移动的距离,误差不要太大,误差超出了设定的搜索窗口大小RowTolerance就不行
RowMove := (FromShiftRow - ToShiftRow) * (1 - OverlapRow)
ColumnMove := (FromShiftColumn - ToShiftColumn) * (1 - OverlapColumn)
RowTolerance := 20//搜索窗口的half height
ColumnTolerance := 20
Rotation := 0 // 如果左右图像之间包含了角度变化,填写此参数
MatchThreshold := 50 //左右角点匹配时的阈值, ssd  sad --应小于此值;   ncc--应大于此值
DistanceThreshold := 0.4
RandSeed := 0
* 返回值Points1和Points2是传入的角点集对应的匹配下标,即RowFromAll,ColumnFromAll中的点与RowToAll, ColumnToAll中的点相匹配的下标
proj_match_points_ransac (ImageFrom, ImageTo, RowFromAll, ColumnFromAll, RowToAll, ColumnToAll,
                          'sad', MaskSize, RowMove, ColumnMove, RowTolerance, ColumnTolerance,
                          Rotation, MatchThreshold, 'gold_standard', DistanceThreshold, RandSeed, ProjMatrix, Points1, Points2)
5 使用gen_projective_mosaic拼接图像
* Finally, we can generate the mosaic image from the projective transformations.
* 连接图像起点,填图像集中间的图像序号,这个值不同会影响拼接后的输出图像的角度
* 填3则代表将3号图片当成行列、角度基准来构建后面的图像
StartImage := 3
* StackingOrder图片堆叠顺序,经过验证,第1位是下方的区域(6,7,8,9,10),最后一位是上方的区域(1,2,3,4,5)
* 并且建议将不同行进行连接的图像作为最后一位,如采用1,6连接,则stacking order为[7,8,9,10,6,2,3,4,5,1]
* 如采用3,8连接,则stacking order为[6,10,7,9,8,1,5,2,4,3]
StackingOrder := [6,7,9,10,8,1,2,4,5,3] // 与下面[6,10,7,9,8,1,5,2,4,3]差别不大
StackingOrder := [6,10,7,9,8,1,5,2,4,3]
*StackingOrder := [7,8,9,10,6,2,3,4,5,1]
*StackingOrder := [6,7,8,9,10,1,2,3,4,5] // 不行
gen_projective_mosaic (Images, MosaicImage, StartImage, From, To, ProjMatrices, StackingOrder, 'false', MosaicMatrices2D)
6显示拼接部分
*  显示拼接部分 ///
* To investigate the seam between two images, we first display the borders
* of the individual images.
* This can be done most easily by creating an image that contains the border
* of the images, generating a mosaic from it, and segmenting the resulting
* mosaic image.
visualize_seams (Image, MosaicImage, StartImage, From, To, ProjMatrices, StackingOrder)

*以下为visualize_seams函数定义,原理:产生10个尺寸与待拼接的纯黑0但边缘宽度1是白色255的图像,然后叠加在一起进行同样的投影矩阵变换
*投影拼接变换后的图像中白色的区域即是图像的边缘部分,也即是图像拼接的部分
	get_image_size (Image, Width, Height)
    gen_image_const (ImageBlank, 'byte', Width, Height)
    gen_rectangle1 (Rectangle, 0, 0, Height - 1, Width - 1)
    paint_region (Rectangle, ImageBlank, ImageBorder, 255, 'margin')
    gen_empty_obj (ImagesBorder)
    for J := 1 to 10 by 1
        concat_obj (ImagesBorder, ImageBorder, ImagesBorder)
    endfor
    gen_projective_mosaic (ImagesBorder, MosaicImageBorder, StartImage, From, To, ProjMatrices, StackingOrder, 'false', MosaicMatrices2D)
    threshold (MosaicImageBorder, Seams, 128, 255)
    dev_clear_window ()
    dev_display (MosaicImage)
    dev_set_color ('green')
    dev_display (Seams)
    return ()
下面是效果图
10张拍摄图像
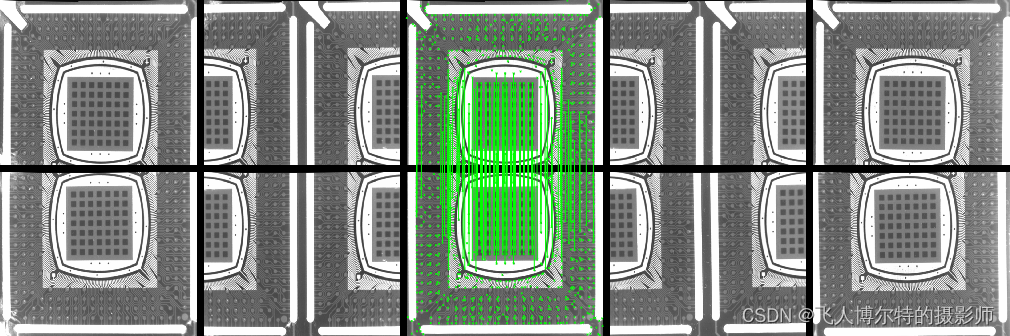
部分对应角点图
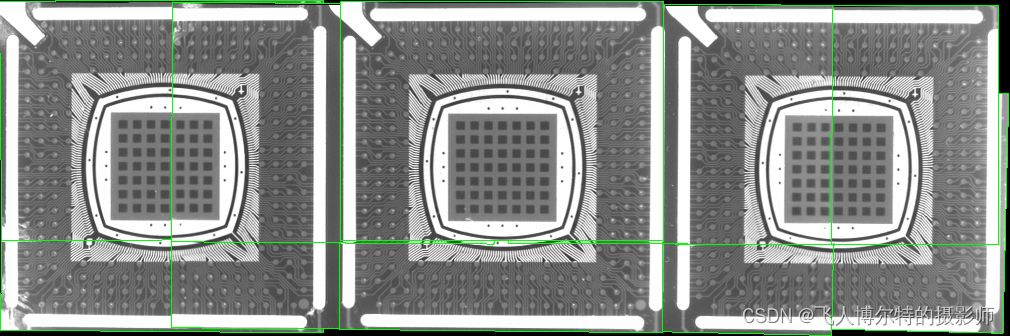
拼接效果图,图中的xld轮廓线,就是拼接处
例程代码的完整注释,包含了算法参数的详细讲解已免费上传,制作不易,觉得帮到了您,还请点个赞
另外,若觉得本文写的与您理解的有些出入,欢迎交流


 3657
3657

 被折叠的 条评论
为什么被折叠?
被折叠的 条评论
为什么被折叠?
 到【灌水乐园】发言


