


 本文详细介绍了如何在Ubuntu20.04环境下安装ROS2Foxy、Qt5.14.2,并配置QtCreator、colcon和VSCode进行C++开发,包括创建ROS功能包、CMake配置和常见问题解决方法。
操作环境
操作系统:虚拟机ubuntu20.04
ROS2版本:foxy
Qt版本:Qt5.14.2
编译环境:colcon 和 vscode
配置QT和ROS2
首先确保安装好Qt和foxy并source好环境,可参考其他文章如:Ubuntu20.04安装ROS2 Foxy,Ubuntu20.04安装Qt5.14,Ubuntu20.04安装vscode这里不过多阐述,另外由于安装ROS2时不自带编译工具,因此还需自己安装colcon来编译:
sudo apt-get install python3-colcon-common-extensions
打开QtCreator创建一个工程,选择cmake编译,得到以下文件,然后先放着备用

接下来开始创建demo工程,先创建一个主文件夹,并在下面创建一个src子文件夹

在src文件夹下,创建一个ros2的功能包,其中ros_qt是自己定义的功能包名字,使用ament_cmake来编译:
ros2 pkg create ros_qt --build-type ament_cmake --dependencies rclcpp
会自动生成如下文件:
 回到主文件夹目录,使用colcon编译整个工程:
colcon build
会生成如下文件夹:

将刚才Qt文件放到功能包的src文件夹下,记住是功能包的src文件夹,当然其他的cpp文件也是放在这里:

打开vscode,开始配置CMakeList.txt,默认的文件是这样的:

废话不多说,直接贴代码,需要注意的点和踩过的坑都用中文注释了。
cmake_minimum_required(VERSION 3.5)
project(ros_qt)

# Default to C99
if(NOT CMAKE_C_STANDARD)
  set(CMAKE_C_STANDARD 99)
endif()

# Default to C++14
if(NOT CMAKE_CXX_STANDARD)
  set(CMAKE_CXX_STANDARD 14)
endif()

if(CMAKE_COMPILER_IS_GNUCXX OR CMAKE_CXX_COMPILER_ID MATCHES "Clang")
  add_compile_options(-Wall -Wextra -Wpedantic)
endif()

set(CMAKE_AUTOMOC ON)
set(CMAKE_AUTOUIC ON)  #一定要添加这几行,不然编译时可能会提示找不到Qt的ui文件
set(CMAKE_AUTORCC ON)

# include_directories(
# "./src"
# ${EIGEN3_INCLUDE_DIR}   #如果使用到其他的包时,需要在这里include
# ${CERES_INCLUDE_DIRS}
# )

# find dependencies
find_package(ament_cmake REQUIRED)
find_package(rclcpp REQUIRED)
find_package(Qt5 COMPONENTS Widgets REQUIRED) #ament_cmake会自动寻找Qt包

FILE(GLOB HEAD_FILES "./src/*.h")
FILE(GLOB SRC_FILES "./src/*.cpp")
FILE(GLOB UI_FILES "./src/*.ui")
add_executable(${PROJECT_NAME}_node ${SRC_FILES} ${HEAD_FILES} ${UI_FILES})

ament_target_dependencies(${PROJECT_NAME}_node rclcpp std_msgs) #自动依赖ros2的包
target_link_libraries(${PROJECT_NAME}_node Qt5::Widgets)  #Qt和其他的包还是要用这行来链接

#install
install(TARGETS
  ${PROJECT_NAME}_node
  DESTINATION lib/${PROJECT_NAME}
)

if(BUILD_TESTING)
  find_package(ament_lint_auto REQUIRED)
  # the following line skips the linter which checks for copyrights
  # uncomment the line when a copyright and license is not present in all source files
  #set(ament_cmake_copyright_FOUND TRUE)
  # the following line skips cpplint (only works in a git repo)
  # uncomment the line when this package is not in a git repo
  #set(ament_cmake_cpplint_FOUND TRUE)
  ament_lint_auto_find_test_dependencies()
endif()

ament_package()
回到终端使用colcon build编译,或者在vscode通过Ctrl+Shift+B选择colcon build,不出意外的话编译成功。
 随便复制一个发布话题的例程:
#include "mainwindow.h"
#include <QApplication>
#include <chrono>
#include <memory>
#include "rclcpp/rclcpp.hpp"
#include "std_msgs/msg/string.hpp"

using namespace std::chrono_literals;

/* This example creates a subclass of Node and uses a fancy C++11 lambda
 * function to shorten the callback syntax, at the expense of making the
 * code somewhat more difficult to understand at first glance. */

class MinimalPublisher : public rclcpp::Node
{
public:
  MinimalPublisher()
  : Node("minimal_publisher"), count_(0)
  {
    publisher_ = this->create_publisher<std_msgs::msg::String>("topic", 10);
    auto timer_callback =
      [this]() -> void {
        auto message = std_msgs::msg::String();
        message.data = "Hello, world! " + std::to_string(this->count_++);
        RCLCPP_INFO(this->get_logger(), "Publishing: '%s'", message.data.c_str());
        this->publisher_->publish(message);
      };
    timer_ = this->create_wall_timer(500ms, timer_callback);
  }

private:
  rclcpp::TimerBase::SharedPtr timer_;
  rclcpp::Publisher<std_msgs::msg::String>::SharedPtr publisher_;
  size_t count_;
};

int main(int argc, char *argv[])
{
    rclcpp::init(argc, argv);
    QApplication a(argc, argv);
    MainWindow w;
    w.show();
    rclcpp::spin(std::make_shared<MinimalPublisher>());
    return a.exec();

}
打开终端,在工程文件夹下重新colcon build构建一次,然后source一下环境:

输入指令运行节点:
ros2 run ros_qt ros_qt_node 运行成功:
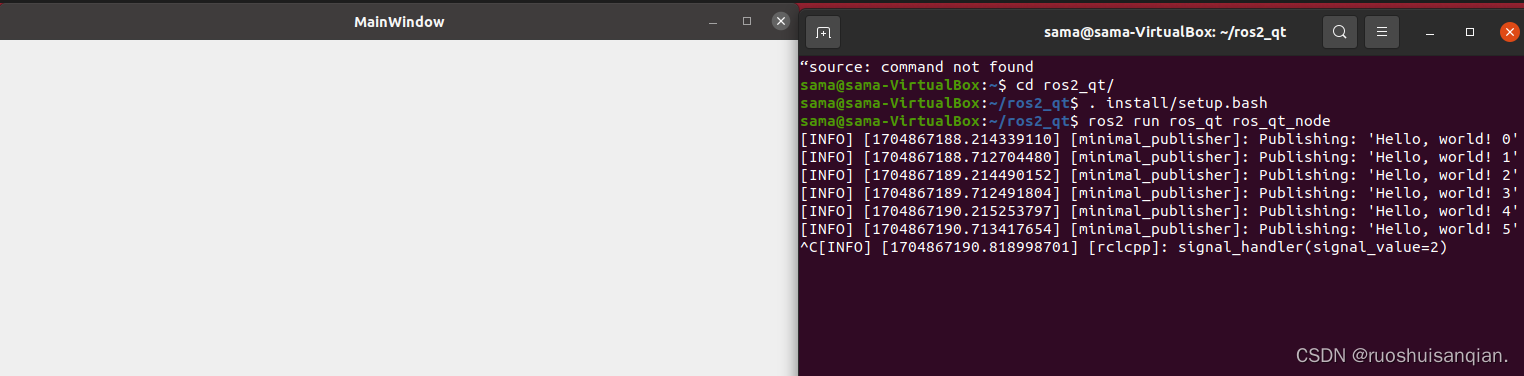
至此,ROS2 + Qt5的配置已经完成,但是在vscode下还是会出现很多红色波浪线 ,也无法在vscode里打开程序,接下来配置vscode。
配置VSCODE
先科普一下vscode中c_cpp_properties.json、launch.json、settings.json、task.json这几个文件的作用:

必须配置的 c_cpp_properties.json和launch.json这两个文件,直接上代码。
c_cpp_properties.json
{
    "configurations": [
        {
            "browse": {
                "databaseFilename": "${default}",
                "limitSymbolsToIncludedHeaders": false
            },
            "includePath": [
                "${workspaceFolder}/**",
                "/opt/ros/foxy/include",
                "/opt/Qt5.14.2/5.14.2/gcc_64/include/**",
                "${workspaceFolder}/build/ros_qt/ros_qt_node_autogen/include"
            ],
            "name": "ROS",
            "intelliSenseMode": "gcc-x64",
            "compilerPath": "/usr/bin/gcc",
            "cStandard": "gnu11",
            "cppStandard": "c++14"
        }
    ],
    "version": 4
}
launch.json
{
    // Use IntelliSense to learn about possible attributes.
    // Hover to view descriptions of existing attributes.
    // For more information, visit: https://go.microsoft.com/fwlink/?linkid=830387
    "version": "0.2.0",
    "configurations": [
        {
            "name": "ros_qt_node",
            "type": "cppdbg",
            "request": "launch",
            "program": "${workspaceFolder}/install/ros_qt/lib/ros_qt/ros_qt_node",//这句是关键
            "args": [],
            "stopAtEntry": false,
            "cwd": "${workspaceFolder}",
            "environment": [

            ],
            "externalConsole": false,
            "MIMode": "gdb",
            "setupCommands": [
                {
                    "description": "Enable pretty-printing for gdb",
                    "text": "-enable-pretty-printing",
                    "ignoreFailures": true
                }
            ],
            "preLaunchTask": "colcon: build",
            "miDebuggerPath": "/usr/bin/gdb"
        }
    ]
}
配置完成后,就可以在vscode上运行代码了

问题记录
如果编译时出现如下报错,Could not find a package configuration file provided by "Qt5SerialPort"

这是QT5的串口包问题,请设置QT5的路径,修改cmakelist.txt如下:
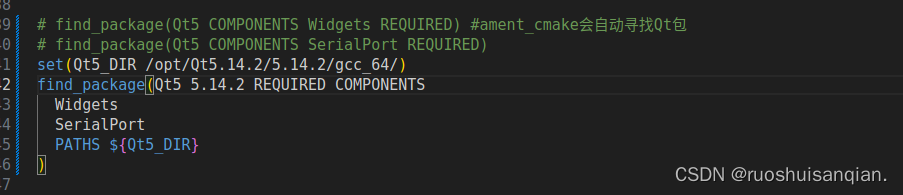
并确保安装了Qt5SerialPort:
sudo apt-get install qtserialport5-dev
如果运行时出现如下报错,version `Qt_5.14' not found:

请在终端打开.bashrc:
gedit ~/.bashrc在文件里设置qt5的lib的环境变量:
export LD_LIBRARY_PATH=/opt/Qt5.14.2/5.14.2/gcc_64/lib:$LD_LIBRARY_PATH
保存文件后,将工程下编译生成的文件夹删掉,然后重启vscode,重新编译运行即可。
以上就是Ubuntu20.04+ROS2+Qt5(c++)+vscode环境配置的全部内容。


 826
826


 被折叠的 条评论
为什么被折叠?
被折叠的 条评论
为什么被折叠?
 到【灌水乐园】发言


