


 S2ANet是一阶段的目标检测器,通过FAM(特征聚合模块)和ODM(目标细化模块)进行旋转框的检测。FAM的forward_single涉及分类和边界框预测,refine_bboxes对预测边界框进行精炼;ODM的forward_single利用ORConv2d进行特征处理,结合RotationInvariantPooling实现旋转不变性。损失函数包括分类和边界框回归损失。
文章目录
- 1. forward_train的代码(s2anet.py)
与Faster-Rcnn不同,,一阶段的检测器使用规则并且密集的采样anchors回归边界框,并且直接对其进行分类。
因此,我们以S2ANet网络为例来查看单阶段目标检测在旋转框环境下的使用
1. forward_train的代码(s2anet.py)
def forward_train(self,
                  img,
                  img_metas,
                  gt_bboxes,
                  gt_labels,
                  gt_bboxes_ignore=None):
    """Forward function of S2ANet."""

losses = dict()
x = self.extract_feat(img)

创建一个空字典losses,用于存储不同类型的损失
调用self.extract_feat函数,将输入图像img作为参数传递进去,以提取图像的特征表示x
(详见1.1)

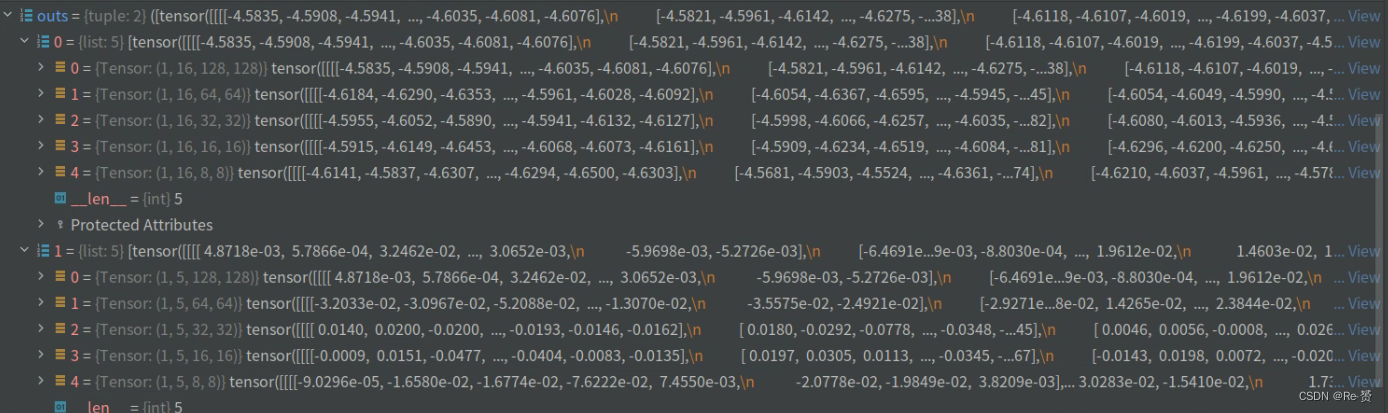
outs = self.fam_head(x)

调用了模型中的fam_head方法(详见1.2)
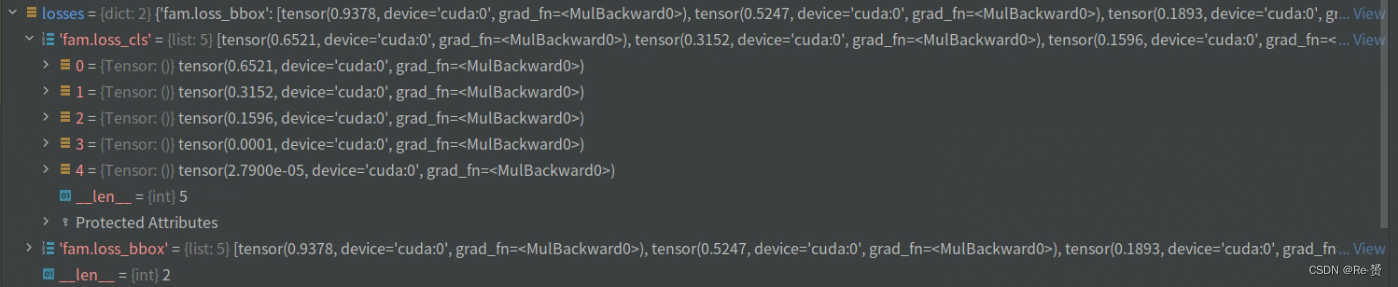
loss_inputs = outs + (gt_bboxes, gt_labels, img_metas)
loss_base = self.fam_head.loss(
    *loss_inputs, gt_bboxes_ignore=gt_bboxes_ignore)
for name, value in loss_base.items():
   losses[f'fam.{name}'] = value

将网络的输出outs与一些其他输入(gt_bboxes、gt_labels和img_metas)组合成一个输入列表
将其作为参数传递给self.fam_head.loss方法
然后遍历loss_base中的每个损失项,并将其添加到losses字典中(详见1.5)
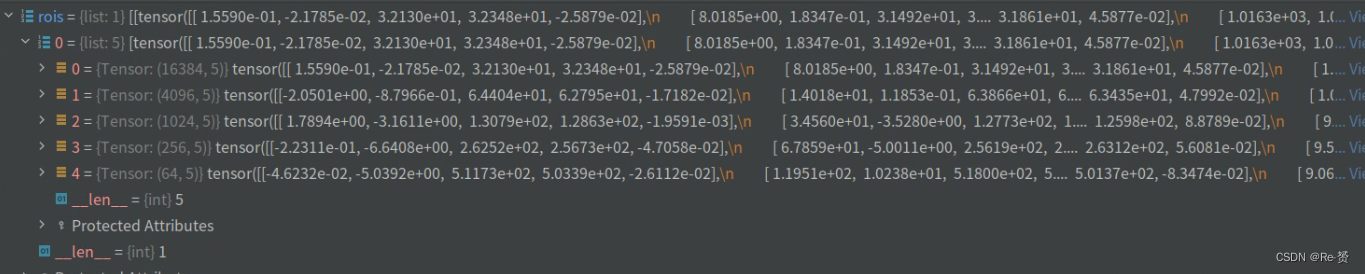
rois = self.fam_head.refine_bboxes(*outs)

使用网络输出outs作为输入来进行进一步的(refine)操作,得到最终的边界框预测结果
(详见1.3)
align_feat = self.align_conv(x, rois)

将输入特征x和边界框rois作为输入,通过self.align_conv方法进行对齐操作(详见1.4)

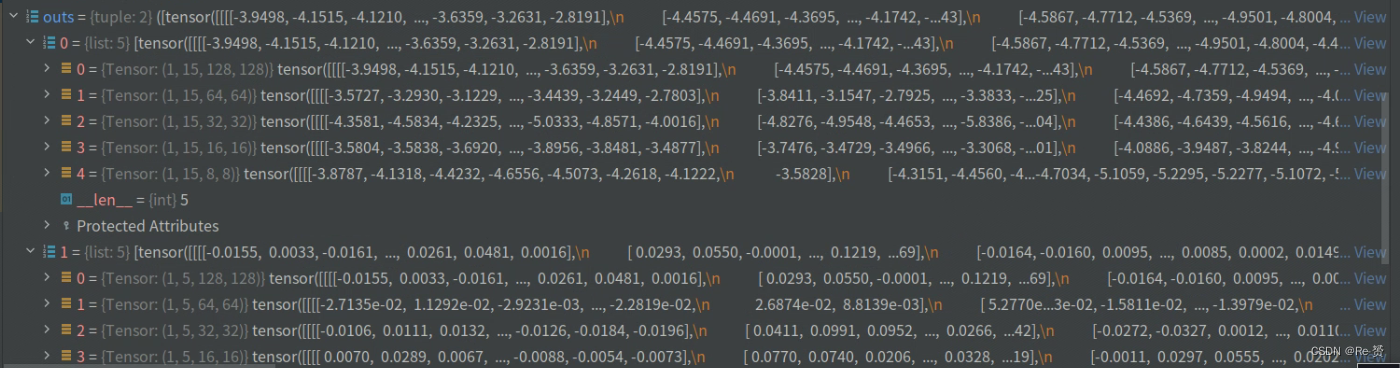
outs = self.odm_head(align_feat)

调用了self.odm_head模块的前向传播函数,将align_feat作为输入,得到预测的输出outs
(详见2.1)
loss_inputs = outs + (gt_bboxes, gt_labels, img_metas)
loss_refine = self.odm_head.loss(
    *loss_inputs, gt_bboxes_ignore=gt_bboxes_ignore, rois=rois)
for name, value in loss_refine.items():
    losses[f'odm.{name}'] = value

用于计算目标检测任务中的损失函数(详见2.2)

1.1 extract_feat的代码(s2anet.py)
def extract_feat(self, img):
   """Directly extract features from the backbone+neck."""
   x = self.backbone(img)
   if self.with_neck:
       x = self.neck(x)
   return x

直接从骨干网络(backbone)和特征融合层(neck)中提取特征
backbone使用的是Resnet网络,neck使用的是FPN,这里不做过多的阐述
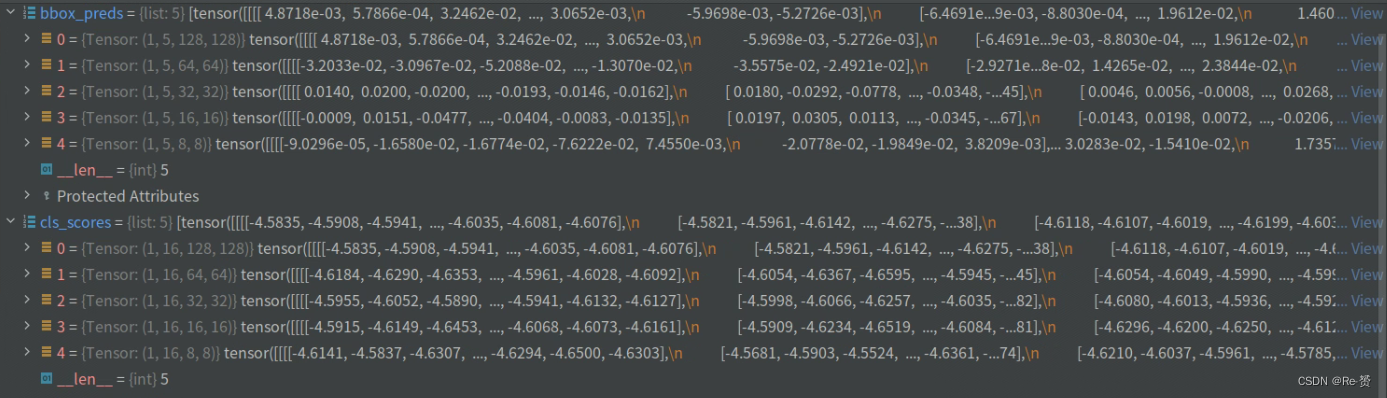
1.2 FAM的forward_single的代码(rotated_retina_head.py)
def forward_single(self, x):
   """Forward feature of a single scale level.

   Args:
       x (torch.Tensor): Features of a single scale level.

   Returns:
       tuple (torch.Tensor):

           - cls_score (torch.Tensor): Cls scores for a single scale \
               level the channels number is num_anchors * num_classes.
           - bbox_pred (torch.Tensor): Box energies / deltas for a \
               single scale level, the channels number is num_anchors * 5.
   """
这里以128大小的特征图尺寸举例

cls_feat = x
reg_feat = x
for cls_conv in self.cls_convs:
cls_feat = cls_conv(cls_feat)
for reg_conv in self.reg_convs:
reg_feat = reg_conv(reg_feat)
对输入特征x进行了两个循环的卷积操作,分别得到了分类特征cls_feat和回归特征reg_feat
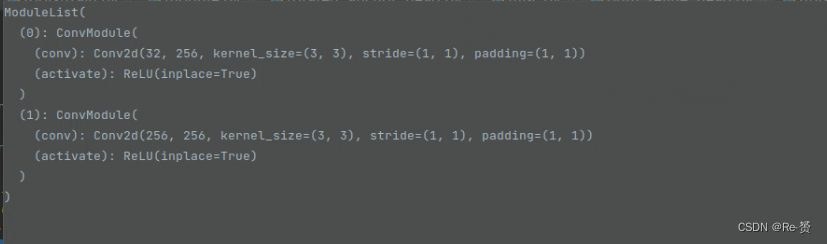
其中,cls_conv和reg_conv的定义在init函数当中:
'''
for i in range(self.stacked_convs):
chn = self.in_channels if i == 0 else self.feat_channels
self.cls_convs.append(
ConvModule(
chn,
self.feat_channels,
3,
stride=1,
padding=1,
conv_cfg=self.conv_cfg,
norm_cfg=self.norm_cfg))
self.reg_convs.append(
ConvModule(
chn,
self.feat_channels,
3,
stride=1,
padding=1,
conv_cfg=self.conv_cfg,
norm_cfg=self.norm_cfg))
'''
cls_convs:

reg_convs:

cls_feat 与reg_feat :

cls_score = self.retina_cls(cls_feat)
bbox_pred = self.retina_reg(reg_feat)
return cls_score, bbox_pred

将分类特征cls_feat和回归特征reg_feat作为输入
通过相应的网络模块进行预测,得到目标检测任务的分类分数和边界框预测
返回cls_score, bbox_pred

其中,retina_cls和retina_reg的定义在init函数当中:
'''
self.retina_cls = nn.Conv2d(
            self.feat_channels,
            self.num_anchors * self.cls_out_channels,
            3,
            padding=1)
self.retina_reg = nn.Conv2d(
   self.feat_channels, self.num_anchors * 5, 3, padding=1)
'''
self.retina_cls是一个(nn.Conv2d),用于进行目标分类的预测。它接收输入特征的通道数为self.feat_channels,输出通道数为self.num_anchors * self.cls_out_channels。其中,self.num_anchors表示每个空间位置的锚框数量,self.cls_out_channels表示每个锚框预测的类别数。
self.retina_reg是一个(nn.Conv2d),用于进行目标边界框的预测。它接收输入特征的通道数同样为self.feat_channels,输出通道数为self.num_anchors * 5。其中,self.num_anchors表示每个空间位置的锚框数量,5表示每个锚框预测的边界框坐标信息,包括(x, y, w, h, a)。


1.3 FAM的refine_bboxes的代码(rotated_retina_head.py)
def refine_bboxes(self, cls_scores, bbox_preds):
   """This function will be used in S2ANet, whose num_anchors=1.

   Args:
       cls_scores (list[Tensor]): Box scores for each scale level
           Has shape (N, num_classes, H, W)
       bbox_preds (list[Tensor]): Box energies / deltas for each scale
           level with shape (N, 5, H, W)

   Returns:
       list[list[Tensor]]: refined rbboxes of each level of each image.
   """
num_levels = len(cls_scores)
assert num_levels == len(bbox_preds)
num_imgs = cls_scores[0].size(0)
for i in range(num_levels):
    assert num_imgs == cls_scores[i].size(0) == bbox_preds[i].size(0)

用于检查分类分数(cls_scores)和边界框预测(bbox_preds)的维度是否一致
并确保它们的尺寸满足一些要求。

device = cls_scores[0].device
featmap_sizes = [cls_scores[i].shape[-2:] for i in range(num_levels)]
mlvl_anchors = self.anchor_generator.grid_priors(
    featmap_sizes, device=device)

通过循环遍历每个级别的分类分数张量,计算每个级别特征图的尺寸
调用self.anchor_generator.grid_priors方法生成锚框的位置信息

bboxes_list = [[] for _ in range(num_imgs)]

for lvl in range(num_levels):
    bbox_pred = bbox_preds[lvl]
    bbox_pred = bbox_pred.permute(0, 2, 3, 1)
    bbox_pred = bbox_pred.reshape(num_imgs, -1, 5)
    anchors = mlvl_anchors[lvl]

    for img_id in range(num_imgs):
        bbox_pred_i = bbox_pred[img_id]
        decode_bbox_i = self.bbox_coder.decode(anchors, bbox_pred_i)
        bboxes_list[img_id].append(decode_bbox_i.detach())

创建一个空列表bboxes_list
通过循环遍历每个级别lvl,依次处理对应的边界框预测结果:
     获取第lvl级别的边界框预测结果bbox_pred
     对bbox_pred进行维度转置,将通道维度放到最后一维
     重塑bbox_pred,将其转换为num_imgs个边界框预测的三维张量,其中每个边界框预测包含5个值。
     获取lvl级别的锚框位置信息anchors
     通过循环遍历每个图像img_id,依次处理对应的边界框预测结果:
		获取第img_id个图像的边界框预测bbox_pred_i
		使用decode方法将锚框和边界框预测解码为真实的边界框坐标decode_bbox_i
		将解码后的边界框坐标以detach()方式添加到对应图像的边界框列表bboxes_list[img_id]中
我们以第一维来举例,首先变换bbox_pred

得到第一维的anchors

将其进行解码,也就是将预测的偏移量 应用于基础框上,生成解码后的边界框

1.4 FAM的align_conv的代码(utils.py)
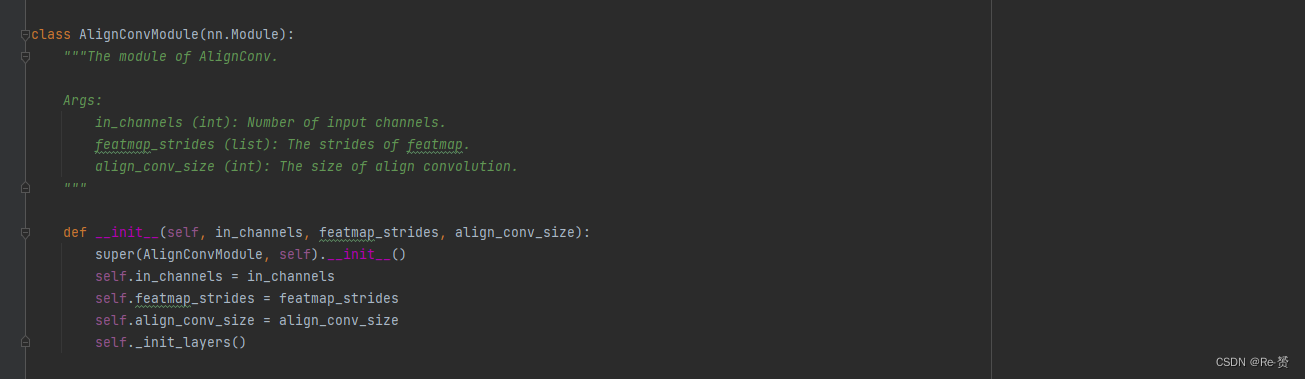
查看传入的参数
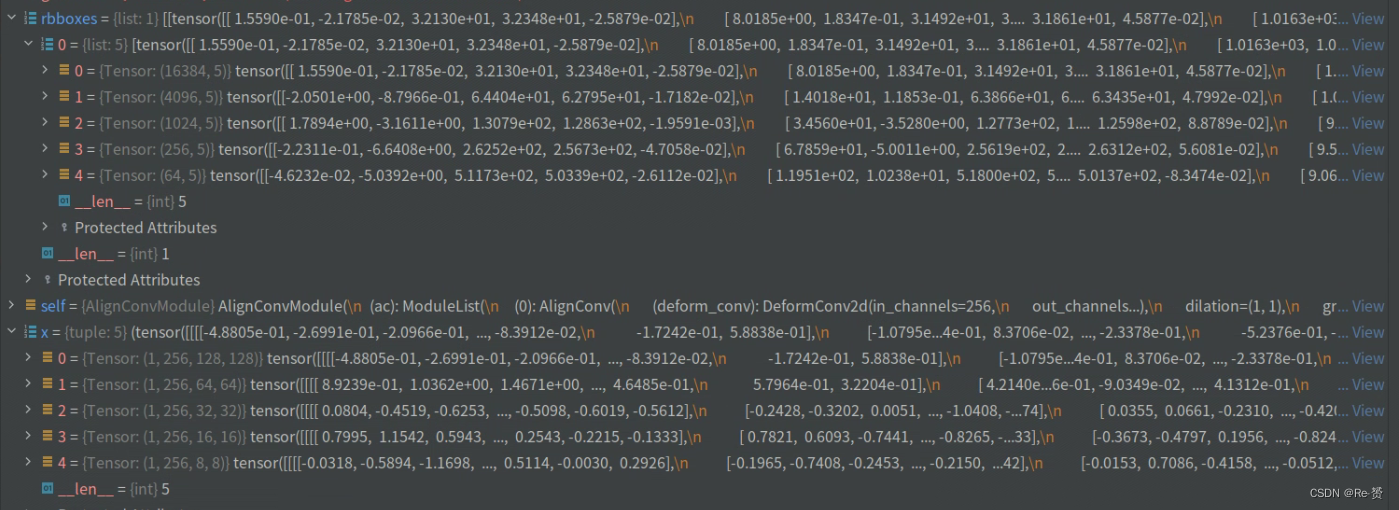
def forward(self, x, rbboxes):
    """
    Args:
        x (list[Tensor]):
            feature maps of multiple scales
        best_rbboxes (list[list[Tensor]]):
            best rbboxes of multiple scales of multiple images
    """
    mlvl_rbboxes = [torch.cat(rbbox) for rbbox in zip(*rbboxes)]
    out = []
    for x_scale, rbboxes_scale, ac_scale in zip(x, mlvl_rbboxes, self.ac):
        feat_refined_scale = ac_scale(x_scale, rbboxes_scale)
        out.append(feat_refined_scale)
    return out

首先对rbboxes进行转置和解包操作,得到每个尺度上的边界框列表rbboxes_scale
然后,对rbboxes_scale进行拼接,得到每个尺度上所有图像的边界框张量列表mlvl_rbboxes
接下来,定义一个空列表out,用于存储每个尺度上经过处理后的特征
循环遍历每个尺度上的特征图x_scale、边界框rbboxes_scale和对应的边界框对齐模块ac_scale,分别对每个尺度的特征进行处理

其中重要的是ac_scale函数,它是AlignConv的类(详见1.4.1)
self.ac = nn.ModuleList([
            AlignConv(
                self.in_channels,
                self.in_channels,
                kernel_size=self.align_conv_size,
                stride=s) for s in self.featmap_strides
        ])
最后的返回结果

1.4.1 AlignConv类的代码(utils.py)
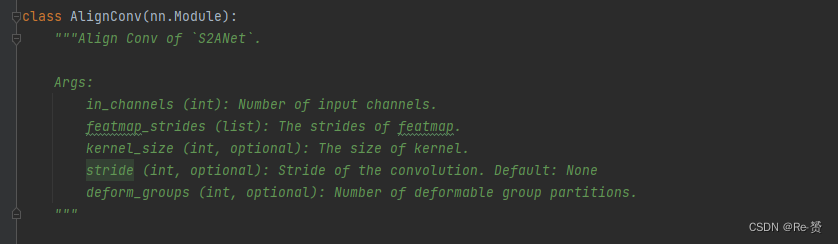
def forward(self, x, anchors):
    """Forward function of AlignConv."""
    anchors = anchors.reshape(x.shape[0], x.shape[2], x.shape[3], 5)
    num_imgs, H, W = anchors.shape[:3]
    offset_list = [
        self.get_offset(anchors[i].reshape(-1, 5), (H, W), self.stride)
        for i in range(num_imgs)
    ]
    offset_tensor = torch.stack(offset_list, dim=0)
    x = self.relu(self.deform_conv(x, offset_tensor.detach()))
    return x

首先,对锚框anchors进行形状重塑,将其变为[batch_size, H, W, 5]的形状

通过循环遍历每个图像i:
     将锚框anchors[i]重塑为[-1, 5]的形状
     调用self.get_offset方法计算对应的偏移量offset_list[i](详见1.4.1.1)
将计算得到的偏移量列表offset_list在新的维度0上进行堆叠,得到形状为[batch_size, H, W, 2]的偏移量张量offset_tensor
通过将偏移量张量offset_tensor与输入特征x传入self.deform_conv方法,进行形变卷积操作

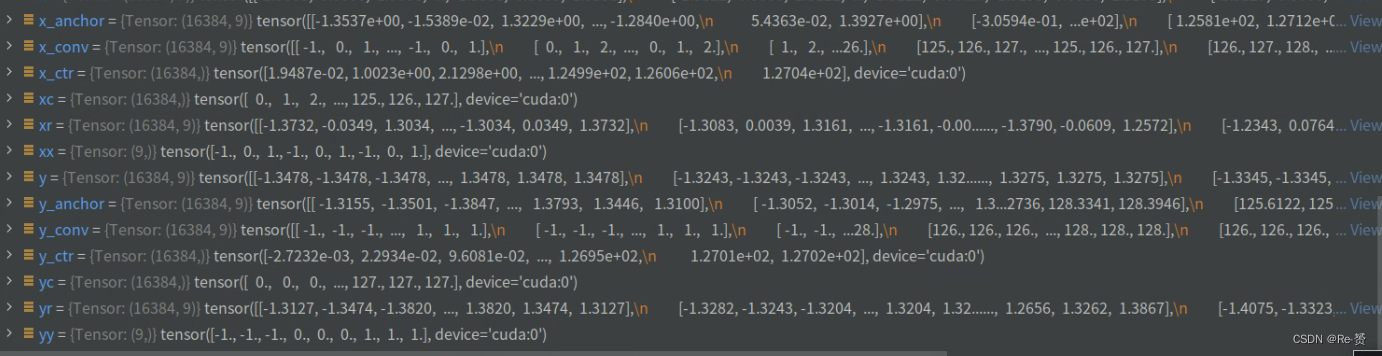
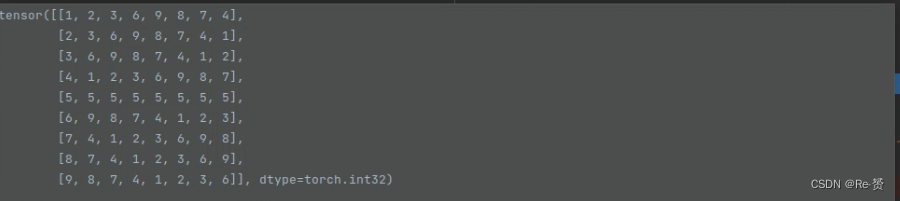
1.4.1.1 get_offset的代码(utils.py)
def get_offset(self, anchors, featmap_size, stride):
        """Get the offset of AlignConv."""

dtype, device = anchors.dtype, anchors.device
feat_h, feat_w = featmap_size
pad = (self.kernel_size - 1) // 2
idx = torch.arange(-pad, pad + 1, dtype=dtype, device=device)
yy, xx = torch.meshgrid(idx, idx)
xx = xx.reshape(-1)
yy = yy.reshape(-1)

获取特征图的高度feat_h和宽度feat_w
计算卷积核的填充大小pad
创建一个以-pad到pad+1的整数序列idx
调用torch.meshgrid(idx, idx),生成二维网格yy和xx
对xx和yy进行形状重塑,将其变为一维张量。


xc = torch.arange(0, feat_w, device=device, dtype=dtype)
yc = torch.arange(0, feat_h, device=device, dtype=dtype)
yc, xc = torch.meshgrid(yc, xc)
xc = xc.reshape(-1)
yc = yc.reshape(-1)
x_conv = xc[:, None] + xx
y_conv = yc[:, None] + yy

创建一个张量xc,其值从0到feat_w,表示特征图的水平采样位置。
创建一个张量yc,其值从0到feat_h,表示特征图的垂直采样位置。
调用torch.meshgrid(yc, xc),生成二维网格yc和xc
对xc和yc进行形状重塑,将其变为一维张量
将一维的采样位置张量xc和yc与偏移量张量xx和yy相加,得到在默认卷积中的采样位置

 x_ctr, y_ctr, w, h, a = torch.unbind(anchors, dim=1)
 x_ctr, y_ctr, w, h = \
     x_ctr / stride, y_ctr / stride, \
     w / stride, h / stride
 cos, sin = torch.cos(a), torch.sin(a)
 dw, dh = w / self.kernel_size, h / self.kernel_size
 x, y = dw[:, None] * xx, dh[:, None] * yy
 xr = cos[:, None] * x - sin[:, None] * y
 yr = sin[:, None] * x + cos[:, None] * y
 x_anchor, y_anchor = xr + x_ctr[:, None], yr + y_ctr[:, None]

将锚框anchors解绑,得到水平中心坐标x_ctr、垂直中心坐标y_ctr、宽度w、高度h和旋转角度a
中心坐标、宽度和高度除以步长stride,以进行归一化
使用torch.cos(a)和torch.sin(a)分别计算旋转角度的余弦值和正弦值
除以self.kernel_size,计算出宽度和高度的步长
将步长乘以偏移量xx和yy,得到相应的采样位置坐标x和y
通过旋转矩阵的计算,将采样位置坐标x和y进行旋转
最后,将旋转后的坐标xr和yr分别加上中心坐标x_ctr和y_ctr,得到在锚框中心坐标基础上的采样位置x_anchor和y_anchor
offset_x = x_anchor - x_conv
offset_y = y_anchor - y_conv
# x, y in anchors is opposite in image coordinates,
# so we stack them with y, x other than x, y
offset = torch.stack([offset_y, offset_x], dim=-1)
offset = offset.reshape(anchors.size(0),
                        -1).permute(1, 0).reshape(-1, feat_h, feat_w)
return offset

计算采样位置x_anchor与默认卷积采样位置x_conv之间的水平偏移量offset_x
采样位置y_anchor与默认卷积采样位置y_conv之间的垂直偏移量offset_y
将水平偏移量offset_x和垂直偏移量offset_y在最后一个维度上进行堆叠
对偏移量进行重塑,具体地,将其形状变为(anchors.size(0), -1, feat_h, feat_w)
最后,通过对维度进行置换操作,将偏移量的形状变为(feat_h * feat_w, anchors.size(0))
再次进行形状重塑操作,将其变为三维张量,形状为(anchors.size(0), feat_h, feat_w)

解释一下最后(18, 128, 128)的形状,offset 原本的形状为(16384, 9, 2),经历了 offset.reshape(anchors.size(0), -1)变为(16384, 18)。接着permute(1, 0)变为(18,16384)
最后reshape(-1, feat_h, feat_w)变为(18, 128, 128)
1.5 loss函数的代码(rotated_anchor_head.py)
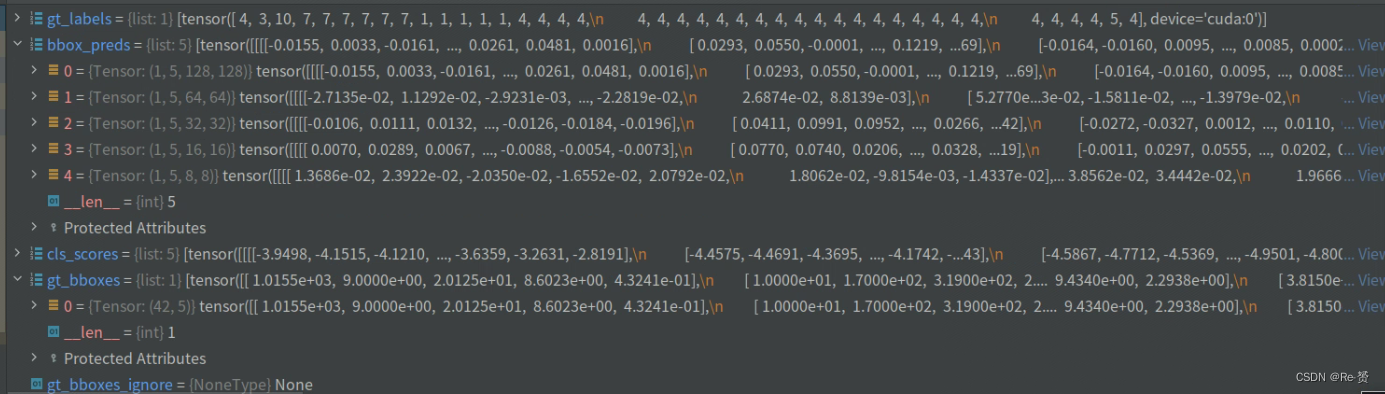
def loss(self,
          cls_scores,
          bbox_preds,
          gt_bboxes,
          gt_labels,
          img_metas,
          gt_bboxes_ignore=None):
     """Compute losses of the head.

     Args:
         cls_scores (list[Tensor]): Box scores for each scale level
             Has shape (N, num_anchors * num_classes, H, W)
         bbox_preds (list[Tensor]): Box energies / deltas for each scale
             level with shape (N, num_anchors * 5, H, W)
         gt_bboxes (list[Tensor]): Ground truth bboxes for each image with
             shape (num_gts, 5) in [cx, cy, w, h, a] format.
         gt_labels (list[Tensor]): class indices corresponding to each box
         img_metas (list[dict]): Meta information of each image, e.g.,
             image size, scaling factor, etc.
         gt_bboxes_ignore (None | list[Tensor]): specify which bounding
             boxes can be ignored when computing the loss. Default: None

     Returns:
         dict[str, Tensor]: A dictionary of loss components.
     """
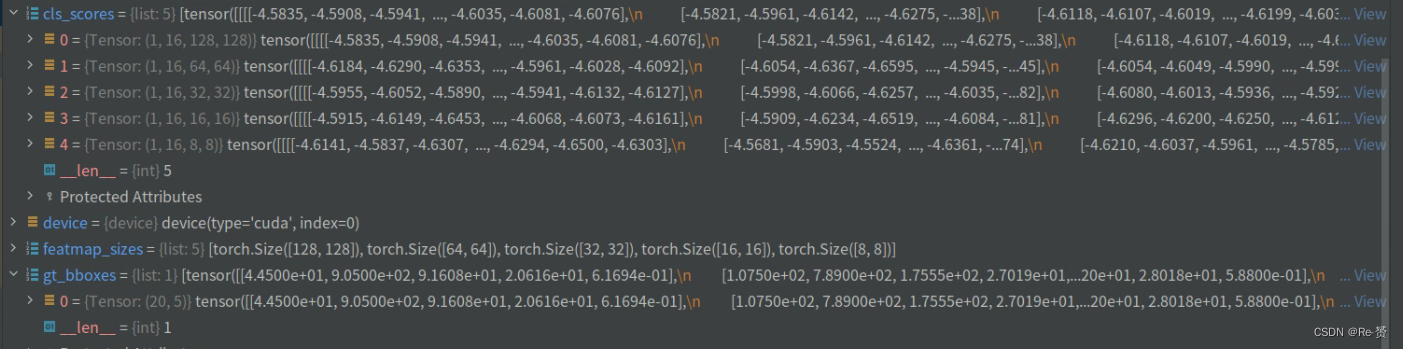
featmap_sizes = [featmap.size()[-2:] for featmap in cls_scores]
assert len(featmap_sizes) == self.anchor_generator.num_levels

device = cls_scores[0].device

anchor_list, valid_flag_list = self.get_anchors(
    featmap_sizes, img_metas, device=device)
label_channels = self.cls_out_channels if self.use_sigmoid_cls else 1

用于获取特征图的尺寸 featmap_sizes
调用 get_anchors 方法生成锚框

cls_reg_targets = self.get_targets(
           anchor_list,
           valid_flag_list,
           gt_bboxes,
           img_metas,
           gt_bboxes_ignore_list=gt_bboxes_ignore,
           gt_labels_list=gt_labels,
           label_channels=label_channels)
if cls_reg_targets is None:
    return None
(labels_list, label_weights_list, bbox_targets_list, bbox_weights_list,
 num_total_pos, num_total_neg) = cls_reg_targets
num_total_samples = (
    num_total_pos + num_total_neg if self.sampling else num_total_pos)
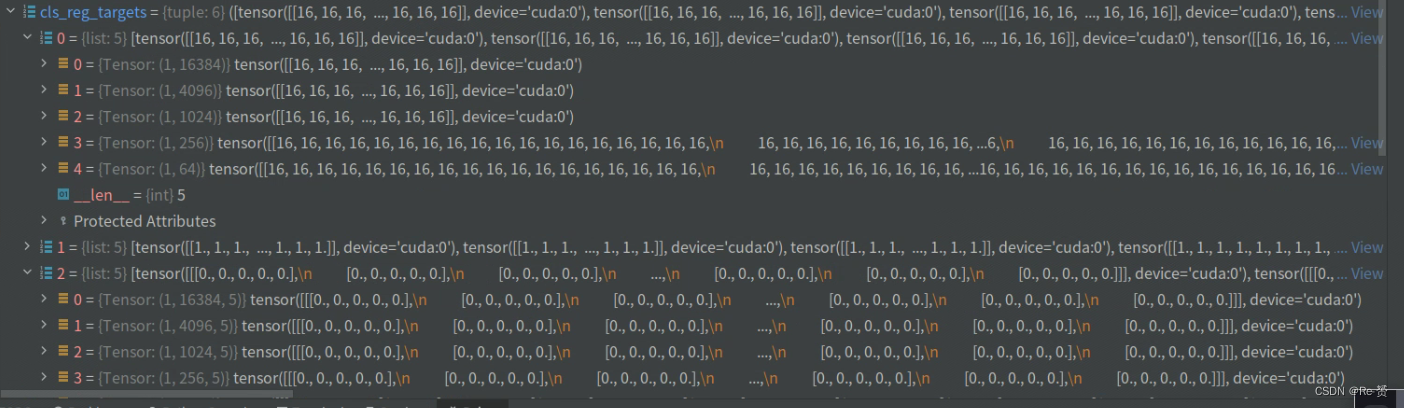
看一下每一个target参数:
labels_list:

label_weights_list:

bbox_targets_list:

bbox_weights_list:

num_total_pos, num_total_neg:

num_level_anchors = [anchors.size(0) for anchors in anchor_list[0]]
        # concat all level anchors and flags to a single tensor
concat_anchor_list = []
 for i, _ in enumerate(anchor_list):
     concat_anchor_list.append(torch.cat(anchor_list[i]))
 all_anchor_list = images_to_levels(concat_anchor_list,
                                    num_level_anchors)

通过遍历 anchor_list,计算每个尺度上的锚框数量
在遍历 anchor_list 的过程中,将每个尺度上的锚框张量拼接起来,并添加到 concat_anchor_list 中
调用 images_to_levels 方法,将连接后的锚框列表 concat_anchor_list 根据每个尺度上的锚框数量 num_level_anchors 进行分组
得到了连接后的锚框张量列表 all_anchor_list,其中包含了所有尺度上的锚框,并按照尺度进行了分组

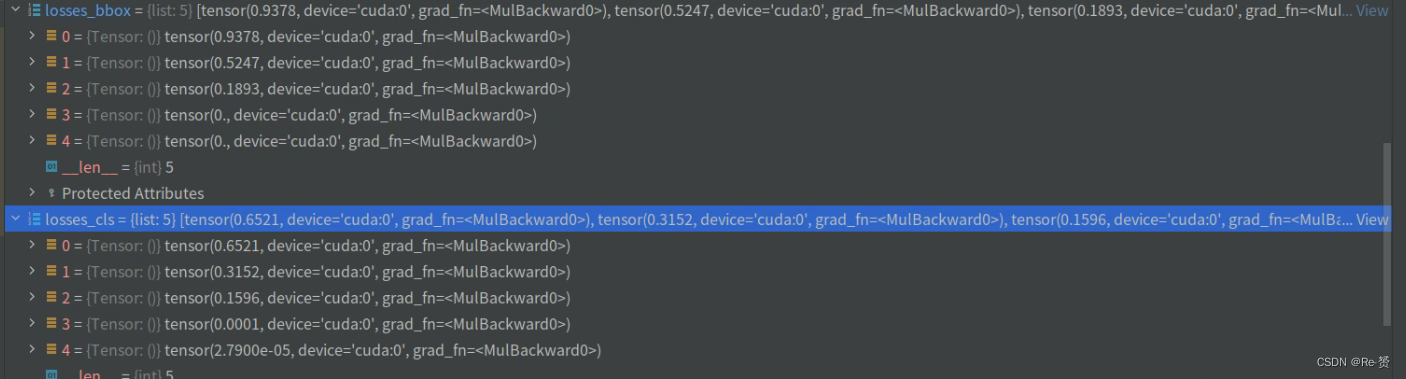
losses_cls, losses_bbox = multi_apply(
            self.loss_single,
            cls_scores,
            bbox_preds,
            all_anchor_list,
            labels_list,
            label_weights_list,
            bbox_targets_list,
            bbox_weights_list,
            num_total_samples=num_total_samples)
return dict(loss_cls=losses_cls, loss_bbox=losses_bbox)

对于每个尺度,self.loss_single 方法会根据分类得分、边界框预测、锚框、标签和权重数据计算相应的分类损失和边界框损失
2.1 ODM的forward_single的代码(odm_refine_head.py)
def forward_single(self, x):
  """Forward feature of a single scale level.

  Args:
      x (torch.Tensor): Features of a single scale level.

  Returns:
      tuple (torch.Tensor):

          - cls_score (torch.Tensor): Cls scores for a single scale \
              level the channels number is num_anchors * num_classes.
          - bbox_pred (torch.Tensor): Box energies / deltas for a \
              single scale level, the channels number is num_anchors * 4.
  """
我们以128的特征图大小为例进行分析

or_feat = self.or_conv(x)
reg_feat = or_feat
cls_feat = self.or_pool(or_feat)

通过self.or_conv模块对特征图x进行卷积操作,得到输出特征图or_feat
通过self.or_pool模块对or_feat进行池化操作,得到输出特征图cls_feat

看一下这两个函数的定义:
self.or_conv = ORConv2d(
            self.feat_channels,
            int(self.feat_channels / 8),
            kernel_size=3,
            padding=1,
            arf_config=(1, 8))
self.or_pool = RotationInvariantPooling(256, 8)		(详见2.1.1)

其中RotationInvariantPooling的定义如下:

class RotationInvariantPooling(nn.Module):
    """Rotating invariant pooling module.

    Args:
        nInputPlane (int): The number of Input plane.
        nOrientation (int, optional): The number of oriented channels.
    """

    def __init__(self, nInputPlane, nOrientation=8):
        super(RotationInvariantPooling, self).__init__()
        self.nInputPlane = nInputPlane
        self.nOrientation = nOrientation

    def forward(self, x):
        """Forward function."""
        N, c, h, w = x.size()
        x = x.view(N, -1, self.nOrientation, h, w)
        x, _ = x.max(dim=2, keepdim=False)
        return x

for cls_conv in self.cls_convs:
cls_feat = cls_conv(cls_feat)
for reg_conv in self.reg_convs:
reg_feat = reg_conv(reg_feat)
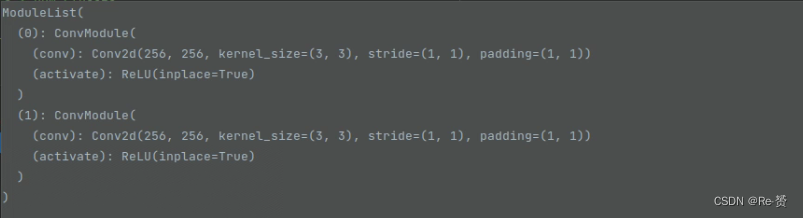
其中cls_convs和reg_convs定义如下:
for i in range(self.stacked_convs):
chn = int(self.feat_channels / 8) if i == 0 else self.feat_channels
self.reg_convs.append(
ConvModule(
self.feat_channels,
self.feat_channels,
3,
stride=1,
padding=1,
conv_cfg=self.conv_cfg,
norm_cfg=self.norm_cfg))
self.cls_convs.append(
ConvModule(
chn,
self.feat_channels,
3,
stride=1,
padding=1,
conv_cfg=self.conv_cfg,
norm_cfg=self.norm_cfg))
cls_convs的定义:
reg_convs的定义:
最后得到的结果:

 cls_score = self.odm_cls(cls_feat)
 bbox_pred = self.odm_reg(reg_feat)
 return cls_score, bbox_pred

其中odm_cls和odm_reg定义如下:

self.odm_cls = nn.Conv2d(
            self.feat_channels,
            self.num_anchors * self.cls_out_channels,
            3,
            padding=1)
self.odm_reg = nn.Conv2d(
     self.feat_channels, self.num_anchors * 5, 3, padding=1)


2.1.1 ORConv2d类的代码(orconv.py)

可以看到主要的函数是self.rotate_arf()
def rotate_arf(self):
    """Build active rotating filter module."""
    return active_rotated_filter(self.weight, self.indices)

def forward(ctx, input: torch.Tensor,
                indices: torch.Tensor) -> torch.Tensor:
        """
        Args:
            input (torch.Tensor): Input features with shape
                [num_output_planes, num_input_planes, num_orientations, H, W].
            indices (torch.Tensor): Indices with shape
                [num_orientations, H, W, num_rotations].

        Returns:
            torch.Tensor: Refined features with shape [num_output_planes *
            num_rotations, num_input_planes * num_orientations, H, W].
        """
        ctx.save_for_backward(input, indices)
        op, ip, o, h, w = input.size()
        o, h, w, r = indices.size()
        output = input.new_zeros((op * r, ip * o, h, w))
        ext_module.active_rotated_filter_forward(input, indices, output)

        return output

self.weight:

self.indices:

而self.indices又是根据get_indices函数得到的
 def get_indices(self):
     """Get the indices of ORConv2d."""
     kernel_indices = {
         1: {
             0: (1, ),
             45: (1, ),
             90: (1, ),
             135: (1, ),
             180: (1, ),
             225: (1, ),
             270: (1, ),
             315: (1, )
         },
         3: {
             0: (1, 2, 3, 4, 5, 6, 7, 8, 9),
             45: (2, 3, 6, 1, 5, 9, 4, 7, 8),
             90: (3, 6, 9, 2, 5, 8, 1, 4, 7),
             135: (6, 9, 8, 3, 5, 7, 2, 1, 4),
             180: (9, 8, 7, 6, 5, 4, 3, 2, 1),
             225: (8, 7, 4, 9, 5, 1, 6, 3, 2),
             270: (7, 4, 1, 8, 5, 2, 9, 6, 3),
             315: (4, 1, 2, 7, 5, 3, 8, 9, 6)
         }
     }
     delta_orientation = 360 / self.nOrientation
     delta_rotation = 360 / self.nRotation
     kH, kW = self.kernel_size
     indices = torch.IntTensor(self.nOrientation * kH * kW, self.nRotation)
     for i in range(0, self.nOrientation):
         for j in range(0, kH * kW):
             for k in range(0, self.nRotation):
                 angle = delta_rotation * k
                 layer = (i + math.floor(
                     angle / delta_orientation)) % self.nOrientation
                 kernel = kernel_indices[kW][angle][j]
                 indices[i * kH * kW + j, k] = int(layer * kH * kW + kernel)
     return indices.view(self.nOrientation, kH, kW, self.nRotation)

外层循环遍历所有的方向(1)
	中层循环遍历卷积核中的每个位置,kH 和 kW 分别表示卷积核的高度和宽度(9)
		内层循环遍历所有的旋转角度(8):
				计算当前旋转角度的实际数值  delta_rotation(45) * k
				根据当前方向和旋转角度计算出所在的方向层
				根据卷积核大小、旋转角度和位置索引,从预定义的 kernel_indices 字典中获取对应的卷积核索引值
				将计算得到的方向层和卷积核索引值存储到索引矩阵 indices 中的对应位置

2.2 ODM的loss的代码(rotated_anchor_head.py)
同1.5


 1271
1271

 被折叠的 条评论
为什么被折叠?
被折叠的 条评论
为什么被折叠?
 到【灌水乐园】发言


