


一、定义
Canvas:canvas是一个可以使用Javascript在其中绘制图像的HTML元素(行内元素)
二、使用(超过画布的内容不显示)
<canvas id="canvas1" width="300px" height="300px">					//创建标签
	你的浏览器不支持canvas!			//如果是IE8及其以下的识别不了就给出提示,能识别就不会显示
</canvas>
<script type="text/javascript">			//利用脚本画图
	let ctx=$('#canvas1').get(0).getContext('2d');	//获得canvas的上下文(即画笔),在getContxt()里面必须有参数2d(但现在还没有3d,开发者说以后会出来),且要用原生js
	ctx.fillRect(50,50,100,50);			//画图(画了个矩形,参数为左上角的x,y坐标,矩形的宽高)
</script>
注意:1、canvas的默认尺寸是300*150
2、canvas画布的宽高需要在行内样式设置;也可以在Javascript里面设置(如canvas.width=100; canvas.height=100;但不能通过canvas.style.width或者canvas.style.height来设置),但也是不能内部样式中设置就会缩放画布,就不会起到扩大画布的效果还会造成模糊
三、canvas的一些基本图形绘制
1、矩形(唯一一个可以直接绘制的形状)
<canvas id="canvas">
	你的浏览器不支持
</canvas>
<script type="text/javascript">
    let canvas=$('#canvas').get(0);
    let ctx=canvas.getContext('2d');
    canvas.width=300;
    canvas.height=300;
    /*
    * 绘制一个填充矩形   fillRect()
    * 绘制一个描边矩形   strokeRect()
    * 清除一个矩形形状的区域   clearRect()
    * */
    ctx.fillRect(50,50,50,50);
    ctx.strokeRect(100,100,50,50);
    ctx.clearRect(75,75,25,25);
<script>
2、路径(一个路径不会显示出来,需要描边和填充的配合)
a)、矩形路径
/*
* 绘制一个矩形路径,没有填充和描边   rect()
* fill()填充                stroke()描边
* */
ctx.beginPath();				//路径开始
ctx.rect(75,75,25,25);			//绘制矩形路径
ctx.stroke();					//描边
ctx.closePath();				//路径闭合
b)、直线路径
/*
* 绘制一条直线   moveTo():起点          lineTo():终点
* */
ctx.beginPath();
ctx.moveTo(200,100);					//起点,直线是默认的两像素的宽
ctx.lineTo(100,200);					//终点
ctx.moveTo(50,200.5);					//起点,宽1像素
ctx.lineTo(150,200.5);					//终点
ctx.stroke();
ctx.closePath();
注意:这里的直线颜色默认会有一点虚

c)、三角形路径
/*
* 绘制三条直线   moveTo():起点          lineTo():终点
* */
ctx.beginPath();
ctx.moveTo(50,100);
ctx.lineTo(150,100);
ctx.lineTo(100,200);
ctx.lineTo(50,100);
ctx.stroke();
ctx.closePath();
d)、圆和圆弧
/*
* 绘制圆弧、圆   arc(圆心x,圆心y,半径,起始角度,结束角度,旋转方向);
* 旋转方向取值:true(逆时针)|false(默认,顺时针)
* */
ctx.beginPath();
ctx.arc(150,150,100,Math.PI/2,Math.PI,false);
ctx.fill();
ctx.closePath();
3、绘制文本(处理文本能力很弱)
/*
* font                  字体的样式(有一定的顺序 斜体-大小-字体)
* textAlign             文本对齐方式(以起始点做为参考),取值left|center|right|start|end
* fillText("文本",起始x,起始y,宽度)        填充字体,这里的宽度是只能压缩不能放大(不写是默认大小)
* strokeText("文本",起始x,起始y,宽度)      描边字体,同上
* */
ctx.font='italic 50px Arial';
ctx.textAlign='end';
ctx.fillText('Hi,there!',100,50);
4、绘制图片
/*
* let img=new Image();                      ①、创建对象,获取图片
* img.src='../images/image03.jpg';
* img.addEventListener('load',function () { ②、当图片加载完成开始绘制
*     ……………………      ③、绘制图片有三种类型
*                       =>绘制默认大小的图片:ctx.drawImage(图片,起始x,起始y)
*                       =>绘制经过缩放的图片:ctx.drawImage(图片,起始x,起始y,缩放后的宽,缩放后的高)
*                       =>绘制经过切片的图片:ctx.drawImage(图片,sx,sy,sw,sh,dx,dy,dw,dh)
*                                           s ==> 原始图片资源        d ==> 画布
* });
* */
let img=new Image();
img.src='../images/image03.jpg';
img.addEventListener('load',function () {
    ctx.drawImage(img,100,100,100,100,50,50,200,200);
    //先把原图片切片之后,在放在画布上面去具体操作
})
5、视频绘制
视频绘制其实就是视频一帧一帧的绘制,在利用定时器显示出来
6、canvas内容样式设置
a)、颜色
/*
* fillStyle         填充颜色,取值与在css里面相同
* strokeStyle       描边颜色,同上
* */
ctx.fillStyle='rgba(150,50,50,.5)';		//设置颜色
ctx.beginPath();
ctx.arc(100,100,50,Math.PI/2,Math.PI*2,true);
ctx.fill();					//开始填充
ctx.closePath();
b)、透明度
/*
* globalAlpha         透明度,取值0~1
* */
ctx.strokeStyle='#ccc';				//设置颜色
ctx.globalAlpha=.6;					//设置透明度
ctx.beginPath();
ctx.moveTo(50,100);
ctx.lineTo(50,200);
ctx.stroke();						//开始描边
ctx.closePath();
c)、线形设置
/*
* 线宽:lineWidth 取值0~正无穷
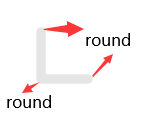
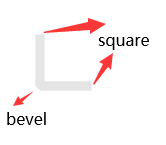
* 线两端样式:lineCap 取值butt(默认值,方的)|round(圆的)|square(方的,但是会比butt宽一点)
* 线拼接样式:lineJoin 取值miter(默认值,方的)|round(圆的)|bevel(带棱角的)
* */
ctx.strokeStyle='#ccc'; //颜色
ctx.globalAlpha=.5; //透明度
ctx.lineWidth=10; //线宽
ctx.lineCap='round'; //线两端
ctx.lineJoin='miter'; //线连接方式
ctx.beginPath();
ctx.moveTo(50,50);
ctx.lineTo(50,100);
ctx.lineTo(100,100);
ctx.stroke();
ctx.closePath();

e)、线性渐变
/*
* createLinearGradient(渐变起始x,渐变起始y,渐变终止x,渐变终止y)创建渐变
* addColorStop(位置,颜色)开始设置渐变,位置取值为0~1
* fillStyle添加渐变
* */
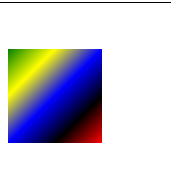
let linearGradient=ctx.createLinearGradient(50,50,150,150);
linearGradient.addColorStop(0,'green');
linearGradient.addColorStop(.25,'yellow');
linearGradient.addColorStop(.5,'blue');
linearGradient.addColorStop(.75,'black');
linearGradient.addColorStop(1,'red');
ctx.fillStyle=linearGradient;
ctx.beginPath();
ctx.rect(50,50,100,100);
ctx.fill();
ctx.closePath();
f)、阴影
/*
* shadowOffsetX x方向的阴影
* shadowOffsetY y方向的阴影
* shadowBlur 模糊程度,取值0~正无穷
* shadowColor 阴影颜色
* */
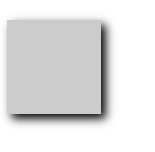
ctx.fillStyle='#ccc';
ctx.shadowOffsetX=5;
ctx.shadowOffsetY=5;
ctx.shadowBlur=10;
ctx.shadowColor='black';
ctx.beginPath();
ctx.rect(50,50,100,100);
ctx.fill();
ctx.closePath();
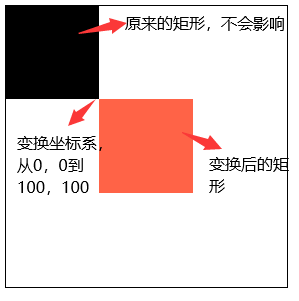
g)、变换translate()、rotate()、scale()
注意变换不会影响原有的内容,但会影响坐标,所以需要在变换之后再返回原来的坐标
translate()
/*
* 坐标系变换:translate(x,y)       把坐标系的原点变换到x,y处
* */
ctx.fillRect(0,0,100,100);             //不会影响变换之前的内容
ctx.save();								//保存原来的坐标
ctx.translate(100,100);                 //坐标系变换
ctx.fillStyle='tomato';
ctx.fillRect(0,0,100,100);
ctx.restore();							//恢复原来的坐标
rotate()
/*
* 旋转:rotate(angle)       以坐标系的原点旋转angle度
* */
ctx.save();                                 //保存原来的坐标系
ctx.rotate(20*Math.PI/180);                 //开始坐标系旋转
ctx.fillStyle='tomato';
ctx.fillRect(100,100,10,10);
ctx.restore();                              //坐标系恢复
ctx.fillRect(110,110,20,20);

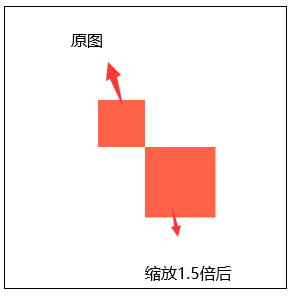
scale()
/*
* 缩放:scale(x,y)       整个坐标系下的x,y缩放
* */
ctx.save();                                 //保存原来的坐标系
ctx.scale(1.5,1.5);                 //开始坐标系缩放
ctx.fillStyle='tomato';
ctx.fillRect(100,100,50,50);
ctx.restore();                              //坐标系恢复
h)、动画
原理:先定义一个初始状态,然后在定义一个定时器,定时器内部执行一个回调函数,记得要在函数内对当前的画面清除,然后在函数内重新绘制要变化的效果,由于肉眼会有视觉停留,所以有动画效果
let timer=setInterval(function () {
	ctx.clearRect(0,0,300,300);				//每次清除画布
	ctx.save();
    ctx.fillStyle='#'+Math.floor(Math.random()*256);
    ctx.beginPath();
    ctx.arc(Math.random()*200+50,Math.random()*200+50,Math.random()*50,0,Math.PI*2);
    ctx.fill();
    ctx.closePath();
    ctx.restore();
},100)
本文只用于个人学习和记录


 332
332


 被折叠的 条评论
为什么被折叠?
被折叠的 条评论
为什么被折叠?
 到【灌水乐园】发言


