


介绍:开发的结构是通过调用.dll的库文件实现控制灯的亮度调节。
工程文件两个,一个是工程光源控制器的功能实现,另一个是调用库文件的。
调用库文件工程
可以直接创建一个工程项目,或者随便创建一个QWidget、QMainwindow工程都可以。
调用库文件的开发需要一个纯虚函数类。没有纯虚函数类是没有办法调用实现接口功能的函数的。
#ifndef IUART_LIGHT_H
#define IUART_LIGHT_H
#include<QWidget>
#include<QObject>
//interfacelight.h头文件命名

#define QTPLUGIN_INTERFACELIGHT_IID "spi.plugin.interface.interfacelight"

class InterfaceLight
{
public:
    virtual void ConterLightOpenConnection()=0;//连接灯的接口
    virtual void SendDataToLight()=0;//指令发送数据
    virtual void ReciveDataFromLight()=0;//接收灯控制器返回的数据信息
    virtual QWidget  *CreateWidget()=0;//控制窗口
};

//定义了接口ID查找函数和几个QObject到接口的转换函数:
Q_DECLARE_INTERFACE(InterfaceLight , QTPLUGIN_INTERFACELIGHT_IID)

#endif // IUART_LIGHT_H
cpp代码:
#include "mainwindow.h"
#include <QApplication>
#include <QPluginLoader>
#include<QWidget>
#include<QDebug>
#include"interfacelight.h"//纯虚函数头文件

int main(int argc, char *argv[])
{
    QApplication a(argc, argv);

    QPluginLoader loader("InheritInterface.dll");
    if(loader.load())
    {qDebug()<<loader.load();
        QObject * plugin = loader.instance();/*返回插件的根组件对象。
 必要时加载插件。如果无法加载插件或无法实例化根组件对象,则该函数返回 nullptr。如果根组件对象被销毁,则调用此函数会创建一个新实例。该函数返回的根组件在 QPluginLoader 销毁时不会被删除。 如果要确保删除根组件,则应在不再需要访问核心组件时立即调用 unload()。 当库最终卸载时,根组件将自动删除。组件对象是一个 QObject。
     使用 qobject_cast() 可将其转成所需的对象。*/
        qDebug() << &plugin;
        if(&plugin)
        {
            //qobject_cast 向下转型的作用。
            InterfaceLight *process = qobject_cast<InterfaceLight *>(plugin);
            qDebug()<<process;
            //process->setParent(ui->ExamStackedWidget->widget(1));
            process->CreateWidget()->show();
            // return a.exec();
        }
    }
    else
    {
        qDebug()<<loader.errorString();
    }

    return a.exec();
}
实现光源控制器的工程
同样也需要包含一个纯虚类的.h文件,这里就不在显示了。加载到工程里面即可。
再创建一个C++ h/cpp的类,此类需要继承上述的纯虚函数类。
.h代码:
#ifndef INHERITINTERFACE_H
#define INHERITINTERFACE_H

#include "inheritinterface_global.h"
#include "interfacelight.h"
#include<QSerialPort>

//#include "ui_qwidgetform.h"
#include "test.h"

class test;

class INHERITINTERFACESHARED_EXPORT InheritInterface : public QObject,public InterfaceLight
{
    Q_OBJECT

    Q_INTERFACES(InterfaceLight)

    Q_PLUGIN_METADATA(IID QTPLUGIN_INTERFACELIGHT_IID)

public slots:
    void ConterLightOpenConnection();//连接灯的接口
    void SendDataToLight();//指令发送数据
    void ReciveDataFromLight();//接收灯控制器返回的数据信息
    QWidget  *CreateWidget();//控制窗口

    void serach();
public:
    QSerialPort serial;

    bool sendASCII;
    bool recvASCII;
    bool display;

public:

    InheritInterface();

    test *m_test;
};

#endif // INHERITINTERFACE_H
.cpp代码:
#include "inheritinterface.h"
#include"ui_test.h"
#include<QDebug>
#include<QSerialPort>
#include<QSerialPortInfo>
#include<QApplication>
#include<QList>
#include <QRadioButton>

InheritInterface::InheritInterface()
{
    m_test =new test();

    bool radi = m_test->ui->rb->isChecked();

    QList<QString> li;
    for(int i = 0 ; i <= 255 ; i++)
    {
        if( i == 0)
            li.append("None");
        if( i%2 == 0)
            li.append(QString::number(i));
//        m_test->ui->cl1->addItems(i);
//        m_test->ui->cl2->addItems(i);
//        m_test->ui->cl3->addItems(i);
//        m_test->ui->cl4->addItems(i);
    }
    m_test->ui->cl1->addItems(li);
    m_test->ui->cl2->addItems(li);
    m_test->ui->cl3->addItems(li);
    m_test->ui->cl4->addItems(li);

    connect(&serial,&QSerialPort::readyRead,this,&InheritInterface::ReciveDataFromLight);

    connect(m_test->ui->pushButton_serach,SIGNAL(clicked()),this,SLOT(serach()));

    connect(m_test->ui->pushButton,SIGNAL(clicked()),this,SLOT(ConterLightOpenConnection()));

    connect(m_test->ui->pushButton_send,SIGNAL(clicked(bool)),this,SLOT(SendDataToLight()));

}

void InheritInterface::serach()
{
    m_test->ui->comboBox->clear();
    foreach (QSerialPortInfo avaiablePort, QSerialPortInfo::availablePorts()) {
        qDebug() << avaiablePort.portName();
        m_test->ui-> comboBox->addItem(avaiablePort.portName());
    }

    if(m_test->ui->comboBox_rate->currentText() == NULL || m_test->ui->comboBox_rate->currentText() == "")
    {
        QStringList list;
        list<< "19200" ;
        m_test->ui -> comboBox_rate->addItems(list);
        m_test->ui->comboBox_cheak->addItem("None");
        m_test->ui->comboBox_data->addItem("8");
        m_test->ui->comboBox_stop->addItem("1");
        m_test->ui->comboBox_control->addItem("None");
    }
}

void InheritInterface::ConterLightOpenConnection()//连接灯的接口
{
    if(m_test->ui ->pushButton->text()== "open")
    {
        //端口名
        qDebug() << m_test->ui->comboBox->currentText();
        serial.setPortName(m_test->ui->comboBox->currentText());
        //端口率
        qDebug() <<m_test->ui->comboBox_rate->currentText().toInt();
        serial.setBaudRate(m_test->ui->comboBox_rate->currentText().toInt());

        //效验位
        switch (m_test->ui->comboBox_cheak -> currentIndex()){
        case 0: serial.setParity(QSerialPort::NoParity);
            qDebug() <<m_test->ui->comboBox_cheak -> currentIndex();break;
        default: serial.setParity(QSerialPort::UnknownParity); break;
        }
        //数据位
        switch (m_test->ui->comboBox_data->currentText().toInt()){

        case 8: serial.setDataBits(QSerialPort::Data8);
            qDebug() <<m_test->ui->comboBox_data->currentText().toInt();break;
        default: serial.setDataBits(QSerialPort::UnknownDataBits); break;
        }
        //停止位
        switch (m_test->ui->comboBox_stop->currentIndex()){

        case 0: serial.setStopBits(QSerialPort::OneStop);
            qDebug() <<m_test->ui->comboBox_stop->currentIndex();break;
        default: serial.setStopBits(QSerialPort::UnknownStopBits); break;
        }
        serial.setFlowControl(QSerialPort::NoFlowControl);

        if(serial.open(QIODevice::ReadWrite))
        {
            m_test->ui->pushButton_serach -> setEnabled(false);
            m_test->ui->comboBox-> setEnabled(false);
            m_test->ui->comboBox_rate -> setEnabled(false);
            m_test->ui->comboBox_cheak -> setEnabled(false);
            m_test->ui->comboBox_data -> setEnabled(false);
            m_test->ui->comboBox_stop-> setEnabled(false);
            m_test->ui->pushButton -> setText("close");
            //QSerialPortInfo serialInfo(serial);
            QSerialPortInfo serialInfo(serial);
        }else {

        }
    }
    else
    {
        serial.close();
        m_test->ui->pushButton_serach -> setEnabled(true);
        m_test->ui->comboBox -> setEnabled(true);
        m_test->ui->comboBox_rate -> setEnabled(true);
        m_test->ui->comboBox_cheak -> setEnabled(true);
        m_test->ui->comboBox_data -> setEnabled(true);
        m_test->ui->comboBox_stop -> setEnabled(true);
        m_test->ui->pushButton -> setText("open");
    }
}
void InheritInterface::SendDataToLight()//指令发送数据
{
    QByteArray sendData;
    sendASCII = true;
    bool rad = true;
    if(rad)
    {
        QString s = "";
        if(m_test->ui->cl1->currentText() != "None")
        {
            s += "L0=";
            QString l1 = m_test->ui->cl1->currentText();
            s += l1;
        }
        if(m_test->ui->cl2->currentText() != "None")
        {
            s += ",L1=";
            QString l2 = m_test->ui->cl2->currentText();
            s += l2;
        }
        if(m_test->ui->cl3->currentText() != "None")
        {
            s += ",L2=";
            QString l3 = m_test->ui->cl3->currentText();
            s += l3;
        }
        if(m_test->ui->cl4->currentText() != "None")
        {
            s += ",L3=";
            QString l4 = m_test->ui->cl4->currentText();
            s += l4;
        }

        if(m_test->ui->cl1->currentText() == "None"&&m_test->ui->cl2->currentText() == "None"
                &&m_test->ui->cl3->currentText() == "None"&&m_test->ui->cl4->currentText()== "None")
            s = "L0=0,L1=0,L2=0,L3=0";

        if(s != "" )
        {
            if(s.startsWith(","))
            {
                s = s.replace(",","");
            }
            QString S_send = QString("$%1#").arg(s);
            m_test -> ui -> textEdit->setText(S_send);
        }

        if(sendASCII)
        {
            sendData = m_test -> ui -> textEdit -> toPlainText().toLatin1();  //直接发ASCII码
            qDebug() << &sendData;
        }else{
            sendData = QByteArray::fromHex(m_test -> ui -> textEdit -> toPlainText().toLatin1());  //发送HEX
        }
    }
    else
    {
        if(sendASCII)
        {
            sendData = m_test -> ui -> textEdit -> toPlainText().toLatin1();  //直接发ASCII码
        }else{
            sendData = QByteArray::fromHex(m_test -> ui -> textEdit -> toPlainText().toLatin1());  //发送HEX
        }
    }

    qDebug() << &sendData;
    //发送数据
    serial.write(sendData);
}
void InheritInterface::ReciveDataFromLight()//接收灯控制器返回的数据信息
{
    QByteArray recvData = serial.readAll();

    QString newData;
    if(true)
        newData = QString(recvData);
    else
        newData = QString(recvData.toHex(' '));

    if(display=1)
    {
        m_test -> ui -> textBrowser -> append(newData);
    }
}
QWidget  *InheritInterface::CreateWidget()//控制窗口
{
    return m_test;
}
有了上诉的两个文件就完成了光源控制器的调节光源的功能了。
下面就是UI界面的工程,直接创建一个空的ui界面类,显示大概是这样:
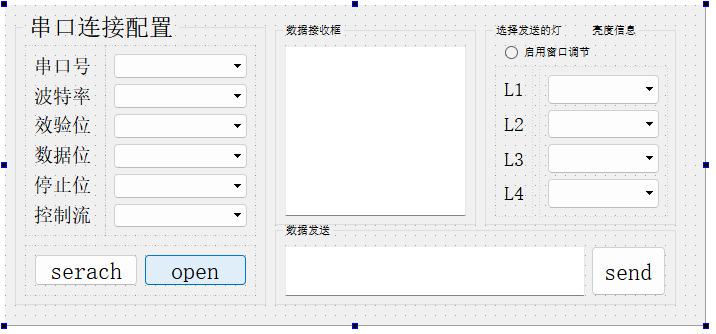
UI的.h文件
主要就是把私有化的ui控件放到公有化里面,然后通过公有化控件使得之前创建的cpp文件可以调用这个ui上的各种控件信息。
#ifndef TEST_H
#define TEST_H

#include <QWidget>
//#include"inheritinterface.h"

//class InheritInterface;

namespace Ui {
class test;
}


class test : public QWidget
{
    Q_OBJECT

public:
    explicit test(QWidget *parent = 0);
    ~test();

    Ui::test *ui;//公有化ui界面----------------------1

private slots:
    void pushButton_serach_click();

    void pushButton_open_click();

private:
    //InheritInterface* iffa;
};

#endif // TEST_H
.cpp文件
#include "test.h"
#include "ui_test.h"
#include"inheritinterface.h"
#include<QSerialPortInfo>
#include <QDebug>

test::test(QWidget *parent) :
    QWidget(parent),
    ui(new Ui::test)
{
    ui->setupUi(this);

}

void test::pushButton_serach_click()
{

}

void test::pushButton_open_click()
{

}

test::~test()
{
    delete ui;
}
最后,本文仅献给自己学习的记录,这次让自己学到了一个完整的qt插件化的开发模式。
总结几点:
插件化的开发,首先需要一个纯虚函数类,此类包含了各种的功能以及界面的调用。
Qt 插件接口的宏定义,QTPLUGIN_INTERFACELIGHT_IID——接口的ID、Q_DECLARE_INTERFACE——接口的声明、Q_INTERFACES——接口、Q_PLUGIN_METADATA——接口的元数据
其他控制界面类的控件步骤:
界面类公有化public: Ui::test *test;
在继承类中声明一个ui界面类,然后再cpp中实例化这个指针。通过这个指针来控制ui上面的控件。
通过信号槽的方式连接控件调用函数,注意手动使用connect时控件的slots不能够以on_XXXXXX_click()的方式,因为这是个默认的ui转到槽的命名,手动会报错。


 5175
5175

 被折叠的 条评论
为什么被折叠?
被折叠的 条评论
为什么被折叠?
 到【灌水乐园】发言


