


本人工作中接触到gstreamer音视频框架,发现本框架的强大程度超过想象。关于本框架的部署与简介不多赘述,可参考下列官方发布网站:
https://gstreamer.freedesktop.org/documentation/xvimagesink/index.html?gi-language=c
https://thiblahute.github.io/GStreamer-doc/index.html?gi-language=c
本系列文章仅作为工作闲暇之余的记录,为自己留一个存档方便日后回忆与跳槽,如有写的不够好的地方烦请谅解,也欢迎交流技术。
以下所有调试均基于Linux平台,发行版为Ubuntu22.04LTS,安装于VMware虚拟机。部署的开发板基于i.MX8MMini-evk。
(1)基本概念
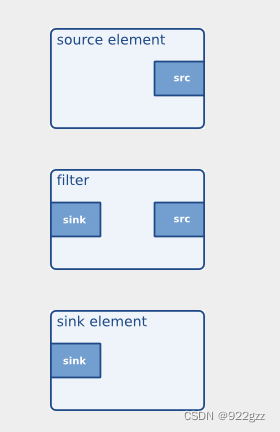
gstreamer构建的是音视频pipeline,通俗点说,就是把“source”,例如v4l2src调用的webcam中的数据,通过一系列操作导向指定的“sink“。gstreamer具有command line直接构建,与通过glibc的相关api编写c语言程序并编译执行两种构建pipeline的方式。pipeline由各种不同功能的element组成,各个element间的连接方式为source to sink,以下图示来自官网。
(2)基本调试
虚拟机端:
gst-launch-1.0 videotestsrc ! videoconvert ! autovideosink
gst-launch-1.0 videotestsrc ! videoconvert ! xvimagesink
gst-launch-1.0 videotestsrc ! videoconvert ! waylandsink
值得注意的是,autovideosink实现原理是扫描带有"sink"与"video"的element直到找到合适的sink。
在gst-launch-1.0后添加-v以获取各个组件的状态信息。下列是官网提供的文档:
gst-launch-1.0 accepts the following options:
--help
Print help synopsis and available FLAGS
-v, --verbose
Output status information and property notifications
-q, --quiet
Do not print any progress information
-m, --messages
Output messages posted on the pipeline's bus
-t, --tags
Output tags (also known as metadata)
-o FILE, --output=FILE
Save XML representation of pipeline to FILE and exit
-f, --no_fault
Do not install a fault handler
-T, --trace
Print memory allocation traces. The feature must be enabled at compile time to work.

可以看到,autovideosink自动匹配了xvimagesink,本次测试时的Ubuntu桌面环境变量为X11。如果切换为Wayland桌面环境,需要切换waylandsink
(3)gstreamer的helloworld
gstreamer最强大的功能在于,能通过先利用command line建立pipeline,验证功能再通过极其完备与复杂的api将pipeline功能集成进c语言文件。我们测试以下pipeline:
gst-launch-1.0 videotestsrc ! videoconvert ! xvimagesink
#include <gst/gst.h>

int main(int argc, char *argv[]) {
  GstElement *pipeline;
  GstBus *bus;
  GstMessage *msg;

  /* Initialize GStreamer */
  gst_init (&argc, &argv);

  /* Build the pipeline */
  pipeline = gst_parse_launch ("playbin videotestsrc ! videoconvert ! xvimagesink", NULL);

  /* Start playing */
  gst_element_set_state (pipeline, GST_STATE_PLAYING);

  /* Wait until error or EOS */
  bus = gst_element_get_bus (pipeline);
  msg = gst_bus_timed_pop_filtered (bus, GST_CLOCK_TIME_NONE, GST_MESSAGE_ERROR | GST_MESSAGE_EOS);

  /* Free resources */
  if (msg != NULL)
    gst_message_unref (msg);
  gst_object_unref (bus);
  gst_element_set_state (pipeline, GST_STATE_NULL);
  gst_object_unref (pipeline);
  return 0;
}通过gcc编译:gcc hello.c -o hello `pkg-config --cflags --libs gstreamer-1.0`
*小tips:强烈建议通过编写Makefile管理编译过程。
编译通过,执行可执行文件,运行结果与命令行相同。值得注意的是,c文件在设置pipeline的播放状态为playing之后,需要进入循环来保持进程不退出。官方文档推荐做法是通过循环查找总线的信息,一旦出现GST_MESSAGE_ERROR | GST_MESSAGE_EOS两个事件之一即退出循环,释放资源防止阻塞。比较建议跟随官方教程的写法,保证代码的debug信息完整。实际上测试中发现while(1)可以起到相同的效果,glib也提供了相关api:g_main_loop_run (loop);
(4)小结
至此我们已经掌握了gstreamer最基本的概念并且编写了helloworld的c文件,构建了简单命令行pipeline。具体的各种element用法,相关api可以参照官方文档。强烈建议观看官网的所有教程文件并进行验证,以进一步学习。


 486
486

 被折叠的 条评论
为什么被折叠?
被折叠的 条评论
为什么被折叠?
 到【灌水乐园】发言


