


之前已经介绍过,在FLGo框架中实现横向联邦学习主要有以下5步
①服务器采样客户端: Server.sample
② 服务器广播模型: Server.pack & Client.unpack
③ 客户端本地训练: Client.train
④ 客户端上传: Client.pack & Server.unpack
⑤ 模型聚合: Server.aggregate()
这5步分别进行封装可以根据自己算法设计的需要对流程中的某一部分进行修改,在本节介绍的主要是自己定义第③步:客户端本地训练: Client.train
1. 模型介绍: FedProx
在这一部分,我们将以FedProx为例,介绍如何在FLGo框架中自己实现本地训练的方法。FedProx 是 Li Tian 在2018 发表在 MLSys2020上的一篇paper,它改进了传统的FedAVG算法,解决了联邦学习中的数据异质性和模型异质性问题。
- 采样& 聚合: 采用按照本地数据集大小比例进行采样, 并直接平均聚合(无加权)来获得无偏梯度估计
- 本地训练阶段:
在原来的本地目标函数上添加了一个近端项
L ′ = L + μ 2 ∥ w k , i t − w g l o b a l t ∥ 2 2 L'=L+\frac{\mu}{2}\|w_{k,i}^t-w_{global}^t\|_2^2 L′=L+2μ∥wk,it−wglobalt∥22
其中 k k k表示第 k k kth 个客户端, t t t表示通信轮次, i i i表示第 i i i轮本地训练迭代, μ \mu μ是FedProx的一个超参数。
2 使用FLGo实现算法
在代码中我们已经实现了MD采样和平均聚合方式,所以在本部分只要实现本地训练过程即可,在提供的代码中也实现了这一过程flgo.algorithm.fedprox
2.1 添加超参数
所有的横向联邦中的超参数都在Server的initialize方法中加入,加入的方法是调用Server.init_algo_para方法,并传入超参数字典
 def init_algo_para(self, algo_para: dict):
        """
        Initialize the algorithm-dependent hyper-parameters for the server and all the clients.

        Args:
            algo_paras (dict): the dict that defines the hyper-parameters (i.e. name, value and type) for the algorithm.

        Example:
        ```python
            >>> # s is an instance of Server and s.clients are instances of Client
            >>> s.u # will raise error
            >>> [c.u for c in s.clients] # will raise errors too
            >>> s.init_algo_para({'u': 0.1})
            >>> s.u # will be 0.1
            >>> [c.u for c in s.clients] # will be [0.1, 0.1,..., 0.1]
        ```
        Note:
            Once `option['algo_para']` is not `None`, the value of the pre-defined hyperparameters will be replaced by the list of values in `option['algo_para']`,
            which requires the length of `option['algo_para']` is equal to the length of `algo_paras`
        """
        ...
algo_para字典中的一个键值对对应一个超参数的变量名和默认值,在调用这个函数后,服务器和客户端都可以通过 self.parameter_name直接访问添加的超参数。这个函数都在Server的initialize方法中调用,例如,对于fedprox来说,超参数是mu,因此只要通过该方法传入{‘mu’:0.01},Server和Client就会被添加额外的属性Server.mu和Client.mu来访问该超参数,其中0.01是默认值。
import flgo.algorithm.fedbase as fedbase
import flgo.utils.fmodule as fmodule

class Server(fedbase.BasicServer):
    def initialize(self, *args, **kwargs):
        # set hyper-parameters
        self.init_algo_para({'mu':0.01})
        # set sampling option and aggregation option
        self.sample_option = 'md'
        self.aggregation_option = 'uniform'
2.2 修改本地训练阶段
import copy
import torch

class Client(fedbase.BasicClient):
    @fmodule.with_multi_gpus
    def train(self, model):
        # record the global parameters
        src_model = copy.deepcopy(model)
        # freeze gradients on the copy of global parameters
        src_model.freeze_grad()
        # start local training
        model.train()
        optimizer = self.calculator.get_optimizer(model, lr=self.learning_rate, weight_decay=self.weight_decay, momentum=self.momentum)
        for iter in range(self.num_steps):
            # get a batch of data
            batch_data = self.get_batch_data()
            model.zero_grad()
            # compute the loss of the model on batched dataset through task-specified calculator
            loss = self.calculator.compute_loss(model, batch_data)['loss']
            # compute the proximal term
            loss_proximal = 0
            for pm, ps in zip(model.parameters(), src_model.parameters()):
                loss_proximal += torch.sum(torch.pow(pm - ps, 2))
            loss = loss + 0.5 * self.mu * loss_proximal
            loss.backward()
            optimizer.step()
        return
2.3 添加一个新的fedprox类
按照以下方式实现一个fedprox类(这部分提供的代码中没有,要自己添加到flgo.algorithm.fedprox中)
class my_fedprox:
    Server = Server
    Client = Client
3 实验
import flgo
import os
# generate federated task
task = './test_synthetic'
config = {'benchmark':{'name':'flgo.benchmark.synthetic_regression', 'para':{'alpha':0.5, 'beta':0.5, 'num_clients':30}}}
if not os.path.exists(task): flgo.gen_task(config, task_path = task)
# running methods
import flgo.algorithm.fedavg as fedavg
option = {'num_rounds':200, 'num_epochs':5, 'batch_size':10, 'learning_rate':0.1, 'gpu':0}
fedavg_runner = flgo.init(task, fedavg, option=option)
my_fedprox_runner = flgo.init(task, my_fedprox, option=option)
fedavg_runner.run()
my_fedprox_runner.run()
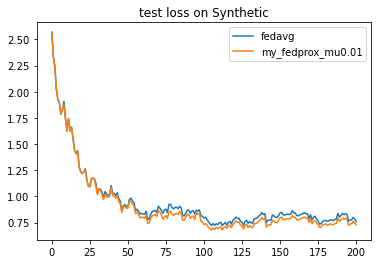
# show results
import flgo.experiment.analyzer
analysis_plan = {
'Selector':{
'task': task,
'header':['fedavg', 'my_fedprox_mu0.01'],
'filter':{'R':200}
},
'Painter':{
'Curve':[
{'args':{'x': 'communication_round', 'y':'test_loss'}, 'fig_option':{'title':'test loss on Synthetic'}},
{'args':{'x': 'communication_round', 'y':'test_accuracy'}, 'fig_option':{'title':'test accuracy on Synthetic'}},
]
}
}
flgo.experiment.analyzer.show(analysis_plan)

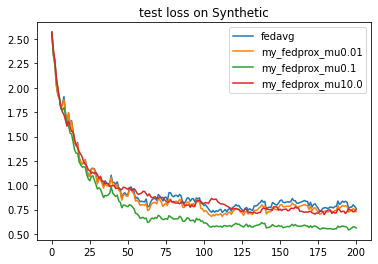
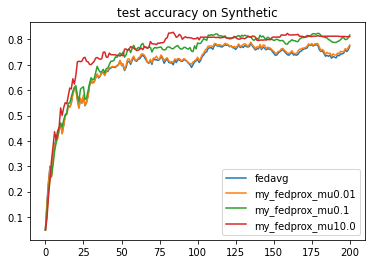
3.1 改变超参数
通过在option中改变 algo_para 的值来改变 超参数
μ
\mu
μ 的值
option01 = {'algo_para':0.1, 'num_rounds':200, 'num_epochs':5, 'batch_size':10, 'learning_rate':0.1, 'gpu':0}
option10 = {'algo_para':10.0, 'num_rounds':200, 'num_epochs':5, 'batch_size':10, 'learning_rate':0.1, 'gpu':0}
my_fedprox001_runner = flgo.init(task, my_fedprox, option=option01)
my_fedprox001_runner.run()
my_fedprox100_runner = flgo.init(task, my_fedprox, option=option10)
my_fedprox100_runner.run()
analysis_plan = {
    'Selector':{
        'task': task,
        'header':['fedavg', 'my_fedprox'],
        'filter':{'R':200}
    },
    'Painter':{
        'Curve':[
            {'args':{'x': 'communication_round', 'y':'test_loss'}, 'fig_option':{'title':'test loss on Synthetic'}},
            {'args':{'x': 'communication_round', 'y':'test_accuracy'},  'fig_option':{'title':'test accuracy on Synthetic'}},
        ]
    }
}
flgo.experiment.analyzer.show(analysis_plan)


 271
271


 被折叠的 条评论
为什么被折叠?
被折叠的 条评论
为什么被折叠?
 到【灌水乐园】发言


