


文章目录
- 74. Where to go next + Code Review Game Engine series
- 75. Entity Component System Game Engine series
- 76. Intro to EnTT (ECS) Game Engine series
- 77. Entities and Components Game Engine series
- 78. The ENTITY Class Game Engine series
- 79. Camera Systems Game Engine series
- 80. Scene Camera Game Engine series
- 81. Native Scripting Game Engine series
- 82. Native Scripting (now with virtual functions!)
- 83. Scene Hierarchy Panel Game Engine series
- 84. Properties Panel Game Engine series
- 85. Camera Component UI
- 86. Drawing Component UI
- 87. Transform Component UI
- 88. Adding Removing Entities and Components UI
- 89. Making the Hazelnut Editor Look Good!
- 90. Saving and Loading Scenes!
- 91. Open Save File Dialogs
- 92. Transformation Gizmos
- 93. Editor Camera
- 94. Multiple Render Targets and Framebuffer Refactor
- 95. Preparing Framebuffers for Mouse Picking
- 96. Clearing Framebuffer Texture Attachments + Git Branching
- 97. Mouse Picking
- 98. Clicking to Select Entities
- 99. SPIR-V and the New Shader System
- 注:
74. Where to go next + Code Review Game Engine series
75. Entity Component System Game Engine series
76. Intro to EnTT (ECS) Game Engine series
这里cherno简单介绍了一下 entt 的用法,比如:
class MeshComponent;

static void OnTransformConstruct(entt::registry& registry, entt::entity entity)
{

}

struct TransformComponent
{
    glm::mat4 Transform;

    TransformComponent() = default;
    TransformComponent(const TransformComponent&) = default;
    TransformComponent(const glm::mat4& transform)
        : Transform(transform) {}

    operator glm::mat4& () { return Transform; }
    operator const glm::mat4& () const { return Transform; }
};

entt::entity entity = m_Registry.create();
m_Registry.emplace<TransformComponent>(entity, glm::mat4(1.0f));

m_Registry.on_construct<TransformComponent>().connect<&OnTransformConstruct>();

TransformComponent& transform = m_Registry.get<TransformComponent>(entity);

auto view = m_Registry.view<TransformComponent>();
for (auto entity : view)
{
    TransformComponent& transform = view.get<TransformComponent>(entity);
}

auto group = m_Registry.group<TransformComponent>(entt::get<MeshComponent>);
for (auto entity : group)
{
    auto&[transform, mesh] = group.get<TransformComponent, MeshComponent>(entity);

    Renderer::Submit(mesh, transform);
}
而我们所需要的只不过是:#include "entt.hpp"
77. Entities and Components Game Engine series
78. The ENTITY Class Game Engine series
我们在写一个 ENTITY 类的时候,本质上在这里是对 entt 库的一个包装,包装成我们自己想要的api形式。但是我们的成员中按理不能有一个 Scene,比如不能是 Ref<Scene>,因为一个 entity 并不拥有场景,但是又需要比如场景是否存在来做判定。因此按理来说比较好的做法是弱引用之类的。不过我们这里就简单地写成一个裸指针了。
79. Camera Systems Game Engine series
80. Scene Camera Game Engine series
81. Native Scripting Game Engine series
我们希望可以做成类似这样的:
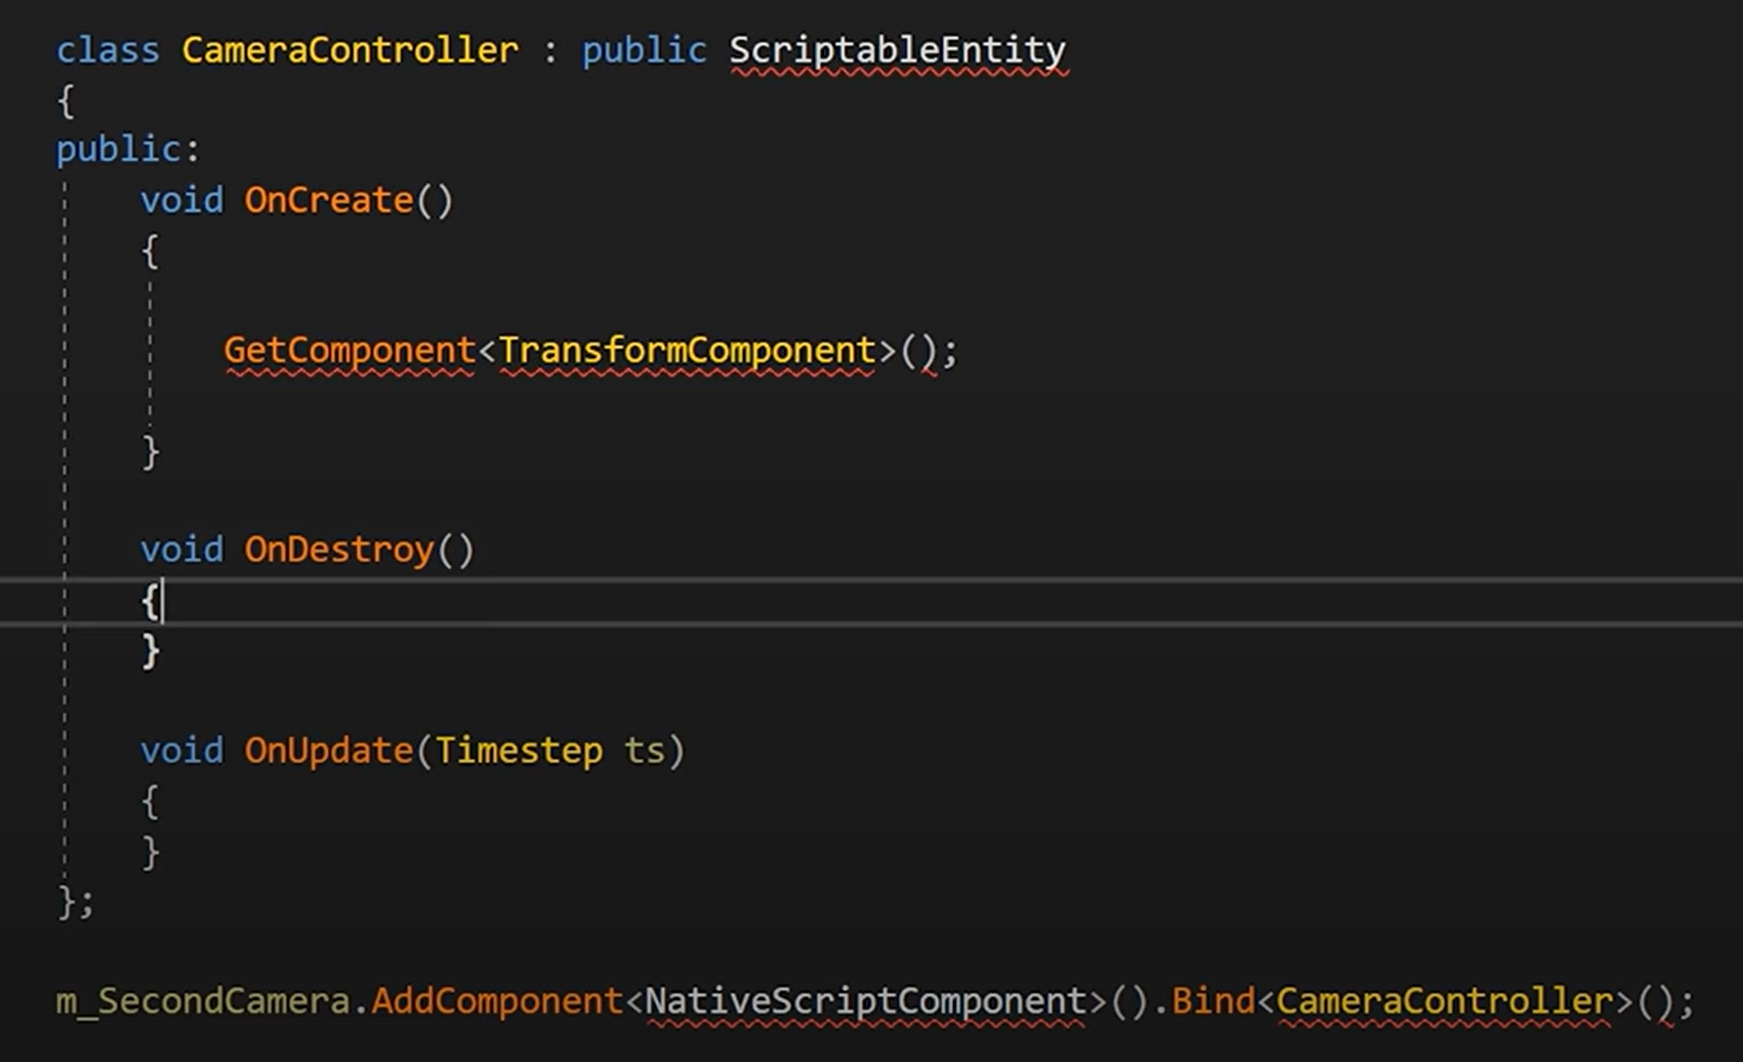
这里我们叫做 NativeScriptComponent ,因为之后想让 ScriptComponent 作为 C# 或是 lua 之类的。
82. Native Scripting (now with virtual functions!)
83. Scene Hierarchy Panel Game Engine series
这里提了一下:imgui中有一个 imgui_demo.cpp 文件,给了imgui的所有(?)用法。貌似是和 showdemowindow 对应的?可以先用 showdemowindow 找到想要的功能。
84. Properties Panel Game Engine series
85. Camera Component UI
86. Drawing Component UI
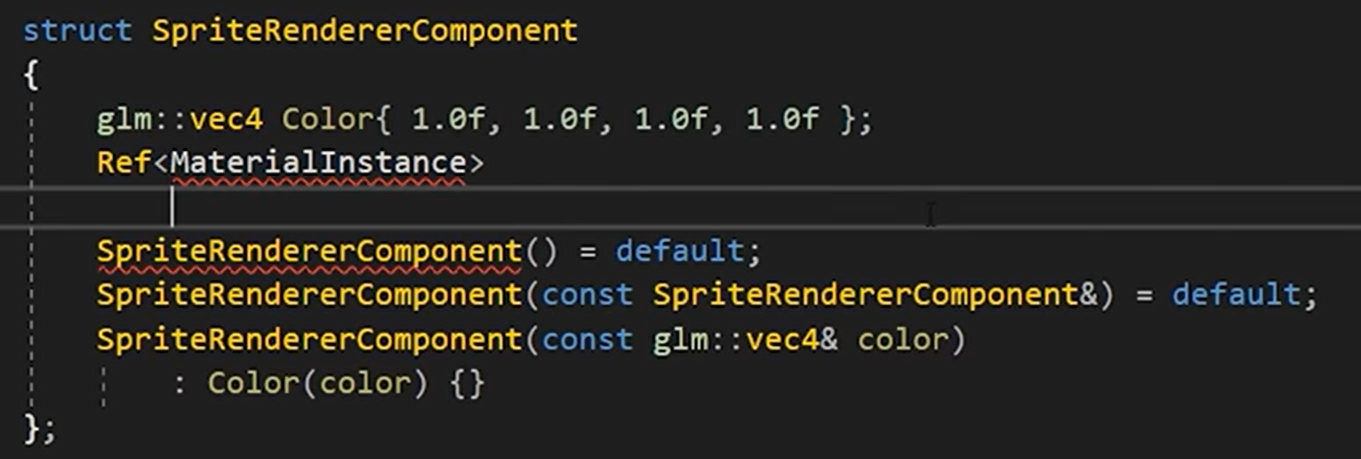
理论上我们最好有一个材质系统,比如我们的组件就可以这样:
我们现在基本上都是这样写的:
if (entity.HasComponent<SpriteRendererComponent>())
{
    if (ImGui::TreeNodeEx((void*)typeid(SpriteRendererComponent).hash_code(), ImGuiTreeNodeFlags_DefaultOpen, "Sprite Renderer"))
    {
        auto& src = entity.GetComponent<SpriteRendererComponent>();
        ImGui::ColorEdit4("Color", glm::value_ptr(src.Color));
        ImGui::TreePop();
    }
}
对于任何component都是这样去写,很重复。
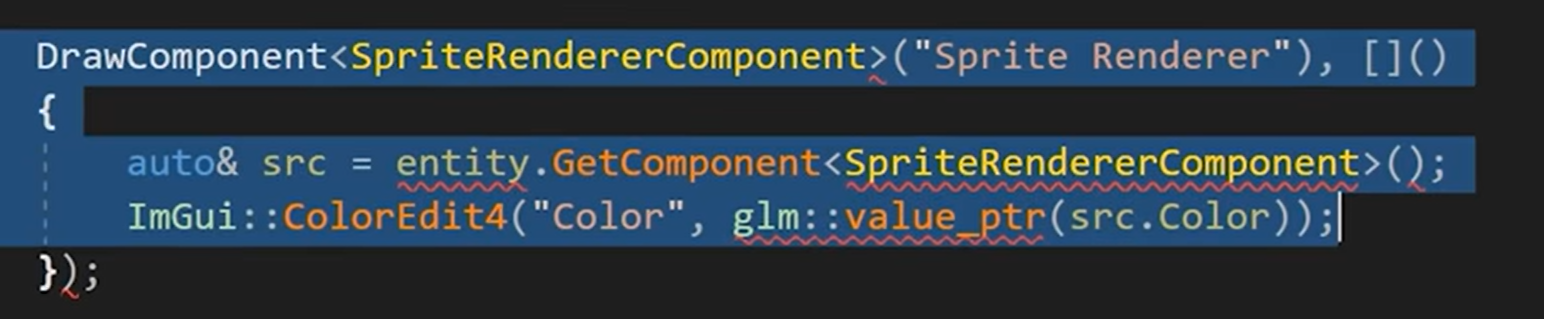
未来我们会改为一个模板的形式,每次只需要:
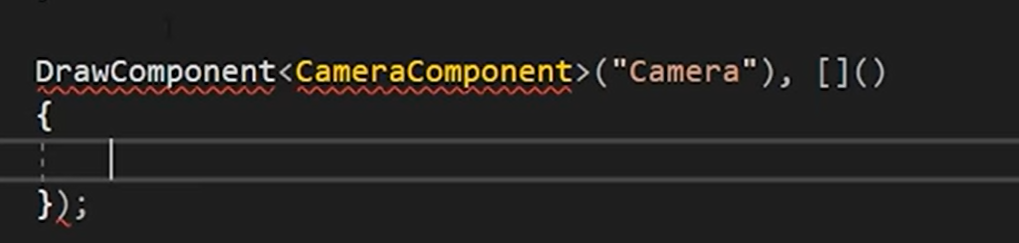
这样,给一个具体的component的模板参数,然后给一个名字,再传入一个我们自定义的lambda的ui方法。而比如上面的 SpriteRendererComponent 代码在这里的lambda函数内部就只需要写这两行:
auto& src = entity.GetComponent<SpriteRendererComponent>();
ImGui::ColorEdit4("Color", glm::value_ptr(src.Color));
87. Transform Component UI
imgui 有一个 pushid 的功能,就像不同的 namespace 一样,否则我们这样的代码ImGui::DragFloat("##X", &values.x, 0.1f);,会由于都是 ##X 而导致 translation rotation 和 scale 操作相同的 bug。
88. Adding Removing Entities and Components UI
89. Making the Hazelnut Editor Look Good!
if (ImGui::InputText("##Tag", buffer, sizeof(buffer)))
貌似 imgui 中这里的 ## 是隐藏的意思?
我们在这里这样改 docking 窗口的最小的宽度:
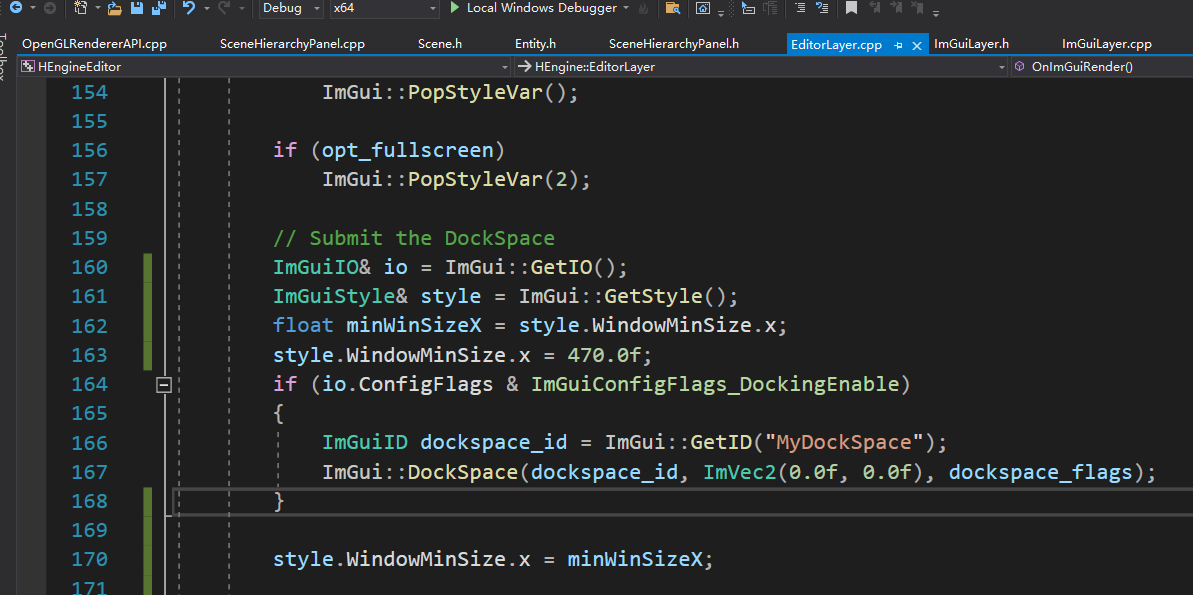
这里我设置的和 cherno 不一样,我设的是 470.0f,因为我发现我的情况只有这个值才能全装得下。
90. Saving and Loading Scenes!
这里我们希望是人可读的,所以放弃二进制,而是序列化成一个 txt 的形式。
这里我们没有选择 json 而是 yaml:
https://www.runoob.com/w3cnote/yaml-intro.html
这里注意 yaml 要使用静态库的方式,需要添加预定义 YAML_CPP_STATIC_DEFINE,这是 cherno 的yaml的premake没有做的一点。
并且还需要把这个宏加在 HEngine 的 project 里:

这里我们希望 yaml 可以重载我们的形式,我们这样写:
YAML::Emitter& operator<<(YAML::Emitter& out, const glm::vec3& v)
{
	out << YAML::Flow;
	out << YAML::BeginSeq << v.x << v.y << v.z << YAML::EndSeq;
	return out;
}

YAML::Emitter& operator<<(YAML::Emitter& out, const glm::vec4& v)
{
	out << YAML::Flow;
	out << YAML::BeginSeq << v.x << v.y << v.z << v.w << YAML::EndSeq;
	return out;
}
这里 YAML::Flow 可以让格式变得更直观。
91. Open Save File Dialogs
92. Transformation Gizmos
93. Editor Camera
94. Multiple Render Targets and Framebuffer Refactor
我们想要的效果如下:
FramebufferSpecification fbSpec;
fbSpec.Attachments = { FramebufferTextureFormat::RGBA8, FramebufferTextureFormat::RGBA8, FramebufferTextureFormat::Depth };
fbSpec.Width = 1280;
fbSpec.Height = 720;
m_Framebuffer = Framebuffer::Create(fbSpec);
就是可以像这样通过一个描述,比如上面的 { FramebufferTextureFormat::RGBA8, FramebufferTextureFormat::RGBA8, FramebufferTextureFormat::Depth },从而我们理应知道有两个 color buffer 和一个 depth buffer
做法很简单,首先封装一下:
enum class FramebufferTextureFormat
{
	None = 0,

	// Color
	RGBA8,

	// Depth/stencil
	DEPTH24STENCIL8,

	// Defaults
	Depth = DEPTH24STENCIL8
};

struct FramebufferTextureSpecification
{
	FramebufferTextureSpecification() = default;
	FramebufferTextureSpecification(FramebufferTextureFormat format)
		: TextureFormat(format) {}

	FramebufferTextureFormat TextureFormat = FramebufferTextureFormat::None;
	// TODO: filtering/wrap
};

struct FramebufferAttachmentSpecification
{
	FramebufferAttachmentSpecification() = default;
	FramebufferAttachmentSpecification(std::initializer_list<FramebufferTextureSpecification> attachments)
		: Attachments(attachments) {}

	std::vector<FramebufferTextureSpecification> Attachments;
};

   struct FramebufferSpecification
   {
       uint32_t Width, Height;
	FramebufferAttachmentSpecification Attachments;
       uint32_t Samples = 1;

       bool SwapChainTarget = false;
   };
但是我个人感觉这样封装的层太多了,与其封装一个 vector 还不如直接封装一个 initializer_list 或者 vector<FramebufferTextureSpecification>,比如这样:
enum class FramebufferTextureFormat
{
	None = 0,

	// Color
	RGBA8,

	// Depth/stencil
	DEPTH24STENCIL8,

	// Defaults
	Depth = DEPTH24STENCIL8
};

struct FramebufferTextureSpecification
{
	FramebufferTextureSpecification() = default;
	FramebufferTextureSpecification(FramebufferTextureFormat format)
		: TextureFormat(format) {}

	FramebufferTextureFormat TextureFormat = FramebufferTextureFormat::None;
	// TODO: filtering/wrap
};

   struct FramebufferSpecification
   {
       uint32_t Width, Height;
	std::initializer_list<FramebufferTextureSpecification> Attachments;
       uint32_t Samples = 1;

       bool SwapChainTarget = false;
   };
这样少一层封装我个人感觉清爽一些,使用的时候我们只需要这样填充:
OpenGLFramebuffer::OpenGLFramebuffer(const FramebufferSpecification& spec)
    : m_Specification(spec)
{
	for (auto spec : m_Specification.Attachments)
	{
		if (!Utils::IsDepthFormat(spec.TextureFormat))
			m_ColorAttachmentSpecifications.emplace_back(spec);
		else
			m_DepthAttachmentSpecification = spec;
	}

    Invalidate();
}
即在对应的图形 api 初始化的时候就去判断一下,每个描述是 color buffer 还是 depth buffer,然后通过类的内部成员:
std::vector<FramebufferTextureSpecification> m_ColorAttachmentSpecifications;
FramebufferTextureSpecification m_DepthAttachmentSpecification;

std::vector<uint32_t> m_ColorAttachments;
uint32_t m_DepthAttachment = 0;
调api对应一下就好了。
不过目前先按着 cherno 的版本来好了,未来或许我会重构一下。
95. Preparing Framebuffers for Mouse Picking
我们希望 Multiple Render Targets 的第二个渲染目标可以返回每个 pixel 对应的 entity id。我们可以用 uint,但是 cherno 喜欢让 -1 为 非entity 的情况:
layout(location = 0) out vec4 color;
layout(location = 1) out int color2;
(当然我们仍然可以用 uint,习惯不同罢了)
96. Clearing Framebuffer Texture Attachments + Git Branching
97. Mouse Picking
98. Clicking to Select Entities
这里的原理是通过多重渲染目标(Multiple Render Targets),每次都把 entity id 给传入到着色器uniform,然后让第二个 framebuffer 的值就为那个 entity id
然后每次都去读这个 framebuffer,写函数:
int OpenGLFramebuffer::ReadPixel(uint32_t attachmentIndex, int x, int y)
{
	HE_CORE_ASSERT(attachmentIndex < m_ColorAttachments.size());

	glReadBuffer(GL_COLOR_ATTACHMENT0 + attachmentIndex);
	int pixelData;
	glReadPixels(x, y, 1, 1, GL_RED_INTEGER, GL_INT, &pixelData);
	return pixelData;
}
传入 x y 为鼠标在对应视图的位置即可。
99. SPIR-V and the New Shader System
我们未来想支持 vulkan,但是虽然都是glsl,然而 vulkan 的 glsl 和 OpenGL 的 glsl 有一些差别,比如uniform
参考:
https://blog.csdn.net/qwertyu1234/article/details/50163847
https://www.khronos.org/spir/
SPIR-V是以一种二进制格式存在的,并且函数还是以控制流图CFG的形式存在;数据结构也保留了高级语言里的层级关系。
这样做的目的是为了更好的在目标平台上进行优化;同时Khronos也放出了官方标准的开源编译器Glslang。

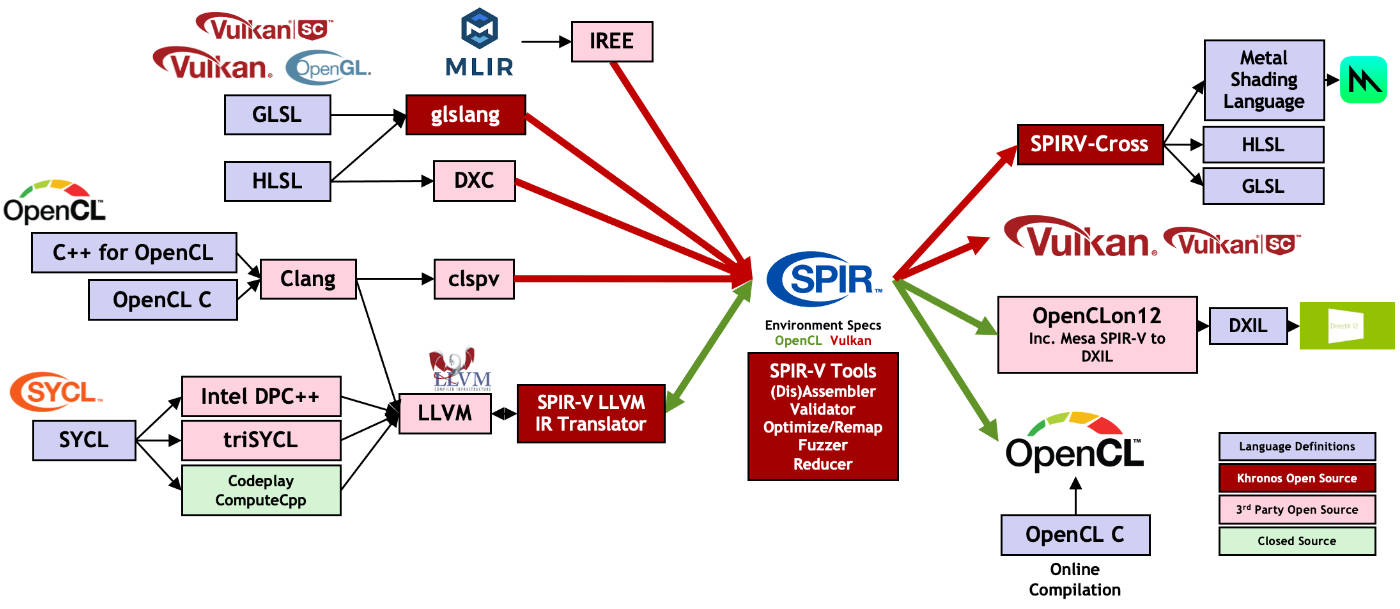
按 cherno 的意思,貌似可以先编译成中间字节码 spir-v,再告诉OpenGL绑定这个spir-v。于是 vulkan 和 OpenGL 就都可以按照 vulkan 的glsl方式去写,然后都先编译成 spir-v,我看games104貌似也是用的spir-v:
ue4 shader 系统补充:
https://zhuanlan.zhihu.com/p/462659745
https://zhuanlan.zhihu.com/p/49069689
注:
上面对应的 YouTube 集数少一集,也就是 99 对应 YouTube 的 100 集


 880
880


 被折叠的 条评论
为什么被折叠?
被折叠的 条评论
为什么被折叠?
 到【灌水乐园】发言


