


文章目录
1. 简答并用程序验证
(1)游戏对象运动的本质是什么?
游戏对象运动的本质就是使用矩阵变换(平移、旋转、缩放)改变游戏对象的空间属性。
(2)请用三种方法以上方法,实现物体的抛物线运动。
首先分析抛物线运动的运动方程,根据物理课所学我们很容易得到:
{
x
=
x
0
+
v
x
t
y
=
v
y
t
+
1
2
a
t
2
\left\{ \begin{aligned} x = &x_0 + v_xt\\ y = &v_yt + \frac{1}{2}at^2 \end{aligned} \right.
⎩⎨⎧x=y=x0+vxtvyt+21at2
因此,对于相邻
Δ
t
\Delta t
Δt 的两个时间点,我们有:
Δ
x
=
x
2
−
x
1
=
(
x
0
+
v
x
t
2
)
−
(
x
0
+
v
x
t
1
)
=
v
x
(
t
2
−
t
1
)
=
v
x
Δ
t
Δ
y
=
y
2
−
y
1
=
(
v
y
t
1
+
1
2
a
t
2
2
)
−
(
v
y
t
2
+
1
2
a
t
1
2
)
=
v
y
(
t
2
−
t
1
)
+
1
2
a
(
t
2
2
−
t
1
2
)
=
v
y
Δ
t
+
1
2
a
(
(
t
1
+
Δ
t
)
2
−
t
1
2
)
=
v
y
Δ
t
+
a
Δ
t
(
t
1
+
1
2
Δ
t
)
\begin{aligned} \Delta x = x_2 - x_1 &= (x_0 + v_xt_2) - (x_0 + v_xt_1)\\ &= v_x(t_2 - t_1) \\ &= v_x\Delta t\\ \Delta y = y_2 - y_1 &= (v_yt_1 + \frac{1}{2}at_2^2) - (v_yt_2 + \frac{1}{2}at_1^2)\\ &= v_y(t_2 - t_1) + \frac{1}{2}a(t_2^2 - t_1^2)\\ &= v_y\Delta t + \frac{1}{2}a((t_1 + \Delta t)^2 - t_1^2)\\ &= v_y\Delta t + a\Delta t(t_1 + \frac{1}{2}\Delta t) \end{aligned}
Δx=x2−x1Δy=y2−y1=(x0+vxt2)−(x0+vxt1)=vx(t2−t1)=vxΔt=(vyt1+21at22)−(vyt2+21at12)=vy(t2−t1)+21a(t22−t12)=vyΔt+21a((t1+Δt)2−t12)=vyΔt+aΔt(t1+21Δt)
所以实现抛物线运动的方法有下面几种:
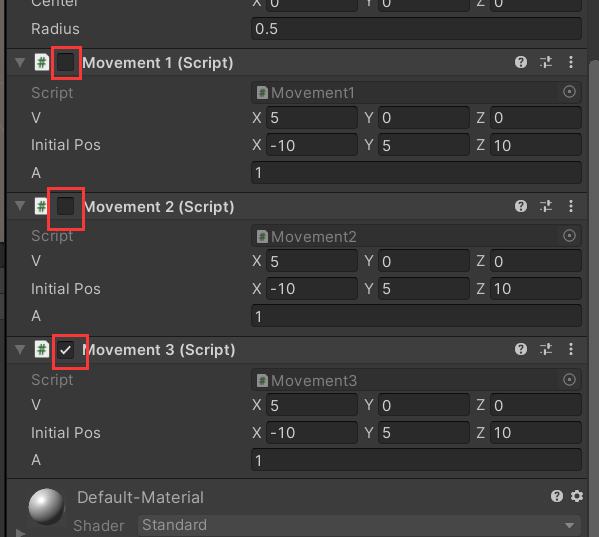
- a. 让Transform.position分别加上各个方向的分量(利用Vector3.right/down)
using System.Collections; using System.Collections.Generic; using UnityEngine; public class Movement1 : MonoBehaviour { public Vector3 v = new Vector3(5, 0, 0); public Vector3 initialPos = new Vector3(-10, 5, 0); public float a = 1.0f; private float delta_x, delta_y; private float curTime; // Start is called before the first frame update void Start() { init(); } // Update is called once per frame void Update() { delta_x = v.x * Time.deltaTime; delta_y = v.y * Time.deltaTime + a * Time.deltaTime * (curTime + 0.5f * Time.deltaTime); curTime += Time.deltaTime; this.transform.position += Vector3.right * delta_x; this.transform.position += Vector3.down * delta_y; if (curTime > 10) init(); } private void init(){ this.transform.position = initialPos; curTime = 0; } } - b. 直接让Transform.position加上一个Vector3变量
using System.Collections; using System.Collections.Generic; using UnityEngine; public class Movement2 : MonoBehaviour { public Vector3 v = new Vector3(5, 0, 0); public Vector3 initialPos = new Vector3(-10, 5, 10); public float a = 1.0f; private float curTime; // Start is called before the first frame update void Start() { init(); } // Update is called once per frame void Update() { this.transform.position += new Vector3(v.x * Time.deltaTime, -v.y * Time.deltaTime - a * Time.deltaTime * (curTime + 0.5f * Time.deltaTime), 0); curTime += Time.deltaTime; if (curTime > 10) init(); } private void init(){ this.transform.position = initialPos; curTime = 0; } } - c. 借助Translate()进行移动
using System.Collections;
using System.Collections.Generic;
using UnityEngine;

public class Movement3 : MonoBehaviour
{
    public Vector3 v = new Vector3(5, 0, 0);
    public Vector3 initialPos = new Vector3(-10, 5, 10);
    public float a = 1.0f;
    private float curTime;
    // Start is called before the first frame update
    void Start()
    {
        init();
    }

    // Update is called once per frame
    void Update()
    {
        this.transform.Translate(new Vector3(v.x * Time.deltaTime, -v.y * Time.deltaTime - a * Time.deltaTime * (curTime + 0.5f * Time.deltaTime), 0));
        curTime += Time.deltaTime;

        if (curTime > 10) init();
    }

    private void init(){
        this.transform.position = initialPos;
        curTime = 0;
    }
}
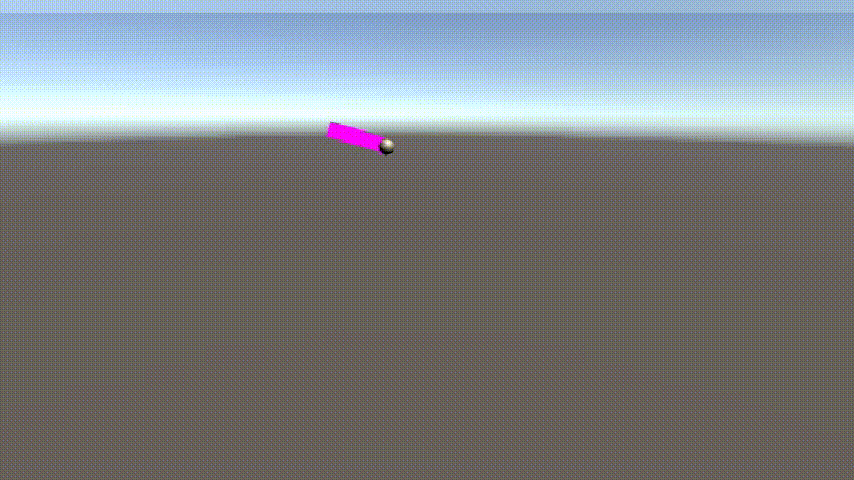
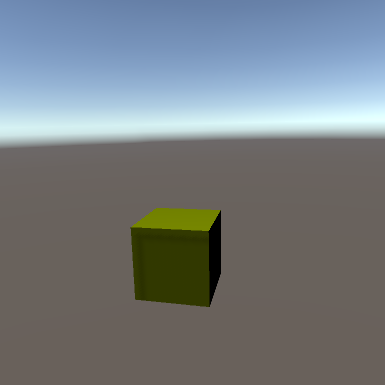
最后我们使用Unity进行测试:
a. 首先我们新建一个项目,并点击GameObject-> 3D Object->Sphere创建一个球体;
b. 然后创建3个新的c#文件,分别命名为Movement1.cs、Movement2.cs、Movement3.cs,将上面的3份代码分别复制进3个文件中;
c. 最后将3个代码文件拖到我们新创建的球体上,点击播放按钮进行测试(每次测试的时候要只启用3个中的一个,不然多个脚本的运动效果会叠加在一起)
最后测试的结果如下(3个测试的结果都一样,我们就只显示一个):
(3)写一个程序,实现一个完整的太阳系, 其他星球围绕太阳的转速必须不一样,且不在一个法平面上。
在课上我们其实做过这个实验的简化版,因此整个内容还是非常简单的,自转和公转的脚本我们之前已经写过,所以我们需要的就是确定各星体的形状参数以及运动参数。
- 上网查询到我们各星体的参数如下:
| 行星 | 公转轨道半径(AU) | 轨道对黄道面倾角 | 公转周期 |
|---|---|---|---|
| 水星 | 0.3871 | 7°0′ | 87.7天 |
| 金星 | 0.7233 | 3°23′ | 255天 |
| 地球 | 1.0000 | 0° | 365.25天 |
| 火星 | 1.5237 | 1°51′ | 686.98天 |
| 木星 | 5.2030 | 1°18′ | 11.862年 |
| 土星 | 9.5390 | 2°29′ | 29.45772年 |
| 天王星 | 19.218 | 0°46′ | 84.013年 |
| 海王星 | 30.0579 | 1°46′ | 164.79年 |
各行星自转参数
| 行星 | 实际半径(km) | 赤道与轨道面夹角 | 自转周期 |
|---|---|---|---|
| 太阳 | 700000 | ----- | ---- |
| 水星 | 2440 | 0° | 58.6天 |
| 金星 | 6073 | 6° | 243天 |
| 地球 | 6378 | 23° 27′ | 23时56分 |
| 火星 | 3397 | 24°55′ | 24时37分 |
| 木星 | 71492 | 3°4′ | 9时50分 |
| 土星 | 60000 | 26°55′ | 10时14分 |
| 天王星 | 25559 | 97°53′ | 15时30分 |
| 海王星 | 24750 | 28°48′ | 约22时 |
- 上网查找之后发现不同星体之间的差距实在太大,如果按照等比例实现的话我们的八大行星基本都看不见,因此最后我们形状参数并没有跟实际情况一致,而是利用开平方,开立方的方法将它们的差距进行适当调整,最后各星体在游戏中使用的参数如下:
| 天体 | init_X (公转轨道半径) | rev_axis_angle (公转轨道倾角) | rev_speed (公转速度) | size (天体半径) | rot_axis_angle (自转轨道倾角) | rot_speed (自转速度) |
|---|---|---|---|---|---|---|
| 太阳 | ----- | ----- | ----- | 26.46 | 0.000 | 19.980 |
| 水星 | 38.69 | 7.000 | 22.5078 | 1.56 | 0.000 | 13.063 |
| 金星 | 47.65 | 3.383 | 15.7696 | 2.46 | 6.000 | 6.415 |
| 地球 | 53.09 | 0.000 | 13.9895 | 2.53 | 23.450 | 100.139 |
| 火星 | 61.09 | 1.850 | 11.3332 | 1.84 | 24.917 | 98.740 |
| 木星 | 91.99 | 1.300 | 6.1355 | 8.46 | 3.067 | 156.227 |
| 土星 | 112.58 | 2.483 | 4.5307 | 7.75 | 26.917 | 153.143 |
| 天王星 | 142.19 | 0.767 | 3.1949 | 5.06 | 97.883 | 124.434 |
| 海王星 | 165.05 | 1.767 | 2.5523 | 4.97 | 28.800 | 165.145 |
- 根据上面的参数我们可以开始整个太阳系模型项目的设计:
-
首先用Unity创建一个新的3D项目,命名为Solar_System
-
创建一个空对象(Ctrl+Shift+N)用于承载我们后面设计的控制脚本;将其Scale设为(1, 1, 1)
-
创建太阳
(1) 点击GameObject->3D Object->Sphere创建一个球体,将其命名为Sun。
(2) 将新创建的球体拖到我们创建的空对象下面,这样的话后续用代码控制天体大小时就有了统一的度量(空对象);或者也可以直接利用上表中的内容对太阳的大小和位置进行设置,这样后面就不需要再次设置大小(这里我们两种方式都使用)
(3) 在网络上寻找相应的图片素材(比如这个网站里面就有太阳和8大行星的图片),我们下载下来这些图片加入到Assets中(建议新建个Planet文件夹归类存储),然后将图片拖到到我们创建的球体,这样太阳就建好了。
-
利用同样的方法建立8个行星,最后效果如下图:
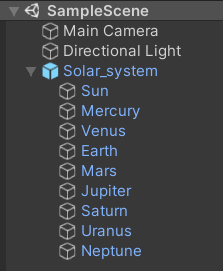
项目Hierarchy文件夹截图
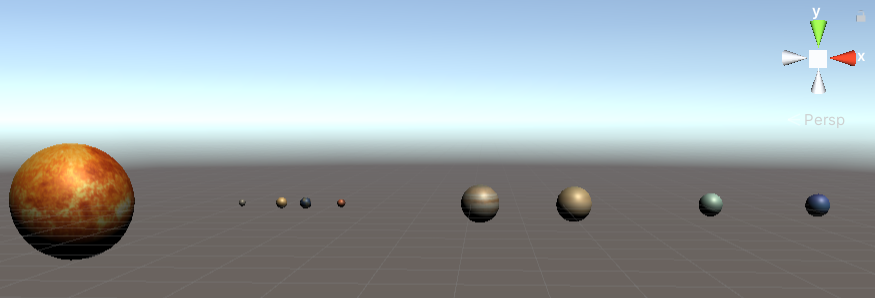
行星初始状态
-
设置拖尾
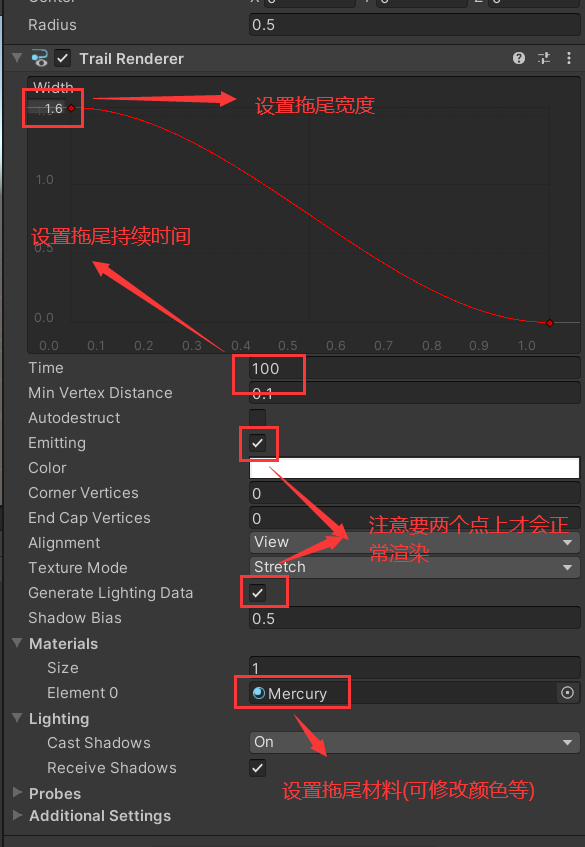
由于行星相比太阳还是太小,运动的时候不是很明显,因此我们为行星加上拖尾,让它们显示出运动轨迹,这样更好观察,拖尾的设置方法如下:
(1) 首先对于每个行星,我们点击右边Inspector面板的Add Component按钮,输入Trail Render并确定添加该组件,里面内容如下面所示。
(2) 该组件面板中各内容的含义:
a. width影响的是拖尾长度,这个我们设置成跟行星的大小一致;
b. Time设置的是拖尾存在时间,这里我们设置成100(如果不够甚至可以200)以让拖尾能够显示一周
c. Emitting和Generate Lighting Data这两个选项卡要点√才能让拖尾能正常渲染,比如第二个没有的话拖尾就一直是黑色。
d. 最后Materials处Element 0里面我们需要新建一个材料(Assets->Create->Material),将其颜色设置成自己喜欢的颜色,你可以为每个行星都设置一个材料(建议创建个Trail文件夹专门存放),也可以设置成同一个材料(如果不设置材料的话默认是粉紫色),然后将新建的材料拖到此处。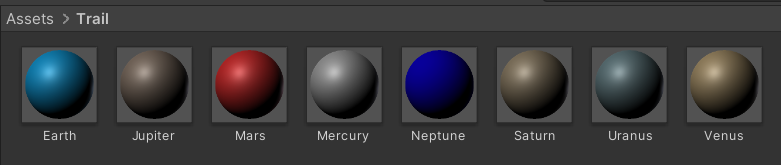
-
然后我们进行项目操控代码(Control.cs)的设计,主要内容介绍如下:
(1) 首先在类内先声明好上面表中出现的各种参数,利用数组存储好9个天体(太阳+8大行星)的各个参数;
(2) 然后在Start函数中将我们声明的9个Transform类型变量与工作区内的9个天体绑定上,并初始化好它们的大小、位置以及对应的公转自转轴
(3) 最后我们在Update函数中实现天体的运动,这部分我么在课堂上其实已经操作过,就不做过多介绍,主要用到的参数以及旋转轴我们在前面都已经实现了,直接照之前课堂上做的用Rotate和RotateAround两个函数实现即可,这里由于使用数组来存储Transform和各个参数,因此使用循环能有效减少代码量。
最后代码如下:using System.Collections; using System.Collections.Generic; using UnityEngine; public class Control : MonoBehaviour { // Parameter public float[] size = {26.46f, 1.56f, 2.46f, 2.53f, 1.84f, 8.46f, 7.75f, 5.06f, 4.97f}; public float[] init_X = {0.0f, 38.69f, 47.65f, 53.09f, 61.09f, 91.99f, 112.58f, 142.19f, 165.05f}; public Vector3[] rev_axis = new Vector3[9]; public float[] rev_axis_angle = {0.0f, 7f, 3.383f, 0f, 1.85f, 1.3f, 2.483f, 0.767f, 1.767f}; public Vector3[] rot_axis = new Vector3[9]; public float[] rot_axis_angle = {0.0f, 0.0f, 6.0f, 23.45f, 24.917f, 3.067f, 26.917f, 97.883f, 28.8f}; public float[] rev_speed = {0.0f, 22.5078f, 15.7696f, 13.9895f, 11.3332f, 6.1355f, 4.5307f, 3.1949f, 2.5523f}; public float[] rot_speed = {19.98f, 13.063f, 6.415f, 100.139f, 98.74f, 156.227f, 153.143f, 124.434f, 165.145f}; // Transform component for each planet private Transform[] transforms = new Transform[9]; // Start is called before the first frame update void Start () { transforms[0] = GameObject.Find("Sun").transform; transforms[1] = GameObject.Find("Mercury").transform; transforms[2] = GameObject.Find("Venus").transform; transforms[3] = GameObject.Find("Earth").transform; transforms[4] = GameObject.Find("Mars").transform; transforms[5] = GameObject.Find("Jupiter").transform; transforms[6] = GameObject.Find("Saturn").transform; transforms[7] = GameObject.Find("Uranus").transform; transforms[8] = GameObject.Find("Neptune").transform; // Initialize axis rot_axis[0] = new Vector3(0, 1, 0); for (int i = 1; i < 9; ++i) { rot_axis[i] = new Vector3(0, Mathf.Cos(rot_axis_angle[i]*Mathf.Deg2Rad), Mathf.Sin(rot_axis_angle[i]*Mathf.Deg2Rad)); rev_axis[i] = new Vector3(0, Mathf.Cos(rev_axis_angle[i]*Mathf.Deg2Rad), Mathf.Sin(rev_axis_angle[i]*Mathf.Deg2Rad)); } // Initialize the size and position of each planet for (int i = 0; i < 9; ++i) { transforms[i].localScale = new Vector3 (size[i], size[i], size[i]); transforms[i].position = new Vector3 (init_X[i], 0, 0); } } // Update is called once per frame void Update () { // Rotate for (int i = 0; i < 9; ++i) { transforms[i].Rotate(rot_axis[i] * rot_speed[i] * Time.deltaTime); } // Revolution for (int i = 1; i < 9; ++i) { transforms[i].RotateAround(transforms[0].position, rev_axis[i], rev_speed[i] * Time.deltaTime); } } } -
将代码拖到之前的空对象上,点击运行,最终程序运行结果如下,如果需要源项目可以点击传送门,我将整个太阳系设置了预制,可以直接拖进新项目使用。
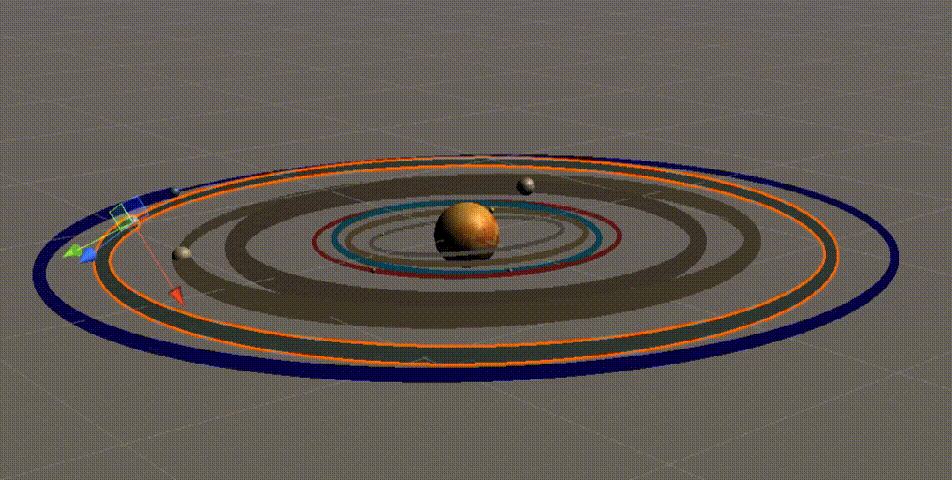
可以看到每个行星既有绕着太阳公转(不同行星间公转法平面的差异比较小,可能看不太出),同时也有自己的自转,因此我们这个模型是成功的。
2. 编程实践
阅读以下游戏脚本
Priests and Devils
Priests and Devils is a puzzle game in which you will help the Priests and Devils to cross the river within the time limit. There are 3 priests and 3 devils at one side of the river. They all want to get to the other side of this river, but there is only one boat and this boat can only carry two persons each time. And there must be one person steering the boat from one side to the other side. In the flash game, you can click on them to move them and click the go button to move the boat to the other direction. If the priests are out numbered by the devils on either side of the river, they get killed and the game is over. You can try it in many > ways. Keep all priests alive! Good luck!程序需要满足的要求:
- play the game(http://www.flash-game.net/game/2535/priests-and-devils.html)
- 列出游戏中提及的事物(Objects)
- 用表格列出玩家动作表(规则表),注意,动作越少越好
- 请将游戏中对象做成预制
- 在场景控制器LoadResources方法中加载并初始化长方形,正方形,球及其色彩代表游戏中的对象。
- 使用C#集合类型有效组织对象
- 整个游戏仅主摄像机和一个Empty对象,其他对象必须代码动态生成!!!。整个游戏不许出现Find游戏对象,SendMessage这类突破程序结构的通讯耦合语句。违背本条准则,不给分
- 请使用课件架构图编程,不接受非MVC结构程序
- 注意细节,例如:船未靠岸,牧师与魔鬼上下船运动中,均不能接受用户事件!
根据实验要求,我们完成了这次编程实践的任务内容,整个项目我已经上传到Gitee,如果需要可以点击此处进入项目地址下载使用,或者也可以根据其中的说明文档复制相应资源自己重新制作此项目。下面我们介绍下整个项目的设计流程。
下面我们介绍下整个项目的设计流程。
1)项目分析
在点击上面提供的链接进行试玩之后,我们对项目进行简单的分析:
(1)事物
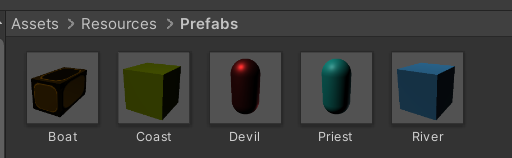
通过玩这个游戏我们很容易发现游戏中的事物有3个牧师、3个魔鬼和1艘船,这也是游戏中最基本的事物;但与此同时,河的两岸也是游戏中不可忽略的事物。我们下面创建项目的时候,各事物具体使用的素材如下:
| Boat | Coast | Devil | Priest |
|---|---|---|---|
 |  |  |  |
(2)规则表
| 玩家动作 | 条件 | 执行结果 |
|---|---|---|
| 点击人物 | 船靠在人物同侧岸边且如果上船的话船上有空位 | 人物上下船 |
| 点击船 | 人物已移动完毕且船正靠在某一侧岸边 | 船从一侧往另一侧移动 |
(3)事件表
| 事件 | 结果 |
|---|---|
| 某一侧岸边魔鬼数量大于牧师数量 | 游戏胜利 |
| 所有人物都到达对岸 | 游戏失败 |
(4)类设计
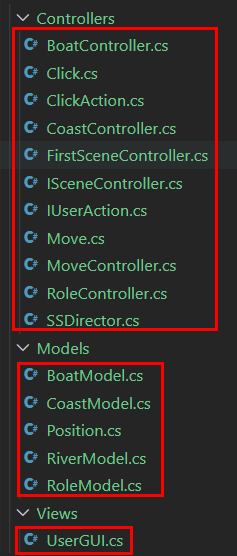
由于要采用MVC设计,我们决定仿照老师课堂讲的框架进行设计,设计借鉴了以往师兄的作业(传送门1和传送门2),不过也做了一部分改动。

首先依照MVC架构,我们添加的内容应该分成3部分,Assets中布局应该如下图所示:
a. Model:我们前面讲事物的时候就已经提出了4种models,不过对于牧师和魔鬼,它们其实可以合并成“人物Role”,因此实际上只需要3种models;但另外还需要一个河流预制,因此又多加了一个Model;而且为了后续布局、移动方便,我们将每个预制应该在的位置用一个类存储,其中的值存成static。
b. View(UserGUI):首先模仿课堂实例,应该有Start()获取"导演"实例,OnGUI()渲染游戏界面;但课堂实例所完成内容比较简单,我们还需要监听鼠标的操作,看它是点击船还是人物。
c. Controller: 首先我们要有SSDirector以及XXXSceneController这两个主要的类以及相关的ISceneController和IUserAction两个接口,然后我们还需要为4个预制Model设置相应的Controller(即要有RoleController/BoatController/CoastController/RiverController),然后对于移动和鼠标点击这两个操作,我们也单独写类来存放我们的操作。
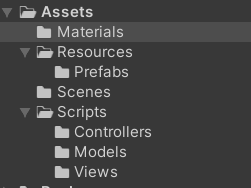
最终Scripts文件夹里的内容为:
2)Unity项目创建
(1)创建空对象
我们首先新建一个3D项目,命名为Priests_and_Devil,进入之后我们创建一个空对象用于加载我们的脚本:首先按Ctrl+Shift+N创建空对象,然后在游戏对象树上右键点击它选择重命名,将其重命名为"main"用于加载我们的脚本(将之前的脚本拖到该空对象上即可)。
(2)准备预制
预制其实我们前面已经做好了,一共4个,这里就不再多讲了,但除此之外还有一个河流的预制前面没有提到,它在游戏中只是充当背景之一的作用
(3)编写脚本
根据上面的类分析,我们进行脚本的设计,由于代码过多,我们就不全展示了。
a. Model
Model类的内容有对应的GameObject对象、适当的属性以及构造函数,比如RoleModel.cs中,人物Model的属性有:
i
n
d
e
x
[
i
n
t
]
−
−
−
人
物
对
应
的
编
号
i
s
P
r
i
e
s
t
[
b
o
o
l
]
−
−
−
说
明
该
人
物
是
牧
师
还
是
魔
鬼
i
s
I
n
B
o
a
t
[
b
o
o
l
]
−
−
−
说
明
人
物
此
时
是
否
在
船
内
i
s
R
i
g
h
t
[
b
o
o
l
]
−
−
−
说
明
人
物
此
时
在
左
岸
还
是
右
岸
\begin{aligned} index[int] & ---人物对应的编号\\ isPriest[bool] & --- 说明该人物是牧师还是魔鬼\\ isInBoat[bool] & --- 说明人物此时是否在船内\\ isRight[bool] & --- 说明人物此时在左岸还是右岸\\ \end{aligned}
index[int]isPriest[bool]isInBoat[bool]isRight[bool]−−−人物对应的编号−−−说明该人物是牧师还是魔鬼−−−说明人物此时是否在船内−−−说明人物此时在左岸还是右岸
using System.Collections;
using System.Collections.Generic;
using UnityEngine;

public class RoleModel
{
  public GameObject role;
  public int index;             // The number to be identified
  public bool isPriest;         // Indicate whether it's a priest or a devil
  public bool isInBoat;         // Indicate whether the role is in the boat
  public bool isRight;          // Indicate which coast the role is in

  public RoleModel(Vector3 pos, bool isPriest, int id)
  {
    this.index = id;
    this.isPriest = isPriest;
    this.isInBoat = false;
    this.isRight = true;

    role = GameObject.Instantiate(Resources.Load("Prefabs/" + (isPriest ? "Priest" : "Devil"), typeof(GameObject))) as GameObject;
    role.transform.localScale = new Vector3(1, 1, 1);
    role.transform.position = pos;
    role.name = "Role" + id;

    // Add Component
    role.AddComponent(typeof(Click));
    role.AddComponent(typeof(BoxCollider));
  }
}
而在BoatModel.cs文件中,船的模型的属性有:
r
o
l
e
s
[
R
o
l
e
M
o
d
e
l
[
]
]
−
−
−
船
上
人
物
对
象
的
数
组
i
s
R
i
g
h
t
[
b
o
o
l
]
−
−
−
说
明
船
此
时
靠
在
左
岸
还
是
右
岸
p
r
i
e
s
t
N
u
m
[
i
n
t
]
,
d
e
v
i
l
N
u
m
[
i
n
t
]
−
−
−
说
明
船
上
牧
师
和
恶
魔
的
数
量
\begin{aligned} roles[RoleModel[]] & --- 船上人物对象的数组\\ isRight[bool] & --- 说明船此时靠在左岸还是右岸\\ priestNum[int], devilNum[int] & --- 说明船上牧师和恶魔的数量 \end{aligned}
roles[RoleModel[]]isRight[bool]priestNum[int],devilNum[int]−−−船上人物对象的数组−−−说明船此时靠在左岸还是右岸−−−说明船上牧师和恶魔的数量
using System.Collections;
using System.Collections.Generic;
using UnityEngine;

public class BoatModel
{
  public GameObject boat;
  public RoleModel[] roles;
  public bool isRight;
  public int priestNum, devilNum;

  public BoatModel(Vector3 pos)
  {
    this.isRight = true;
    this.priestNum = this.devilNum = 0;
    this.roles = new RoleModel[2];

    boat = GameObject.Instantiate(Resources.Load("Prefabs/Boat", typeof(GameObject))) as GameObject;
    boat.transform.localScale = new Vector3(4, 2, 2);
    boat.transform.position = pos;
    boat.name = "Boat";

    // Add Component
    boat.AddComponent(typeof(Click));
    boat.AddComponent(typeof(BoxCollider));
  }
}
b. View
View模块只有一个文件,就是UserGUI.cs文件。这部分的代码比较简单,可以看到,该类的Start()函数只是声明一些基本的变量,而在OnGUI函数中,则输出了一些提示字符(如标题、状态及时间),然后就是提供按钮点击用于暂停或重新开始。
using System.Collections;
using System.Collections.Generic;
using UnityEngine;

public class UserGUI : MonoBehaviour
{
  private IUserAction userAction;
  public string statusMessage;
  public int time;
  GUIStyle titleStyle, statusStyle, timeStyle;

  // Start is called before the first frame update
  void Start()
  {
    userAction = SSDirector.getInstance().currentSceneController as IUserAction;
    time = 60;

    // Text Style Settings
    titleStyle = new GUIStyle();
    titleStyle.fontSize = 30;
    titleStyle.normal.textColor = Color.black;
    titleStyle.alignment = TextAnchor.MiddleCenter;
    statusStyle = new GUIStyle();
    statusStyle.fontSize = 20;
    statusStyle.normal.textColor = Color.red;
    statusStyle.alignment = TextAnchor.MiddleCenter;
    timeStyle = new GUIStyle();
    timeStyle.fontSize = 20;
    timeStyle.normal.textColor = Color.blue;
  }

  // Update is called once per frame
  void OnGUI()
  {
    userAction.Check();

    // Texts
    float w = Screen.width;
    float h = Screen.height;
    GUI.Label(new Rect(w * 0.35f, h * 0.1f, w * 0.4f, h * 0.1f), "Priest and Devil", titleStyle);
    GUI.Label(new Rect(w * 0.35f, h * 0.2f, w * 0.4f, h * 0.1f), statusMessage, statusStyle);
    GUI.Label(new Rect(w * 0.8f, h * 0.2f, w * 0.15f, h * 0.1f), "Time: " + time, timeStyle);

    // Button
    float button_w = w * 0.2f;
    float button_h = h * 0.1f;
    string pause_button_str = SSDirector.getInstance().isPaused ? "Resume" : "Pause";
    if (GUI.Button(new Rect(w * 0.2f, h * 0.85f, button_w, button_h), pause_button_str))
    {
      userAction.Pause();
    }
    float restart_x = w / 12;
    float restart_y = h / 5;
    if (GUI.Button(new Rect(w * 0.6f, h * 0.85f, button_w, button_h), "Restart"))
    {
      userAction.Restart();
    }
  }
}
c. Controller
Controller模块是整个项目中内容最多的一部分,像基本的SSDirector.cs、IUserAction接口这些我们就不放代码了,主要放的的FirstSceneController.cs,如下面所示,可以看到整个代码是很长的,里面实现了一部分的功能控制。
可以看到前面的变量中包括了很多控制器,以及River的Model(因为河流只是个摆设,没有其他动作)。然后还有isRunning和time两个状态变量,用来记录此局游戏的状态。
关于本类中实现的几个函数,对它们的作用做个简单介绍
- 首先它在Awake()函数中设置当前场记,然后执行LoadResource加载资源,然后添加UserGUI模块使得能够让用户进行操作。
- Update()则用于改变time变量,实现时间的流逝
- LoadResource中则是将所有的控制器和model “new” 出来,并且将人物都附加在右岸(初始状态)上
- MoveBoat()和MoveRole()与Move类和Click类搭配,实现在点击时能够产生动作
- Pause()和Restart()用于实现游戏流程的控制,一个是暂停计时,一个则是重新开始
- 最后的Check()函数用于检查当前状态是否合法,如果错误的话就直接让isRunning改为false,停止游戏。
using System.Collections;
using System.Collections.Generic;
using UnityEngine;

public class FirstSceneController : MonoBehaviour, ISceneController, IUserAction
{
  private CoastController leftCoast, rightCoast;
  private BoatController boatController;
  private RoleController[] roleControllers;
  private MoveController moveController;
  private RiverModel riverModel;

  // Status
  private bool isRunning;
  private float time;

  // the first scripts
  void Awake()
  {
    SSDirector director = SSDirector.getInstance();
    director.currentSceneController = this;
    LoadResources();
    this.gameObject.AddComponent<UserGUI>();
  }

  void Update()
  {
    if (isRunning)
    {
      time -= Time.deltaTime;
      this.gameObject.GetComponent<UserGUI>().time = (int)time;
      if (time <= 0)
      {
        this.gameObject.GetComponent<UserGUI>().time = 0;
        this.gameObject.GetComponent<UserGUI>().statusMessage = "YOU LOSE";
        isRunning = false;
      }
    }
  }

  // loading resources for the first scence
  public void LoadResources()
  {
    // Create Coast
    leftCoast = new CoastController();
    rightCoast = new CoastController();
    leftCoast.CreateCoast("leftCoast", Position.leftCoast);
    rightCoast.CreateCoast("rightCoast", Position.rightCoast);

    // Create River
    riverModel = new RiverModel(Position.river);

    // Create Boat
    boatController = new BoatController();
    boatController.CreateBoat(Position.rightBoat);

    // Create Roles
    roleControllers = new RoleController[6];
    for (int i = 0; i < 6; ++i)
    {
      roleControllers[i] = new RoleController();
      roleControllers[i].CreateRole(Position.coastRole[i], i < 3, i);
    }

    // Add roles to rightCoast
    for (int i = 0; i < 6; ++i)
    {
      roleControllers[i].GetRoleModel().role.transform.localPosition = rightCoast.AddRole(roleControllers[i].GetRoleModel());
    }

    moveController = new MoveController();

    isRunning = true;
    time = 60;
  }

  // MoveBoat
  public void MoveBoat()
  {
    if (!isRunning || moveController.checkIsMoving()) return;
    if (boatController.GetBoatModel().isRight)
      moveController.SetMove(Position.leftBoat, boatController.GetBoatModel().boat);
    else
      moveController.SetMove(Position.rightBoat, boatController.GetBoatModel().boat);

    // Change the status of the boat and roles
    bool curSide = !boatController.GetBoatModel().isRight;
    boatController.GetBoatModel().isRight = curSide;
    for (int i = 0; i < 2; ++i)
    {
      if (boatController.GetBoatModel().roles[i] != null)
        boatController.GetBoatModel().roles[i].isRight = curSide;
    }
  }

  public void Pause()
  {
    isRunning = !isRunning;
  }

  public void Restart()
  {
    // Create Coast
    leftCoast.CreateCoast("leftCoast", Position.leftCoast);
    rightCoast.CreateCoast("rightCoast", Position.rightCoast);

    // Create Boat
    boatController.CreateBoat(Position.rightBoat);
    // Create Roles
    for (int i = 0; i < 6; ++i)
    {
      roleControllers[i].CreateRole(Position.coastRole[i], i < 3, i);
      roleControllers[i].GetRoleModel().role.transform.position =
          rightCoast.AddRole(roleControllers[i].GetRoleModel());
    }

    // Add roles to rightCoast
    for (int i = 0; i < 6; ++i)
    {
      roleControllers[i].GetRoleModel().role.transform.localPosition = rightCoast.AddRole(roleControllers[i].GetRoleModel());
    }

    isRunning = true;
    time = 60;
  }

  public void MoveRole(RoleModel roleModel)
  {
    if (!isRunning || moveController.checkIsMoving()) return;
    if (roleModel.isInBoat)
    {
      // Boat to Coast
      if (boatController.GetBoatModel().isRight)
        moveController.SetMove(rightCoast.AddRole(roleModel), roleModel.role);
      else
        moveController.SetMove(leftCoast.AddRole(roleModel), roleModel.role);
      boatController.RemoveRole(roleModel);
    }
    else
    {
      // Coast to Boat
      if (boatController.GetBoatModel().isRight == roleModel.isRight)
      {
        if (roleModel.isRight) rightCoast.RemoveRole(roleModel);
        else leftCoast.RemoveRole(roleModel);

        moveController.SetMove(boatController.AddRole(roleModel), roleModel.role);
      }
    }
  }

  public void Check()
  {
    this.gameObject.GetComponent<UserGUI>().statusMessage = "";
    // Game Success
    if (leftCoast.GetCoastModel().priestNum == 3 &&
        leftCoast.GetCoastModel().devilNum == 3)
    {
      this.gameObject.GetComponent<UserGUI>().statusMessage = "YOU WIN";
      isRunning = false;
    }
    else
    {
      int leftPriestCnt, leftDevilCnt, rightPriestCnt, rightDevilCnt;
      // Role Number calculate
      leftPriestCnt = leftCoast.GetCoastModel().priestNum;
      leftDevilCnt = leftCoast.GetCoastModel().devilNum;
      if (!boatController.GetBoatModel().isRight)
      {
        leftPriestCnt += boatController.GetBoatModel().priestNum;
        leftDevilCnt += boatController.GetBoatModel().devilNum;
      }
      rightPriestCnt = 3 - leftPriestCnt;
      rightDevilCnt = 3 - leftDevilCnt;

      // Game Fail Check
      if ((leftDevilCnt > leftPriestCnt && leftPriestCnt != 0) ||
          (rightDevilCnt > rightPriestCnt && rightPriestCnt != 0))
      {
        this.gameObject.GetComponent<UserGUI>().statusMessage = "YOU LOSE";
        isRunning = false;
      }
    }
  }
}
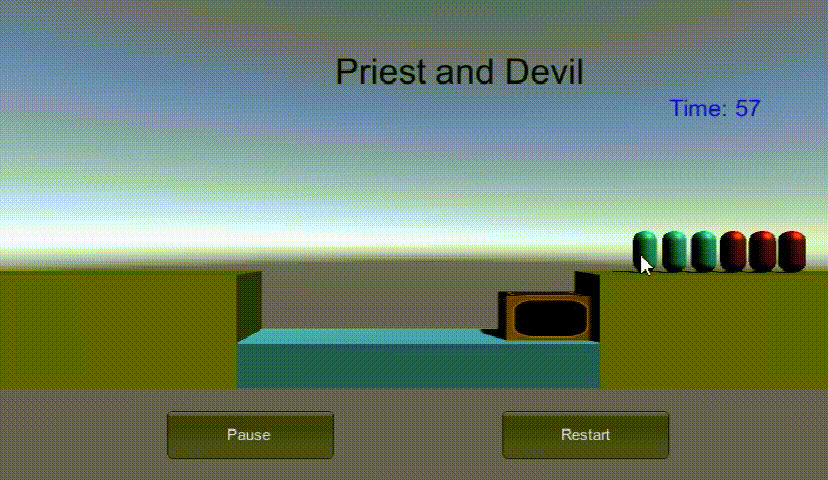
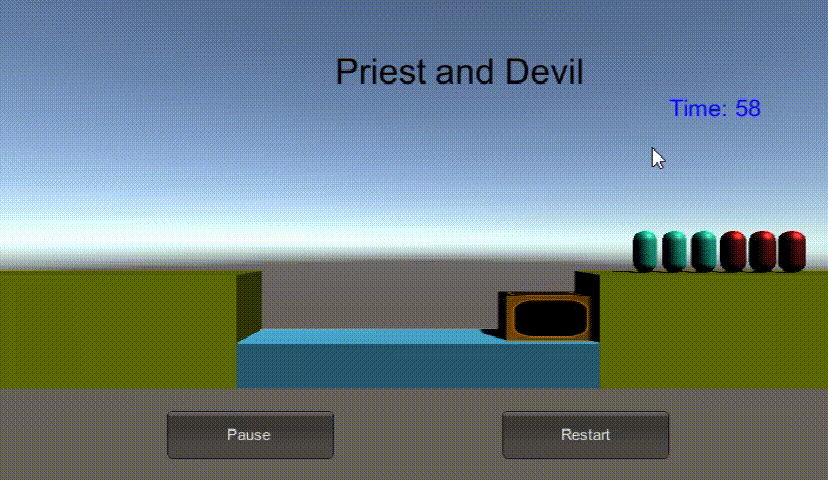
(4)效果演示
将上面操作执行完毕后,我们点击运行进行测试,发现游戏运行正常,运行结果如下所示:
游戏成功:
游戏失败:
3. 心得
这次实验内容比上次相比其实没有多很多,不过在实际试验的时候这次实验却比上次多花了很多时间。
在制造太阳系模型的时候就花了太多时间,编写代码的时候一开始是想模仿师兄师姐为每个天体都添加两个脚本的,但是在调试的时候经常卡住,只能删掉项目重搞,每次重新设置联系就很麻烦,因此最后选择了使用GameObject.Find方法来直接定位场景中的9个天体,然后我将9个天体的参数都设成了数组,这样我就可以使用循环批量的配置各个天体,平时调试也可以直接在Inspector面板中修改参数。
在实现后面的牧师与魔鬼的时候,我也是搞了好久才做出来,中间还出现了我没预料的bug,后面又重新拉回去改。整个MVC模式的话其实去年学Web课的时候有谈到,理解还是比较容易的,但是这次在做项目的时候写了很多个脚本,找bug的时候调试起来很麻烦,最后在网上找方法配置了Vscode才解决。


 1635
1635


 被折叠的 条评论
为什么被折叠?
被折叠的 条评论
为什么被折叠?
 到【灌水乐园】发言


